Page 404 of 498

403 Practical hints
Unlocking/locking in an emergency
Unlocking the trunk
A minimum height clearance of 5.90 ft
(1.80 m) is required to open the trunk lid.
If you are unable to unlock the trunk with
the SmartKey or KEYLESS-GO*, open the
trunk with the mechanical key.
The handle is located above the rear
license plate recess.
1Locking
2Unlocking
�
Insert the mechanical key into the
trunk lid lock.
�
Turn the mechanical key counterclock-
wise to position2 and hold it in this
position.
�
Pull trunk handle and lift the trunk lid.
�
Turn the mechanical key clockwise to
position1 and remove it.
Locking the vehicle
If you cannot lock the vehicle with the
SmartKey or the SmartKey with
KEYLESS-GO*, do the following:�
Close the passenger doors and the
trunk.
�
Press the central locking switch in the
cockpit (
�page 123).
�
Check to see whether the locking
knobs on the passenger doors have
moved down.
�
If necessary push them down manually.
�
Remove the mechanical key2 out of
the SmartKey (
�page 402).
�
Check whether the trunk is locked.
�
If necessary, lock the trunk with the
mechanical key (
�page 121).
Except for the driver's door, the vehicle
should now be locked.
!Always make sure there is sufficient
overhead clearance.
��
Page 410 of 498
409 Practical hints
Replacing SmartKey batteries
�
Insert the mechanical key1 in direc-
tion of arrow in side opening.
�
Using mechanical key1 push gray
slide2 to unlatch battery
compartment3.
�
Pull the battery compartment3 out of
the housing in direction of arrow.
4Battery
5Contact spring
�
Remove the batteries4 in direction of
arrow.
�
Using a lint-free cloth, insert new
batteries4 under the contact
spring5 with the plus (+) side facing
up.
�
Return battery compartment3 into
housing until it locks into place.
�
Slide mechanical key1 back into the
SmartKey.
�
Check the operation of the SmartKey.
SmartKey with KEYLESS-GO*
Replacement batteries: Lithium, type
CR 2025 or equivalent.�
Remove mechanical key (
�page 402).
�
Insert the mechanical key3 in side
opening and push grey slide
(�page 408).
Battery compartment is unlatched.
�
Pull battery compartment out of the
housing in direction of arrow
(�page 408).
��
Page 411 of 498
410 Practical hintsReplacing SmartKey batteries1Battery
2Tilt battery up
3Mechanical key
�
Using mechanical key3 apply pres-
sure to position2.
Battery1 tilts up slightly.
�
Pull out batteries1 in direction of
arrow.
�
Using a lint-free cloth, insert new
batteries1 with the plus (+) side fac-
ing up.
�
Return battery compartment into hous-
ing until it locks into place.
�
Slide mechanical key1 back into the
SmartKey.
�
Check the operation of the SmartKey
and the KEYLESS-GO*.
��
Page 418 of 498
417 Practical hints
Replacing wiper blades
�Replacing wiper blades
Removing wiper blades�
Turn SmartKey in starter switch to
position1.
�
Turn combination switch to wiper
settingII (
�page 54).
�
With wiper arm in the vertical position,
turn SmartKey in starter switch to
position0.
�
Fold the wiper arm forward until it
snaps into place.
�
Turn the wiper blade at a right angle to
wiper arm.
�
Slide the wiper blade sideways out of
the retainer.
!The windshield wipers must be in a
vertical position before folding them
away from the windshield. They could
otherwise damage the hood.
Warning!
G
For safety reasons, switch off wipers and re-
move SmartKey from starter switch (vehi-
cles with KEYLESS-GO*: make sure the
vehicle's on-board electronics have status
0) before replacing a wiper blade. Other-
wise, the wiper motor could suddenly turn
on and cause injury.
Page 420 of 498

419 Practical hints
Flat tire
�Flat tire
The CLS 55 AMG with Performance
Package* is equipped with a TIREFIT kit.Preparing the vehicle�
Park the vehicle in a safe distance from
moving traffic on a hard, flat surface
when possible.
�
Turn on the hazard warning flashers.
�
Turn the steering wheel so that the
front wheels are in a straight ahead
position.
�
Set the parking brake.
�
Move the gear selector lever to P.
Vehicles with SmartKey:
�
Turn off the engine (
�page 60).
�
Remove the SmartKey from the starter
switch.Vehicles with KEYLESS-GO*:
�
Turn off the engine by pressing the
KEYLESS-GO* button on the gear
selector lever once (
�page 60).
�
Open the driver’s door (this puts the
starter switch in position 0, same as
with the SmartKey removed from the
starter switch). The driver’s door then
can be closed again.
�
Have any passenger exit the vehicle at
a safe distance from the roadway.
Sealing tires with TIREFIT
Small tire punctures, particularly those in
the tread, can be sealed with TIREFIT.
TIREFIT can be used in ambient tempera-
tures down to -4°F (-20°C).
iOpen door only when conditions are
safe to do so.
iCLS 55 AMG with Performance
Package* only.Warning!
G
Keep TIREFIT away from sparks, open flame
or heat source.
Do not smoke.
Page 429 of 498

428 Practical hintsFlat tire�
Screw union nut5 onto the tire valve.
�
Insert electrical plug3 into vehicle
cigarette lighter socket (
�page 258).
�
Turn the SmartKey in the starter switch
to position1.
or
�
Press the KEYLESS-GO* start/stop
button on the gear selector lever once
without depressing the brake pedal.
�
Press I on electric air pump switch2.
The electric air pump should now
switch on and inflate the tire.
�
Inflate the tire to approximately 51 psi
(3.5 bar).
This takes about 5 minutes for the col-
lapsible tire. Air hose4 and union
nut5 can become hot during infla-
tion. Exercise proper caution to avoid
burning yourself when using the equip-
ment.
�
Press 0 on electric air pump switch2.
�
Turn the SmartKey in the starter switch
to position0.
or
�
Press KEYLESS-GO* start/stop button
on the gear selector lever twice without
depressing the brake pedal.
The electric air pump should now be
switched off.
�
If the tire inflation pressure is above
51 psi (3.5 bar), release excess tire in-
flation pressure using the vent screw.
�
Detach the electric air pump.
�
Stow electrical plug3 and air hose4
behind flap1 and place the air pump
back in the trunk.
!Do not operate the air pump longer
than 8 minutes without interruption.
Otherwise it may overheat.
You may operate the air pump again
after it has cooled off.
Warning!
G
Follow recommend inflation pressures.
Do not overinflate tires. Overinflating tires
can result in sudden deflation (blowout)
because they are more likely to become
punctured or damaged by road debris,
potholes, etc.
Do not underinflate tires. Underinflated tires
wear unevenly, adversely affect handling
and fuel economy, and are more likely to fail
from being overheated.
��
Page 433 of 498

432 Practical hintsBattery
Disconnecting the battery�
Depress parking brake firmly or move
gear selector lever to positionP.
�
Turn off all electrical consumers.
�
Remove SmartKey from starter switch.
Vehicles with KEYLESS-GO*:�
Press the start/stop button until
the engine shuts off.
�
Open the driver’s door.
Warning!
G
Do not place metal objects on the battery as
this could result in a short circuit.
Use leak-proof battery only to avoid the risk
of acid burns in the event of an accident.
Warning!
G
The electro-hydraulic brake system requires
electrical power to operate.
A malfunction in the vehicle’s power supply
or electrical system may impair brake sys-
tem operation and switch it into its emer-
gency operation mode. The same applies if
battery is disconnected. To brake, the driver
must then apply significantly greater brake
pedal pressure and depress the pedal much
further to obtain the expected braking ef-
fect. If necessary, apply full pressure to the
brake pedal. Brakes may only be applied to
the front wheels. Stopping distance is in-
creased! Adjust your driving style according-
ly. For more information, refer to
“Electro-hydraulic brake system”
(�page 89).
Warning!
G
With a disconnected battery�
you will no longer be able to turn the
SmartKey in the starter switch and
pressing the KEYLESS-GO* start/stop
button on the gear selector lever will
have no effect
�
the gear selector lever will remain
locked in positionP
Page 440 of 498

439 Practical hints
Towing the vehicle
Installing towing eye bolt
Front of vehicle
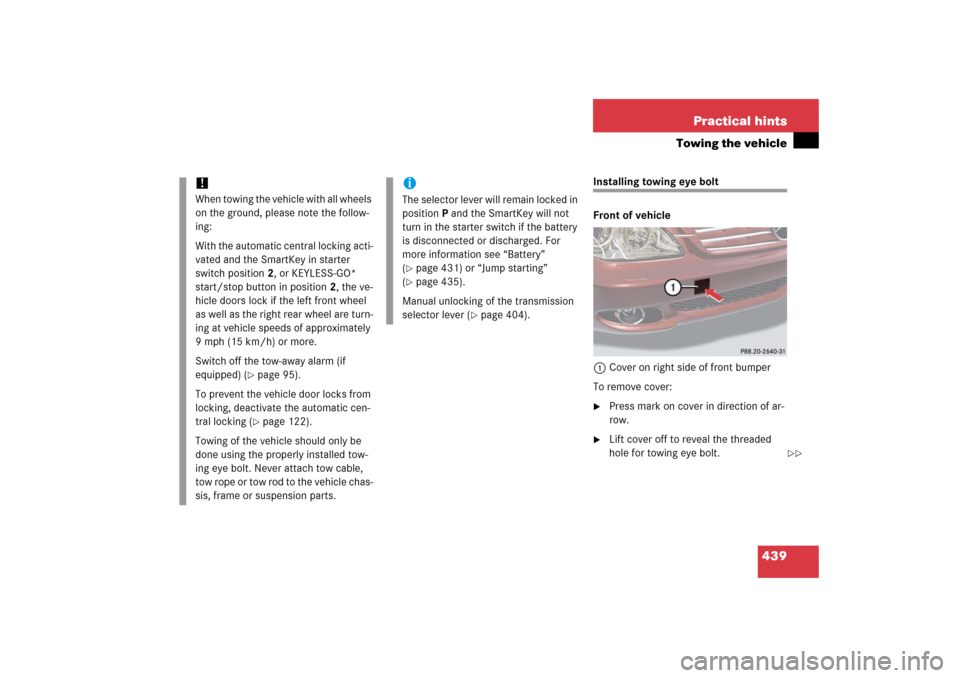
1Cover on right side of front bumper
To remove cover:�
Press mark on cover in direction of ar-
row.
�
Lift cover off to reveal the threaded
hole for towing eye bolt.
!When towing the vehicle with all wheels
on the ground, please note the follow-
ing:
With the automatic central locking acti-
vated and the SmartKey in starter
switch position2, or KEYLESS-GO*
start/stop button in position2, the ve-
hicle doors lock if the left front wheel
as well as the right rear wheel are turn-
ing at vehicle speeds of approximately
9 mph (15 km/h) or more.
Switch off the tow-away alarm (if
equipped) (
�page 95).
To prevent the vehicle door locks from
locking, deactivate the automatic cen-
tral locking (�page 122).
Towing of the vehicle should only be
done using the properly installed tow-
ing eye bolt. Never attach tow cable,
tow rope or tow rod to the vehicle chas-
sis, frame or suspension parts.
iThe selector lever will remain locked in
positionP and the SmartKey will not
turn in the starter switch if the battery
is disconnected or discharged. For
more information see “Battery”
(�page 431) or “Jump starting”
(�page 435).
Manual unlocking of the transmission
selector lever (
�page 404).
��