Page 345 of 498
.
Do not apply any of these products or wax
if")
344 OperationVehicle careMercedes-Benz approved Paint Cleaner
should be applied if the paint surface
shows signs of embedded dirt (i.e. loss of
gloss).
Do not apply any of these products or wax
if your vehicle is parked in the sun or if the
hood is still hot.�
Use the appropriate MB-Touch-Up
Stick for quick and provisional repairs
of minor paint damage (i.e. chips from
stones, vehicle doors, etc.).
Engine cleaning
Prior to cleaning the engine compartment,
make sure to protect electrical compo-
nents and connectors from contact with
water and cleaning agents.Corrosion protection, such as MB Anticor-
rosion Wax should be applied to the engine
compartment after every engine cleaning.
Before applying, all control linkage bush-
ings and joints should be lubricated. The
poly-V-belt and all pulleys should be pro-
tected from any wax.
Vehicle washing
In the winter, thoroughly remove all traces
of road salt as soon as possible.
When washing the vehicle underbody, do
not forget to clean the inner sides of the
wheels.Hand-wash
Do not use hot water or wash your vehicle
in direct sunlight.
�
Only use a mild car wash detergent,
such as Mercedes-Benz approved Car
Shampoo.
�
Thoroughly spray the vehicle with a dif-
fused jet of water.
Direct only a very weak spray towards
the ventilation intake.
�
Use plenty of water and rinse the
sponge and chamois frequently.
�
Rinse with clean water and thoroughly
dry with a chamois.
Do not allow cleaning agents to dry on
the finish.
iVehicles with KEYLESS-GO*:
If a door handle is hit by a strong jet of
water, and a SmartKey with
KEYLESS-GO* is in close proximity, i.e.
within approximately 3 ft (approxi-
mately 1 m), the vehicle could be inad-
vertently locked or unlocked.
Page 352 of 498
351 Practical hints
What to do if …
Where will I find ...?
Unlocking/locking in an emergency
Opening/closing in an emergency
Resetting activated head restraints
Replacing SmartKey batteries
Replacing bulbs
Replacing wiper blades
Flat tire
Battery
Jump starting
Towing the vehicle
Fuses
Page 378 of 498
;(Canada only)3
Brake fluid
Visit workshop
There is insufficient brake flui")
377 Practical hints
What to do if …
Display symbol
Display messages
Possible cause/consequence
Possible solution
(USA only);(Canada only)3
Brake fluid
Visit workshop
There is insufficient brake fluid in the
reservoir.
�
Risk of accident! Stop the vehicle in a
safe location and notify an authorized
Mercedes-Benz Center. Do not add
brake fluid! This will not solve the
problem.
Warning!
G
Driving with the messages “Brake fluid Visit
workshop” displayed can result in an acci-
dent. Have your brake system checked im-
mediately.
If there is a malfunction in the
electro-hydraulic brake system, we recom-
mend that the vehicle be transported with
all wheels off the ground using flatbed or ap-
propriate wheel lift/dolly equipment.
A tow bar must be used if circumstances do
not permit the use of the recommended
towing methods and the vehicle requires
towing with all four wheels on the ground.
Towing the vehicle with all four wheels on
the ground is only permissible for distances
up to 30 miles (50 km) and at a speed not to
exceed 30 mph (50 km/h). For more infor-
mation, refer to “Towing the vehicle”
(�page 437).
If the electro-hydraulic brake system enters
its emergency operation mode, the driver
must apply significantly greater brake pedal
pressure and depress the pedal much fur-
ther than normal to obtain braking effect. If
necessary, apply full pressure to the brake
pedal. Brakes may only be applied to the
front wheels. Stopping distance is in-
creased!
Do not add brake fluid before checking the
brake system. Overfilling the brake fluid res-
ervoir can result in spilling brake fluid on hot
engine parts and the brake fluid catching
fire. You can be seriously burned.!If you find that the brake fluid in the
brake fluid reservoir has fallen to the
minimum mark or below, have the
brake system checked for brake pad
thickness and leaks.
Page 400 of 498

399 Practical hints
Where will I find ...?
Removing the spare wheel�
Turn luggage bowl counterclockwise.
�
Remove spare wheel2.
Storing the spare wheel
�
Place spare wheel2 in wheel well.
�
Turn luggage bowl clockwise to its stop
to secure the spare wheel.
Vehicle tool kit
The vehicle tool kit is stored in the com-
partment underneath the trunk floor
(�page 398).
The vehicle tool kit includes:
�
One pair of universal pliers
�
One towing eye bolt
�
One wheel wrench
�
One alignment bolt
�
One fuse extractor
�
One collapsible wheel chock
�
Spare fusesVehicle jack
!Always lower trunk floor before closing
the trunk.iVehicles with collapsible tire:
The electrical air pump is located under
the luggage bowl3.
Warning!
G
The jack is designed exclusively for jacking
up the vehicle at the jack take-up brackets
built into both sides of the vehicle. To help
avoid personal injury, use the jack only to lift
the vehicle during a wheel change. Never
get beneath the vehicle while it is supported
by the jack. Keep hands and feet away from
the area under the lifted vehicle. Always
firmly set parking brake and block wheels
before raising vehicle with jack.
Do not disengage parking brake while the
vehicle is raised. Be certain that the jack is
always vertical (plumb line) when in use, es-
pecially on hills. Always try to use the jack
on a level surface. Make sure the jack arm is
fully seated in the jack take-up bracket.
Always lower the vehicle onto sufficient
capacity jackstands before working under
the vehicle.
Page 405 of 498
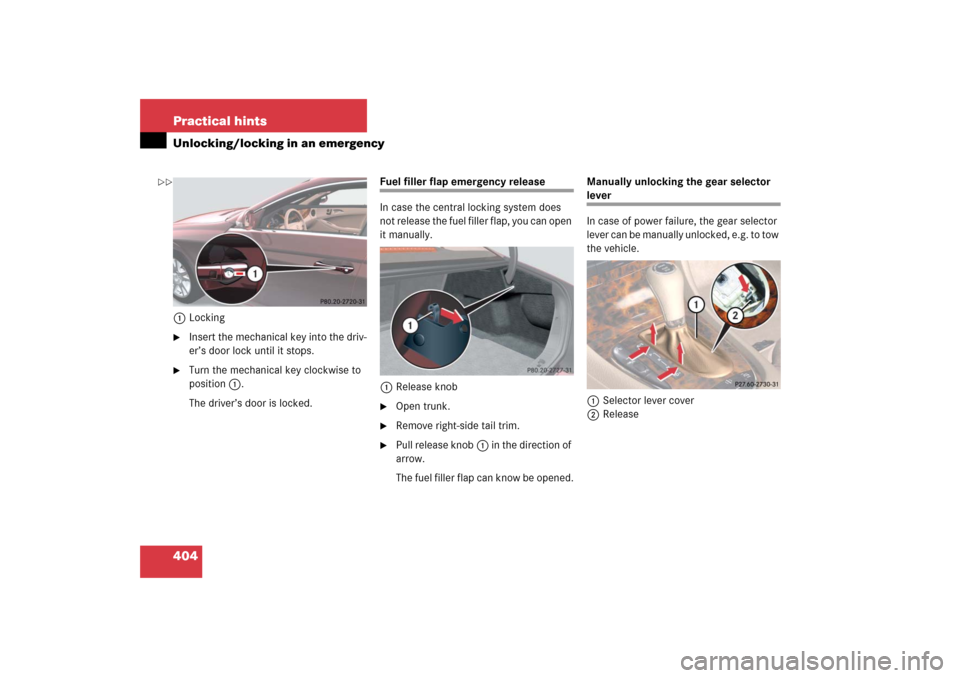
404 Practical hintsUnlocking/locking in an emergency1Locking�
Insert the mechanical key into the driv-
er’s door lock until it stops.
�
Turn the mechanical key clockwise to
position1.
The driver’s door is locked.
Fuel filler flap emergency release
In case the central locking system does
not release the fuel filler flap, you can open
it manually.
1Release knob�
Open trunk.
�
Remove right-side tail trim.
�
Pull release knob1 in the direction of
arrow.
The fuel filler flap can know be opened.Manually unlocking the gear selector
lever
In case of power failure, the gear selector
lever can be manually unlocked, e.g. to tow
the vehicle.
1Selector lever cover
2Release
��
Page 408 of 498

407 Practical hints
Resetting activated head restraints
�Resetting activated head restraints
If the active head restraint have been trig-
gered in an accident, the head restraints
must be reset. Otherwise, active head re-
straint cannot offer any additional protec-
tion in the event of another rear-end
collision.
�
Take the reset tool out of the
Mercedes-Benz vehicle literature
pouch.
�
Guide reset tool into center of head re-
straint between head restraint cushion
and rear head restraint cover.
�
Press reset tool forward in direction of
arrow.
�
Press reset tool downward until you
hear the head restraint release
mechanism audibly engage.
�
Pull out reset tool.
�
Firmly press head restraint cushion
backward towards rear head restraint
cover until it engages.
�
Repeat this procedure for second head
restraint.
For information on head restraint adjust-
ment, see “Seats” (
�page 39).
iFor your convenience, we recommend
that you have this work carried out by
an authorized Mercedes-Benz Center.
You will find the reset tool for manually
operating the head restraints in the
Mercedes-Benz vehicle literature
pouch.
!Be careful not to damage upholstery.
Warning!
G
When pushing back the head restraint cush-
ion, take care that your fingers do not be-
come caught between the head restraint
cushion and the cover. Failing to do so may
lead to injury.
Page 429 of 498
.
�
Turn the SmartKey in the starter switch
to positio")
428 Practical hintsFlat tire�
Screw union nut5 onto the tire valve.
�
Insert electrical plug3 into vehicle
cigarette lighter socket (
�page 258).
�
Turn the SmartKey in the starter switch
to position1.
or
�
Press the KEYLESS-GO* start/stop
button on the gear selector lever once
without depressing the brake pedal.
�
Press I on electric air pump switch2.
The electric air pump should now
switch on and inflate the tire.
�
Inflate the tire to approximately 51 psi
(3.5 bar).
This takes about 5 minutes for the col-
lapsible tire. Air hose4 and union
nut5 can become hot during infla-
tion. Exercise proper caution to avoid
burning yourself when using the equip-
ment.
�
Press 0 on electric air pump switch2.
�
Turn the SmartKey in the starter switch
to position0.
or
�
Press KEYLESS-GO* start/stop button
on the gear selector lever twice without
depressing the brake pedal.
The electric air pump should now be
switched off.
�
If the tire inflation pressure is above
51 psi (3.5 bar), release excess tire in-
flation pressure using the vent screw.
�
Detach the electric air pump.
�
Stow electrical plug3 and air hose4
behind flap1 and place the air pump
back in the trunk.
!Do not operate the air pump longer
than 8 minutes without interruption.
Otherwise it may overheat.
You may operate the air pump again
after it has cooled off.
Warning!
G
Follow recommend inflation pressures.
Do not overinflate tires. Overinflating tires
can result in sudden deflation (blowout)
because they are more likely to become
punctured or damaged by road debris,
potholes, etc.
Do not underinflate tires. Underinflated tires
wear unevenly, adversely affect handling
and fuel economy, and are more likely to fail
from being overheated.
��
Page 430 of 498

429 Practical hints
Flat tire
Lowering the vehicle�
Lower vehicle by turning crank coun-
terclockwise until vehicle is resting ful-
ly on its own weight.
�
Remove the jack.
1-5 Wheel bolts
�
Tighten the five wheel bolts evenly, fol-
lowing the diagonal sequence illustrat-
ed (1 to 5), until all bolts are tight.
Observe a tightening torque of 96 lb-ft
(130 Nm).
�
Before storing the jack in the trunk, it
should be fully collapsed.
MOExtended system*
The MOExtended system allows you to
continue driving your vehicle even if there
is a total loss of pressure in one or more
tires.
You may only use the MOExtended system
in conjunction with the Run Flat Indicator*
or the Advanced TPMS* (Canada only)
(�page 314).
Warning!
G
Have the tightening torque checked after
changing a wheel. The wheels could come
loose if they are not tightened to a torque of
96 lb-ft (130 Nm).iWrap the damaged wheel in the protec-
tive film that comes with the spare
wheel and put the wheel in the trunk.
You can also place the damaged wheel
down into the spare wheel well. In this
case, you must stow the luggage bowl
in the trunk.
!The maximum distance in emergency
mode depends on the vehicle’s load. It
is 30 miles (50 km) if the vehicle is par-
tially loaded and 18 miles (30 km) if the
vehicle is fully loaded.
The point at which the maximum driv-
ing distance begins in emergency
mode is when the warning message
appears in the multifunction display
indicating that there is a loss of tire
inflation pressure.
Do not exceed the maximum speed of
50 mph (80 km/h).