Page 412 of 514
411 Practical hints
What to do if …?
Display symbol
Display message
Possible cause/consequence
Possible solution
t
Function
Unavailable
This display appears if button t or
s on the multifunction steering wheel
is pressed and the vehicle is not equipped
with a telephone.
X
Tire pressure
Check tires
The Run Flat Indicator* indicates that the
pressure is too low in one or more tires.
�
Carefully bring the vehicle to a halt,
avoiding abrupt steering and braking
maneuvers. Observe the traffic
situation around you.
�
Check and adjust tire inflation pres-
sure as required (
�page 341).
�
If necessary, change the wheel
(�page 446).
�
Reactivate the Run Flat Indicator* af-
ter adjusting the tire inflation pressure
values (
�page 343).
Page 414 of 514
413 Practical hints
Where will I find...?
�Where will I find...?
First aid kit
The first aid kit is located in the trunk on
the right side secured by a hook and loop
fastener.
1First aid kit
2Hook and loop fastener�
Loosen hook and loop fastener2.
�
Remove first aid kit1.
Vehicle tool kit
The vehicle tool kit is stored in the com-
partment underneath the trunk floor.
The following is included:�
Towing eye bolt
�
Wheel wrench
�
Alignment bolt
�
Vehicle jack
�
Collapsible wheel chock
�
Spare fuses
�
Fuse extractor
�
Straps for soft top emergency opera-
tion
�
A pair of gloves
The spare wheel bolts are fixed at the
Minispare wheel.
iCheck expiration dates and contents
for completeness at least once a year
and replace missing/expired items.
iHex wrench:
You will find the hex wrench for
manually operating the roll bars
(�page 423) or the soft top
(�page 425) at the lower edge of the
storage well casing.
Page 415 of 514

414 Practical hintsWhere will I find...?Removing the vehicle tool kit�
Lift up trunk floor cover and engage
trunk floor handle in upper edge of
trunk.
1Retaining screw
2Storage well casing
�
Loosen retaining screw 1 in the mid-
dle of storage well casing 2 by turning
it counterclockwise.
�
Remove storage well casing2.3Arrow
4Minispare wheel
5Vehicle tool kit storage well casing
6Vehicle tool kit
�
Remove vehicle tool kit6.
Storing the vehicle tool kit
�
Place vehicle tool kit6 in vehicle tool
kit storage well casing5.
�
Place storage well casing2 over the
vehicle tool kit storage well casing5
and turn retaining screw1 clockwise
as far it will go to secure the Minispare
wheel.
�
Disengage trunk floor handle in upper
edge of trunk and lower trunk floor cov-
er.iArrow3 on vehicle tool kit storage
well casing5 must point in the direc-
tion of travel. Otherwise you cannot
place the storage well casing2 on top
and secure the Minispare wheel with
retaining screw1.!To prevent damage, always disengage
trunk floor handle from upper edge of
trunk and lower trunk floor before
closing the trunk.
Page 416 of 514

415 Practical hints
Where will I find...?
Vehicle jackThe vehicle jack is located in the storage
compartment underneath the trunk floor.
Storage position�
Remove vehicle jack from its
compartment.
�
Turn crank handle in direction of arrow
as far as it will go.
Operational position�
Turn crank handle clockwise.
Before storing the vehicle jack in its com-
partment:
�
It should be fully collapsed
�
The handle must be folded in (storage
position)
Warning!
G
The jack is designed exclusively for jacking
up the vehicle at the jack take-up brackets
built into both sides of the vehicle. To help
avoid personal injury, use the jack only to lift
the vehicle during a wheel change. Never
get beneath the vehicle while it is supported
by the jack. Keep hands and feet away from
the area under the lifted vehicle. Always
firmly set parking brake and block wheels
before raising vehicle with jack.
Do not disengage parking brake while the
vehicle is raised. Be certain that the jack is
always vertical (plumb line) when in use, es-
pecially on hills. Always try to use the jack
on a level surface. Make sure the jack arm is
fully seated in the jack take-up bracket.
Always lower the vehicle onto sufficient
capacity jackstands before working under
the vehicle.
Page 417 of 514
416 Practical hintsWhere will I find...?Setting up the collapsible wheel chock
The collapsible wheel chock serves to
additionally secure the vehicle, e.g. while
changing the wheel.
1Tilt the plate upward
2Fold the lower plate outward
3Insert the plate
�
Tilt both plates upward1.
�
Fold the lower plate outward2.
�
Guide the tabs of the lower plate all the
way into the openings of the base
plate3.
Minispare wheel
The Minispare wheel is located in the
storage compartment underneath the
trunk floor.
Removing the Minispare wheel�
Lift up trunk floor cover and engage
trunk floor handle in upper edge of
trunk.
�
Loosen the retaining screw in the mid-
dle of storage well casing by turning it
counterclockwise (
�page 414).
�
Remove the storage well casing
(�page 414).
Page 418 of 514

417 Practical hints
Where will I find...?
1Vehicle tool kit
Wheel wrench
Jack
2Arrow
3Minispare wheel, Wheel bolts for
Minispare wheel
4Vehicle tool kit storage well casing�
Remove vehicle tool kit storage well
casing4.
�
Remove Minispare wheel3.Storing the Minispare wheel
�
Place Minispare wheel3 in wheel
well.
�
Place vehicle tool kit storage well
casing4 over the Minispare wheel.
Make sure arrow 2 on vehicle tool kit
storage well casing4 points in the
direction of travel.
�
Place storage well casing (
�page 414)
over the vehicle tool kit storage well
casing 4 and turn the retaining screw
(
�page 414) clockwise as far it will go
to secure the Minispare wheel.
�
Disengage trunk floor handle in upper
edge of trunk and lower trunk floor cov-
er.
iArrow2 on vehicle tool kit storage
well casing4 must point in the
direction of travel. Otherwise you
cannot place the storage well casing
(�page 414) on top and secure the
Minispare wheel with the retaining
screw (
�page 414).
!To prevent damage, always disengage
trunk floor handle from upper edge of
trunk and lower trunk floor before
closing the trunk.Warning!
G
The dimensions of the Minispare wheel are
different from those of the road wheels. As
a result, the vehicle handling characteristics
change when driving with a Minispare wheel
mounted.
The Minispare wheel should only be used
temporarily, and should be replaced with a
regular road wheel as quickly as possible.
Do not switch off the ESP
® when a Minis-
pare wheel is mounted.
Page 419 of 514
418 Practical hintsWhere will I find...?In case of a flat tire, you may temporarily
use the Minispare wheel when observing
the following restrictions:�
Do not exceed a vehicle speed of
50 mph (80 km/h).
�
Drive to the nearest tire repair facility
to have the flat tire repaired or
replaced as appropriate.
�
Do not operate vehicle with more than
one Minispare wheel mounted.
For more information, see “Rims and tires”
(
�page 471).
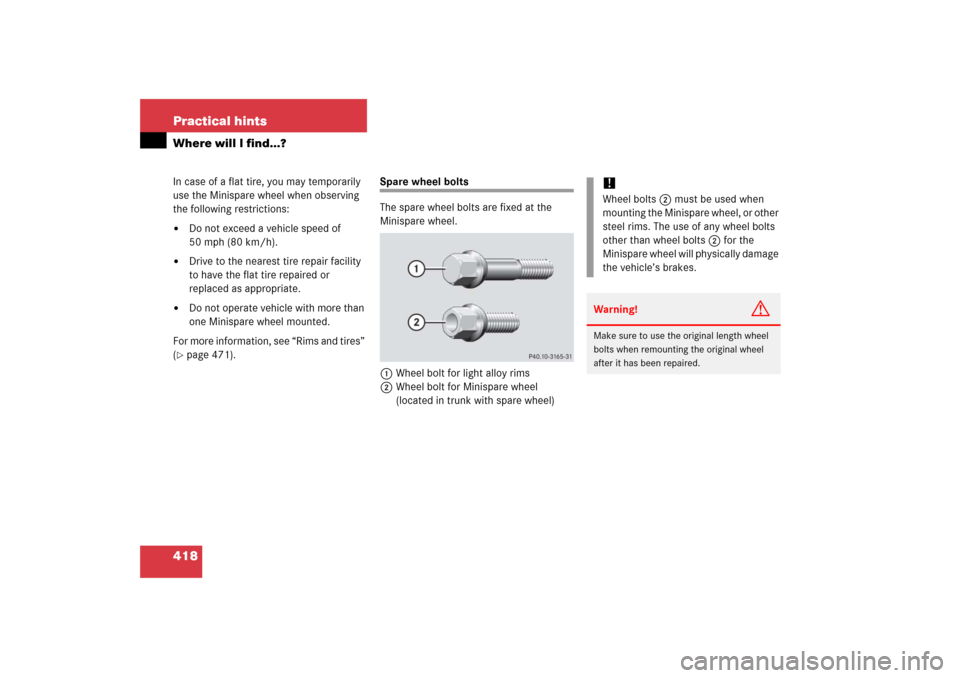
Spare wheel bolts
The spare wheel bolts are fixed at the
Minispare wheel.
1Wheel bolt for light alloy rims
2Wheel bolt for Minispare wheel
(located in trunk with spare wheel)
!Wheel bolts2 must be used when
mounting the Minispare wheel, or other
steel rims. The use of any wheel bolts
other than wheel bolts2 for the
Minispare wheel will physically damage
the vehicle’s brakes.Warning!
G
Make sure to use the original length wheel
bolts when remounting the original wheel
after it has been repaired.
Page 447 of 514
.")
446 Practical hintsFlat tire
Preparing the vehicle�
Park the vehicle in a safe distance from
moving traffic on a hard, flat surface
when possible.
�
Turn on the hazard warning flashers
(�page 133).
�
Turn the steering wheel so that the
front wheels are in a straight ahead
position.
�
Set the parking brake (
�page 57).
�
Move the gear selector lever toP.
Vehicles with SmartKey:
�
Turn off the engine (
�page 58).
�
Remove the SmartKey from the starter
switch.Vehicles with SmartKey with
KEYLESS-GO*:
�
Turn off the engine by pressing the
KEYLESS-GO* start/stop button on the
gear selector lever once (
�page 59).
�
Open the driver’s door (this puts the ig-
nition in position0 (
�page 36), same
as with the SmartKey removed from
the starter switch). The driver’s door
then can be closed again.
�
Have any passenger exit the vehicle at
a safe distance from the roadway.
Warning!
G
The dimensions of the Minispare wheel are
different from those of the road wheels. As
a result, the vehicle handling characteristics
change when driving with a Minispare wheel
mounted. Adapt your driving style
accordingly.
The spare wheel is for temporary use only.
When driving with spare wheel mounted,
ensure proper tire inflation pressure and do
not exceed a vehicle speed of 50 mph
(80 km/h).
Drive to the nearest Mercedes-Benz Center
as soon as possible to have the spare wheel
replaced with a regular road wheel.
Never operate the vehicle with more than
one Minispare wheel mounted.
Do not switch off the ESP
® when a Minis-
pare wheel is mounted.
iOpen door only when conditions are
safe to do so.