Page 40 of 514

39 Getting started
Adjusting
Head restraint adjusting
Manually adjust the head restraint.�
Push or pull the head restraint cushion
to the desired position.
For more information, see “Seats”
(
�page 119).Folding front seat backrests forward
1Release lever
Folding backrests forward
�
Pull release lever1 forward and fold
the seat backrest forward.
The head restraint will automatically
move down.
Folding backrests back
�
Fold and press the backrest rearward
until it engages in driving position.
The head restraint returns to its previ-
ous position.
Warning!
G
For your protection, drive only with properly
positioned head restraints.
Adjust head restraint so that the center of
the head restraint supports the back of the
head at eye level. This will reduce the poten-
tial for injury to the head and neck in the
event of an accident or similar situation.
Do not drive the vehicle without the seat
head restraints. Head restraints are intend-
ed to help reduce injuries during an
accident.
iAdjust the head restraint in such a way
that it is as close to the head as
possible.
��
Page 41 of 514
.
iIn addition to the front seat backrests")
40 Getting startedAdjusting
For information on additional convenience
features permitting easy entry and exit,
see “Easy-entry/exit feature” (
�page 42).
iIn addition to the front seat backrests,
the front seat cushions can also be
shifted forward to permit easy access
to the rear whenever the seat is located
in the rear half of its adjustment range.
Pivot backrest forward by pulling the
release lever until the seat moves in a
combined forward and upward
movement.!When moving the seat, make sure
there are no items in the footwell or be-
hind the seats. Otherwise you could
damage the seats.
Warning!
G
The seat belts provide protection only with
the backrest locked in place. Therefore, the
backrest must be locked in place with the
vehicle in motion. Do not drive the vehicle
when the backrest is not locked in place.
If the warning message:Lock front
passenger seator Lock driver’s
seatis displayed in the multifunction display,
then the respective backrest is not engaged
in its lock. Carefully slow down, and drive
with caution to an area which is in a safe dis-
tance from the roadway. Always provide suf-
ficient room behind the backrest and fold
the backrest all the way back until it locks in
place.
The warning message is no longer displayed
as soon as the backrest is locked in place. If
both backrests are locked in place and the
warning message is still displayed, have the
system checked at an authorized
Mercedes-Benz Center immediately.
When leaving the vehicle, always remove the
SmartKey or SmartKey with KEYLESS-GO*
from the starter switch, take it with you, and
lock the vehicle.
The power seats can also be operated with
the driver’s or passenger door open. Do not
leave children unattended in the vehicle or
with access to an unlocked vehicle. Unsu-
pervised use of vehicle equipment may
cause an accident and/or serious personal
injury.
Never place hands under seat or near any
moving parts during a seat adjustment pro-
cedure.
��
Page 265 of 514
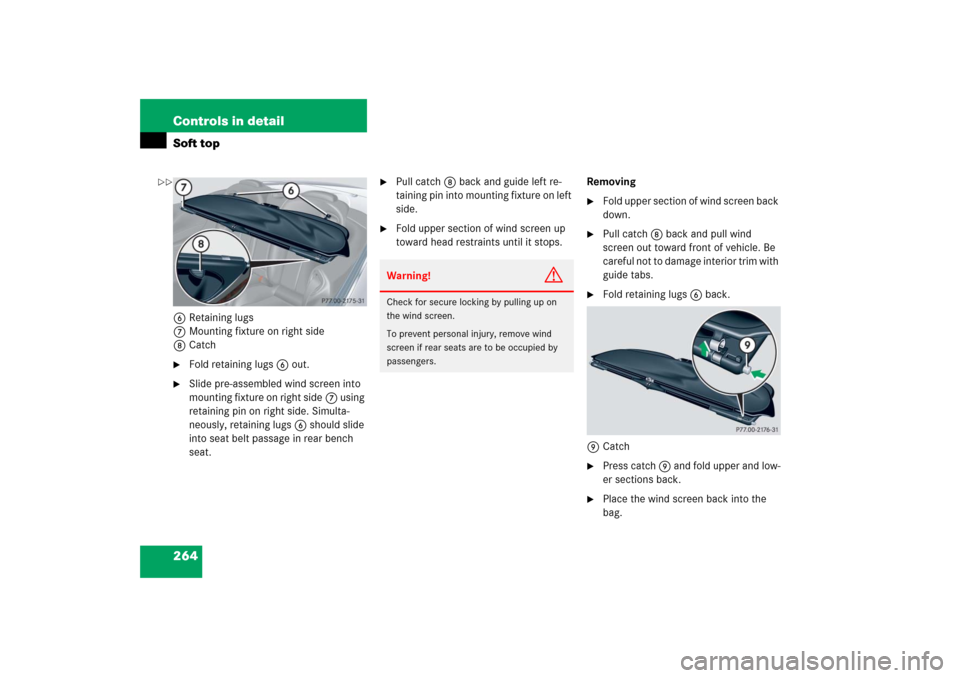
264 Controls in detailSoft top6Retaining lugs
7Mounting fixture on right side
8Catch�
Fold retaining lugs6 out.
�
Slide pre-assembled wind screen into
mounting fixture on right side7 using
retaining pin on right side. Simulta-
neously, retaining lugs6 should slide
into seat belt passage in rear bench
seat.
�
Pull catch8 back and guide left re-
taining pin into mounting fixture on left
side.
�
Fold upper section of wind screen up
toward head restraints until it stops.Removing
�
Fold upper section of wind screen back
down.
�
Pull catch8 back and pull wind
screen out toward front of vehicle. Be
careful not to damage interior trim with
guide tabs.
�
Fold retaining lugs6 back.
9Catch
�
Press catch 9 and fold upper and low-
er sections back.
�
Place the wind screen back into the
bag.
Warning!
G
Check for secure locking by pulling up on
the wind screen.
To prevent personal injury, remove wind
screen if rear seats are to be occupied by
passengers.
��
Page 503 of 514

502 Index
Fuel reserve 25, 379
High beam headlamp 25
Instrument cluster 374–380
Low beam headlamp 25
Maintenance service 361
Parktronic system*
warning indicators 271
Roll bar 379
Seat belt telltale 25, 71, 379
Seat belts 379
SRS 25, 63, 380
Turn signals 25
Language, Setting 151
LATCH-type child seat anchors see
Children in the vehicle
License plate lamps
Messages in display 405
Replacing bulbs 439, 443
Light alloy wheels, cleaning 370
Light sensor see Lamp sensor
Lighter see Cigarette lighter
Lighting, Exterior and interior 127
Limp Home Mode 180
Loading
Ski sack* (Canada only) 273
Loading see Vehicle loadingLoading the vehicle 333
Locator lighting 129, 157
Lock buttons
Door handle (KEYLESS-GO*) 60, 104
Trunk lid (KEYLESS-GO*) 106
Lock knob 489
Locking 60
Loss of keys 100, 106
Loss of Service and
Warranty Information Booklet 467
Low beam headlamps
Indicator lamp 25
Messages in display 406
Replacing bulbs (Bi-Xenon*) 438
Replacing bulbs (Halogen) 438, 440
Switching on 52
Lubricants 479
Luggage cover 262
Folding back 273
M
Maintenance 12, 361
Calling up service indicator 362
Clearing service indicator 362
FSS (Canada vehicles) 361
Maintenance System
(U.S. vehicles) 361Resetting service indicator 363
Service indicator 361
Service term exceeded 362
Maintenance system
(U.S. vehicles) 361, 489
Manual headlamp mode see Headlamps
Manual shift program 178
MAXCOOL maximum cooling 202
Maximum load rating, Tires 356
Maximum loaded vehicle weight,
Tire inflation pressure 356
Maximum tire inflation pressure 356
Mechanical key 419
Memory function see Seats, Power
Menus see Control system menus
Microphone, Hands-free 29
Minispare wheel see Spare wheel
Mirrors
Adjusting 43
Antiglare position 181
Auto-dimming 182
Exterior rear view mirrors 43
Parking position 126, 161, 183
Interior rear view mirror 43
MOE see MOExtended
MOE tires see MOExtended system*