Page 367 of 514
366 OperationVehicle care�
Use the appropriate MB-Touch-Up
Stick for quick and provisional repairs
of minor paint damage (i.e. chips from
stones, vehicle doors, etc.).
Engine cleaning
Prior to cleaning the engine compartment,
make sure to protect electrical compo-
nents and connectors from contact with
water and cleaning agents.
Corrosion protection, such as MB Anticor-
rosion Wax, should be applied to the
engine compartment after every engine
cleaning. Before applying, all control
linkage bushings and joints should be
lubricated. The poly-V-belt and all pulleys
should be protected from any wax. Vehicle washing
In the winter, thoroughly remove all traces
of road salt as soon as possible.
When washing the vehicle underbody, do
not forget to clean the inner sides of the
wheels.Hand-wash
Do not use hot water or wash your vehicle
in direct sunlight.
�
Only use a mild car wash detergent,
such as Mercedes-Benz approved Car
Shampoo.
�
Thoroughly spray the vehicle with a dif-
fused jet of water.
Direct only a very weak spray towards
the ventilation intake.
�
Use plenty of water and rinse the
sponge and chamois frequently.
�
Rinse with clean water and thoroughly
dry with a chamois.
Do not allow cleaning agents to dry on
the finish.
iVehicles with KEYLESS-GO*:
If a door handle is hit by a strong jet of
water, and a SmartKey with
KEYLESS-GO* is in close proximity, i.e.
within approximately 3 ft
(approximately 1 m), the vehicle could
be inadvertently locked or unlocked.
��
Page 405 of 514
404 Practical hintsWhat to do if …?Display symbol
Display message
Possible cause/consequence
Possible solution
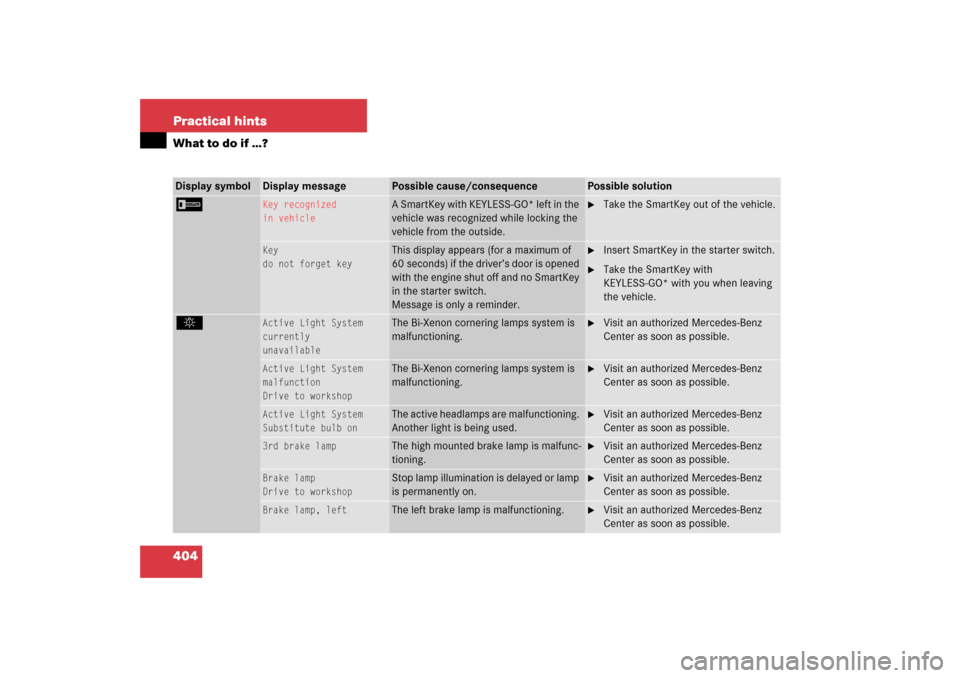
I
Key recognized
in vehicle
A SmartKey with KEYLESS-GO* left in the
vehicle was recognized while locking the
vehicle from the outside.
�
Take the SmartKey out of the vehicle.
Key
do not forget key
This display appears (for a maximum of
60 seconds) if the driver’s door is opened
with the engine shut off and no SmartKey
in the starter switch.
Message is only a reminder.
�
Insert SmartKey in the starter switch.
�
Take the SmartKey with
KEYLESS-GO* with you when leaving
the vehicle.
.
Active Light System
currently
unavailable
The Bi-Xenon cornering lamps system is
malfunctioning.
�
Visit an authorized Mercedes-Benz
Center as soon as possible.
Active Light System
malfunction
Drive to workshop
The Bi-Xenon cornering lamps system is
malfunctioning.
�
Visit an authorized Mercedes-Benz
Center as soon as possible.
Active Light System
Substitute bulb on
The active headlamps are malfunctioning.
Another light is being used.
�
Visit an authorized Mercedes-Benz
Center as soon as possible.
3rd brake lamp
The high mounted brake lamp is malfunc-
tioning.
�
Visit an authorized Mercedes-Benz
Center as soon as possible.
Brake lamp
Drive to workshop
Stop lamp illumination is delayed or lamp
is permanently on.
�
Visit an authorized Mercedes-Benz
Center as soon as possible.
Brake lamp, left
The left brake lamp is malfunctioning.
�
Visit an authorized Mercedes-Benz
Center as soon as possible.
Page 420 of 514
419 Practical hints
Unlocking/locking in an emergency
�Unlocking/locking in an emergency
Unlocking the vehicle
If you are unable to unlock the vehicle with
the SmartKey or KEYLESS-GO*, open the
driver’s door and the trunk using the
mechanical key.
1Mechanical key locking tab
2Mechanical key
�
Move locking tab1 in direction of
arrow.
�
Slide mechanical key2 out of the
housing.Unlocking the driver’s door
1Unlocking
�
Insert the mechanical key into the
driver’s door lock until it stops.
�
Turn the mechanical key counterclock-
wise to position1.
The driver’s door is unlocked.
iUnlocking and opening the driver’s
door and/or the trunk with the
mechanical key will trigger the
anti-theft alarm system.
To cancel the alarm, do one of the
following:�
Press button Œ or ‹on the
SmartKey.
�
Insert the SmartKey in the starter
switch.
Vehicles with KEYLESS-GO*:
�
Pull the outside door handle.
�
Press the KEYLESS-GO* start/stop
button (
�page 35).
Page 421 of 514
420 Practical hintsUnlocking/locking in an emergencyUnlocking the trunk
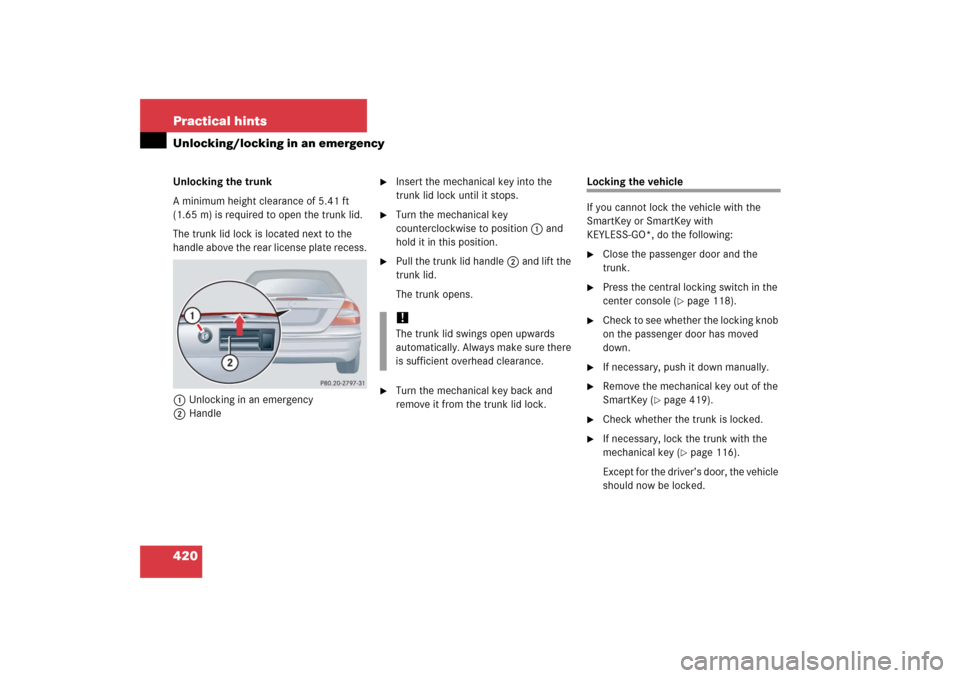
A minimum height clearance of 5.41 ft
(1.65 m) is required to open the trunk lid.
The trunk lid lock is located next to the
handle above the rear license plate recess.
1Unlocking in an emergency
2Handle
�
Insert the mechanical key into the
trunk lid lock until it stops.
�
Turn the mechanical key
counterclockwise to position1 and
hold it in this position.
�
Pull the trunk lid handle2 and lift the
trunk lid.
The trunk opens.
�
Turn the mechanical key back and
remove it from the trunk lid lock.
Locking the vehicle
If you cannot lock the vehicle with the
SmartKey or SmartKey with
KEYLESS-GO*, do the following:�
Close the passenger door and the
trunk.
�
Press the central locking switch in the
center console (
�page 118).
�
Check to see whether the locking knob
on the passenger door has moved
down.
�
If necessary, push it down manually.
�
Remove the mechanical key out of the
SmartKey (
�page 419).
�
Check whether the trunk is locked.
�
If necessary, lock the trunk with the
mechanical key (
�page 116).
Except for the driver’s door, the vehicle
should now be locked.
!The trunk lid swings open upwards
automatically. Always make sure there
is sufficient overhead clearance.
Page 422 of 514
421 Practical hints
Unlocking/locking in an emergency
1Locking�
Insert the mechanical key into the
driver’s door lock until it stops.
�
Turn the mechanical key clockwise to
position1.
The driver’s door is locked.
Fuel filler flap
In case the central locking system does
not release the fuel filler flap, you can open
it manually.
The release button is on the right-hand
side of the luggage compartment behind
the side trim.
�
Open trunk lid.
�
Remove the side trim from the
right-hand side of the luggage compart-
ment.
�
Reach inside through opening2 in di-
rection of arrow.
�
Turn release knob 1 clockwise (arrow)
as far as will go.
The fuel filler flap is released and can
be opened from outside.
�
Open the fuel filler flap from outside.
Warning!
G
If you operate the emergency release but-
ton, be careful of the sharp edges so that
you do not injure yourself.
Page 434 of 514
433 Practical hints
Opening/closing in an emergency
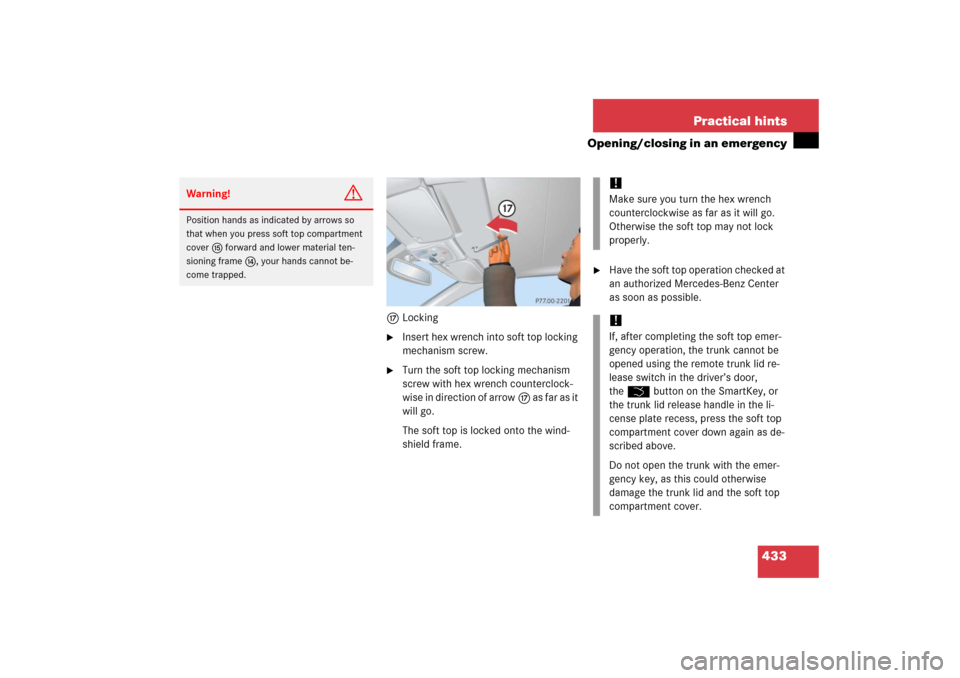
hLocking �
Insert hex wrench into soft top locking
mechanism screw.
�
Turn the soft top locking mechanism
screw with hex wrench counterclock-
wise in direction of arrowh as far as it
will go.
The soft top is locked onto the wind-
shield frame.
�
Have the soft top operation checked at
an authorized Mercedes-Benz Center
as soon as possible.
Warning!
G
Position hands as indicated by arrows so
that when you press soft top compartment
coverf forward and lower material ten-
sioning framee, your hands cannot be-
come trapped.
!Make sure you turn the hex wrench
counterclockwise as far as it will go.
Otherwise the soft top may not lock
properly.!If, after completing the soft top emer-
gency operation, the trunk cannot be
opened using the remote trunk lid re-
lease switch in the driver’s door,
theŠ button on the SmartKey, or
the trunk lid release handle in the li-
cense plate recess, press the soft top
compartment cover down again as de-
scribed above.
Do not open the trunk with the emer-
gency key, as this could otherwise
damage the trunk lid and the soft top
compartment cover.
Page 455 of 514
454 Practical hintsBattery2Negative terminal
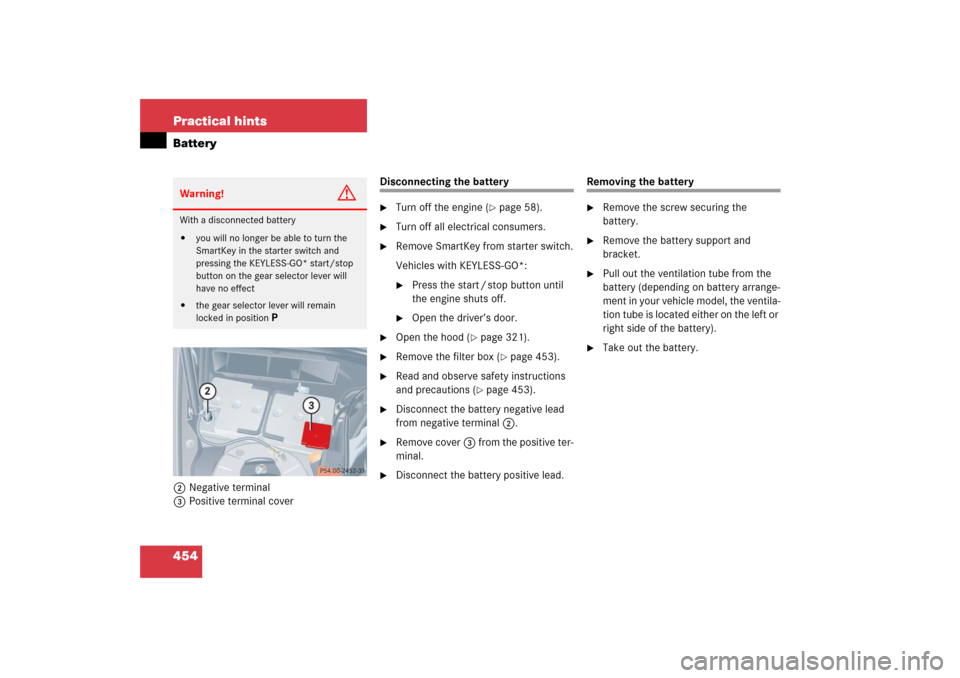
3Positive terminal cover
Disconnecting the battery�
Turn off the engine (
�page 58).
�
Turn off all electrical consumers.
�
Remove SmartKey from starter switch.
Vehicles with KEYLESS-GO*:�
Press the start / stop button until
the engine shuts off.
�
Open the driver’s door.
�
Open the hood (
�page 321).
�
Remove the filter box (
�page 453).
�
Read and observe safety instructions
and precautions (
�page 453).
�
Disconnect the battery negative lead
from negative terminal2.
�
Remove cover3 from the positive ter-
minal.
�
Disconnect the battery positive lead.
Removing the battery�
Remove the screw securing the
battery.
�
Remove the battery support and
bracket.
�
Pull out the ventilation tube from the
battery (depending on battery arrange-
ment in your vehicle model, the ventila-
tion tube is located either on the left or
right side of the battery).
�
Take out the battery.
Warning!
G
With a disconnected battery�
you will no longer be able to turn the
SmartKey in the starter switch and
pressing the KEYLESS-GO* start/stop
button on the gear selector lever will
have no effect
�
the gear selector lever will remain
locked in position
P
Page 456 of 514
455 Practical hints
Battery
Charging and reinstalling the battery�
Charge battery in accordance with the
instructions of the battery charger
manufacturer.
�
Reinstall the charged battery. Follow
the previously described steps in
reverse order.
Reconnecting the battery�
Turn off all electrical consumers.
�
Remove SmartKey from starter switch.
Vehicles with KEYLESS-GO*:�
Press the start / stop button until
the engine shuts off.
�
Open the driver’s door.
�
Connect the battery positive lead and
fasten its cover3.
�
Connect the battery negative lead2.
�
Reinstall the filter box (
�page 453).
Batteries contain materials that can harm
the environment if disposed of improperly.
Large 12-volt storage batteries contain
lead. Recycling of batteries is the preferred
method of disposal. Many states require
sellers of batteries to accept old batteries
for recycling.
Warning!
G
Never charge a battery while still installed in
the vehicle unless the accessory battery
charge unit* approved by Mercedes-Benz is
being used. Gases may escape during charg-
ing and cause explosions that may result in
paint damage, corrosion or personal injury.
An accessory battery charge unit* specially
adapted for Mercedes-Benz vehicles and
tested and approved by Mercedes-Benz is
available, permitting the charging of the bat-
tery in its installed position. Contact an au-
thorized Mercedes-Benz Center for
information and availability. Charge battery
in accordance with the separate instruc-
tions for the accessory battery charger*.
!The battery, its filler caps and the vent
tube must always be securely installed
when the vehicle is in operation.!NEVER invert the terminal connections!
iThe following procedures must be
carried out following any interruption of
battery power (e.g. due to reconnect-
ing):�
Set the clock (
�page 153).
Vehicles with COMAND*:
see COMAND operator’s manual.
�
Synchronize the side windows
(�page 251).