Page 270 of 489

269 Controls in detail
Useful features
�Useful features
Storage compartments Glove box
1Glove box lid
2Glove box lid release
Opening the glove box
�
Pull glove box lid release2.
The glove box lid1 opens downward.
Closing the glove box
�
Push glove box lid1 up to close.Storage box (Center armrest design A)
The storage box is in front of the armrest
storage compartment.
1Storage box
Warning!
G
To help avoid personal injury during a colli-
sion or sudden maneuver, exercise care
when storing objects in the vehicle. Put lug-
gage or cargo in the trunk if possible. Do not
pile luggage or cargo higher than the seat
backs.
Parcel nets cannot secure hard or heavy ob-
jects.
Keep compartment lids closed. This will help
to prevent stored objects from being thrown
about and injuring vehicle occupants during
an accident.
iAudio system/COMAND* with CD
changer*: The CD changer is located in
the glove box.
Warning!
G
Do not use this storage compartment as an
ashtray and/or place hot cigarettes or other
hot smoking materials in the storage box.
Placing such materials in the storage box
may cause vehicle damage and/or poten-
tially cause a vehicle fire.
Page 287 of 489
,
and the reserve SmartKey is not handy:�
Contact the Merc")
286 Controls in detailUseful featuresRemote door unlock
In case you have locked your vehicle unin-
tentionally (e.g. SmartKey inside vehicle),
and the reserve SmartKey is not handy:�
Contact the Mercedes-Benz Response
Center at 1-800-756-9018 (in the USA)
or 1-888-923-8367 (in Canada).
You will be asked to provide your pass-
word which you provided when you
completed the subscriber agreement.
�
Then return to your vehicle and pull the
trunk recessed handle for a minimum
of 20 seconds until the SOS button is
flashing.
The message
Connecting call
appears in the multifunction display.
As an alternative, you may unlock the vehi-
cle via Internet using the ID and password
sent to you shortly after the completion of
your acquaintance call.
The Response Center will then unlock your
vehicle with the remote door unlocking
feature.Stolen Vehicle Recovery services
In the event your vehicle was stolen:
�
Report the incident to the police.
The police will issue a numbered
incident report.
�
Pass this number on to the
Mercedes-Benz Response Center along
with your password issued to you when
you subscribed to the service.
The Response Center will then attempt
to covertly contact the vehicle’s
Tele Aid system. Once the vehicle is
located, the Response Center will
contact the local law enforcement and
you. The vehicle’s location will only be
provided to law enforcement.
iThe remote door unlock feature is
available if the relevant cellular phone
network is available.
The SOS button will flash and the
message
Connecting call
will appear
in the multifunction display to indicate
receipt of the door unlock command.
Once the vehicle is unlocked,
a Response Center specialist will
attempt to establish voice contact with
the vehicle occupants.
If the trunk recessed handle was pulled
for more than 20 seconds before door
unlock authorization was received by
the Response Center, you must
wait 15 minutes before pulling the
trunk recessed handle again.
iWhen the anti-theft alarm or the
tow-away alarm stays on for more than
30 seconds, a call is initiated automat-
ically to the Response Center, see “An-
ti-theft alarm system” (
�page 93) and
tow-away alarm (
�page 95).
Page 303 of 489

302 OperationDriving instructionsPassenger compartmentDriving abroad
Abroad, there is an extensive
Mercedes-Benz service network at your
disposal. If you plan to drive into areas
which are not listed in the index of your
Mercedes-Benz Center directory, you
should request pertinent information from
an authorized Mercedes-Benz Center.Control and operation of radio trans-
mitters
COMAND*, radio and telephone*Telephones* and two-way radios
Radio transmitters, such as a mobile
phone or a citizens band unit should only
be used inside the vehicle if they are con-
nected to an antenna that is installed on
the outside of the vehicle.
Refer to the radio transmitter operation in-
structions regarding use of an external
antenna.
Warning!
G
Always fasten items being carried as
securely as possible.
In an accident, during hard braking or sud-
den maneuvers, loose items will be thrown
around inside the vehicle, and cause injury
to vehicle occupants unless the items are
securely fastened in the vehicle.
The trunk is the preferred place to carry
objects.
Warning!
G
Please do not forget that your primary re-
sponsibility is to drive the vehicle safely.
Only operate the COMAND (Cockpit Man-
agement and Data System), radio or tele-
phone
1 if road, weather and traffic
conditions permit.
Bear in mind that at a speed of just 30 mph
(approximately 50 km/h), your vehicle is
covering a distance of 44 feet
(approximately 14 m) every second.
1Observe all legal requirements.
Warning!
G
Never operate radio transmitters equipped
with a built-in or attached antenna (i.e. with-
out being connected to an external antenna)
from inside the vehicle while the engine is
running. Doing so could lead to a malfunc-
tion of the vehicle’s electronic system, pos-
sibly resulting in an accident and/or serious
personal injury.
Page 398 of 489

397 Practical hints
What to do if …?
Display symbol
Display message
Possible cause/consequence
Possible solution
K
Close
sunroof
You have opened the driver’s door with
the SmartKey removed from the starter
switch and the sliding portion of the
tilt/sliding sunroof open.
�
Close the tilt/sliding sunroof
(�page 251).
J
Close
sunroof
You have opened the driver’s door with
the SmartKey removed from the starter
switch and the tilting portion of the
tilt/sliding sunroof open.
�
Close the tilt/sliding sunroof
(�page 251).
L
Tele Aid malfunction
Drive to workshop
One or more main functions of the Tele
Aid system are malfunctioning.
�
Have the Tele Aid system checked by
an authorized Mercedes-Benz Center.
t
Function
Unavailable
This display appears if button t or
s on the multifunction steering wheel
is pressed and the vehicle is not equipped
with a telephone.
Ê
Trunk open
This message will appear whenever the
trunk is open.
�
Close the trunk.
W
Washer fluid
Check level
The fluid level has dropped to about
1/3 of
total reservoir capacity.
�
Add washer fluid (
�page 316).
Page 399 of 489
398 Practical hintsWhere will I find...?First aid kit
The first aid kit is located in the trunk on
the left side secured by a hook and loop
fastener.�
Loosen hook and loop fastener.
�
Remove first aid kit.
Vehicle tool kit
The vehicle tool kit is located in the storage
compartment underneath the trunk floor.
The following is included:�
Towing eye bolt
�
Wheel wrench
�
Alignment bolt
�
Vehicle jack
�
Collapsible wheel chock
�
Spare fuses
�
A pair of gloves
The spare wheel bolts are fixed at the
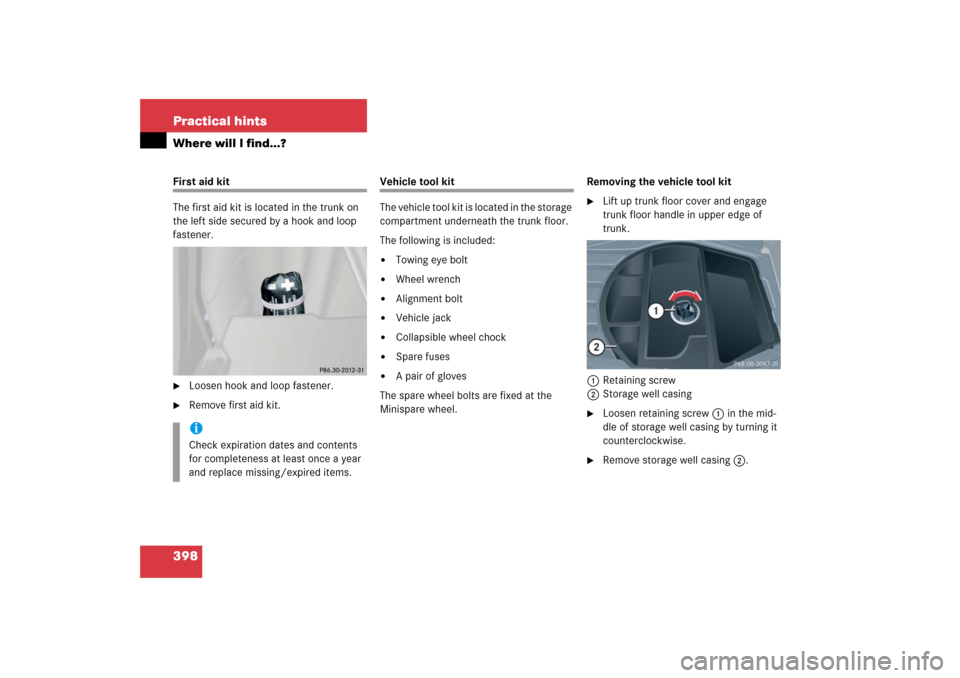
Minispare wheel.Removing the vehicle tool kit
�
Lift up trunk floor cover and engage
trunk floor handle in upper edge of
trunk.
1Retaining screw
2Storage well casing
�
Loosen retaining screw1 in the mid-
dle of storage well casing by turning it
counterclockwise.
�
Remove storage well casing2.
iCheck expiration dates and contents
for completeness at least once a year
and replace missing/expired items.
Page 400 of 489
399 Practical hints
Where will I find...?
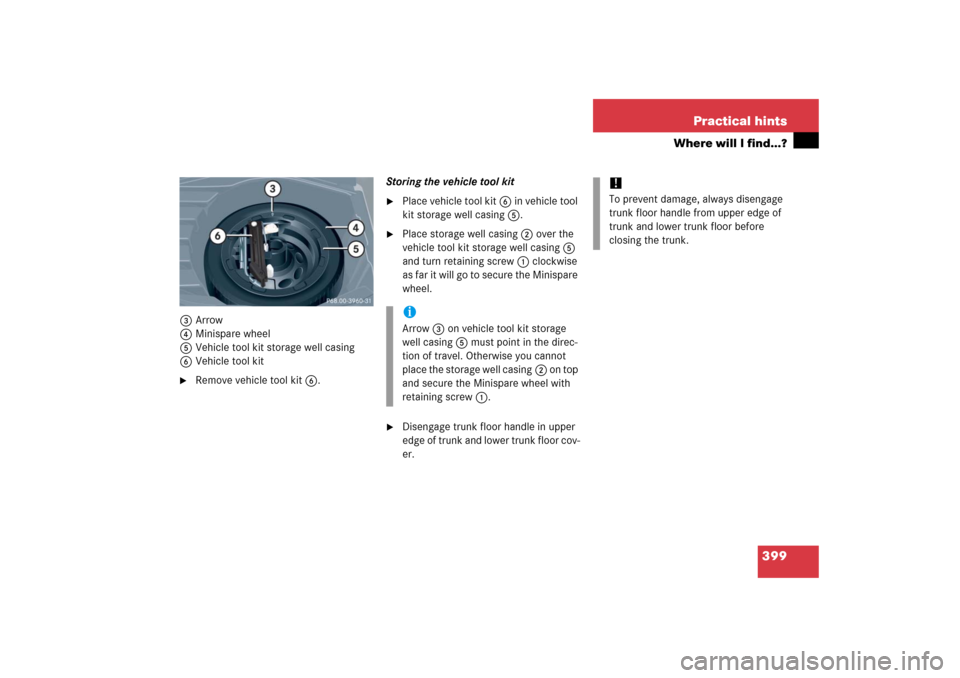
3Arrow
4Minispare wheel
5Vehicle tool kit storage well casing
6Vehicle tool kit�
Remove vehicle tool kit6.Storing the vehicle tool kit
�
Place vehicle tool kit6 in vehicle tool
kit storage well casing5.
�
Place storage well casing2 over the
vehicle tool kit storage well casing5
and turn retaining screw1 clockwise
as far it will go to secure the Minispare
wheel.
�
Disengage trunk floor handle in upper
edge of trunk and lower trunk floor cov-
er.iArrow3 on vehicle tool kit storage
well casing5 must point in the direc-
tion of travel. Otherwise you cannot
place the storage well casing2 on top
and secure the Minispare wheel with
retaining screw1.
!To prevent damage, always disengage
trunk floor handle from upper edge of
trunk and lower trunk floor before
closing the trunk.
Page 401 of 489

400 Practical hintsWhere will I find...?Vehicle jackThe vehicle jack is located in the storage
compartment underneath the trunk floor.
Storage position�
Remove vehicle jack from its
compartment.
�
Turn crank handle in direction of arrow
as far as it will go.
Operational position�
Turn crank handle clockwise.
Before storing the vehicle jack in its
compartment:
�
It should be fully collapsed.
�
The handle must be folded in (storage
position).
Warning!
G
The jack is designed exclusively for jacking
up the vehicle at the jack take-up brackets
built into both sides of the vehicle. To help
avoid personal injury, use the jack only to lift
the vehicle during a wheel change. Never
get beneath the vehicle while it is supported
by the jack. Keep hands and feet away from
the area under the lifted vehicle. Always
firmly set parking brake and block wheels
before raising vehicle with jack.
Do not disengage parking brake while the
vehicle is raised. Be certain that the jack is
always vertical (plumb line) when in use,
especially on hills. Always try to use the jack
on level surface. Make sure the jack arm is
fully seated in the jack take-up bracket.
Always lower the vehicle onto sufficient
capacity jackstands before working under
the vehicle.
Page 402 of 489
401 Practical hints
Where will I find...?
Setting up the collapsible wheel chock
The collapsible wheel chock serves to
additionally secure the vehicle, e.g. while
changing the wheel.
1Tilt the plate upward
2Fold the lower plate outward
3Insert the plate
�
Tilt both plates upward1.
�
Fold the lower plate outward2.
�
Guide the tabs of the lower plate all the
way into the openings of the base
plate3.
Minispare wheel
The Minispare wheel is located in the
storage compartment underneath the
trunk floor.
Removing the Minispare wheel�
Lift up trunk floor cover and engage
trunk floor handle in upper edge of
trunk.
�
Loosen the retaining screw in the mid-
dle of storage well casing by turning it
counterclockwise (
�page 398).
�
Remove the storage well casing
(�page 398).