Page 105 of 489
.
�
You can combine KEYLESS-GO func-")
104 Controls in detailLocking and unlocking
Important notes on using KEYLESS-GO*�
You can also use the SmartKey with
KEYLESS-GO like a normal SmartKey
(�page 98).
�
You can combine KEYLESS-GO func-
tions with normal SmartKey functions
(e.g. unlocking with KEYLESS-GO and
locking with the‹button).
�
Always carry the SmartKey with
KEYLESS-GO with you.
�
Never store the SmartKey with
KEYLESS-GO together with:�
Electronic items such as a cellular
phone or another SmartKey with
KEYLESS-GO.
�
Metallic objects such as coins or
metal foil.
Doing so could impair the function of
the KEYLESS-GO system.
iUSA only:
This device complies with Part 15 of
the FCC Rules. Operation is subject to
the following two conditions:
(1) This device may not cause harmful
interference, and
(2) this device must accept any
interference received, including
interference that may cause
undesired operation.
Any unauthorized modification to this
device could void the user’s authority
to operate the equipment.
iCanada only:
This device complies with RSS-210 of
Industry Canada. Operation is subject
to the following two conditions:
(1) This device may not cause interfer-
ence, and
(2) this device must accept any
interference received, including
interference that may cause
undesired operation of the device.
Any unauthorized modification to this
device could void the user’s authority
to operate the equipment.iYou can also open and close the power
windows and power tilt/sliding sun-
roof* using the SmartKey with
KEYLESS-GO, see “Summer opening
feature” (
�page 249) and see “Conve-
nience closing feature” (
�page 250).
Page 112 of 489

111 Controls in detail
Locking and unlocking
�
Pull on door handle2.
If door was locked, locking knob1 will
move up.
Opening the trunk
Opening the trunk from the outside
A minimum height clearance of 5.71 ft
(1.74 m) is required to open the trunk lid.
Vehicles without KEYLESS-GO*:
The vehicle must be unlocked.
The handle is located in the rear license
plate recess.
1Handle�
Pull on handle1.
The trunk opens.
iIf you open a door, the side windows on
that side of the vehicle will lower slight-
ly. The windows close again when you
close the door.
!The trunk lid swings open upwards au-
tomatically. Always make sure there is
sufficient overhead clearance.
Vehicles with trunk opening/closing
system*: To stop the opening proce-
dure, press button Š on the Smart-
Key or SmartKey with KEYLESS-GO*.iIf the trunk does not open, it is still
locked separately (
�page 119).
iThe trunk can also be opened using
buttonŠ on the SmartKey or
SmartKey with KEYLESS-GO* or from
its inside in an emergency, see “Trunk
emergency release” (
�page 118).
Page 182 of 489

181 Controls in detail
Good visibility
Auto-dimming rear view mirrors*
The reflection brightness of the exterior
rear view mirror on the driver’s side and
the interior rear view mirror will respond
automatically to glare when�
the ignition is switched on (
�page 36),
and
�
incoming light from headlamps falls on
the sensor in the interior rear view
mirror.
The rear view mirror will not react if
�
reverse gearR is engaged
�
the interior lighting is turned on
Warning!
G
The auto-dimming function does not react if
incoming light is not aimed directly at sen-
sors in the interior rear view mirror.
The interior rear view mirror and the exterior
rear view mirror on the driver’s side do not
react, for example, if the rear window sun
shade* is in raised position.
Glare can endanger you and others.Warning!
G
In case of an accident, liquid electrolyte may
escape from the mirror housing if the mirror
glass breaks.
Electrolyte has an irritating effect. Do not
allow the liquid to come into contact with
eyes, skin, clothing, or respiratory system.
In case it does, immediately flush affected
area with water, and seek medical help if
necessary.
!Electrolyte drops coming into contact
with the vehicle paint finish can be
completely removed only while in the
liquid state and by applying plenty of
water.Warning!
G
Exercise care when using the passen-
ger-side exterior rear view mirror. The mirror
surface is convex (outwardly curved surface
for a wider field of view). Objects in mirror
are closer than they appear. Check your
interior rear view mirror or glance over your
shoulder before changing lanes.
Page 184 of 489
183 Controls in detail
Good visibility
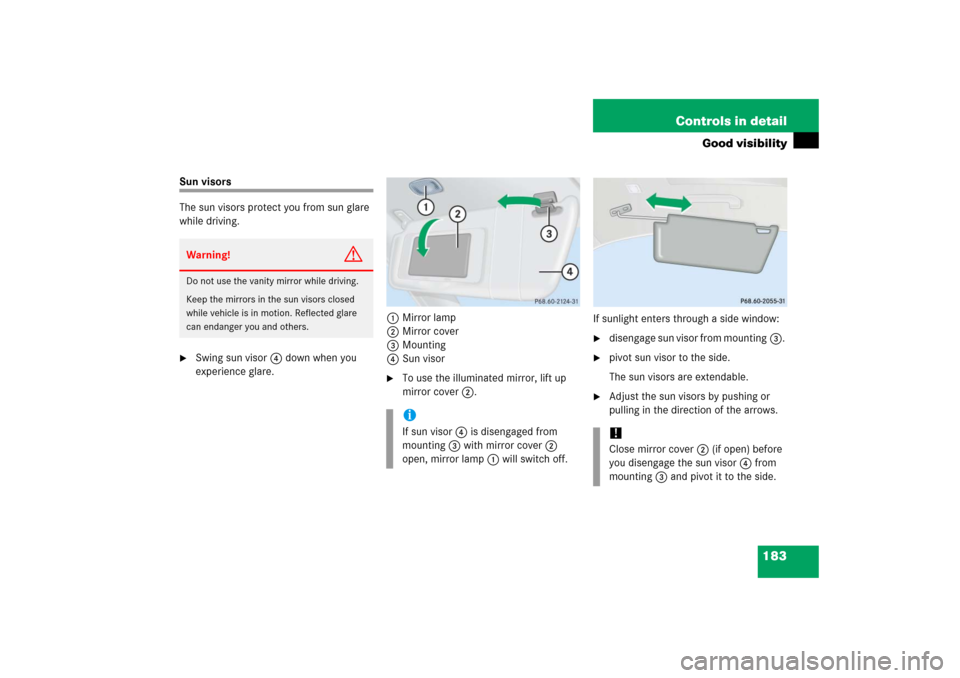
Sun visors
The sun visors protect you from sun glare
while driving.�
Swing sun visor4 down when you
experience glare.1Mirror lamp
2Mirror cover
3Mounting
4Sun visor
�
To use the illuminated mirror, lift up
mirror cover2.If sunlight enters through a side window:
�
disengage sun visor from mounting3.
�
pivot sun visor to the side.
The sun visors are extendable.
�
Adjust the sun visors by pushing or
pulling in the direction of the arrows.
Warning!
G
Do not use the vanity mirror while driving.
Keep the mirrors in the sun visors closed
while vehicle is in motion. Reflected glare
can endanger you and others.
iIf sun visor4 is disengaged from
mounting3 with mirror cover2
open, mirror lamp1 will switch off.
!Close mirror cover2 (if open) before
you disengage the sun visor4 from
mounting3 and pivot it to the side.
Page 185 of 489

The switch is located in the center console.
1Rear window sunshade switch�
Switch on the ignition (
�page 36).
Always raise the")
184 Controls in detailGood visibilityRear window sunshade* (Canada only)
The switch is located in the center console.
1Rear window sunshade switch�
Switch on the ignition (
�page 36).
Always raise the sunshade fully for its sup-
port against the window frame.Raising the sunshade
�
Press switch1 briefly.
The sunshade is raised completely.
Stopping the raising procedure
�
Press switch1 again.
The sunshade stops.
Lowering the sunshade
�
Press switch1 briefly.
The sunshade is lowered completely.
Stopping the lowering procedure
�
Press switch1 again.
The sunshade stops.
!Make sure that the movement of the
rear window sunshade is not restricted
by objects on the rear window shelf.
Otherwise, the sunshade or the objects
could be damaged.
Warning!
G
When operating the rear window sunshade,
make sure there is no danger of anyone be-
ing harmed by the raising or lowering
procedure.
The raising or lowering procedure can be
immediately halted by briefly pressing the
switch1.
Briefly press switch1 again to raise or low-
er the rear window sunshade completely.Warning!
G
When leaving the vehicle, always remove the
SmartKey or SmartKey with KEYLESS-GO*
from the starter switch, take it with you, and
lock the vehicle. Do not leave children unat-
tended in the vehicle, or with access to an
unlocked vehicle. Unsupervised use of vehi-
cle equipment may cause an accident
and/or serious personal injury.
Page 186 of 489

185 Controls in detail
Good visibility
Rear window defroster
The rear window defroster uses a large
amount of power. To keep the battery
drain to a minimum, switch off the
defroster as soon as the rear window is
clear. The defroster is automatically
deactivated after approximately
6 to 17 minutes of operation depending on
the outside temperature.Activating
�
Press buttonF or1 in the
climate control panel (
�page 197) or
automatic climate control panel
(
�page 197).
The indicator lamp on the button
comes on.
Deactivating
�
Press buttonF or1 again.
The indicator lamp on the button goes
out.
Warning!
G
Any accumulation of snow and ice should be
removed from the rear window before
driving. Visibility could otherwise be
impaired, endangering you and others.!If the rear window defroster switches
off too soon and the indicator lamp
starts flashing, this means that too
many electrical consumers are
operating simultaneously and there is
insufficient voltage in the battery. The
system responds automatically by
deactivating the rear window defroster.
As soon as the battery has sufficient
voltage, the rear window defroster
automatically switches on again.
Page 188 of 489
187 Controls in detail
Climate control (CLK 350)
Canada only
USA only
Item
1
Left side air vent, adjustable
2
Thumbwheel for air volume control
for center air vents
3
Right side air vent, adjustable
4
Climate control panel
5
Right center air vent, adjustable
6
Thumbwheel for air volume control
for right side center air vent
7
Thumbwheel for air volume control
for left side center air vent
8
Left center air vent, adjustableiFor draft-free ventilation, move the
sliders for the side air vents1 and3
and center air vents5 and 8 to the
middle position.
Item
1
Air volume control
2
Left side temperature control
3
Right side temperature control
4
Air distribution control
5
Rear window defroster
6
AC cooling on/off
7
Air distribution and air volume
(automatic mode)
8
Air recirculation
9
Front defroster
Page 189 of 489
The climate control is operational when-
ever the engine is running. You can oper-
ate the climate control system in either the
automatic or manual mode")
188 Controls in detailClimate control (CLK 350)The climate control is operational when-
ever the engine is running. You can oper-
ate the climate control system in either the
automatic or manual mode. The system
cools or heats the interior depending on
the selected interior temperature and the
current outside temperature.Nearly all dust particles, pollutants and
odors are filtered out before outside air en-
ters the passenger compartment through
the air distribution system.
The air conditioning will not engage (no
cooling) if the A/C mode is deactivated
(
�page 194).
Warning!
G
When operating the climate control, the air
that enters the passenger compartment
through the air vents can be very hot or very
cold (depending on the set temperature).
This may cause burns or frostbite on unpro-
tected skin in the immediate area of the air
vents. Always keep sufficient distance be-
tween unprotected parts of the body and the
air vents. If necessary, use the air distribu-
tion control (
�page 187) to direct the air to
air vents in the vehicle interior that are not
in the immediate area of unprotected skin.
Warning!
G
Follow the recommended settings for heat-
ing and cooling given on the following pag-
es. Otherwise the windows could fog up,
impairing visibility and endangering you and
others.
iSevere conditions (e.g. strong air
pollution) may require replacement of
the filter before its scheduled interval.
A clogged filter will reduce the air
volume to the interior.
If the vehicle interior is hot, ventilate
the interior before driving off, see
“Summer opening feature”
(�page 249). The climate control will
then adjust the interior temperature to
the set value much faster.
Keep the air intake grille in front of the
windshield free of snow and debris.
Do not obstruct air flow by placing
objects on the air flow-through exhaust
slots below the rear window.

Canada only
USA only
Item
1
Left side air vent, adjustable
2
Thumbwheel for air volume control
for center air vents
3
Right side air vent, adjustable")