Page 183 of 489

182 Controls in detailGood visibilityActivating exterior rear view mirror
parking position
Follow these steps to activate the mirror
parking position so that the
passenger-side exterior rear view mirror
will be turned downward to the stored
position.
The buttons are located above the exterior
lamp switch.
1Driver’s side exterior rear view mirror
button
2Passenger-side exterior rear view
mirror button
�
Make sure you have stored a parking
position for the passenger-side exterior
rear view mirror (
�page 130).
�
Make sure the
Mirror adjustment
parking aid function in the
Convenience
submenu of the control
system is switched to
on (�page 164).
�
Switch on the ignition (
�page 36).
�
Press button2 for the passenger-side
exterior rear view mirror.
�
Place the gear selector lever in reverse
gearR.
The passenger-side exterior rear view
mirror will be turned downward to the
stored position.The exterior rear view mirror returns to its
previously stored driving position:
�
ten seconds after you put the gear se-
lector lever out of positionR
�
immediately once your vehicle exceeds
a speed of approximately 6 mph
(10 km/h)
�
immediately when you press button1
for the driver’s side mirror
Page 213 of 489
 and the
function buttons (left side of radio panel)
are re")
212 Controls in detailAudio systemButton and soft key operation
In these instructions, the alphanumeric
keypad (right side of radio panel) and the
function buttons (left side of radio panel)
are referred to as “buttons”. The four keys
below the display panel are referred to as
“soft keys”.Operation
Switching the unit on/off
Switching on�
Turn the SmartKey in the starter switch
to position 1 or 2.
�
If the audio system was on as you
removed the SmartKey from the starter
switch, the audio system will
automatically come back on as you
turn the SmartKey to position 1 or 2.
or
�
Press M button.
Switching off
�
Remove SmartKey from starter switch.
or
�
Press M button.Adjusting the volume
�
Turn rotary control of N button.
The volume will increase or decrease
depending on the direction turned.
!Do not press directly in the display
face. Otherwise, the display will be
damaged.
iIf the radio is switched on without the
key in the starter switch, it will
automatically switch off again after
approximately 30 minutes.
If your vehicle is equipped with a
telephone, the display may prompt you
to enter your PIN (GSM network) or
code (TDMA or CDMA network).
iShould excessively high temperatures
occur while the audio system is being
operated, the display will dim. If tem-
peratures continue to rise,
HIGH TEMP
will appear in the display, after which
the audio system will be switched off
for a cooling-down period.
iIf your vehicle equipment includes a
Mercedes-Benz specified mobile
phone*, you can adjust its volume sep-
arately from the volume of the audio
system while the telephone is being
used.
Page 218 of 489

217 Controls in detail
Audio system
Direct frequency input�
Select desired waveband.
�
Press * button.
�
Enter desired frequency with buttons
1to R.Manual tuning
�
Select desired waveband.
�
Press S or Tbutton for approx-
imately three seconds.
�
Press button repeatedly until desired
frequency has been reached.
Step-by-step station tuning takes place
in ascending or descending order. Each
time the button is pressed, the radio
tunes further by 0.2 MHz. During man-
ual tuning, the radio is muted.
Automatic seek tuning
�
Select desired waveband.
�
Press S or T button briefly.
The radio will tune to the next highest
or next lowest receivable frequency.Scan search
�
Starting scan search�
Select desired waveband.
�
Press
SC soft key.
SC will appear in the display. The ra-
dio briefly tunes in all receivable
stations on the waveband selected.
�
Ending scan search�
Press
SC soft key or S or T.
The station last played will be se-
lected and
SC disappears from the
display.
iYou can only enter frequencies within
the respective waveband.
If a button is not pressed within
four seconds, the radio will return to
the last station tuned.
iIf no station is received after two
consecutive scans of the complete
frequency range, then the scan stops
at the frequency from which it began.
Page 219 of 489
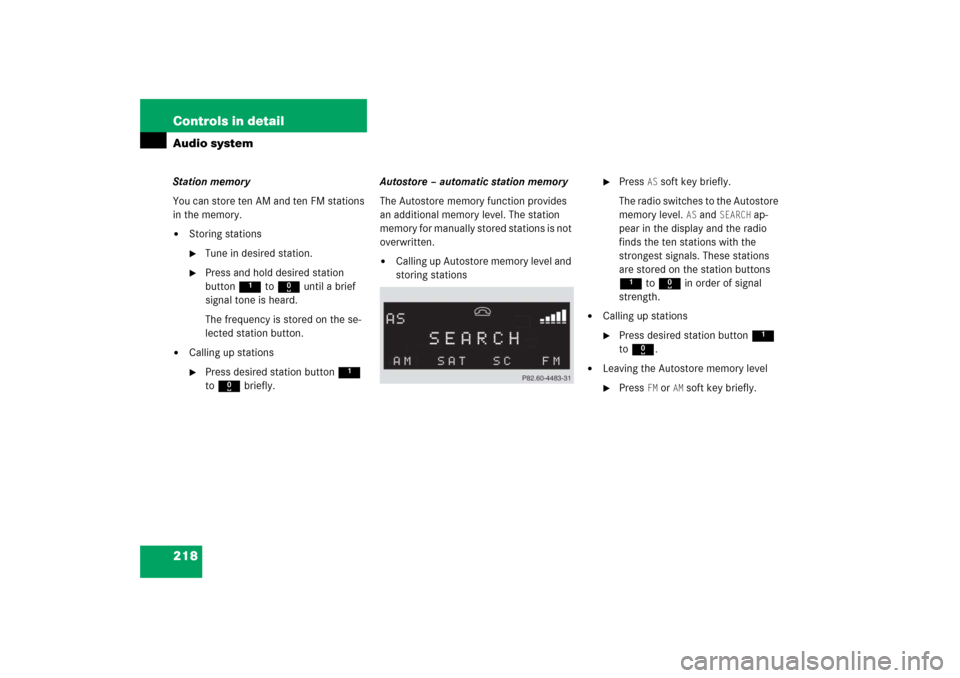
218 Controls in detailAudio systemStation memory
You can store ten AM and ten FM stations
in the memory.�
Storing stations�
Tune in desired station.
�
Press and hold desired station
button1 to R until a brief
signal tone is heard.
The frequency is stored on the se-
lected station button.
�
Calling up stations�
Press desired station button1
to R briefly.Autostore – automatic station memory
The Autostore memory function provides
an additional memory level. The station
memory for manually stored stations is not
overwritten.
�
Calling up Autostore memory level and
storing stations
�
Press
AS soft key briefly.
The radio switches to the Autostore
memory level.
AS and
SEARCH
ap-
pear in the display and the radio
finds the ten stations with the
strongest signals. These stations
are stored on the station buttons
1 to R in order of signal
strength.
�
Calling up stations�
Press desired station button1
to R.
�
Leaving the Autostore memory level�
Press
FM or
AM
soft key briefly.
Page 220 of 489

�
Mute on�
Press U button.
The radio mode is interrupted")
219 Controls in detail
Audio system
Interrupting radio mode
The radio mode is interrupted by an incom-
ing call on the telephone* (
�page 236)
�
Mute on�
Press U button.
The radio mode is interrupted and MUTED
appears in the display.
�
Mute off�
Press U button.
The radio mode is again active.
Weather band
�
Press
WB soft key.
The weather band station last received
is tuned in.Selecting a weather band station
directly
�
Select desired weather band station
with buttons 1 to 7.
If a station cannot be tuned in, a search
is automatically started.
Search
�
Press S or T button to tune in
the next receivable weather band sta-
tion.Scan search
�
Starting scan search�
Press
SC soft key.
SC will appear in the display. The ra-
dio briefly tunes in all receivable
weather band stations.
�
Ending scan search�
Press
SC soft key or S or T.
The weather band station last
played will be selected and
SC dis-
appears from the display.
iIf no weather band station is received
after three consecutive scans of the
complete frequency range, then the
scan stops at the channel with which it
began and
NO WB FOUND
appears in the
display.
If this happens, switch back to stan-
dard radio mode.
Page 229 of 489

228 Controls in detailAudio systemPlaying CDs
Single CD player in the audio unit�
Pressi button.CD 0
will appear in the upper left-hand
corner of the display.
The CD will resume playback at the point
where it was switched off.
CD changer*
�
Press Q button.CD and the selected magazine slot num-
ber appear in the upper left-hand cor-
ner of the display.
If you have not removed a CD since the last
time the CD audio source was activated,
the last CD listened to will begin to play at
the point where it was switched off.
After the last track on a CD has finished,
the next CD is automatically played.Playing tracks
You have the following options:
�
Audio system with CD changer*: se-
lecting CDs
�
Direct track entry
�
Track skip forward/reverse
�
Fast forward/reverse
�
Scan
�
Random tracks
�
Repeat trackSelecting CDs in the audio unit with CD
changer*
�
You can select from among the
inserted CDs with buttons
Rto6.
R = CD player in the audio unit
1to6 = CDs in the
CD changer*
The magazine slot number of the se-
lected CD appears next to
CD in the dis-
play, and the number of the currently
played track appears next to TRACK
.
iIf there is no CD in the selected maga-
zine slot,
NO CD
appears in the display
with the corresponding slot number.
Page 230 of 489

229 Controls in detail
Audio system
Direct track entry
You can make a direct selection from
among the tracks on a CD.�
Press * button.
�
Enter track number using buttons 1
to R.
The number of the track being played
appears next to
TRACK
in the display.
You can only enter available track num-
bers.Skipping tracks forward/backward
�
Skipping tracks forward�
Press S button briefly.
The next track will be played.
�
Skipping tracks backward�
Press T button briefly.
If the track has been playing for
more than ten seconds, the unit
skips back to the beginning of the
track currently playing. If less than
ten seconds have been played, the
unit skips back to the beginning of
the previous track.
Pressing the T or S button repeat-
edly will result in multiple tracks being
skipped.Fast forward/reverse
�
Fast forward�
Press and hold S button until
desired point has been reached.
�
Reverse�
Press and hold T button until
desired point has been reached.
Scan
�
Starting scan�
Press
SC soft key.
SC will appear in the display.
Each track on the current CD will be
played for approximately eight sec-
onds in ascending order.
�
Ending scan�
Press
SC soft key or T or S.
iThe track number and the relative time
of the track is shown in the display dur-
ing the search.
Page 233 of 489

232 Controls in detailAudio systemSwitching on the telephone
Switching on the telephone�
Pressh button.
If the telephone was previously
switched off,
PROCESSING
appears in
the display and you will then be
prompted to enter your PIN.
Switching off the telephone
�
Pressh button for approximately
three seconds.PROCESSING
appears in the display until
the telephone is off. Afterward,
PHONE OFF
appears in the display.PIN entry
�
Enter PIN number using buttons 1
to R.
�
If necessary, correct number entered
with the
CLR
soft key. Press soft key
briefly to delete the last digit entered;
press soft key and hold to delete the
complete number.
�
Press
OK soft key after entering correct
PIN.
�
READY
or
ROAMING
will appear in the dis-
play.Adjusting the volume
�
Turn rotary control of N button dur-
ing a telephone call.
The volume will increase or decrease
depending on the direction turned.
Adjusting sound
�
Adjust sound during a telephone call.
Sound adjustment (
�page 213).
iIf the PIN is entered incorrectly three
times,
NEED PUK
will appear in the dis-
play. Enter PUK via your telephone.
Please refer to the separate telephone
operating instructions for more infor-
mation.
iThe volume can be adjusted separately
for telephone mode and audio mode.