Page 114 of 489

113 Controls in detail
Locking and unlocking
Closing the trunk
Closing the trunk from the inside
automatically*
In vehicles with trunk opening/closing sys-
tem* you can close the trunk from the in-
side using the remote trunk closing*
switch.�
Press the remote trunk closing*
switch2 (
�page 112) until the indi-
cator lamp in the switch goes out and
the trunk lid is closed.
To interrupt the closing procedure:
�
Release remote trunk closing*
switch2.If the trunk lid comes into contact with an
object while closing (e.g. luggage that has
been piled too high), in the sequence, the
upper motion the closing procedure is
stopped and the trunk reopens slightly.iYou can also close the trunk by hand
(�page 114).
Warning!
G
Maintain sight of trunk area while operating
the door mounted remote trunk closing*
switch. Monitor the closing procedure care-
fully to ensure that no one is in danger of be-
ing injured.
To interrupt the closing procedure, release
the door mounted remote trunk closing
switch.
Even with the SmartKey or the SmartKey
with KEYLESS-GO* removed from the start-
er switch or the SmartKey with
KEYLESS-GO* removed from the vehicle,
the remote trunk opening/closing* switch
can be operated. Therefore, do not leave
children unattended in the vehicle, or with
access to an unlocked vehicle. Unsuper-
vised use of vehicle equipment may cause
an accident and/or serious personal injury.
Warning!
G
Only drive with the trunk closed as, among
other dangers such as blocked visibility,
exhaust fumes may enter the vehicle
interior.
Page 119 of 489

118 Controls in detailLocking and unlocking
Trunk emergency release
With the emergency release button, the
trunk can be opened from inside the trunk.
The emergency release button is located
on the inside of the trunk lid.
1Emergency release button�
Briefly press emergency release
button1.
The trunk unlocks and opens slightly.
�
Push up the trunk lid to fully open.
iTo prevent a possible inadvertent lock-
out, the trunk will open automatically if
a SmartKey with KEYLESS-GO is recog-
nized inside the vehicle or in the trunk.Warning!
G
Monitor the closing procedure carefully to
ensure that no one is in danger of being in-
jured. To prevent possible personal injury,
always keep hands and fingers away from
the trunk opening when closing the trunk.
Be especially careful when small children
are around. To stop the closing procedure,
do one of the following:�
press KEYLESS-GO locking/closing
switch1
�
press trunk closing switch
�
press the Š button on the SmartKey
with KEYLESS-GO
�
press the remote trunk opening or clos-
ing switch (on driver’s door)
Even with the SmartKey with KEYLESS-GO
removed from the vehicle, the trunk closing
switch can be operated. Therefore, do not
leave children unattended in the vehicle, or
with access to an unlocked vehicle. Unsu-
pervised use of vehicle equipment may
cause an accident and/or serious personal
injury.Warning!
G
Only drive with the trunk closed as, among
other dangers such as blocked visibility,
exhaust fumes may enter the vehicle
interior.
Page 120 of 489

119 Controls in detail
Locking and unlocking
Illumination of the emergency release but-
ton:�
The button will flash for 30 minutes
after opening the trunk.
�
The button will flash for 60 minutes
after closing the trunk.
Valet locking
The lock is located next to the handle
above the rear license plate recess.
1Neutral position
2Locked
iThe emergency release button unlocks
and opens the trunk while the vehicle is
standing still or in motion.iThe emergency release button does
not open the trunk if the vehicle battery
is discharged or disconnected.iIf the trunk does not open, it is still
locked separately (
�page 119).
iIf the vehicle has previously been
locked using the SmartKey or
KEYLESS-GO*, opening the trunk from
the inside using the emergency release
button will trigger the anti-theft alarm
system.
To cancel the alarm, do one of the
following:�
Insert the SmartKey in the starter
switch.
�
Press button‹orŒ on the
SmartKey.
In vehicles with KEYLESS-GO*:
�
Pull an outside door handle.
The SmartKey with KEYLESS-GO*
must be within 3 ft (1 m) of the ve-
hicle.
�
Press the KEYLESS-GO* start/stop
button (
�page 35).
The SmartKey with KEYLESS-GO*
must be inside the vehicle.
iTo deny any unauthorized person ac-
cess to the trunk, e.g. when you valet
park the vehicle, lock it separately with
the mechanical key. Leave only the
SmartKey or SmartKey with
KEYLESS-GO* less its mechanical key
with the vehicle.
��
Page 266 of 489

265 Controls in detail
Loading
Removing the ski sack
You can remove the ski sack for cleaning
or drying.
1Button
2Ski sack frame
3Flap�
Open trunk lid.
�
Press button1.
The flap3 opens downward.
�
Press button1 firmly until ski sack
frame2 is released.
�
Pull ski sack frame2 with ski sack
out.Installing the ski sack
Install the ski sack in the reverse order.
�
Push ski sack frame2 with ski sack
inward until the ski sack frame snaps
into place.
�
Close flap3.
�
Close trunk lid.
Split rear bench seat
To expand the cargo area, you can fold
down the left and right rear seat backrests.
The two sections can be folded down
separately.
Warning!
G
Never drive vehicle with trunk open while
the ski sack is removed. Deadly carbon
monoxide (CO) gases may enter vehicle in-
terior, resulting in unconsciousness and
death.iTo prevent unauthorized persons from
access to the trunk, always close the
flap.
Warning!
G
When expanding the luggage compartment,
always fold the seat cushions fully forward.
Unless you are transporting cargo, the back-
rests must remain properly locked in the up-
right position.
In an accident, during hard braking or sud-
den maneuvers, loose items will be thrown
around inside the vehicle, and cause injury
to vehicle occupants unless the items are
securely fastened in the vehicle.
Always use the cargo tie down rings
(�page 268).
Page 267 of 489
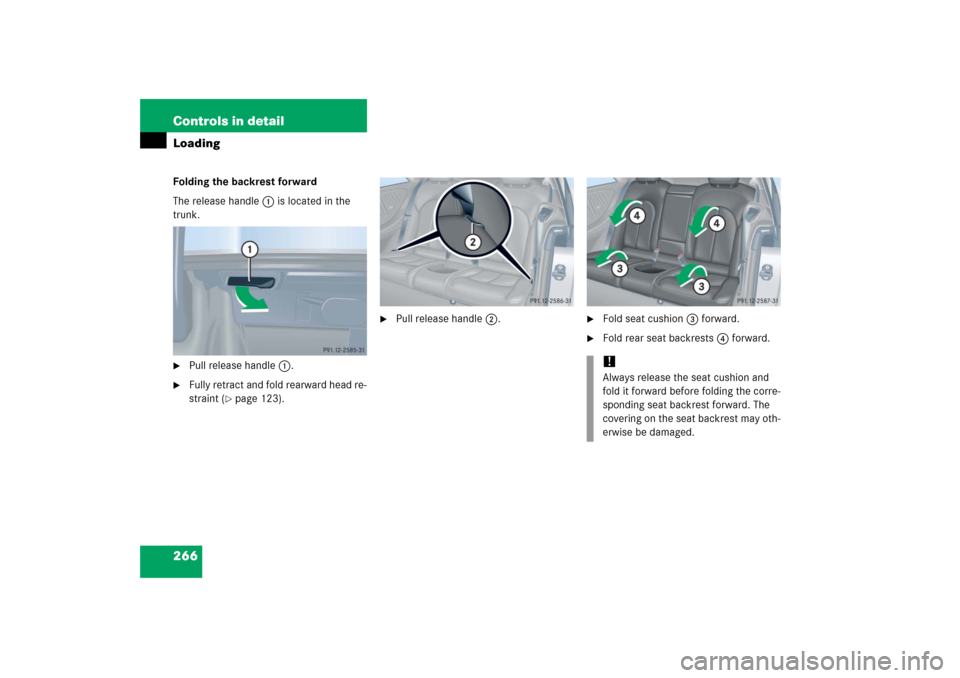
266 Controls in detailLoadingFolding the backrest forward
The release handle1 is located in the
trunk.�
Pull release handle1.
�
Fully retract and fold rearward head re-
straint (
�page 123).
�
Pull release handle2.
�
Fold seat cushion3 forward.
�
Fold rear seat backrests4 forward.!Always release the seat cushion and
fold it forward before folding the corre-
sponding seat backrest forward. The
covering on the seat backrest may oth-
erwise be damaged.
Page 270 of 489

269 Controls in detail
Useful features
�Useful features
Storage compartments Glove box
1Glove box lid
2Glove box lid release
Opening the glove box
�
Pull glove box lid release2.
The glove box lid1 opens downward.
Closing the glove box
�
Push glove box lid1 up to close.Storage box (Center armrest design A)
The storage box is in front of the armrest
storage compartment.
1Storage box
Warning!
G
To help avoid personal injury during a colli-
sion or sudden maneuver, exercise care
when storing objects in the vehicle. Put lug-
gage or cargo in the trunk if possible. Do not
pile luggage or cargo higher than the seat
backs.
Parcel nets cannot secure hard or heavy ob-
jects.
Keep compartment lids closed. This will help
to prevent stored objects from being thrown
about and injuring vehicle occupants during
an accident.
iAudio system/COMAND* with CD
changer*: The CD changer is located in
the glove box.
Warning!
G
Do not use this storage compartment as an
ashtray and/or place hot cigarettes or other
hot smoking materials in the storage box.
Placing such materials in the storage box
may cause vehicle damage and/or poten-
tially cause a vehicle fire.
Page 439 of 489
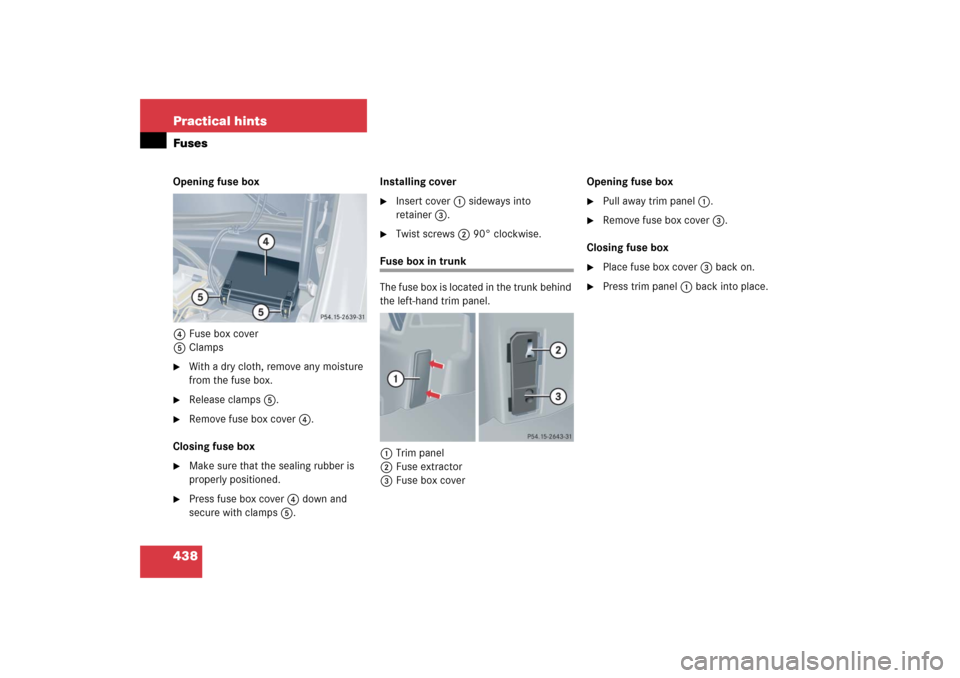
438 Practical hintsFusesOpening fuse box
4Fuse box cover
5Clamps�
With a dry cloth, remove any moisture
from the fuse box.
�
Release clamps5.
�
Remove fuse box cover4.
Closing fuse box
�
Make sure that the sealing rubber is
properly positioned.
�
Press fuse box cover4 down and
secure with clamps5.Installing cover
�
Insert cover1 sideways into
retainer3.
�
Twist screws2 90° clockwise.
Fuse box in trunk
The fuse box is located in the trunk behind
the left-hand trim panel.
1Trim panel
2Fuse extractor
3Fuse box coverOpening fuse box
�
Pull away trim panel1.
�
Remove fuse box cover3.
Closing fuse box
�
Place fuse box cover3 back on.
�
Press trim panel1 back into place.
Page 486 of 489

485 Index
Tread depth 319, 346
Treadwear indicators 344
Trip computer 165
Trip odometer 141
Trunk
Closing from inside 113
Fuse box 438
Lamp 139
Lid 111
Lock button, KEYLESS-GO* 109
Message in display 397
Opening 111
Opening, from inside 112
Tie-down rings 268
Trunk lid 113
Trunk lid emergency release 118
Unlocking in an emergency 405
Unlocking/opening,
KEYLESS-GO* 109
Unlocking/opening,
SmartKey 102
Valet locking 119Turn signal lamps
Cleaning lenses 355
Messages in display 394
Replacing bulbs (Bi-Xenon*) 416
Replacing bulbs (Halogen) 415
Replacing bulbs (rear) 417
Turn signals 53
Additional in mirrors 412
Bulbs 412, 413
Bulbs (Bi-Xenon)) 416
Cleaning lenses 355
Indicator lamps 25
Turning off engine 58
U
Uniform Tire Quality
Grading Standards 344
Units, Settings
Speedometer 155
Unleaded gasoline, Premium 455
Upholstery, Cleaning 358
Useful features 269V
Vacuum line routing diagram label 442
Vehicle
Battery 315, 426
Break-in period 294
Care 351
Control system, Settings menu 152
Dimensions 451
Jump starting 430
Locking/Unlocking,
KEYLESS-GO* 33, 60, 103
Locking/Unlocking,
SmartKey 32, 60, 98
Lowering 424
Modifications and alterations,
Operating safety 16
Towing 432
Unlocking/locking
in an emergency 404, 405
Washing 353
Weights 451
Vehicle capacity weight 344
Vehicle Identification Number see VIN
Vehicle jack 398, 400, 421
Vehicle lighting 307