Page 434 of 489

433 Practical hints
Towing the vehicle
Warning!
G
Prior to towing the vehicle with all wheels on
the ground, make certain that the SmartKey
is in starter switch position
2.
If the SmartKey is left in starter switch posi-
tion
0 for an extended period of time, it can
no longer be turned in the switch. In this
case, the steering is locked. To unlock, re-
move SmartKey from starter switch and re-
insert.
If circumstances require towing the vehicle
with all wheels on the ground, always tow
with a tow bar if:
�
the engine will not run
�
there is a malfunction in the power sup-
ply or in the vehicle’s electrical system
as that will be necessary to adequately con-
trol the towed vehicle.
Warning!
G
With the engine not running, there is no
power assistance for the brake and steering
systems. In this case, it is important to keep
in mind that a considerably higher degree of
effort is necessary to brake and steer the ve-
hicle. Adapt your driving accordingly.iTo signal turns while being towed with
the hazard warning flasher in use,
switch on the ignition and activate the
combination switch for the left or right
turn signal in the usual manner – only
the selected turn signal will operate.
Upon canceling the turn signal, the haz-
ard warning flasher will operate again.
!When towing the vehicle with all wheels
on the ground, please note the follow-
ing:
With the automatic central locking acti-
vated and the SmartKey in starter
switch position2, or KEYLESS-GO*
start/stop button in position2, the ve-
hicle doors lock if the left front wheel
as well as the right rear wheel are turn-
ing at vehicle speeds of approx. 9 mph
(15 km / h) or more.
Switch off the tow-away alarm
(�page 95).
To prevent the vehicle door locks from
locking, deactivate the automatic cen-
tral locking (
�page 163).
Towing of the vehicle should only be
done using the properly installed tow-
ing eye bolt. Never attach tow cable,
tow rope or tow rod to the vehicle chas-
sis, frame or suspension parts.
Page 435 of 489
434 Practical hintsTowing the vehicle
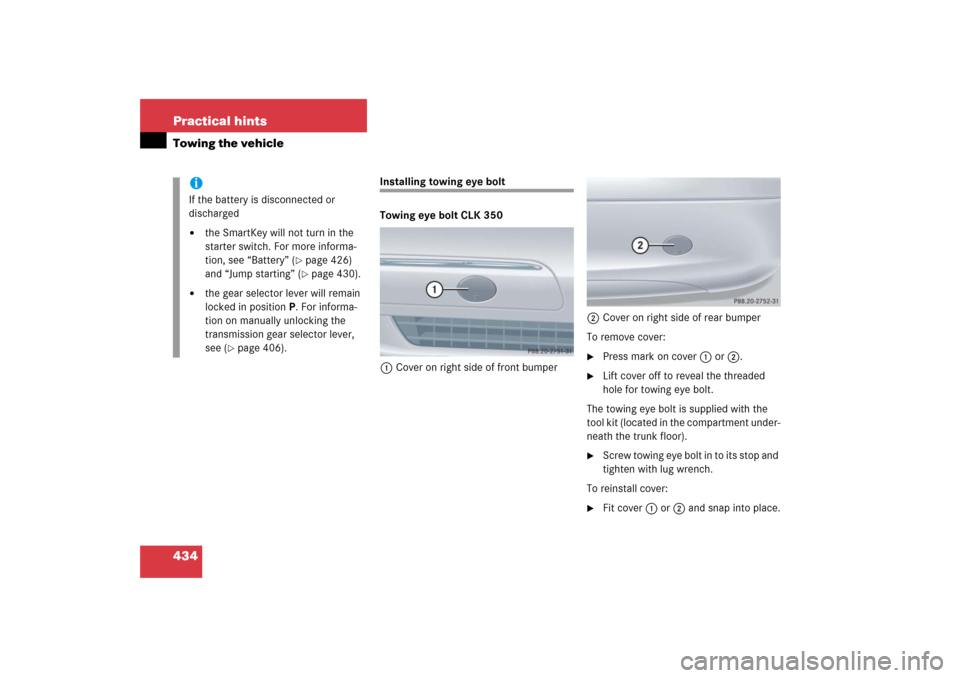
Installing towing eye bolt
Towing eye bolt CLK 350
1Cover on right side of front bumper2Cover on right side of rear bumper
To remove cover:
�
Press mark on cover 1 or 2.
�
Lift cover off to reveal the threaded
hole for towing eye bolt.
The towing eye bolt is supplied with the
tool kit (located in the compartment under-
neath the trunk floor).
�
Screw towing eye bolt in to its stop and
tighten with lug wrench.
To reinstall cover:
�
Fit cover 1 or 2 and snap into place.
iIf the battery is disconnected or
discharged�
the SmartKey will not turn in the
starter switch. For more informa-
tion, see “Battery” (
�page 426)
and “Jump starting” (�page 430).
�
the gear selector lever will remain
locked in positionP. For informa-
tion on manually unlocking the
transmission gear selector lever,
see (
�page 406).
Page 436 of 489

435 Practical hints
Towing the vehicle
Towing eye bolt CLK 500
Towing eye bolt in front bumper
The cover for the towing eye bolt in the
front bumper is identical to the cover on
the CLK 350.
To remove and to reinstall cover, see “Tow-
ing eye bolt CLK 350” (
�page 434).
Towing eye bolt in rear bumper
1Cover on right side of rear bumper
2Recess in the coverTo remove cover 1:
�
Insert flat, blunt object as a lever in
recess 2 on the edge of cover 1.
�
Loosen cover 1 from the bumper us-
ing lever, to reveal the threaded hole
for towing eye bolt.
The towing eye bolt is supplied with the
tool kit (located in the compartment
underneath the trunk floor).
�
Screw towing eye bolt in to its stop and
tighten with lug wrench.To reinstall cover 1:
�
Hook right-hand side of the cover1
into opening.
�
Slide cover1 as far as it will go in the
direction of the arrow3.
�
Gently press left-hand side of cover1
in direction of the arrow4.
The hooks on the left-hand side
engage.iWhen closing the cover1, make sure
the cover’s check strap does not get
caught.
Page 473 of 489

472 IndexE
Easy-entry/exit feature 42, 164
Electrical fuses see Fuses
Electrical outlet 277
Electrical system, Technical data 450
Electronic Stability Program see ESP
®
Emergency call system* 279
Emergency calls
911 calls 244
Tele Aid calls 281, 282
Emergency operation
(Limp-Home Mode) 179
Emergency operations
Active head restraints, Resetting 408
Center console,
Indicator lamps 368–369
Gear selector lever, Unlocking 406
Instrument cluster,
Indicator lamps 360–367
Power tilt/sliding sunroof*,
Manual operation 407
Remote door unlock 286
Trunk lid, Releasing from inside 118
Trunk lid, Unlocking 405
Unlocking/locking the vehicle 404Emergency tensioning device see ETD
Emergency, In case of
Battery, Jump starting 430
First aid kit 398
Flat tire, Changing 420
Fuses 436
Hazard warning flasher 137
Roadside Assistance 12, 282
Towing the vehicle 432
Emission control 303
Emission control information label 442
Emission control vacuum
line routing diagram label 442
Emission system warranties 10
Engine
Belt layout 443
Block heater (Canada only) 347
Break-in recommendations 294
Cleaning 353
Compartment 308
Malfunction indicator lamp 25, 362
Maximum engine speed 444
Message in display 384
Number 442, 462
Starting 48
Starting difficulties 50Starting with KEYLESS-GO* 49
Starting with SmartKey 49
Technical data 444
Turning off 58
Turning off with KEYLESS-GO* 58
Turning off with SmartKey 58
Engine coolant see Coolant
Engine oil 309, 454
Adding 312, 454
Additives 454
Changing 312, 454
Checking level 307, 310
Checking level (Dipstick) 311
Consumption 309
Filler cap 313
Filler neck 313
Messages in display 310, 388
Viscosity 462
Engine oil level 307, 310
ESP
®
90, 462
Messages in display 374–375
Warning lamp 365
ETD 72, 462
Safety guidelines 66
Exterior rear view mirrors 43, 181
Parking position 164, 182
Page 485 of 489

484 IndexTelephone* 26, 167, 278
Answering/ending a call 168
Hands-free microphone 29
Messages in display 397
Operation 167, 231
Phone book 168
Redialing 169
TEL menu* 167
Temperature
Interior temperature 190, 200
Tie-down rings, Trunk 268
Tightening torque, Wheel bolts 424, 466
Tilt/sliding sunroof* see
Power tilt/sliding sunroof*
Time 157
Time, Setting 157, 158
TIN 344
Tire and Loading Information
Placard 321
Terminology 342
Tire inflation pressure see
the placard on the fuel filler flapTires 317, 445
Air pressure 342
Care and maintenance 318
Chains 347
Cleaning 319
Direction of rotation, Spinning 320
Driving instructions 298
Important notes,
Tire inflation pressure 327
Inflation pressure 307, 326, 328
Inflation pressure,
Information placard 326
Inspection 318
Load rating 344
MOExtended system* 425
Ply composition
and material used 344
Problems under-/overinflated 331
Retreads 317
Rims and tires 445
Rotation 345
Run Flat Indicator 329
Service life 318
Sizes 447
Snow 346
Spare wheel 401, 421, 449Speed rating 300, 335, 344
Storing 319
Temperature 327, 341
Terminology 342
Tire Identification Number see TIN
Traction 299, 344
Tread 344
Tread depth 319, 346
Treadwear indicators 344
Wear pattern 345
Winter 346
Tools 398
Top tether
Children in the vehicle 82
Tether attachment points 82
Tow-away alarm 27
Tow-away alarm* 95
Towing eye bolt 398, 434, 435
Towing the vehicle 432
Tow-start 430, 432
Traction 176, 299, 344
Transmission gear selector lever see
Gear selector lever
Transmission see Automatic transmission
Traveling abroad 302
Tread 344
Page 486 of 489

485 Index
Tread depth 319, 346
Treadwear indicators 344
Trip computer 165
Trip odometer 141
Trunk
Closing from inside 113
Fuse box 438
Lamp 139
Lid 111
Lock button, KEYLESS-GO* 109
Message in display 397
Opening 111
Opening, from inside 112
Tie-down rings 268
Trunk lid 113
Trunk lid emergency release 118
Unlocking in an emergency 405
Unlocking/opening,
KEYLESS-GO* 109
Unlocking/opening,
SmartKey 102
Valet locking 119Turn signal lamps
Cleaning lenses 355
Messages in display 394
Replacing bulbs (Bi-Xenon*) 416
Replacing bulbs (Halogen) 415
Replacing bulbs (rear) 417
Turn signals 53
Additional in mirrors 412
Bulbs 412, 413
Bulbs (Bi-Xenon)) 416
Cleaning lenses 355
Indicator lamps 25
Turning off engine 58
U
Uniform Tire Quality
Grading Standards 344
Units, Settings
Speedometer 155
Unleaded gasoline, Premium 455
Upholstery, Cleaning 358
Useful features 269V
Vacuum line routing diagram label 442
Vehicle
Battery 315, 426
Break-in period 294
Care 351
Control system, Settings menu 152
Dimensions 451
Jump starting 430
Locking/Unlocking,
KEYLESS-GO* 33, 60, 103
Locking/Unlocking,
SmartKey 32, 60, 98
Lowering 424
Modifications and alterations,
Operating safety 16
Towing 432
Unlocking/locking
in an emergency 404, 405
Washing 353
Weights 451
Vehicle capacity weight 344
Vehicle Identification Number see VIN
Vehicle jack 398, 400, 421
Vehicle lighting 307