Page 333 of 489
332 OperationTires and wheelsMOExtended system*
The MOExtended system allows you to
continue driving your vehicle even if there
is a total loss of pressure in one or more
tires.
You may only use the MOExtended system
in conjunction with the Run Flat Indicator*
(�page 329).
For information on driving in case of pres-
sure loss in one or more tires (emergency
mode), see the “Practical hints” section
(�page 425).
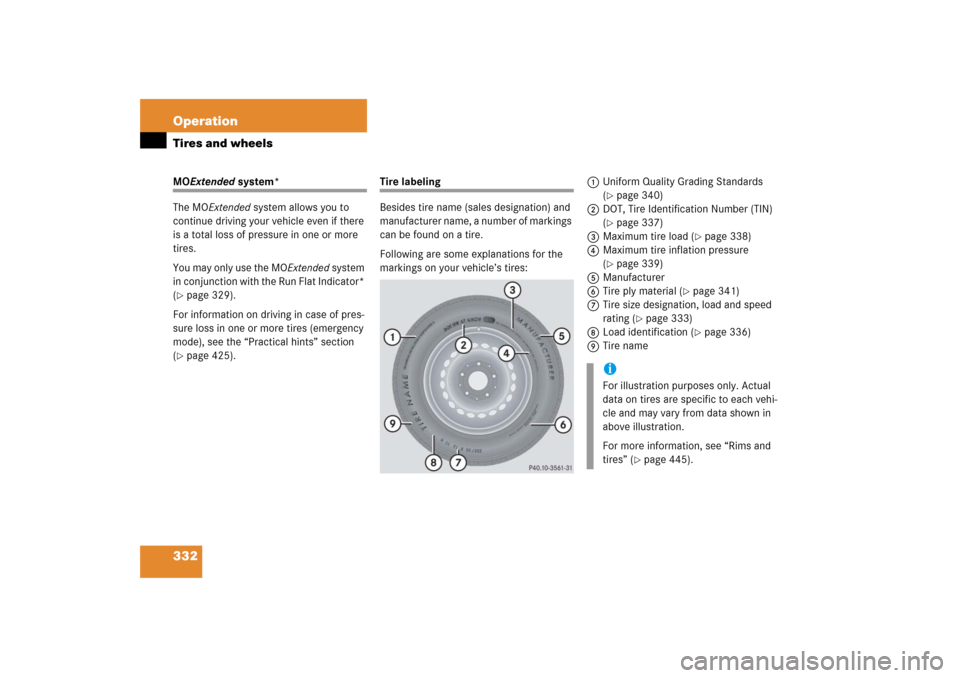
Tire labeling
Besides tire name (sales designation) and
manufacturer name, a number of markings
can be found on a tire.
Following are some explanations for the
markings on your vehicle’s tires:1Uniform Quality Grading Standards
(
�page 340)
2DOT, Tire Identification Number (TIN)
(�page 337)
3Maximum tire load (
�page 338)
4Maximum tire inflation pressure
(
�page 339)
5Manufacturer
6Tire ply material (
�page 341)
7Tire size designation, load and speed
rating (
�page 333)
8Load identification (
�page 336)
9Tire name
iFor illustration purposes only. Actual
data on tires are specific to each vehi-
cle and may vary from data shown in
above illustration.
For more information, see “Rims and
tires” (
�page 445).
Page 373 of 489
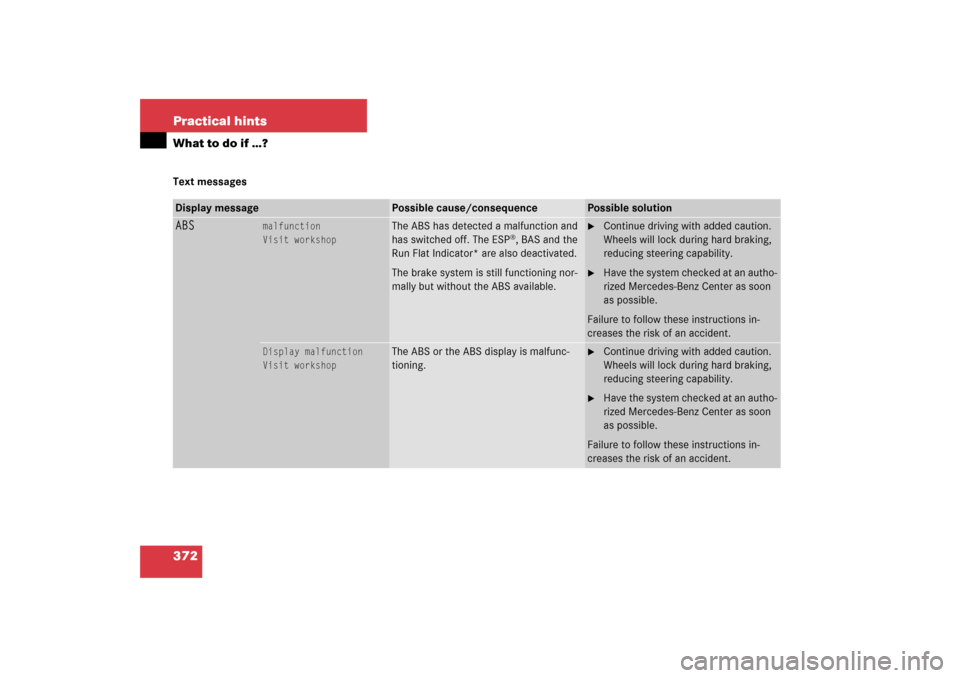
372 Practical hintsWhat to do if …?Text messagesDisplay message
Possible cause/consequence
Possible solution
ABS
malfunction
Visit workshop
The ABS has detected a malfunction and
has switched off. The ESP
®, BAS and the
Run Flat Indicator* are also deactivated.
The brake system is still functioning nor-
mally but without the ABS available.
�
Continue driving with added caution.
Wheels will lock during hard braking,
reducing steering capability.
�
Have the system checked at an autho-
rized Mercedes-Benz Center as soon
as possible.
Failure to follow these instructions in-
creases the risk of an accident.
Display malfunction
Visit workshop
The ABS or the ABS display is malfunc-
tioning.
�
Continue driving with added caution.
Wheels will lock during hard braking,
reducing steering capability.
�
Have the system checked at an autho-
rized Mercedes-Benz Center as soon
as possible.
Failure to follow these instructions in-
creases the risk of an accident.
Page 375 of 489
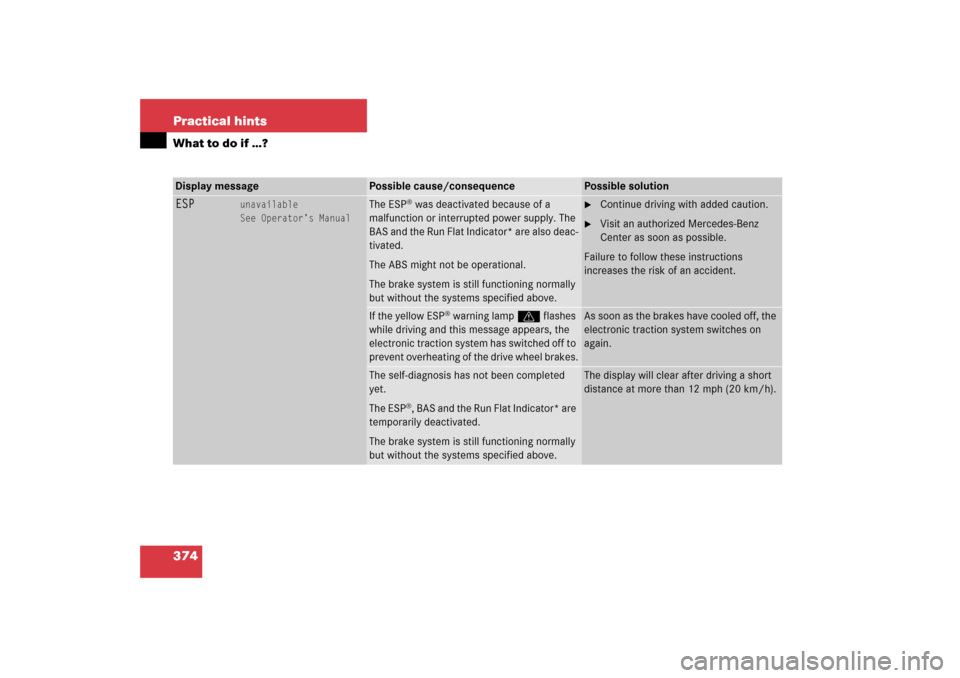
374 Practical hintsWhat to do if …?Display message
Possible cause/consequence
Possible solution
ESP
unavailable
See Operator’s Manual
The ESP
® was deactivated because of a
malfunction or interrupted power supply. The
BAS and the Run Flat Indicator* are also deac-
tivated.
The ABS might not be operational.
The brake system is still functioning normally
but without the systems specified above.
�
Continue driving with added caution.
�
Visit an authorized Mercedes-Benz
Center as soon as possible.
Failure to follow these instructions
increases the risk of an accident.
If the yellow ESP
® warning lampv flashes
while driving and this message appears, the
electronic traction system has switched off to
prevent overheating of the drive wheel brakes.
As soon as the brakes have cooled off, the
electronic traction system switches on
again.
The self-diagnosis has not been completed
yet.
The ESP
®, BAS and the Run Flat Indicator* are
temporarily deactivated.
The brake system is still functioning normally
but without the systems specified above.
The display will clear after driving a short
distance at more than 12 mph (20 km/h).
Page 376 of 489
375 Practical hints
What to do if …?
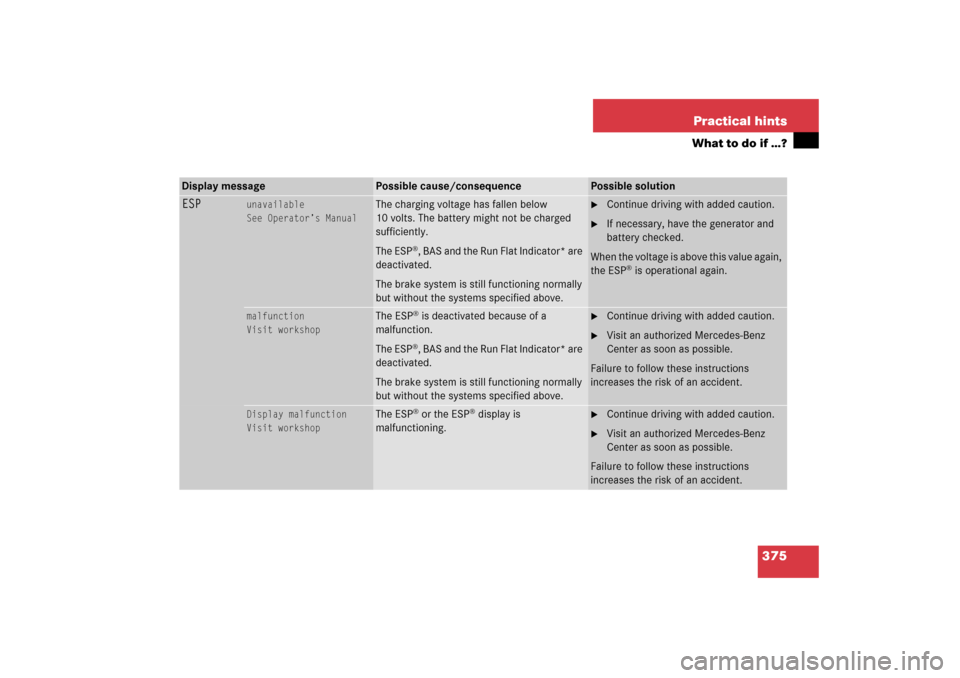
Display message
Possible cause/consequence
Possible solution
ESP
unavailable
See Operator’s Manual
The charging voltage has fallen below
10 volts. The battery might not be charged
sufficiently.
The ESP
®, BAS and the Run Flat Indicator* are
deactivated.
The brake system is still functioning normally
but without the systems specified above.
�
Continue driving with added caution.
�
If necessary, have the generator and
battery checked.
When the voltage is above this value again,
the ESP
® is operational again.
malfunction
Visit workshop
The ESP
® is deactivated because of a
malfunction.
The ESP®, BAS and the Run Flat Indicator* are
deactivated.
The brake system is still functioning normally
but without the systems specified above.
�
Continue driving with added caution.
�
Visit an authorized Mercedes-Benz
Center as soon as possible.
Failure to follow these instructions
increases the risk of an accident.
Display malfunction
Visit workshop
The ESP
® or the ESP
® display is
malfunctioning.
�
Continue driving with added caution.
�
Visit an authorized Mercedes-Benz
Center as soon as possible.
Failure to follow these instructions
increases the risk of an accident.
Page 382 of 489
381 Practical hints
What to do if …?
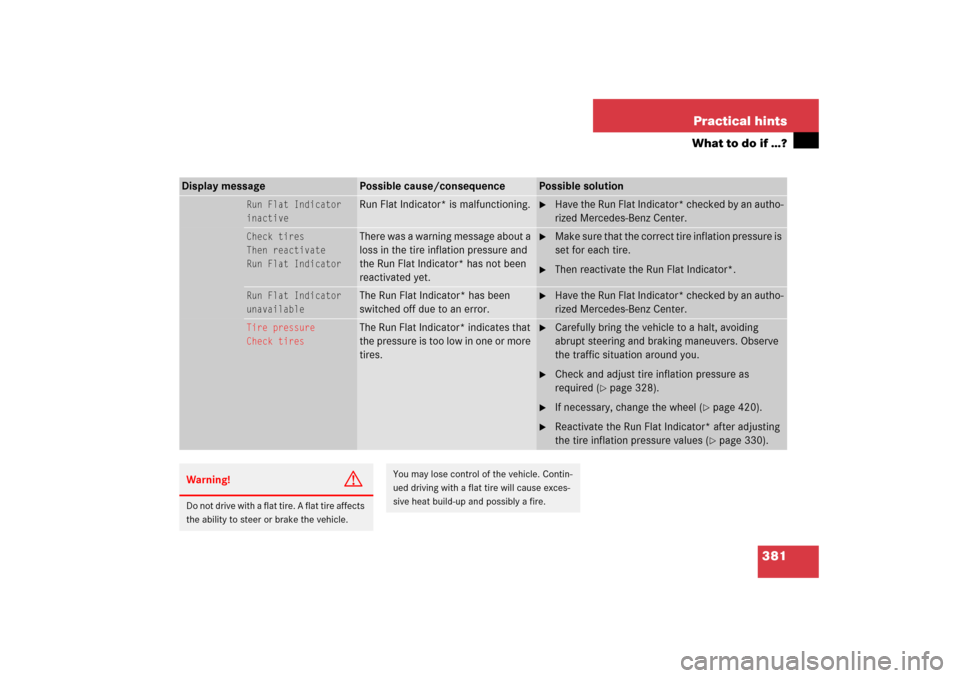
Display message
Possible cause/consequence
Possible solution
Run Flat Indicator
inactive
Run Flat Indicator* is malfunctioning.
�
Have the Run Flat Indicator* checked by an autho-
rized Mercedes-Benz Center.
Check tires
Then reactivate
Run Flat Indicator
There was a warning message about a
loss in the tire inflation pressure and
the Run Flat Indicator* has not been
reactivated yet.
�
Make sure that the correct tire inflation pressure is
set for each tire.
�
Then reactivate the Run Flat Indicator*.
Run Flat Indicator
unavailable
The Run Flat Indicator* has been
switched off due to an error.
�
Have the Run Flat Indicator* checked by an autho-
rized Mercedes-Benz Center.
Tire pressure
Check tires
The Run Flat Indicator* indicates that
the pressure is too low in one or more
tires.
�
Carefully bring the vehicle to a halt, avoiding
abrupt steering and braking maneuvers. Observe
the traffic situation around you.
�
Check and adjust tire inflation pressure as
required (
�page 328).
�
If necessary, change the wheel (
�page 420).
�
Reactivate the Run Flat Indicator* after adjusting
the tire inflation pressure values (
�page 330).
Warning!
G
Do not drive with a flat tire. A flat tire affects
the ability to steer or brake the vehicle.
You may lose control of the vehicle. Contin-
ued driving with a flat tire will cause exces-
sive heat build-up and possibly a fire.
Page 404 of 489
403 Practical hints
Where will I find...?
In case of a flat tire, you may temporarily
use the Minispare wheel when observing
the following restrictions:�
Do not exceed a vehicle speed of
50 mph (80 km/h).
�
Drive to the nearest tire repair facility
to have the flat tire repaired or
replaced as appropriate.
�
Do not operate vehicle with more than
one Minispare wheel mounted.
For more information, see “Rims and tires”
(
�page 445).
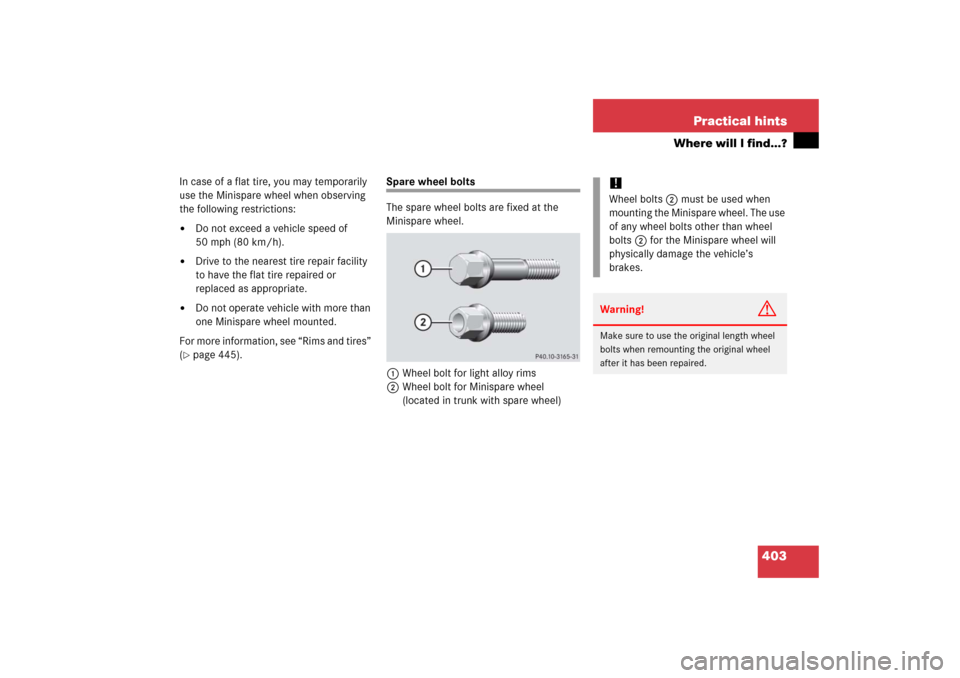
Spare wheel bolts
The spare wheel bolts are fixed at the
Minispare wheel.
1Wheel bolt for light alloy rims
2Wheel bolt for Minispare wheel
(located in trunk with spare wheel)
!Wheel bolts2 must be used when
mounting the Minispare wheel. The use
of any wheel bolts other than wheel
bolts2 for the Minispare wheel will
physically damage the vehicle’s
brakes.Warning!
G
Make sure to use the original length wheel
bolts when remounting the original wheel
after it has been repaired.
Page 422 of 489
421 Practical hints
Flat tire
Mounting the Minispare wheel
Preparing the vehicle
Prepare the vehicle as described
(�page 420).
�
Take the wheel wrench, alignment bolt,
collapsible wheel chock, and the jack
out of the trunk (
�page 398).
�
Take the Minispare wheel and wheel
bolts out of the trunk (
�page 401).Lifting the vehicle
�
Prevent the vehicle from rolling away
by blocking wheels with wheel chocks
or other sizeable objects.
One wheel chock is included with the
vehicle tool kit (
�page 398).
When changing wheel on a level surface:
�
Place the wheel chock in front of and
another sizeable object behind the
wheel that is diagonally opposite to the
wheel being changed.
Always try lifting the vehicle using the jack
on a level surface. However, should
circumstances require you to do so on a
hill, place the wheel chock and the other
sizeable object as follows:
�
Place the wheel chock and another
sizeable object on the downhill side
blocking both wheels of the axle not
being worked on.
Warning!
G
The jack is designed exclusively for jacking
up the vehicle at the jack take-up brackets
built into both sides of the vehicle. To help
avoid personal injury, use the jack only to lift
the vehicle during a wheel change. Never
get beneath the vehicle while it is supported
by the jack. Keep hands and feet away from
the area under the lifted vehicle. Always
firmly set parking brake and block wheels
before raising vehicle with jack.
Do not disengage parking brake while the
vehicle is raised. Be certain that the jack is
always vertical (plumb line) when in use,
especially on hills. Always try to use the jack
on level surface. Make sure the jack arm is
fully seated in the jack take-up bracket.
Always lower the vehicle onto sufficient
capacity jackstands before working under
the vehicle.
Page 424 of 489
423 Practical hints
Flat tire
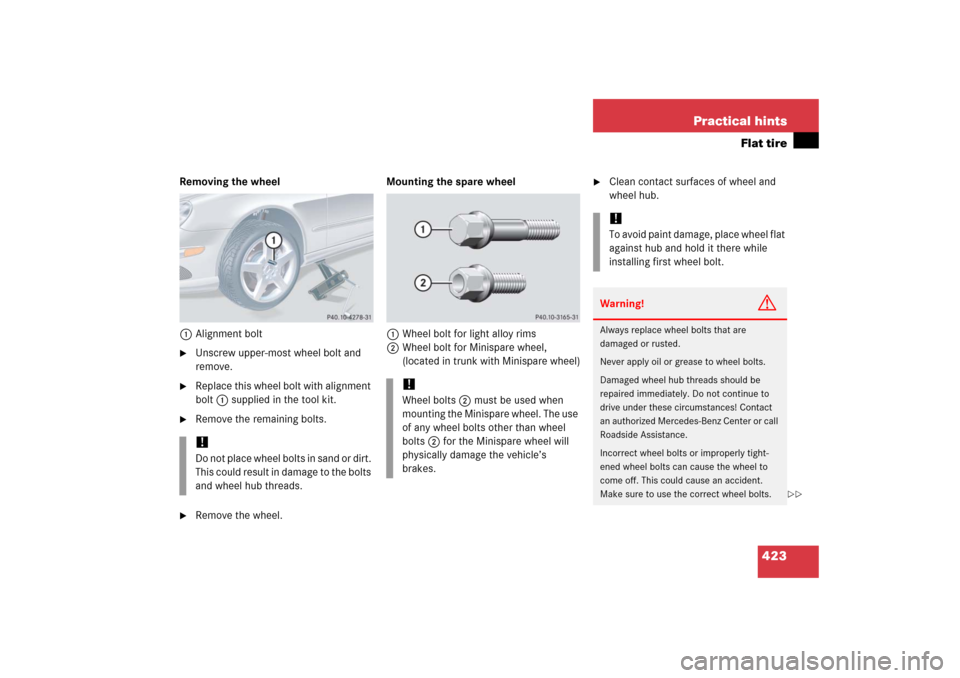
Removing the wheel
1Alignment bolt�
Unscrew upper-most wheel bolt and
remove.
�
Replace this wheel bolt with alignment
bolt1 supplied in the tool kit.
�
Remove the remaining bolts.
�
Remove the wheel.Mounting the spare wheel
1Wheel bolt for light alloy rims
2Wheel bolt for Minispare wheel,
(located in trunk with Minispare wheel)
�
Clean contact surfaces of wheel and
wheel hub.
!Do not place wheel bolts in sand or dirt.
This could result in damage to the bolts
and wheel hub threads.
!Wheel bolts2 must be used when
mounting the Minispare wheel. The use
of any wheel bolts other than wheel
bolts2 for the Minispare wheel will
physically damage the vehicle’s
brakes.
!To avoid paint damage, place wheel flat
against hub and hold it there while
installing first wheel bolt.Warning!
G
Always replace wheel bolts that are
damaged or rusted.
Never apply oil or grease to wheel bolts.
Damaged wheel hub threads should be
repaired immediately. Do not continue to
drive under these circumstances! Contact
an authorized Mercedes-Benz Center or call
Roadside Assistance.
Incorrect wheel bolts or improperly tight-
ened wheel bolts can cause the wheel to
come off. This could cause an accident.
Make sure to use the correct wheel bolts.
��