Page 95 of 489
1Indicator lamp (vehicles without
tow-away")
94 Safety and SecurityAnti-theft systemsArming the alarm system
The indicator lamp is in the center console.
1Indicator lamp (vehicles with tow-away
alarm)1Indicator lamp (vehicles without
tow-away alarm)
�
Lock the vehicle with the SmartKey or
KEYLESS-GO*.
The turn signal lamps flash three times,
and an acoustic signal sounds three
times (if equipped and feature activat-
ed), to indicate that the alarm system is
armed.
Indicator lamp1 begins to flash after
approximately 30 seconds after arming
the alarm system.
iIf the alarm stays on for more than
30 seconds, a call to the Response
Center is initiated automatically by the
Tele Aid system (
�page 279) provided
Tele Aid service was subscribed to and
properly activated, and that necessary
cellular service and GPS coverage are
available.
iIf the turn signal lamps do not flash
three times, and the acoustic signal do
not sounds three times (if equipped
and feature activated), one of the fol-
lowing elements may not be properly
closed:�
a door
�
the trunk
Close the respective element and lock
the vehicle again.
Page 97 of 489

96 Safety and SecurityAnti-theft systemsArming tow-away alarm�
Lock the vehicle with the SmartKey or
KEYLESS-GO*.
The tow-away alarm is automatically
armed after about 30 seconds.Disarming tow-away alarm
To prevent triggering the tow-away alarm,
switch off the tow-away alarm feature
before towing the vehicle, or when parking
on a surface subject to movement, such as
a ferry or auto train.
The switch is located on the center
console.
1Tow-away alarm off switch
2Indicator lamp
�
Switch off the ignition (
�page 36).
�
Remove the SmartKey.
�
Press tow-away alarm off switch1.
Indicator lamp2 in tow-away alarm
off switch1 comes on briefly.
�
Exit the vehicle.
�
Lock the vehicle with the SmartKey or
(vehicles with KEYLESS-GO*) the lock
button on each outside door handle or
trunk.
The tow-away alarm remains disarmed
until you lock the vehicle again.
iWhen you unlock the vehicle, the
tow-away protection disarms
automatically. The tow-away alarm
remains disarmed until you lock the
vehicle again.
iYou cannot disarm the tow-away alarm
while the ignition is switched on.
Page 122 of 489

121 Controls in detail
Locking and unlocking
Locking and unlocking from the inside
You can lock or unlock the doors and the
trunk from inside using the central locking
or unlocking switch. This can be useful, for
example, if you want to lock the vehicle
before starting to drive.
You cannot lock or unlock the fuel filler flap
with the central locking or unlocking
switch.
The switches are located in the center
console.1Central locking switch
2Central unlocking switchLocking
�
Press central locking switch1.
If both doors are closed, the vehicle
locks.
Unlocking
�
Press central unlocking switch2.
The vehicle unlocks.
Warning!
G
When leaving the vehicle, always remove the
SmartKey or SmartKey with KEYLESS-GO*
from the starter switch, take it with you, and
lock the vehicle. Do not leave children unat-
tended in the vehicle, or with access to an
unlocked vehicle. Unsupervised use of vehi-
cle equipment may cause an accident
and/or serious personal injury.
iYou can open a locked door from the
inside. Open door only when conditions
are safe to do so.
If the vehicle was previously centrally
locked with the SmartKey or the
SmartKey with KEYLESS-GO*, it will
not unlock using the central unlocking
switch2.
If the vehicle was previously locked
with the central locking switch1�
while in the selective remote
control mode, only the door opened
from inside is unlocked.
�
while in the global remote control
mode, the complete vehicle is
unlocked when a door is opened
from the inside.
Page 124 of 489
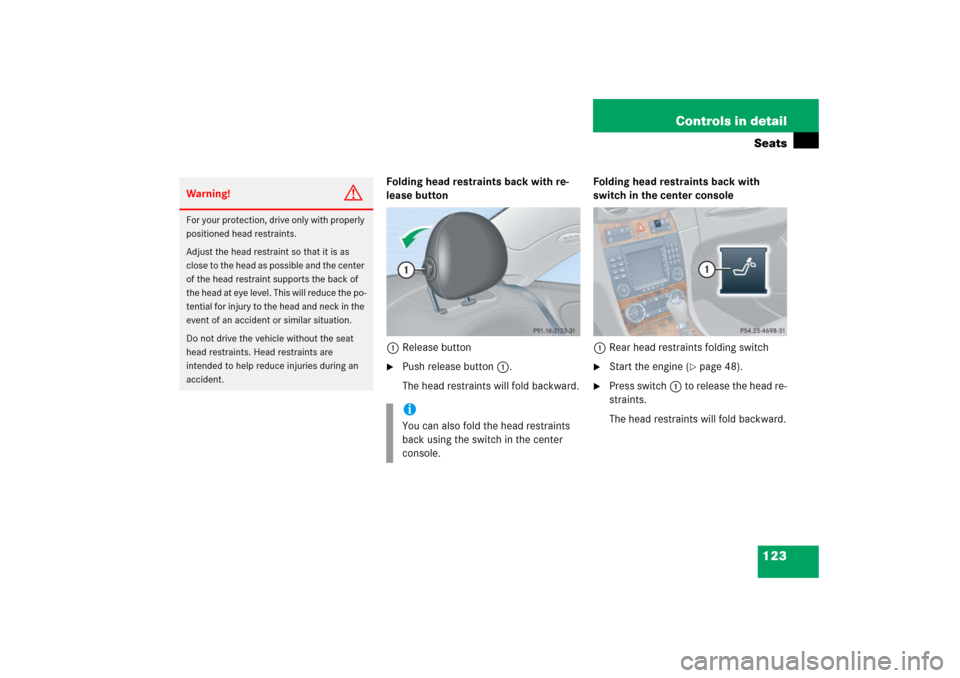
123 Controls in detailSeats
Folding head restraints back with re-
lease button
1Release button�
Push release button1.
The head restraints will fold backward.Folding head restraints back with
switch in the center console
1Rear head restraints folding switch
�
Start the engine (
�page 48).
�
Press switch1 to release the head re-
straints.
The head restraints will fold backward.
Warning!
G
For your protection, drive only with properly
positioned head restraints.
Adjust the head restraint so that it is as
close to the head as possible and the center
of the head restraint supports the back of
the head at eye level. This will reduce the po-
tential for injury to the head and neck in the
event of an accident or similar situation.
Do not drive the vehicle without the seat
head restraints. Head restraints are
intended to help reduce injuries during an
accident.
iYou can also fold the head restraints
back using the switch in the center
console.
Page 127 of 489

126 Controls in detailSeatsSeat heating*
Both switches for the front seats are
located in the center console.
1Seat heating switchThe red indicator lamps on the switch1
show which heating level you have select-
ed.
�
Switch on the ignition (
�page 36).Switching on seat heating
�
Press seat heating switch1 once.
Three red indicator lamps in the switch
come on.
�
Continue pressing seat heating
switch1 until desired seat heating
level is reached.
Switching off seat heating
�
Press seat heating switch1
repeatedly until all red indicator lamps
go out.
Level3
Three indicator lamps on
(highest level).
After approximately five minutes,
seat heating is automatically
switched to level 2.
2
Two indicator lamps on.
After approximately ten minutes,
seat heating is automatically
switched to level 1.
1
One indicator lamp on
(lowest level).
After approximately 20 minutes,
seat heating is automatically
switched off.
off
No indicator lamp on.
iIf one or more of the indicator lamps on
the seat heater switch1 are flashing,
there is insufficient voltage due to too
many electrical consumers being
switched on. The seat heating switches
off automatically.
The seat heating will switch back on
again automatically as soon as
sufficient voltage is available.
Page 128 of 489

127 Controls in detailSeats
Seat ventilation*
Both switches for the front seats are
located in the center console.
1Seat ventilation switchThe blue indicator lamps in the switch1
show which ventilation level you have
selected:
�
Switch on the ignition (
�page 36).
All lamps in the instrument cluster
come on.
Switching on seat ventilation
�
Press seat ventilation switch1.
Three blue indicator lamps come on.
�
Press seat ventilation switch1
repeatedly until the desired seat venti-
lation level is reached.Switching off seat ventilation
�
Press seat ventilation switch1
repeatedly until all blue indicator lamps
go out.
Level3
Three indicator lamps on
2
Two indicator lamps on
1
One indicator lamp on
off
No indicator lamp on
iThe seat ventilation for the driver’s seat
is automatically set to the highest level
if activated via summer opening
feature (
�page 249).
iIf one or more of the indicator lamps on
the seat ventilation switch1 are flash-
ing, there is insufficient voltage due to
too many electrical consumers being
switched on. The seat ventilation
switches off automatically.
The seat ventilation will switch back on
again automatically as soon as
sufficient voltage is available.
Page 138 of 489
137 Controls in detail
Lighting
Hazard warning flasher
The hazard warning flasher can be
switched on at all times, even with the
SmartKey or the SmartKey with
KEYLESS-GO* removed from the starter
switch or with the SmartKey with
KEYLESS-GO* removed from the vehicle.
The hazard warning flasher switches on
automatically when an air bag deploys.
The hazard warning flasher switch is
located on the upper part of the center
console.
1Hazard warning flasher switchSwitching on hazard warning flasher
�
Press hazard warning flasher
switch1.
All turn signals are flashing.Switching off hazard warning flasher
�
Press hazard warning flasher switch1
again.
iWith the hazard warning flasher
activated and the combination switch
set for either left or right turn, only the
respective turn signals will operate
when the ignition is switched on
(�page 36).
iIf the hazard warning flasher has been
activated automatically, press hazard
warning flasher switch1 once to
switch it off.
Page 177 of 489

176 Controls in detailAutomatic transmissionAutomatic shift program
The program mode selector switch is
located on the lower part of the center
console.
1Program mode selector switch
C Comfort For comfort driving
S Sport For standard driving
The current gear selector lever position
and the selected program mode (
C/S) are
indicated in the multifunction display
(
�page 171).
�
Press program mode selector
switch1 repeatedly until the letter of
the desired program mode appears in
the multifunction display.
SelectCfor comfort driving:�
The vehicle starts out in second
gear (both forward and reverse) for
gentler starts. This does not apply if
full throttle is applied or gear
range1 is selected.
�
Traction and driving stability are
improved on icy roads.
�
Upshifts occur earlier even when
you give more gas. The engine then
operates at lower rpms and the
wheels are less likely to spin.
!Never change the program mode when
the gear selector lever is out of
positionP. This could result in a
change of driving characteristics for
which you may not be prepared.iThe last selected program
mode (CorS) is switched on when the
engine is restarted.