Page 163 of 456

162 Controls in detailControl system�
Press buttonj ork repeatedly
until you see this message in the multi-
function display:
INTERIOR LIGHTING
DELAYED SWITCH-OFF
.
The selection marker is on the current
setting.
�
Pressæ orç to select the de-
sired lamp-on time period. You can se-
lect:�
0 SEC.
, the delayed switch-off fea-
ture is deactivated.
�
5 SEC.,
10 SEC.
, 15 SEC.,
or
20 SEC.
, the delayed switch-off fea-
ture is activated.Vehicle submenu
Access the
VEHICLE
submenu via the
SETINGS
menu. Use the
VEHICLE
submenu
to make general vehicle settings. The
following functions are available:Setting automatic locking
Use this function to activate or deactivate
the automatic central locking. With the au-
tomatic central locking system activated,
the vehicle is centrally locked at vehicle
speeds of approximately 9 mph
(15 km/h).
�
Press buttonæ orç to move
the selection marker to the
VEHICLE
submenu.
�
Press buttonj ork repeatedly
until you see this message in the multi-
function display:
AUTOMATIC DOOR LOCK
.
The selection marker is on the current
setting.
�
Pressæ orç to switch AUTOMATIC DOOR LOCK
ON or
OFF
.
Function
Page
Set automatic locking
162
Limiting opening height of trunk
lid*
163
��
Page 164 of 456

163 Controls in detail
Control system
Limiting opening height of trunk lid*
This function is available on vehicles with
the trunk opening/closing system*. Use
this function to activate or deactivate the
limiting opening height of trunk lid.�
Move the selection marker with
theæ orç button to
VEHICLE
submenu.
�
Press buttonj ork repeatedly
until you see this message in the multi-
function display:OPENING LIMITER
TRUNK LIDThe selection marker is on the current
setting.
�
Press buttonæ orç to switch
the opening limiter for trunk lid
ON
or
OFF
.Convenience submenu
Access the
CONVENIENCE
submenu via the
SETTINGS
menu. Use the
CONVENIENCE
sub-
menu to change the settings for a number
of convenience features. The following
functions are available:Activating easy-entry/exit feature
Use this function to activate and deacti-
vate the easy-entry/exit feature
(
�page 112).
Function
Page
Activating easy-entry/exit fea-
ture
163
Setting fold-in function for exteri-
or rear view mirrors
164
Warning!
G
You must make sure no one can become
trapped or injured by the moving steering
wheel and driver’s seat when the easy-en-
try/exit feature is activated.
To cancel seat/steering wheel movement,
do one of the following:�
Press seat adjustment switch
(�page 38).
�
Move steering column stalk
(�page 42).
�
Press one of the memory position but-
tons or the memory button M
(�page 123).
��
Page 229 of 456
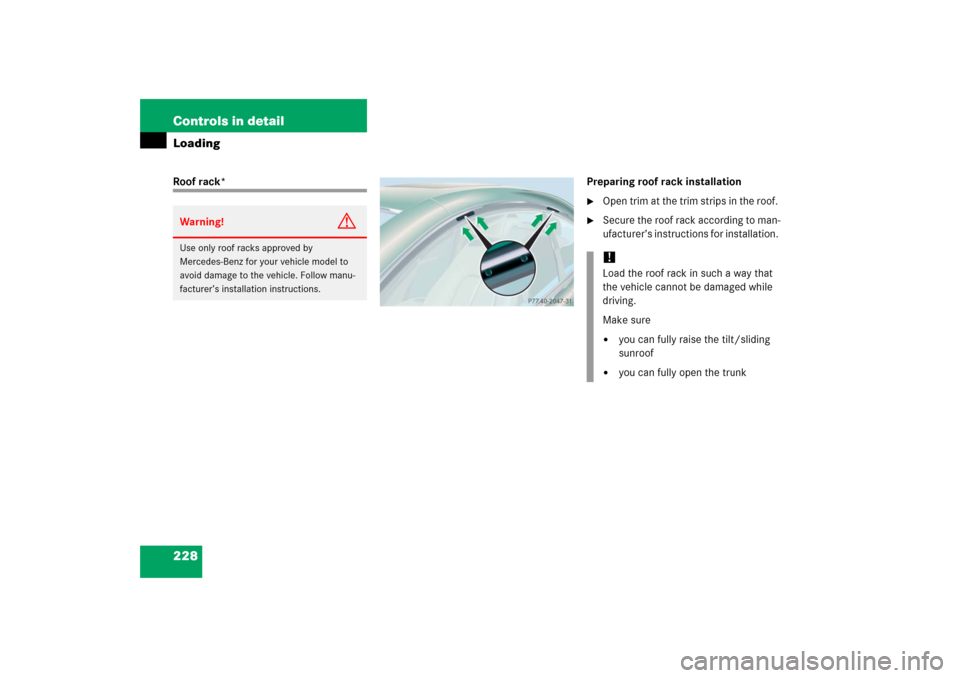
228 Controls in detailLoadingRoof rack* Preparing roof rack installation
�
Open trim at the trim strips in the roof.
�
Secure the roof rack according to man-
ufacturer’s instructions for installation.
Warning!
G
Use only roof racks approved by
Mercedes-Benz for your vehicle model to
avoid damage to the vehicle. Follow manu-
facturer’s installation instructions.
!Load the roof rack in such a way that
the vehicle cannot be damaged while
driving.
Make sure�
you can fully raise the tilt/sliding
sunroof
�
you can fully open the trunk
Page 230 of 456

229 Controls in detail
Loading
Loading instructions
The total load weight including vehicle oc-
cupants and luggage/cargo should not ex-
ceed the load limit or vehicle capacity
weight as indicated on the corresponding
placard located on the driver’s door B-pil-
lar.
Cargo tie-down hooks
Six hooks are located in the trunk.�
Carefully secure cargo by applying
even load on all hooks with rope of suf-
ficient strength to hold down the cargo.
Warning!
G
Always fasten items being carried as secure-
ly as possible.
In an accident, during hard braking or sud-
den maneuvers, loose items will be thrown
around inside the vehicle and can cause in-
jury to vehicle occupants unless the items
are securely fastened in the vehicle.
To help avoid personal injury during a colli-
sion or sudden maneuver, exercise care
when transporting cargo. Put luggage or car-
go in the trunk if possible. Do not pile lug-
gage or cargo higher than the seat backs.
Do not place anything on the rear-window
shelf.
Never drive vehicle with trunk open. Deadly
carbon monoxide (CO) gases may enter ve-
hicle interior resulting in unconsciousness
and death.
Page 232 of 456
231 Controls in detail
Useful features
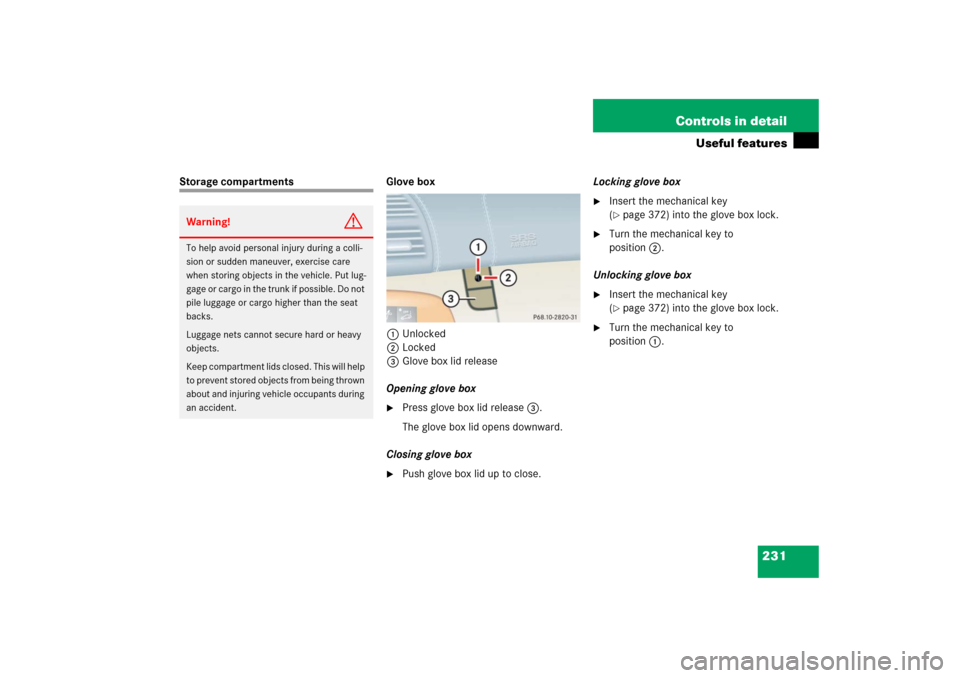
Storage compartments Glove box
1Unlocked
2Locked
3Glove box lid release
Opening glove box
�
Press glove box lid release3.
The glove box lid opens downward.
Closing glove box
�
Push glove box lid up to close.Locking glove box
�
Insert the mechanical key
(�page 372) into the glove box lock.
�
Turn the mechanical key to
position2.
Unlocking glove box
�
Insert the mechanical key
(�page 372) into the glove box lock.
�
Turn the mechanical key to
position1.
Warning!
G
To help avoid personal injury during a colli-
sion or sudden maneuver, exercise care
when storing objects in the vehicle. Put lug-
gage or cargo in the trunk if possible. Do not
pile luggage or cargo higher than the seat
backs.
Luggage nets cannot secure hard or heavy
objects.
Keep compartment lids closed. This will help
to prevent stored objects from being thrown
about and injuring vehicle occupants during
an accident.
Page 235 of 456

234 Controls in detailUseful featuresStorage compartments under the front
seats
1Lid
2Buttons
Opening�
Press buttons2 together and fold
lid1 down.
Closing
�
Close lid1 until both buttons2 of
lock engage.Parcel net in front passenger footwell
A small convenience parcel net is located
in the front passenger footwell. It is for
small and light items, such as road maps,
mail, etc.Parcel net in trunk
You can hang a parcel net in the trunk. The
hooks and the parcel net in the trunk can
hold a load of up to 29.8 lbs (13.5 kg).
1Hook
�
Hang the parcel net on hooks1 on the
left and right sides of the trunk.
Warning!
G
The parcel net is intended for storing
light-weight items only.
Heavy objects, objects with sharp edges or
fragile objects may not be transported in the
parcel net. In an accident, during hard brak-
ing, or sudden maneuvers, they could be
thrown around inside the vehicle and cause
injury to vehicle occupants
The parcel net cannot protect transported
goods in the event of an accident.
!The parcel net cannot protect or suffi-
ciently secure goods in the event of an
accident.
Page 249 of 456
,
and the reserve SmartKey is not handy:�
Contact the Mer")
248 Controls in detailUseful features
Remote door unlock
In case you have locked your vehicle unin-
tentionally (e.g. SmartKey inside vehicle),
and the reserve SmartKey is not handy:�
Contact the Mercedes-Benz Response
Center at 1-800-756-9018 (in the USA)
or 1-888-923-8367 (in Canada).
You will be asked to provide your pass-
word which you provided when you
completed the subscriber agreement.
�
Then return to your vehicle and press
the trunk lid button for a minimum of
20 seconds until the SOS button is
flashing.
The message
CALL CONNECTED
ap-
pears in the multifunction display.
As an alternative, you may unlock the vehi-
cle via Internet using the ID and password
sent to you shortly after the completion of
your acquaintance call.
The Response Center will then unlock your
vehicle with the remote door unlocking
feature.
iWhen a Tele Aid call has been initiated,
the audio system or the COMAND*
system audio is muted and the
selected mode (radio or CD) pauses.
The optional cellular phone (if installed)
switches off. If you must use this
phone, the vehicle must be parked.
Disconnect the coiled cord and place
the call. The COMAND* navigation
system (if engaged) will continue to
run. The display in the instrument
cluster is available for use, and spoken
commands are only available by press-
ing the RPT button on the COMAND*
unit. A pop-up window will appear in
the COMAND* display to indicate that
a Tele Aid call is in progress.
iThe remote door unlock feature is avail-
able if the relevant cellular phone net-
work is available.
The SOS button will flash and the mes-
sage
CALL CONNECTED
will appear in
the multifunction display to indicate re-
ceipt of the door unlock command.
Once the vehicle is unlocked, a
Response Center specialist will at-
tempt to establish voice contact with
the vehicle occupants.
If the trunk lid button was pressed for
more than 20 seconds before door un-
lock authorization was received by the
Response Center, you must wait
15 minutes before pressing the trunk
lid button again.
Page 268 of 456

267 Operation
Driving instructions
Passenger compartmentDriving abroad
Abroad, there is an extensive
Mercedes-Benz service network at your
disposal. If you plan to drive into areas
which are not listed in the index of your
Mercedes-Benz Center directory, you
should request pertinent information from
an authorized Mercedes-Benz Center.Control and operation of radio trans-
mitters
COMAND, radio and telephone*Telephones and two-way radios
Radio transmitters, such as a portable tele-
phone or a citizens band unit should only
be used inside the vehicle if they are con-
nected to an antenna that is installed on
the outside of the vehicle.
Refer to the radio transmitter operation in-
structions regarding use of an external an-
tenna.
Warning!
G
Always fasten items being carried as secure-
ly as possible.
In an accident, during hard braking or sud-
den maneuvers, loose items will be thrown
around inside the vehicle, and cause injury
to vehicle occupants unless the items are
securely fastened in the vehicle.
The trunk is the preferred place to carry ob-
jects.
Warning!
G
Please do not forget that your primary
responsibility is to drive the vehicle safely.
Only operate the COMAND (Cockpit
Management and Data System), radio or
telephone
1 if road, weather and traffic con-
ditions permit.
Bear in mind that at a speed of just 30 mph
(approximately 50 km/h), your vehicle is
covering a distance of 44 feet (approximate-
ly 14 m) every second.
1Observe all legal requirements.
Warning!
G
Never operate radio transmitters equipped
with a built-in or attached antenna (i.e. with-
out being connected to an external antenna)
from inside the vehicle while the engine is
running. Doing so could lead to a malfunc-
tion of the vehicle’s electronic system, pos-
sibly resulting in an accident and/or
personal injury.