Page 110 of 456

109 Controls in detail
Locking and unlocking
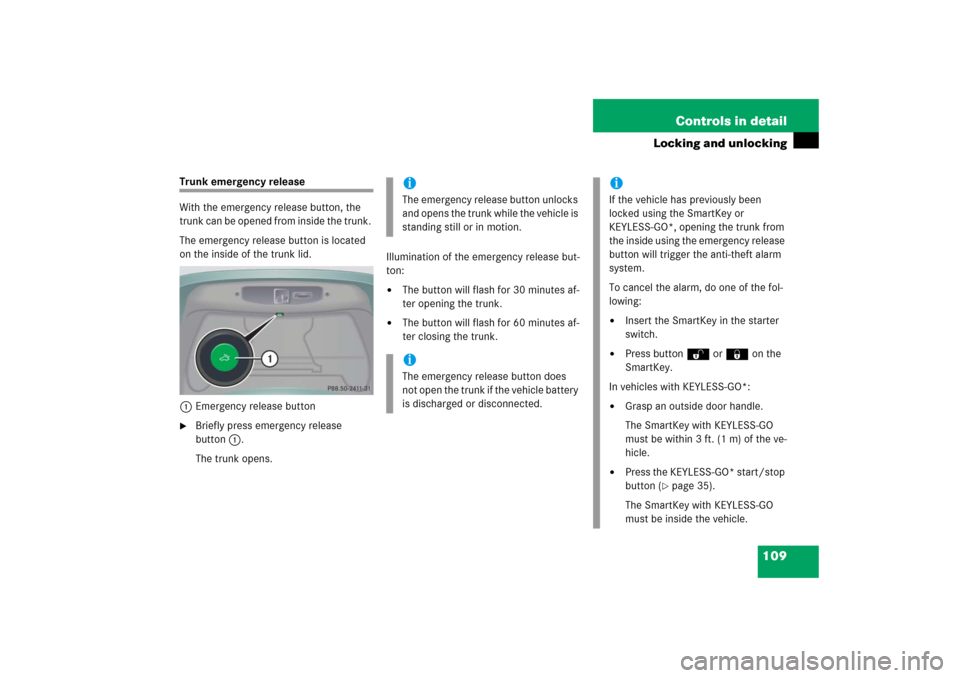
Trunk emergency release
With the emergency release button, the
trunk can be opened from inside the trunk.
The emergency release button is located
on the inside of the trunk lid.
1Emergency release button�
Briefly press emergency release
button1.
The trunk opens.Illumination of the emergency release but-
ton:
�
The button will flash for 30 minutes af-
ter opening the trunk.
�
The button will flash for 60 minutes af-
ter closing the trunk.iThe emergency release button unlocks
and opens the trunk while the vehicle is
standing still or in motion.iThe emergency release button does
not open the trunk if the vehicle battery
is discharged or disconnected.
iIf the vehicle has previously been
locked using the SmartKey or
KEYLESS-GO*, opening the trunk from
the inside using the emergency release
button will trigger the anti-theft alarm
system.
To cancel the alarm, do one of the fol-
lowing:�
Insert the SmartKey in the starter
switch.
�
Press button Œ or ‹ on the
SmartKey.
In vehicles with KEYLESS-GO*:
�
Grasp an outside door handle.
The SmartKey with KEYLESS-GO
must be within 3 ft. (1 m) of the ve-
hicle.
�
Press the KEYLESS-GO* start/stop
button (
�page 35).
The SmartKey with KEYLESS-GO
must be inside the vehicle.
Page 111 of 456

110 Controls in detailLocking and unlockingPower closing assist for doors and trunk lid
It is not necessary to slam the door or
trunk lid closed. A pneumatic power-as-
sisted mechanism draws doors and trunk
lid closed quietly and automatically once
door and trunk lid has been latched. When
the pneumatic power-assisted mechanism
has stopped, doors and/or trunk can be
re-opened.Power closing assist for doors
�
Press the doors gently past the initial
engage position into the lock.
The doors close automatically.
Power closing assist for trunk lid
�
Press the trunk lid gently into its lock.
The trunk closes automatically.
Automatic central locking
The doors and the trunk automatically lock
when the ignition is switched on and the
wheels are turning at speeds of approxi-
mately 9mph (15km/h) or more.
You can open a locked door from the in-
side. Open door only when conditions are
safe to do so.
You can deactivate the automatic locking
using the control system (
�page 162).
Warning!
G
To prevent possible personal injury, always
keep hands and fingers away from the door
or trunk opening when closing a door or the
trunk. Be especially careful when small chil-
dren are around.
In case of danger, pull the inside or outside
door handle, or press the trunk lid lock.
To prevent personal injury, never actuate
the closing assist mechanism by tampering
with the door or trunk lid latch.
Warning!
G
Only drive with the doors closed. Otherwise,
one or more of the doors could open while
the vehicle is in motion, putting you and/or
others at risk.Warning!
G
Only drive with the trunk closed as, among
other dangers such as blocked visibility, ex-
haust fumes may enter the vehicle interior.
iThe doors unlock automatically after an
accident if the force of the impact ex-
ceeds a preset threshold. The vehicle
locks automatically when the ignition is
switched on and the wheels are turning
at vehicle speeds of approximately
9 mph (15 km/h) or more. You could
therefore lock yourself out when the
vehicle�
is pushed or towed
�
is on a test stand
Page 112 of 456

111 Controls in detail
Locking and unlocking
Locking and unlocking from the inside
You can lock or unlock the doors and the
trunk from inside using the central locking
or unlocking switch. This can be useful, for
example, if you want to lock the vehicle be-
fore starting to drive.
The fuel filler flap cannot be locked or un-
locked with the central locking or unlock-
ing switch, respectively.The switches are located on the upper part
of the front center console.
Central locking/unlocking switches1Central locking switch
2Central unlocking switch
Locking�
Press central locking switch 1.
If both doors are closed, the vehicle
locks.
Unlocking
�
Press central unlocking switch 2.
The vehicle unlocks.
Warning!
G
When leaving the vehicle, always remove the
SmartKey or SmartKey with KEYLESS-GO*
from the starter switch, take it with you,
take the SmartKey with KEYLESS-GO* with
you and lock the vehicle. Do not leave chil-
dren unattended in the vehicle, or with ac-
cess to an unlocked vehicle. Unsupervised
use of vehicle equipment may cause an ac-
cident and/or serious personal injury.
iYou can open a locked door from the
inside. Open door only when conditions
are safe to do so.
If the vehicle was previously centrally
locked with the SmartKey or the
SmartKey with KEYLESS-GO*, it will
not unlock using the central unlocking
switch2.
If the vehicle was previously locked
with the central locking switch1:�
While in the global remote control
mode, the vehicle is unlocked com-
pletely when a door is opened from
the inside.
�
While in the selective remote con-
trol mode, only the door opened
from inside is unlocked.
Page 132 of 456

131 Controls in detail
Lighting
Interior lighting
The controls are located in the overhead
control panel.
1Left reading lamp on/off
2Rear interior lamps on/off
3Right reading lamp on/off
4Rocker switch for automatic
control on/offAutomatic control
Activating
�
Press rocker switch 4 to the center
position.
The interior lighting switches on in
darkness when you:�
unlock the vehicle
�
remove the SmartKey from the
starter switch
�
open a door
�
open the trunk
The interior lighting switches off automati-
cally following an adjustable time delay.
For more information, see “Interior illumi-
nation delayed switch-off” (
�page 161).Deactivating
�
Press the ñ symbol on rocker
switch 4.
The interior lighting remains switched
off in darkness, even when you:�
unlock the vehicle
�
remove the SmartKey from the
starter switch
�
open a door
�
open the trunk
iLeaving an interior light switch in the
ON position for extended periods of
time with the engine turned off could
result in a discharged battery.
iIf the door remains open, the interior
lighting switches off automatically after
approximately 5 minutes.
Page 133 of 456
132 Controls in detailLightingManual control
Front interior lighting�
Press the ð symbol on rocker
switch 4.
The front interior lighting switches on.
�
Press the ñ symbol on rocker
switch 4 again.
The front interior lighting switches off.
The automatic control function is acti-
vated.Rear interior lighting
�
Press switch2 on theò symbol.
The rear compartment lighting switch-
es on.
�
Press switch2 on theò symbol
again.
The rear compartment lighting switch-
es off.Reading lamps
The reading lamps are integrated into the
interior rear view mirror.
�
Press reading lamp switch1or3 to
switch on the desired reading lamp.
�
Press reading lamp switch1or3
again to switch off the respective read-
ing lamp.
iThe setting selected for the interior
lighting is used for the trunk lighting as
well.
If the trunk remains open, the trunk
lighting switches off automatically after
approximately 10 minutes.
Page 134 of 456

133 Controls in detail
Lighting
Courtesy lighting
For better orientation in the dark, courtesy
lamps will illuminate the interior of your ve-
hicle as follows:
With parking lamps switched on:�
the door handles
�
the driver and passenger footwells
With the SmartKey in the starter switch
position1:
�
the door handles
�
the center console
Door entry lamps
For better orientation in the dark, the cor-
responding door entry lamps will switch on
in darkness when you open a door and the
automatic control is activated.
The door entry lamps switch off when the
corresponding door is closed.
Trunk lighting
The trunk lighting switches on if the trunk
is opened.
If you leave the trunk open for an extended
period of time, the trunk lighting will switch
off automatically after approximately
10 minutes.
iIf you turn the SmartKey in the starter
switch to position0 and switch off the
exterior headlamps, the door handle
lamps will remain lit for approximately
5minutes.
iIf you turn the SmartKey in the starter
switch to position0 and switch off the
exterior headlamps, the door entry
lamps will remain lit for approximately
5 minutes.
Page 147 of 456

146 Controls in detailControl systemOperational readiness of CD changer
If a CD changer has been installed in the
system, it can be operated from the
COMAND system key pad located in the
center dashboard. A loaded magazine
must be installed for CD playing.Loading/unloading the CD magazine
The CD changer is located behind the cov-
er on the left hand side in the trunk.
�
Remove the CD changer cover.
�
Slide the CD changer door to the right
and press the eject button g.
�
The magazine is ejected.
1CD
2CD changer
3CD tray
4CD magazine
�
Remove the magazine 4 and com-
pletely pull out the CD tray 3.
�
Place the CD 1 in the recess of the
tray 3, label side up.
�
Push the tray 3 into the magazine 4
in the direction shown by the arrow.
�
Push the magazine 4 into the CD
changer2 in the direction shown by
the arrow and close the CD changer
door.
Warning!
G
The CD changer is a Class 1 laser product.
There is a danger of invisible laser radiation
if the cover is opened or damaged.
Do not remove the cover. The CD changer
does not contain any parts which can be ser-
viced by the user. For safety reasons, have
any service work which may be necessary
performed only by qualified personnel.
iCDs which have been inserted improp-
erly or are unreadable will not be
played.
Page 157 of 456
156 Controls in detailControl systemThe table below shows what settings can
be changed within the various menus. De-
tailed instructions on making individual
settings can be found on the following pag-
es.INSTRUMENT CLUSTER
LIGHTING
VEHICLE
CONVENIENCE
Select temperature display
mode
Set daytime running lamp mode
(USA only)
Set automatic locking
Activating easy-entry/exit
feature
Select multifunction display
mode
Set locator lighting
Limiting opening height of trunk
lid*
Set fold-in function for exterior
rear view mirrors
Select language
Exterior lamps delayed shut-off
Select tire inflation pressure
unit
Interior lighting delayed shut-off