Page 117 of 456
116 Controls in detailSeatsFolding down and placing upright rear
power head restraints with the switch
in the rear center console
You can fold the rear power head restraints
backward or place them upright using the
rear head restraint switch in the rear cen-
ter console.
1Place rear head restraint upright
2Fold rear head restraint down
�
Switch on the ignition (
�page 34).
�
Push upper half1 of switch to place
the head restraints upright.
�
Push lower half2 o f s w i t c h t o f o ld t h e
head restraints down.Head restraint tilt
You can adjust the angle manually by pull-
ing or pushing the head restraints by hand.Warning!
G
For safety reasons, always drive with the
rear head restraints in the upright position
when the rear seats are occupied.
Keep the area around head restraints clear
of articles (e.g. clothing) to not obstruct the
folding operation of the head restraints.
iAdjust the head restraint in such a way
that it is as close to the head as possi-
ble.
Page 118 of 456
117 Controls in detailSeats
Lumbar support
You can adjust the contour of the seat’s
lumbar support to help enhance support to
your spine.
The thumbwheels for the driver’s and front
passenger’s seat are located on the outer
side of the seat.
1Thumbwheel�
Switch on the ignition (
�page 34).
�
Set the lumbar support between 0
and 5.
Multicontour seats*
The multicontour seat has inflatable air
cushions built into the seat backrest to
provide additional lumbar and side sup-
port.
The seat backrest cushion height and cur-
vature can be adjusted with switches on
the right side of the seat after switching on
ignition.The switches for the driver and front pas-
senger seat are located on the inner side of
the seat.
1Shoulder region support
2Side bolster adjustment
3Massage function (PULSE)
4Lumbar region support
�
Switch on the ignition (
�page 34).
Shoulder region support
�
Press æ or ç on switch1.
The air cushion inflates or deflates.
Page 120 of 456

119 Controls in detailSeats
Seat heating
Vehicles without seat ventilation*
The switch is located on the door.
1Normal heating
2Rapid heating
The red indicator lamps above the switch-
es show the heating level selected:
�
Switch on the ignition (
�page 34).
Switching on seat heating
�
Press switch1.
A red indicator lamp above the switch
comes on.
Switching off seat heating
�
Press switch1 again.
The indicator lamp above the switch
goes out.
Switching on rapid seat heating
�
Press switch2.
Both red indicator lamps above the
switch come on. Switching off rapid seat heating
�
Press switch2 again.
Both indicator lamps above the switch
go out.
Leveloff
No indicator lamp on.
1
One left indicator lamp on.
2
Two right indicator lamps on.
iThe seat heating will be automatically
switched off after approximately
30 minutes.
iThe system switches over to normal
heating mode after approximately
5 minutes. Only the right-hand indica-
tor lamp remains lit. iIf one or both of the lamps on the seat
heating switch are flashing, there is in-
sufficient voltage available since too
many electrical consumers are turned
on. The seat heating switches off auto-
matically.
The seat heating will switch back on
again automatically as soon as suffi-
cient voltage is available.
Page 121 of 456

120 Controls in detailSeatsVehicles with seat ventilation*
The switch is located on the door.
1Seat heating switch
The red indicator lamps above the switch
show the heating level selected:
�
Switch on the ignition (
�page 34).
Switching on seat heating
�
Press switch1 twice.
A red indicator lamp above the switch
comes on.
Switching off seat heating
�
Press switch1 again.
The indicator lamp above the switch
goes out.
Switching on rapid seat heating
�
Press switch1 once.
Both indicator lamps above the switch
come on. Switching off rapid seat heating
�
Press switch1 twice.
Both indicator lamps above the switch
go out.
Leveloff
No indicator lamp on.
1
One indicator lamp on.
2
Two indicator lamps on.
iThe seat heating will be automatically
switched off after approximately
30 minutes.
iThe system switches over to normal
heating mode after approximately
5 minutes. Only the right-hand indica-
tor lamp remains lit. iIf one or both of the lamps on the seat
heating switch are flashing, there is in-
sufficient voltage available since too
many electrical consumers are turned
on. The seat heating switches off auto-
matically.
The seat heating will switch back on
again automatically as soon as suffi-
cient voltage is available.
Page 122 of 456

121 Controls in detailSeats
Seat ventilation*
The switch is located on the door. Seat
ventilation can be activated manually with
the SmartKey in starter switch position 1
or 2. The driver’s seat ventilation can be
activated automatically by the summer
opening feature (
�page 200).
The blue indicator lamps on the switch
show the ventilation level selected:
1Seat ventilation switch
�
Switch on the ignition (
�page 34).
Switching on seat ventilation
�
Press switch1.
Three blue indicator lamps above the
switch come on.
�
Continue pressing switch1 until the
desired seat ventilation level is
reached.Switching off seat ventilation
�
Press switch1 repeatedly until all in-
dicator lamps go out.
Level3
Three indicator lamps on
(highest level)
2
Two indicator lamps on
1
One indicator lamp on
(lowest level)
off
No indicator lamp on
iThe seat ventilation for the driver’s seat
is automatically set to the highest level
if activated via summer opening fea-
ture (
�page 200).
iIf one or all of the lamps on the seat
ventilation switch are flashing, there is
insufficient voltage due to too many
electrical consumers being switched
on. The seat ventilation switches off au-
tomatically.
The seat ventilation will switch back on
again automatically as soon as suffi-
cient voltage is available.
Page 124 of 456
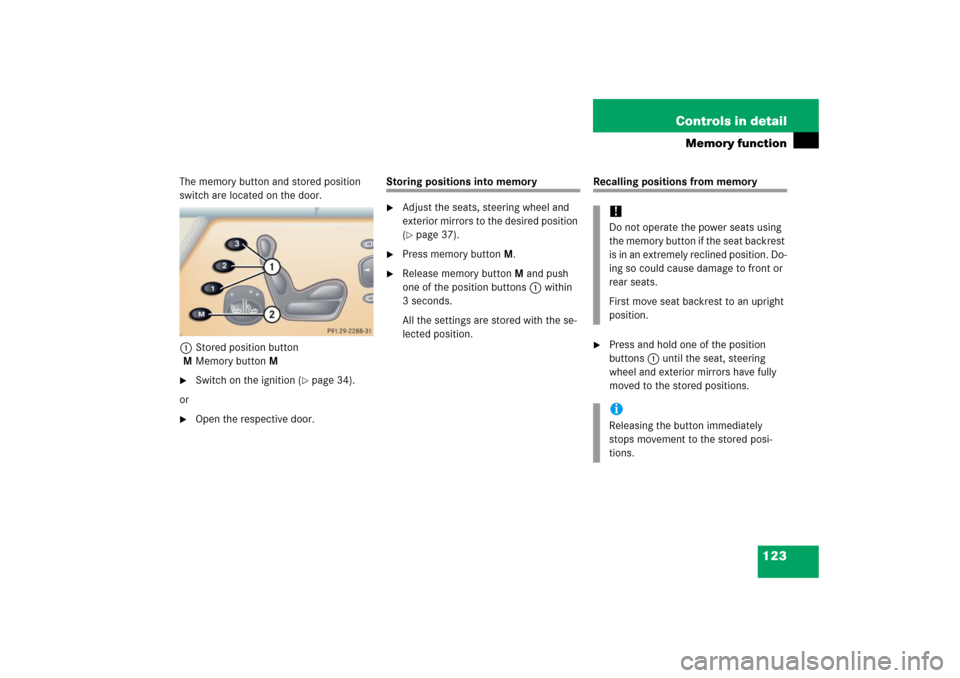
123 Controls in detail
Memory function
The memory button and stored position
switch are located on the door.
1Stored position button
MMemory button M�
Switch on the ignition (
�page 34).
or
�
Open the respective door.
Storing positions into memory�
Adjust the seats, steering wheel and
exterior mirrors to the desired position
(�page 37).
�
Press memory button M.
�
Release memory button M and push
one of the position buttons1 within
3 seconds.
All the settings are stored with the se-
lected position.
Recalling positions from memory�
Press and hold one of the position
buttons1 until the seat, steering
wheel and exterior mirrors have fully
moved to the stored positions.!Do not operate the power seats using
the memory button if the seat backrest
is in an extremely reclined position. Do-
ing so could cause damage to front or
rear seats.
First move seat backrest to an upright
position.iReleasing the button immediately
stops movement to the stored posi-
tions.
Page 125 of 456

124 Controls in detailMemory functionStoring exterior rear view mirror park-ing position
For easier parking, you can adjust the pas-
senger-side exterior rear view mirror so
that you can see the right rear wheel as
soon as you engage reverse gearR.
For information on activating the parking
position, see “Activating exterior rear view
mirror parking position” (
�page 180).The buttons are located on the driver’s
door.
1Passenger-side exterior rear view mir-
ror button
2Adjustment button
MMemory button M
�
Stop the vehicle in a safe location.
�
Make sure the ignition is switched on
(�page 34).
�
Press button1.
The passenger-side exterior rear view
mirror is selected.
�
Adjust the passenger-side exterior rear
view mirror with button2 so that you
see the rear wheel and the road curb.
�
Press memory button M.
�
Within 3 seconds, press bottom of ad-
justment button2 on ƒ.
The parking position is stored if the
mirror does not move.iIf the mirror does move, repeat the
above steps. After the setting is stored,
you can move the mirror again.
Page 135 of 456
.
1Reset buttonJ
The instrument cl")
134 Controls in detailInstrument clusterA full view illustration of the instrument
cluster can be found in the “At a glance”
section of this manual (
�page 24).
1Reset buttonJ
The instrument cluster is activated when
you:
�
open a door
�
switch on the ignition (
�page 34)
�
press reset buttonJ1
�
switch on the exterior lamps
You can change the instrument cluster set-
tings in the instrument cluster submenu of
the control system (
�page 157).
Instrument cluster illumination
1Knob for adjusting instrument cluster
illumination
Use knob1 to adjust the illumination
brightness for the instrument cluster.
�
Press knob1.
The knob will pop out.
To brighten illumination
�
Turn knob1 in the instrument cluster
clockwise.
The instrument cluster illumination will
brighten.
To dim illumination
�
Turn knob1 in the instrument cluster
counterclockwise.
The instrument cluster illumination will
dim.
iThe instrument cluster illumination is
dimmed or brightened automatically to
suit ambient light conditions.
The instrument cluster illumination will
also be adjusted automatically when
you switch on the vehicle’s exterior
lamps.