Page 172 of 456

171 Controls in detail
Automatic transmission
Automatic shift program
The program mode selector switch is
located on the lower part of the center
console.
1Program mode selector switch
C Comfort For comfort driving
S Sport For standard driving
The current gear selector lever position
and the selected program mode (
C/S) are
indicated in the tachometer display
(
�page 166).
�
Press program mode selector
switch1 repeatedly until the letter of
the desired program mode appears in
the tachometer display.
SelectCfor comfort driving:�
The vehicle starts out in second
gear (both forward and reverse) for
gentler starts. This does not apply if
full throttle is applied or gear
range1 is selected.
�
Traction and driving stability are
improved on icy roads.
�
Upshifts occur earlier even when
you give more gas. The engine then
operates at lower rpms and the
wheels are less likely to spin.
!Never change the program mode when
the gear selector lever is out of
positionP. This could result in a
change of driving characteristics for
which you may not be prepared.iThe last selected program
mode (CorS) is switched on when the
engine is restarted.
Page 176 of 456

175 Controls in detail
Automatic transmission
Manual shift program CL 55 AMG and CL 65 AMG
In addition to the automatic shift
programC orS, your vehicle is equipped
with the manual shift programM.
In the manual program modeM,
system-controlled automatic gearshifting
is switched off and you need to change the
gears by manually upshifting or downshift-
ing using the steering wheel gearshift but-
tons to the left and right of the steering
wheel (
�page 173) or the gear selector
lever.The program mode selector switch is
located on the lower part of the center
console.
1Program mode selector switch
M Manual For manual gear shifting
C Comfort For comfort driving
S Sport For standard driving
The current gear selector lever position
and the selected program mode (
M/C/S)
are indicated in the tachometer display
(
�page 166).
!Allow engine to warm up under low
load use. Do not place full load on the
engine until the operating temperature
has been reached.
Shift into reverse gearR or parking
positionP only when the vehicle is
stopped.
Avoid spinning of a drive wheel for an
extended period when driving off on
slippery road surfaces. This may cause
serious damage to the drivetrain which
is not covered by the Mercedes-Benz
Limited Warranty.
Page 183 of 456
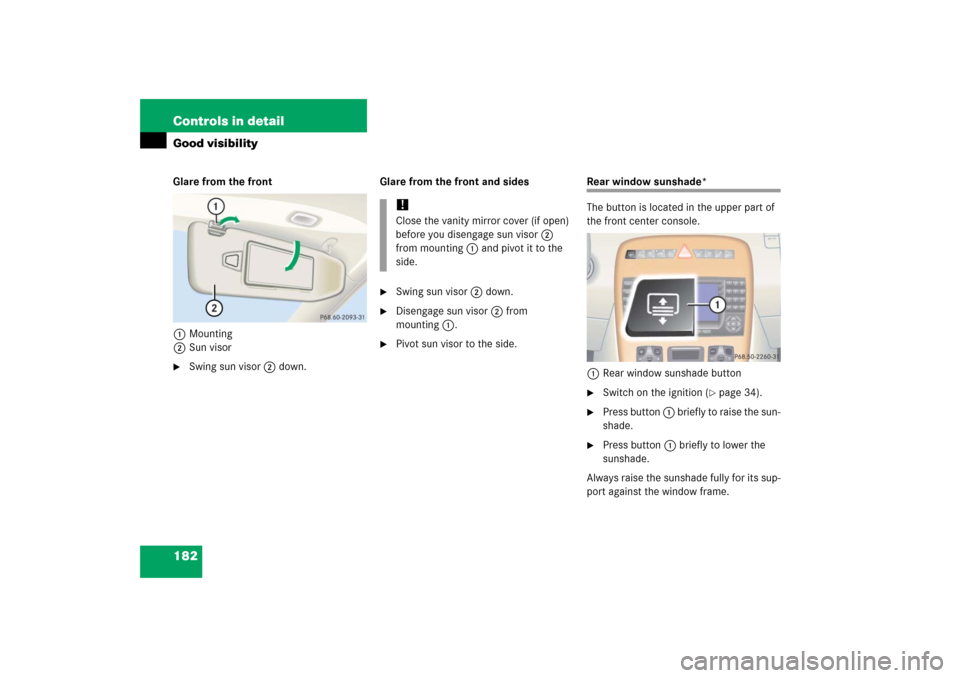
182 Controls in detailGood visibilityGlare from the front
1Mounting
2Sun visor�
Swing sun visor2 down.Glare from the front and sides
�
Swing sun visor2 down.
�
Disengage sun visor2 from
mounting1.
�
Pivot sun visor to the side.
Rear window sunshade*
The button is located in the upper part of
the front center console.
1Rear window sunshade button�
Switch on the ignition (
�page 34).
�
Press button 1 briefly to raise the sun-
shade.
�
Press button 1 briefly to lower the
sunshade.
Always raise the sunshade fully for its sup-
port against the window frame.
!Close the vanity mirror cover (if open)
before you disengage sun visor2
from mounting1 and pivot it to the
side.
Page 198 of 456

197 Controls in detail
Power windows
�Power windows
Opening and closing the power windows
The side windows are opened and closed
electrically. The switches for all side win-
dows are on the driver’s door. The switch
for the front passenger door window is on
the front passenger door.
1Left door window
2Right door window
3Right rear side window
4Left rear side window
5Rear side windows override switch
(
�page 78)The additional switches for the rear side
windows are on the rear center console.
6Left rear side window
7Right rear side window
Warning!
G
When closing the windows, make sure that
there is no danger of anyone being harmed
by the closing procedure.
The closing of the door windows can be im-
mediately halted by releasing the switch or,
if the switch was pressed past the resis-
tance point and released, by pressing the re-
spective switch.
The closing of the rear side windows can be
immediately halted by releasing the switch.
The door windows are equipped with the ex-
press-close and automatic reversal func-
tion. If a door window encounters an
obstruction that blocks its path in a circum-
stance where you pressed the switch past
the resistance point and released it to close
the door window, the automatic reversal
function will stop the door window and open
it slightly.
If the door window encounters an obstruc-
tion that blocks its path in a circumstance
where you are closing the door window by
pressing and holding the switch, by pressing
and holding button ‹ on the SmartKey,
by pressing and holding the lock button
(vehicles with KEYLESS-GO*) on an outside
door handle, or by pressing and holding
button
,
or button
e
on the climate
control panel, the automatic reversal func-
tion will not operate.
��
Page 217 of 456

216 Controls in detailDriving systemsThe distance warning function on/off but-
ton and thumbwheel for setting distance
are located on the lower part of the front
center console.
1Distance warning function on/off but-
ton
2Thumbwheel for setting distanceIncreasing distance
Increasing the distance setting tells
Distronic to maintain a greater following
distance to the vehicle ahead.
�
Turn thumbwheel2 towards¯.
Decreasing distance
Decreasing the distance setting tells
Distronic to maintain a shorter following
distance to the vehicle ahead.
�
Turn thumbwheel2 towards®.Distance warning function
When Distronic is deactivated, this func-
tion will continue to warn you when recog-
nizing a slower vehicle moving in the
vehicle’s path and the danger of a collision
exists:
�
The distance warning lampl in the
instrument cluster comes on.
�
An intermittent warning sounds.
If these warnings are issued, you must
brake manually to maintain a safe distance
and avoid a collision with the vehicle
ahead.
When pressing the brake pedal, the warn-
ing sound stops. The warning sound also
stops when the distance to the vehicle
ahead is sufficient again without applying
the brake pedal. In this case the distance
warning lampl also extinguishes.
Page 223 of 456
222 Controls in detailDriving systemsThe button with the indicator lamps is lo-
cated in the upper part of the front center
console.
1Indicator lamps
2Vehicle level control button
�
Start the engine (
�page 48).
�
Briefly press button2 to change from
one level setting to the next. �
The normal level is selected if both
indicator lamps are off.
�
At level 1, one of the indicator
lamps 1 is on.
�
At level 2, both indicator lamps 1
are on.
The message:
ACTIVE BODY CONTROL
ABC
VEHICLE RISINGappears in the multifunction display for
a short time.
When the vehicle is at level 2, pressing
the button will return the vehicle to nor-
mal level.
iPressing the button twice in quick suc-
cession will cause the vehicle to imme-
diately raise or lower to the new vehicle
level as selected.
The selected setting is stored, even if
the engine is turned off.
Page 227 of 456

226 Controls in detailDriving systemsAs your vehicle approaches an object, one
or more distance segments will illuminate,
depending on the distance. When the
eighth distance segment illuminates, you
have reached the minimum distance.�
Front area: An intermittent acoustic
warning will sound as the first red dis-
tance segment illuminates and a con-
stant acoustic warning lasting a
maximum of 2 seconds will sound for
the second red distance segment. The
signal is canceled when the gear selec-
tor lever is placed in position P.
�
Rear area: An intermittent acoustic
warning will sound as the first red dis-
tance segment illuminates and a con-
stant acoustic warning lasting a
maximum of 2 seconds will sound for
the second red distance segment. The
signal is canceled when the gear selec-
tor lever is placed in position D orP.Switching the Parktronic system
on/off
The Parktronic system can be switched off
manually.
The Parktronic button is located in the up-
per part of the front center console.
1Parktronic button
2Indicator lampSwitching off the Parktronic system
�
Press button 1.
Indicator lamp 2 comes on.
Switching on the Parktronic system
�
Press button 1 again.
Indicator lamp 2 goes out.iThe Parktronic system is automatically
switched on when the ignition is
switched on (
�page 34).
Page 238 of 456

237 Controls in detail
Useful features
Cup holder in rear seat armrest
1Compartment for cup holder
Opening cup holder�
Push front of sliding compartment1.
The cup holder slides out.
Closing cup holder
�
Push sliding compartment1 back un-
til it engages.
Ashtrays
Center console ashtray
1Button for disengaging ashtray
Opening ashtray�
Briefly touch cover plate.
The ashtray opens automatically.Removing ashtray insert
�
Secure vehicle from movement by set-
ting the parking brake. Move the gear
selector lever to positionN.
Now you have more room to remove
the insert.
�
Push sliding button1 to the right.
The ashtray is disengaged and slides
out a short way.
�
Remove insert from ashtray frame.
Reinstalling the ashtray insert
�
Install insert by pushing back into the
frame until it engages.Warning!
G
Remove front ashtray only with vehicle
standing still. Set the parking brake to se-
cure vehicle from movement. Move the gear
selector lever to positionN. With gear selec-
tor lever in positionN, turn off the engine.