Page 277 of 456
 is not in po-
sition 2, the following message will appear:
FOR ENGINE OIL LEVEL
SWIT")
276 OperationEngine compartmentOther display messages
If the SmartKey or KEYLESS-GO*
start/stop button (
�page 35) is not in po-
sition 2, the following message will appear:
FOR ENGINE OIL LEVEL
SWITCH IGNITION ON�
Switch on the ignition (
�page 34).
If you see the message:
PERF. SERV. ON TIME�
If engine is at operating temperature,
wait 5 minutes before repeating check
procedure.
�
If engine is not at operating tempera-
ture yet, wait 30 minutes before re-
peating check procedure.If you see the message:
ENGINE OIL LEVEL
NOT WHEN ENGINE ON�
Turn off the engine.
�
If the engine is at operating tempera-
ture, wait 5 minutes before checking
oil.
�
If the engine is not at operating temper-
ature yet, you must wait 30 minutes be-
fore checking oil.
If there is excess engine oil with the engine
at normal operating temperature, the fol-
lowing message will appear:
ENGINE OIL LEVEL
REDUCE OIL LEVEL�
Have excess oil siphoned or drained
off. Contact an authorized
Mercedes-Benz Center.For more information on messages in the
multifunction display concerning engine
oil, see the “Practical hints” section
(
�page 351).!Excess oil must be siphoned or drained
off. It could cause damage to the en-
gine and catalytic converter not cov-
ered by the Mercedes-Benz Limited
Warranty.iPerform the engine oil level check with
the dipstick (CL 500 and CL 55 AMG
only) if it cannot be completed with the
control system.
In this case we recommend that you
have the system checked at a
Mercedes-Benz Center.
Page 278 of 456

When checking the oil level�
the vehicle must be parked on level
ground
�
with the engin")
277 Operation
Engine compartment
Checking the engine oil level with the
oil dipstick (CL 500, CL 55 AMG only)
When checking the oil level�
the vehicle must be parked on level
ground
�
with the engine at operating tempera-
ture, the vehicle must have been sta-
tionary for at least 5 minutes with the
engine turned off
�
with the engine not at operating tem-
perature yet, the vehicle must have
been stationary for at least 30 minutes
with the engine turned offTo check the engine oil level with the oil
dipstick, do the following:
�
Open the hood (
�page 273).
�
Pull out oil dipstick1 (
�page 278).
�
Wipe oil dipstick1 clean.
�
Fully insert oil dipstick1 into the dip-
stick guide tube.
�
Pull out oil dipstick1 again after ap-
proximately 3 seconds to obtain accu-
rate reading.
Oil dipstickThe oil level is correct when it is between
the lower (min) and upper (max) mark of
the oil dipstick.
�
If necessary, add engine oil.
For adding engine oil see (
�page 278).
For more information on engine oil, see the
“Technical data” section (
�page 418) and
(
�page 420).
For more information on messages in the
multifunction display concerning engine
oil, see the “Practical hints” section
(�page 351)
iThe engine oil level can be checked by
either the oil dipstick or via the multi-
function display in the instrument clus-
ter (
�page 275). The amount of engine
oil needed is shown more precisely in
the multifunction display.
iThe filling quantity between upper and
lower oil dipstick marking level is ap-
proximately 2.1 US qt (2.0 l).
Page 279 of 456

278 OperationEngine compartmentAdding engine oil
CL 500, CL 55 AMG1Oil dipstick
2Filler cap�
Unscrew filler cap2 from filler neck.
�
Add engine oil as required. Be careful
not to overfill with oil.
Be careful not to spill any oil when adding.
Avoid environmental damage caused by oil
entering the ground or water.
�
Screw filler cap2 back on filler neck.
CL 6001Filler cap
!Only use approved engine oils and oil
filters required for vehicles with
Maintenance System (U.S. vehicles) or
FSS (Canada vehicles). For a listing of
approved engine oils and oil filters, re-
fer to the Factory Approved Service
Products pamphlet in your vehicle liter-
ature portfolio, or contact an autho-
rized Mercedes-Benz Center.
Using engine oils and oil filters of spec-
ification other than those expressly re-
quired for the Maintenance System
(U.S. vehicles) or FSS (Canada vehi-
cles), or changing of oil and oil filter at
change intervals longer than those
called for by the Maintenance System
(U.S. vehicles) or FSS (Canada vehi-
cles) will result in engine damage not
covered by the Mercedes-Benz Limited
Warranty.
!Excess oil must be siphoned or drained
off. It could cause damage to the en-
gine and catalytic converter not cov-
ered by the Mercedes-Benz Limited
Warranty.
Page 280 of 456

279 Operation
Engine compartment
CL 65 AMG1Filler cap�
Unscrew filler cap 1 from filler neck.
�
Add engine oil as required. Be careful
not to overfill with oil.
Be careful not to spill any oil when adding.
Avoid environmental damage caused by oil
entering the ground or water.
�
Screw filler cap1 back on filler neck.
For more information on engine oil, see the
“Technical data” section (
�page 418) and
(
�page 420).
Transmission fluid level
The transmission fluid level does not need
to be checked. If you notice transmission
fluid loss or gear shifting malfunctions,
have an authorized Mercedes-Benz Center
check the automatic transmission.Active Body Control (ABC) fluid level
Regular fluid level check is not required. If
you notice fluid leaks or malfunction mes-
sages in the multifunction display, have an
authorized Mercedes-Benz Center check
the ABC system.
!Excess oil must be siphoned or drained
off. It could cause damage to the en-
gine and catalytic converter not cov-
ered by the Mercedes-Benz Limited
Warranty.
Page 318 of 456

317 Operation
Maintenance
Resetting the maintenance service indicator
In the event that the maintenance service
on your vehicle is not carried out by an au-
thorized Mercedes-Benz Center, you can
have the maintenance service indicator re-
set. The automotive maintenance facility
carrying out the maintenance service will
find the information for resetting the main-
tenance service indicator in the mainte-
nance-relevant information for your
vehicle. Such information is available from
either your authorized Mercedes-Benz
Center or directly from Mercedes-Benz
USA, LLC.
iIf the battery is disconnected, the days
of disconnection will not be included in
the count shown by the maintenance
service indicator. To arrive at the true
maintenance service deadline, you will
need to subtract these days from the
days shown in the maintenance service
indicator.
Do not confuse the maintenance ser-
vice indicator with the engine oil level
indicator N.
iIf the maintenance service indicator
was inadvertently reset, have an autho-
rized Mercedes-Benz Center correct it.
Only reset if the proper maintenance
service has been performed. Resetting
the system without performing the
proper service as called for by the
maintenance service indicator will re-
sult in engine damage and/or other ve-
hicle damage not covered by the
Mercedes-Benz Limited Warranty.
Page 352 of 456
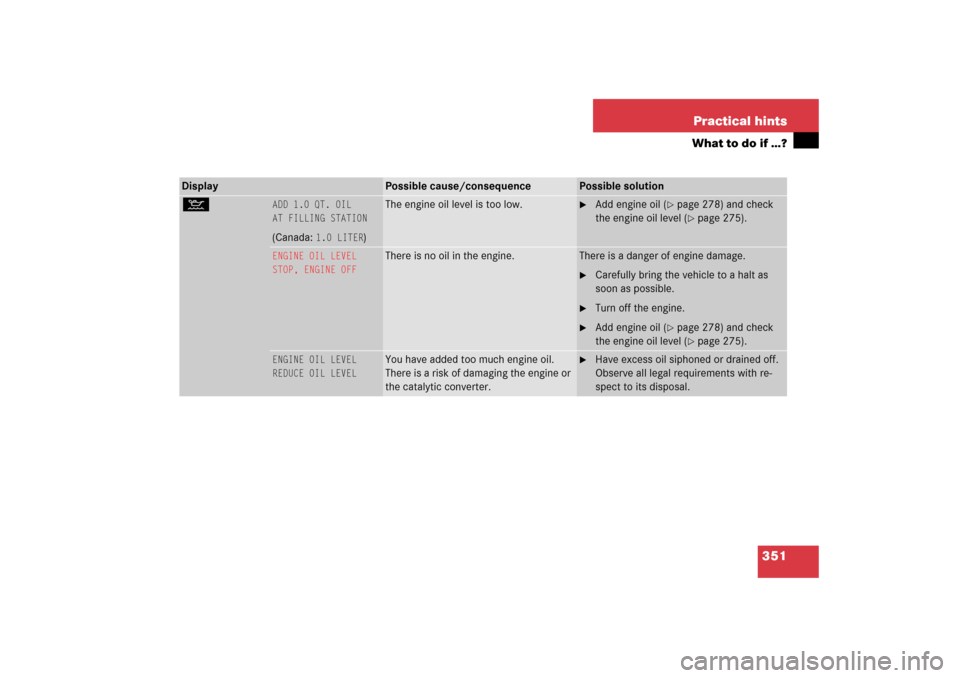
351 Practical hints
What to do if …?
Display
Possible cause/consequence
Possible solution
:
ADD 1.0 QT. OIL
AT FILLING STATION(Canada:
1.0 LITER
)
The engine oil level is too low.
�
Add engine oil (
�page 278) and check
the engine oil level (�page 275).
ENGINE OIL LEVEL
STOP, ENGINE OFF
There is no oil in the engine.
There is a danger of engine damage.�
Carefully bring the vehicle to a halt as
soon as possible.
�
Turn off the engine.
�
Add engine oil (
�page 278) and check
the engine oil level (�page 275).
ENGINE OIL LEVEL
REDUCE OIL LEVEL
You have added too much engine oil.
There is a risk of damaging the engine or
the catalytic converter.
�
Have excess oil siphoned or drained off.
Observe all legal requirements with re-
spect to its disposal.
Page 353 of 456

appears while the engine is running and at
operating temperature, the engine oil level")
352 Practical hintsWhat to do if …?When the message:ADD 1.0 QT. OIL
AT FILLING STATION(Canada:
1.0 LITER
)
appears while the engine is running and at
operating temperature, the engine oil level
has dropped to approximately the mini-
mum level.When this occurs, the warning will first
come on intermittently and then stay on if
the oil level drops further.
Visually check for oil leaks. If no obvious oil
leaks are noted, drive to the nearest ser-
vice station where the engine oil should be
topped to the required level with an ap-
proved oil specified in the Factory
Approved Service Products pamphlet.
Display
Possible cause/consequence
Possible solution
:
ENGINE OIL LEVEL
VISIT WORKSHOP
The engine oil has dropped to a critical
level.
�
Check the engine oil level (
�page 275)
and add engine oil as required
(
�page 278).
�
If you must add engine oil frequently,
have the engine checked for possible
leaks.
There is water in the engine oil.
�
Have the engine oil checked.
OIL SENSOR MALFUNCT.
VISIT WORKSHOP
The measuring system is malfunctioning.
�
Have the measuring system checked by
an authorized Mercedes-Benz Center.
!The engine oil level warnings should
not be ignored. Extended driving with
the symbol displayed could result in
serious engine damage that is not
covered by the Mercedes-Benz Limited
Warranty.
Page 390 of 456
.
�
Continue to turn the crank")
389 Practical hints
Flat tire
�
Keeping jack in this position, turn
crank3 clockwise until the jack base
meets the ground. Make sure the jack
is vertical (plumb line).
�
Continue to turn the crank until the tire
is a maximum of 1.2 in (3 cm) from the
ground.Removing the wheel
1Alignment bolt
�
Unscrew upper-most wheel bolt and re-
move.
�
Replace this wheel bolt with alignment
bolt1 supplied in the tool kit.
�
Remove the remaining bolts.
�
Remove the wheel.Mounting the new wheel
�
Clean contact surfaces of wheel and
wheel hub.
Warning!
G
The jack is intended only for lifting the vehi-
cle briefly for wheel changes. It is not suited
for performing maintenance work under the
vehicle.�
Never start the engine when the vehicle
is raised.
�
Never lie down under the raised vehicle.
!Do not place wheel bolts in sand or dirt.
This could result in damage to the bolt
and wheel hub threads.
!To avoid paint damage, place wheel flat
against hub and hold it there while in-
stalling first wheel bolt.Warning!
G
Always replace wheel bolts that are dam-
aged or rusted.
Never apply oil or grease to wheel bolts.
Damaged wheel hub threads should be re-
paired immediately. Do not continue to drive
under these circumstances! Contact an au-
thorized Mercedes-Benz Center or call
Roadside Assistance.
Incorrect wheel bolts or improperly tight-
ened wheel bolts can cause the wheel to
come off. This could cause an accident.
Make sure you are using the correct wheel
bolts.
��