Page 123 of 456

122 Controls in detailMemory functionPrior to operating the vehicle, the driver
should check and adjust the seat height,
seat position fore and aft, and seat back-
rest angle if necessary, to ensure adequate
control, reach and comfort. The head re-
straint should also be adjusted for proper
height. See also the section on air bags
(�page 63) for proper seat positioning.
In addition, adjust the steering wheel to
ensure adequate control, reach, operation
and comfort. Both the inside and outside
rear view mirrors should be adjusted for
adequate rear vision.
Fasten seat belts. Infants and small chil-
dren should be seated in a properly se-
cured restraint system that complies with
U.S. Federal Motor Vehicle Safety
Standards 213 and 225 and Canadian
Motor Vehicle Safety Standards 213 and
210.2.With the memory function you can store up
to four different settings.
The following settings are stored when us-
ing the buttons on the driver’s door:
�
Driver’s seat and seat, backrest and
head restraint position
�
Settings for multicontour seat*
�
Steering wheel position
�
Exterior rear view mirror positionThe following settings are stored when us-
ing the buttons on the passenger door:
�
Front passenger seat, backrest and
head restraint position
�
Settings for multicontour seat*Warning!
G
Do not activate the memory function while
driving. Activating the memory function
while driving could cause the driver to lose
control of the vehicle.
Page 124 of 456
123 Controls in detail
Memory function
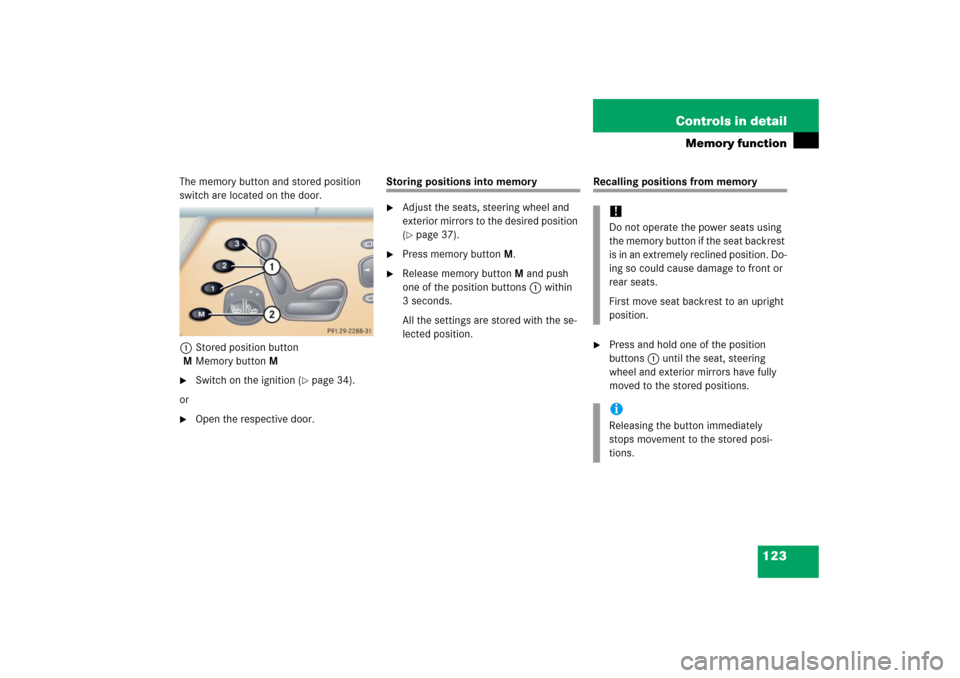
The memory button and stored position
switch are located on the door.
1Stored position button
MMemory button M�
Switch on the ignition (
�page 34).
or
�
Open the respective door.
Storing positions into memory�
Adjust the seats, steering wheel and
exterior mirrors to the desired position
(�page 37).
�
Press memory button M.
�
Release memory button M and push
one of the position buttons1 within
3 seconds.
All the settings are stored with the se-
lected position.
Recalling positions from memory�
Press and hold one of the position
buttons1 until the seat, steering
wheel and exterior mirrors have fully
moved to the stored positions.!Do not operate the power seats using
the memory button if the seat backrest
is in an extremely reclined position. Do-
ing so could cause damage to front or
rear seats.
First move seat backrest to an upright
position.iReleasing the button immediately
stops movement to the stored posi-
tions.
Page 125 of 456

124 Controls in detailMemory functionStoring exterior rear view mirror park-ing position
For easier parking, you can adjust the pas-
senger-side exterior rear view mirror so
that you can see the right rear wheel as
soon as you engage reverse gearR.
For information on activating the parking
position, see “Activating exterior rear view
mirror parking position” (
�page 180).The buttons are located on the driver’s
door.
1Passenger-side exterior rear view mir-
ror button
2Adjustment button
MMemory button M
�
Stop the vehicle in a safe location.
�
Make sure the ignition is switched on
(�page 34).
�
Press button1.
The passenger-side exterior rear view
mirror is selected.
�
Adjust the passenger-side exterior rear
view mirror with button2 so that you
see the rear wheel and the road curb.
�
Press memory button M.
�
Within 3 seconds, press bottom of ad-
justment button2 on ƒ.
The parking position is stored if the
mirror does not move.iIf the mirror does move, repeat the
above steps. After the setting is stored,
you can move the mirror again.
Page 139 of 456
138 Controls in detailControl systemMultifunction steering wheel
The displays in the multifunction display
and the settings in the control system are
controlled by the buttons on the multifunc-
tion steering wheel.
1
Multifunction display in the speed-
ometerOperating the control system
2
Selecting the submenu or setting the
volumeæ
up/to increase
ç
down/to decrease
3
Telephone*s
to take a call
t
to end a call
4
Menu systemsè
for next menu
ÿ
for previous menu
5
Moving within a menuj
for next display
k
for previous display
Page 140 of 456

139 Controls in detail
Control system
Pressing any of the buttons on the multi-
function steering wheel will alter what is
shown in the multifunction display.
The information available in the multifunc-
tion display is arranged in menus, each
containing a number of functions or sub-
menus.
The individual functions are then found
within the relevant menu (radio or CD op-
erations under
AUDIO
, for example). These
functions serve to call up relevant informa-
tion or to customize the settings for your
vehicle.It is helpful to think of the menus, and the
functions within each menu, as being ar-
ranged in a circular pattern.
�
If you press buttonè orÿ
repeatedly, you will pass through each
menu one after the other.
�
If you press buttonj ork
repeatedly, you will pass through each
function display, one after the other, in
the current menu.In the
SETTINGS
menu, instead of functions
you will find a number of submenus for
calling up and changing settings. For in-
structions on using these submenus, see
“Settings menu” (�page 154).
The number of menus available in the sys-
tem depends on which optional equipment
is installed in your vehicle.
The menus are described on the following
pages.
Page 149 of 456

148 Controls in detailControl systemThe following functions are available:
Answering a call
When your telephone is ready to receive
calls, you can answer a call at any time. In
the multifunction display you will then see
the message:�
Press buttons.
You have answered the call. In the mul-
tifunction display you see the length of
the call positioned above the number.Ending a call
�
Press buttont.
You have ended the call. In the multi-
function display you will again see the
standby message.
Dialing a number from the phone book
If your telephone is ready to receive calls,
you may select and dial a number from the
phone book at any time.
�
Press buttonÿ orè repeatedly
until you see the
TEL
menu in the mul-
tifunction display.
�
Press buttonj ork.
The control system reads the phone
book which is stored in the telephone.
The transmission depends on the num-
ber of entries in the phone book and can take up to 60 seconds. In the mul-
tifunction display you will see the mes-
sage
PLEASE WAIT!
.
When the message PLEASE WAIT!
dis-
appears, the phone book has been
loaded.
�
Press buttonj ork repeatedly
until the desired name appears in the
multifunction display.
The stored names are displayed in as-
cending or descending alphabetical or-
der.
Function
Page
Answering a call
148
Ending a call
148
Dialing a number from the phone
book
148
Redialing
149
iIf you do not wish to accept a call,
press buttont.
iIf you press and holdj ork for
longer than 1 second, the system
scrolls rapidly through the list of names
until you release the button again.
Cancel the quick search mode by
pressingt.
Page 150 of 456

149 Controls in detail
Control system
�
Press buttons.
The system dials the selected phone
number.�
If the connection is successful, the
name of the party you called and
the duration of the call will appear
in the multifunction display.
�
If no connection is made, the con-
trol system stores the dialed num-
ber in the redial memory.Redialing
The control system stores the most recent-
ly dialed phone numbers. This eliminates
the need to search through your entire
phone book.
�
Press buttonè orÿ repeatedly
until you see the
TEL
menu in the mul-
tifunction display.
�
Press buttons.
In the multifunction display you see the
first number in the redial memory.
�
Press buttonj ork repeatedly
until the desired name appears in the
multifunction display.
�
Press buttons.
The control system dials the selected
phone number.
NAVI menu
In the
NAVI
menu, you will see the naviga-
tion system’s status.
�
Press buttonè orÿ repeatedly
until you see the message
NAVI
in the
multifunction display.
�
If COMAND is switched off, the mes-
sage
NAVI OFF
is shown in the multi-
function display.
�
With COMAND switched on but route
guidance not activated, the direction of
travel and, if available, the name of the
street currently traveled on appear in
the multifunction display.
�
With COMAND switched on and route
guidance activated, the direction of
travel and maneuver instructions ap-
pear in the multifunction display.
Please refer to separate COMAND operat-
ing instructions on how to activate the
route guidance system.
iIf you do not want to use the telephone,
press buttont.
Page 174 of 456

173 Controls in detail
Automatic transmission
Steering wheel gearshift control
one-touch gear shifting CL 55 AMG and CL 65 AMG
The steering wheel gearshift control pro-
vides an alternative method for changing
the gears manually and limiting or extend-
ing the gear range for automatic shifting
with the gear selector lever in positionD
and driving in the automatic program
modeC orS.The steering wheel gearshift buttons are
located to the left and right of the steering
wheel.
1Left button: downshift
2Right button: upshift
iFor information on using the steering
wheel gearshift control in manual
program modeM (CL 55 AMG and
CL 65 AMG only), see “Manual shift
program CL 55 AMG and CL 65 AMG”
(�page 175).
iTo avoid overrevving the engine when
downshifting with steering wheel
gearshift buttons, the transmission will
not shift to a lower gear if the engine’s
max. speed would be exceeded.!Allow engine to warm up under low
load use. Do not place full load on the
engine until the operating temperature
has been reached.
Shift into reverse gearR or parking
positionP only when the vehicle is
stopped.
Avoid spinning of a drive wheel for an
extended period when driving off on
slippery road surfaces. This may cause
serious damage to the drivetrain which
is not covered by the Mercedes-Benz
Limited Warranty.