Page 201 of 456

200 Controls in detailPower windowsSummer opening feature
If the weather is warm, you can ventilate
the vehicle before driving off by simulta-
neously: �
opening the windows
�
opening the tilt/sliding sunroof
�
turning on the seat ventilation* for the
driver’s seat
�
Aim transmitter eye of the SmartKey or
SmartKey with KEYLESS-GO* at the
driver’s outside door handle.
The SmartKey or SmartKey with
KEYLESS-GO* must be in close proxim-
ity to the driver’s door handle.
�
Press and hold button Πuntil the
windows and tilt/sliding sunroof have
reached the desired position.
�
Release button Πto interrupt pro-
cedure.
Convenience closing feature
When you lock the vehicle, you can close
the windows and tilt/sliding sunroof simul-
taneously. �
Aim transmitter eye of the SmartKey or
SmartKey with KEYLESS-GO* at the
driver’s outside door handle.
The SmartKey or SmartKey with
KEYLESS-GO* must be in close proxim-
ity to the driver’s door handle.
�
Press and hold button ‹ until the
windows and tilt/sliding sunroof are
completely closed.
�
Release button ‹ to interrupt pro-
cedure.
iThe seat ventilation* for the driver’s
seat is automatically set to the highest
level if activated via summer opening
feature.
Page 202 of 456
 until
the windows and the tilt/sliding sun-
roof are completely")
201 Controls in detail
Power windows
Vehicles with KEYLESS-GO*:�
Press and hold the lock button on an
outside door handle (
�page 60) until
the windows and the tilt/sliding sun-
roof are completely closed.
�
Release the lock button at the outside
door handle to interrupt procedure.
Warning!
G
When closing the windows and the tilt/slid-
ing sunroof, make sure that there is no dan-
ger of anyone being harmed by the closing
procedure.
If potential danger exists, proceed as fol-
lows:�
Release button ‹ to stop the closing
procedure. To open, press and hold but-
ton Œ. To continue the closing after
making sure that there is no danger of
anyone being harmed by the closing pro-
cedure, press and hold button‹.
Vehicles with KEYLESS-GO*:
�
Release the lock button on the outside
door handle (
�page 60) to stop the
closing procedure.
�
Pull on the door handle and hold firmly.
The windows and the tilt/sliding sunroof
will open for as long as the door handle
is held but the door is not opened.
Page 204 of 456
.
Opening and closing the power
tilt/sliding sunroof
�
To open, close, raise or lower the
tilt/sliding sunroof,")
203 Controls in detail
Power tilt/sliding sunroof
�
Switch on the ignition (
�page 34).
Opening and closing the power
tilt/sliding sunroof
�
To open, close, raise or lower the
tilt/sliding sunroof, move the switch to
resistance point in the required
direction1to4.
�
Release the sunroof switch when the
tilt/sliding sunroof has reached the de-
sired position.
Fully opening (Express-open) and clos-
ing (Express-close) the power the
tilt/sliding sunroof
�
To open, close, raise or lower the
tilt/sliding sunroof, move the switch
past the resistance point in the re-
quired direction1to4 and release.
The tilt/sliding sunroof opens or closes
completely.
When leaving the vehicle, always remove the
SmartKey or SmartKey with KEYLESS-GO*
from the starter switch, take it with you, and
lock the vehicle. Do not leave children unat-
tended in the vehicle, or with access to an
unlocked vehicle. Unsupervised use of vehi-
cle equipment can cause an accident
and/or serious personal injury.!To avoid damaging the seals, do not
transport any objects with sharp edges
which can stick out of the tilt/sliding
sunroof.
Do not open the tilt/sliding sunroof if
there is snow or ice on the roof, as this
could result in malfunctions.
The tilt/sliding sunroof can be opened
or closed manually should an electrical
malfunction occur (
�page 375).
iYou can also open or close the side
windows and power tilt/sliding sunroof
using the SmartKey or SmartKey with
KEYLESS-GO*, see “Summer opening
feature” (
�page 200) and
“Convenience closing feature”
(
�page 200).
Depending on current position, the
tilt/sliding sunroof may also open or
close when the air recirculation
button, or the charcoal filter
buttone in the climate control
panel (
�page 185) is pressed and
held.
iWith the SmartKey in starter switch po-
sition 0 or removed from the starter
switch, the tilt/sliding sunroof can be
operated�
until you open the driver’s or pas-
senger door
�
for up to approximately 5 minutes.
��
Page 205 of 456

204 Controls in detailPower tilt/sliding sunroof
Stopping the power tilt/sliding sunroof
during Express-operation�
Move the switch in any direction.
Synchronizing the power tilt/sliding
sunroof
The tilt/sliding sunroof must be synchro-
nized�
after the vehicle battery has been
disconnected or discharged
�
after the tilt/sliding sunroof has been
closed manually (
�page 375)
�
the tilt/sliding sunroof does not open
smoothly
�
after a malfunction
�
Switch on the ignition (
�page 34).
�
Press and hold the sunroof switch in
the direction of arrow1 until the
tilt/sliding sunroof is fully raised at the
rear.
Keep holding the sunroof switch in the
direction of arrow1 for approximately
1 second.
�
Check the Express-open feature
(�page 203).
If the tilt/sliding sunroof opens com-
pletely, the sunroof is synchronized.
Otherwise repeat the above steps.
iThe selecting a tilt/sliding sunroof
opening position feature is activated
for Canada vehicles, but deactivated
for U.S. vehicles at the factory. If you
wish to have it activated, contact an au-
thorized Mercedes-Benz Center.
To select a tilt/sliding sunroof opening
position, press the sunroof switch to
the resistance point and release it
when the tilt/sliding sunroof has
reached the desired position. The
tilt/sliding sunroof now opens to the
position set when the sunroof switch is
pressed past the resistance point in the
“open” direction.
iIf the movement of the tilt/sliding sun-
roof is blocked during the closing pro-
cedure, the sunroof will stop and
reopen slightly.
��
Page 232 of 456
231 Controls in detail
Useful features
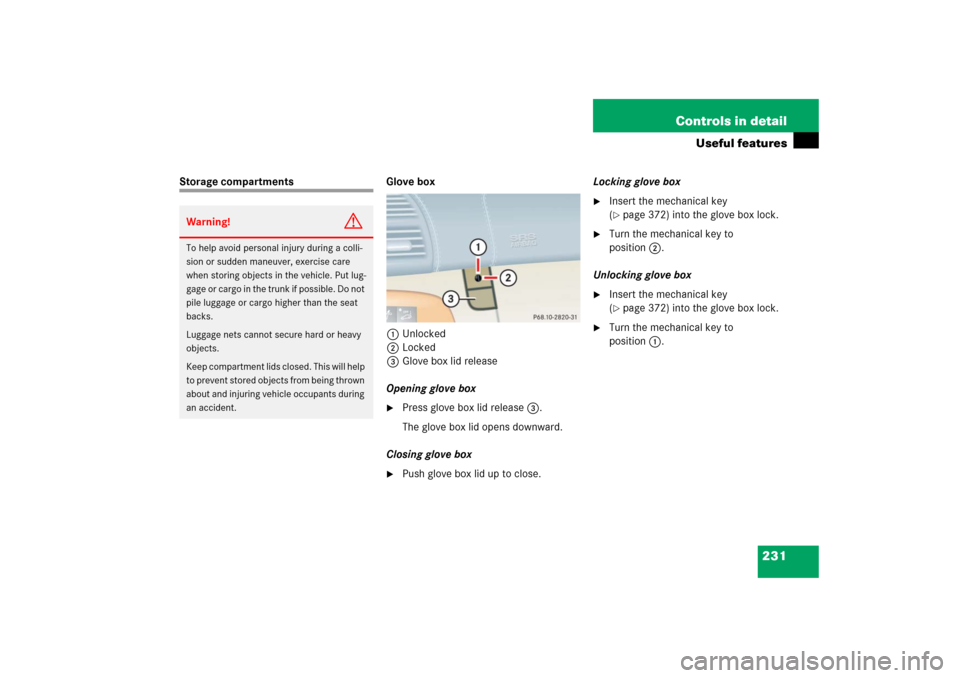
Storage compartments Glove box
1Unlocked
2Locked
3Glove box lid release
Opening glove box
�
Press glove box lid release3.
The glove box lid opens downward.
Closing glove box
�
Push glove box lid up to close.Locking glove box
�
Insert the mechanical key
(�page 372) into the glove box lock.
�
Turn the mechanical key to
position2.
Unlocking glove box
�
Insert the mechanical key
(�page 372) into the glove box lock.
�
Turn the mechanical key to
position1.
Warning!
G
To help avoid personal injury during a colli-
sion or sudden maneuver, exercise care
when storing objects in the vehicle. Put lug-
gage or cargo in the trunk if possible. Do not
pile luggage or cargo higher than the seat
backs.
Luggage nets cannot secure hard or heavy
objects.
Keep compartment lids closed. This will help
to prevent stored objects from being thrown
about and injuring vehicle occupants during
an accident.
Page 233 of 456
232 Controls in detailUseful featuresStorage compartment in the glove box
A storage compartment is located in the
cover of the glove box. It can be used to
store cards, pens, a flashlight, etc.
1Storage compartment in glove box�
Lightly press the marking on the lid of
storage compartment1.
The lid opens upward.Storage compartment in front of arm-
rest
1Storage compartment
Opening
The compartment contains a cup holder
(
�page 235).
�
Lightly touch cover plate1.
The cover opens automatically.
Closing
�
Lightly push the cover plate1 up until
it engages in lock.Storage compartment below the front
armrest
Depending on vehicle model and configu-
ration, your vehicle is equipped with a stor-
age compartment below the front armrest.
The storage compartment below the front
armrest is illuminated with the exterior
lamps switched on.
The buttons are located under the cushion
of the armrest.
1Button to open storage compartment
2Button to open storage tray and tele-
phone holder*
Page 235 of 456

234 Controls in detailUseful featuresStorage compartments under the front
seats
1Lid
2Buttons
Opening�
Press buttons2 together and fold
lid1 down.
Closing
�
Close lid1 until both buttons2 of
lock engage.Parcel net in front passenger footwell
A small convenience parcel net is located
in the front passenger footwell. It is for
small and light items, such as road maps,
mail, etc.Parcel net in trunk
You can hang a parcel net in the trunk. The
hooks and the parcel net in the trunk can
hold a load of up to 29.8 lbs (13.5 kg).
1Hook
�
Hang the parcel net on hooks1 on the
left and right sides of the trunk.
Warning!
G
The parcel net is intended for storing
light-weight items only.
Heavy objects, objects with sharp edges or
fragile objects may not be transported in the
parcel net. In an accident, during hard brak-
ing, or sudden maneuvers, they could be
thrown around inside the vehicle and cause
injury to vehicle occupants
The parcel net cannot protect transported
goods in the event of an accident.
!The parcel net cannot protect or suffi-
ciently secure goods in the event of an
accident.
Page 239 of 456
238 Controls in detailUseful featuresRear seat ashtray
1Latch
Opening ashtray�
Pull at top of cover to open ashtray.
Removing ashtray insert
�
Pull latch1 to disengage ashtray in-
sert and remove it.
Reinstalling the ashtray insert
�
Install ashtray insert.
�
Close the ashtray.
Cigarette lighter
1Cigarette lighter�
Switch on the ignition (
�page 34).
�
Push in cigarette lighter1.
The lighter will pop out automatically
when hot.
Warning!
G
Never touch the heating element or sides of
the lighter; they are extremely hot. Hold the
knob only.
When leaving the vehicle, always remove the
SmartKey or SmartKey with KEYLESS-GO*
from the starter switch, take it with you, and
lock the vehicle. Do not leave children unat-
tended in the vehicle, or with access to an
unlocked vehicle. Unsupervised use of vehi-
cle equipment may cause an accident
and/or serious personal injury.