Page 24 of 456
23 At a glance
Cockpit
Item
Page
1
Combination switch�
Turn signals
53
�
Windshield wipers
54
�
High beam
129
2
Cruise control lever
212
�
Cruise control
205
�
Distronic*
208
3
Instrument cluster
24
4
Multifunction steering
wheel
26
5
Steering wheel gearshift
control (CL 55 AMG and
CL 65 AMG only)
175
Item
Page
6
Lever for voice control sys-
tem*, see separate operat-
ing instructions
7
Front Parktronic* warning
indicator for right front area
225
8
Overhead control panel
29
9
Glove box lock
231
a
Glove box lid release
231
b
Glove box
231
c
Center console
27, 28
d
Starter switch
34
e
Horn
Item
Page
f
Steering wheel adjustment
stalk
42
Heated steering wheel*
239
g
Parking brake pedal
50
h
Hood lock release
273
j
Parking brake release
50
k
Door control panel
30
l
Exterior lamp switch
125
m
Headlamp washer button
178
n
Front Parktronic* warning
indicator for left front area
225
Page 77 of 456

76 Safety and SecurityOccupant safetyInstallation of infant and child restraint
systems
This vehicle is equipped with tether an-
chorages for a top tether strap at each of
the rear seating positions.
1Cover of top anchorage ring�
Remove cover1 from anchorage ring.
�
Store cover1 in a convenient place
(e.g. glove box).
�
Guide tether strap between head re-
straint and top of seat back.Head restraint must be positioned such
that the top tether strap can pass freely
between the head restraint and the top of
seat back.
�
Make sure the tether strap is not
twisted.
2Hook
3Anchorage ring
�
Securely fasten hook2, which is part
of the tether strap, to anchorage
ring3.Once the top tether anchorage hook is at-
tached, the child restraint itself can be se-
cured. Tighten the top tether strap
according to the child restraint
manufacturer’s instructions.
�
Reinstall cover after removing the teth-
er strap.iFor safety, make sure the hook2 has
attached to the ring3 beyond the
safety catch, as illustrated.
Page 232 of 456
231 Controls in detail
Useful features
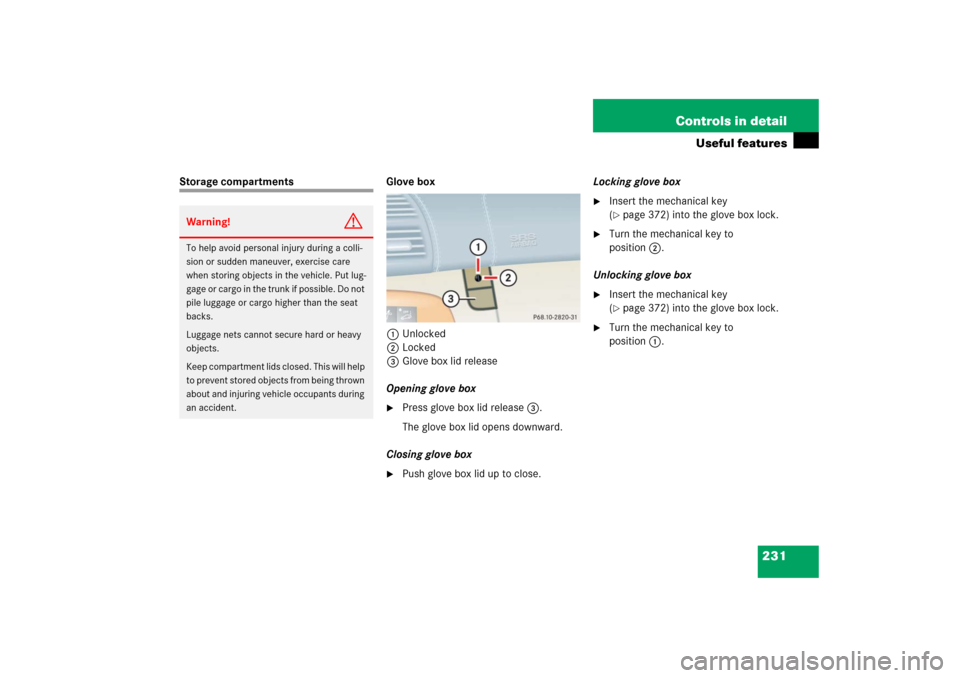
Storage compartments Glove box
1Unlocked
2Locked
3Glove box lid release
Opening glove box
�
Press glove box lid release3.
The glove box lid opens downward.
Closing glove box
�
Push glove box lid up to close.Locking glove box
�
Insert the mechanical key
(�page 372) into the glove box lock.
�
Turn the mechanical key to
position2.
Unlocking glove box
�
Insert the mechanical key
(�page 372) into the glove box lock.
�
Turn the mechanical key to
position1.
Warning!
G
To help avoid personal injury during a colli-
sion or sudden maneuver, exercise care
when storing objects in the vehicle. Put lug-
gage or cargo in the trunk if possible. Do not
pile luggage or cargo higher than the seat
backs.
Luggage nets cannot secure hard or heavy
objects.
Keep compartment lids closed. This will help
to prevent stored objects from being thrown
about and injuring vehicle occupants during
an accident.
Page 233 of 456
232 Controls in detailUseful featuresStorage compartment in the glove box
A storage compartment is located in the
cover of the glove box. It can be used to
store cards, pens, a flashlight, etc.
1Storage compartment in glove box�
Lightly press the marking on the lid of
storage compartment1.
The lid opens upward.Storage compartment in front of arm-
rest
1Storage compartment
Opening
The compartment contains a cup holder
(
�page 235).
�
Lightly touch cover plate1.
The cover opens automatically.
Closing
�
Lightly push the cover plate1 up until
it engages in lock.Storage compartment below the front
armrest
Depending on vehicle model and configu-
ration, your vehicle is equipped with a stor-
age compartment below the front armrest.
The storage compartment below the front
armrest is illuminated with the exterior
lamps switched on.
The buttons are located under the cushion
of the armrest.
1Button to open storage compartment
2Button to open storage tray and tele-
phone holder*
Page 371 of 456

370 Practical hintsWhere will I find ...?Vehicle jack, vehicle tool kit, luggage bowl, spare wheel
The spare wheel, the vehicle tool kit and
the luggage bowl are stored in the com-
partment underneath the trunk floor.
1Vehicle jack
2Vehicle tool kit
3Luggage bowl
4Spare wheel�
Lift up trunk floor cover and engage
trunk floor handle in upper edge of
trunk.
You can now remove the tools and ac-
cessories.The vehicle tool kit includes:
�
One interchangeable slot/Phillips
screwdriver
�
One towing eye bolt
�
One wheel bolt wrench with socket
wrench
�
One alignment bolt
�
One pair of gloves
�
One fuse extractor
�
One fuse chart for the main fuse box
�
Spare fusesVehicle jack
To prepare the vehicle jack for use
�
Remove the vehicle jack from the spare
wheel well under the trunk floor.
�
Push the crank handle up.
�
Turn the crank handle clockwise until it
engages (operational position).
!To prevent damage, always disengage
trunk floor handle from trunk edge and
lower trunk floor before closing the
trunk.
Page 440 of 456

439 Index
Fuel filler flap 270
Locking/unlocking 270
Opening in an emergency 374
Opening/closing 270
Fuel reserve warning lamp 331
Fuel tank
Capacity 419
Filler flap 270
Fuel tank reserve warning lamp 25
Fuel, Premium unleaded gasoline 271,
419
Fuels, coolants, lubricants etc.
Capacities 418
Fuses 399
Aids for replacing fuses 399
Fuse boxes in engine
compartment 401
Fuse boxes in passenger
compartment 400
Fuse chart 370
Fuse extractor 370
Replacing 399
Spare fuses 370G
Garage door opener 249
Gasoline see Fuel
GAWR 309
Gear range 429
Automatic transmission 170
Limiting 170
Shifting into optimal 172
Gear selector lever 48, 165
Cleaning 324
Lock 51
Message in display 344
Position indicator 166
Position, Automatic transmission 48,
165, 167
Global locking/unlocking see Key
Global Positioning System see GPS
Glove box 231
Good visibility 178
GPS 429
Gross Axle Weight Rating see GAWR
Gross Vehicle Weight Rating see GVWR
Gross Vehicle Weight see GVW
GVW 309
GVWR 310H
Hands-free microphone 29
Hard plastic trim items, cleaning 324
Hazard warning flasher 130
Head restraints
Folding rear head restraints
back 115
Front seat 38, 39
Front seat, Removing and
installing 114
Rear seat 115
Head unit see COMAND
Headlamp switch-off delay see Delayed
switch-off, Exterior lights
Headlamps
Automatic headlamp mode 126
Bi-Xenon 379, 427
Cleaning lenses 321
Cleaning system 178, 282, 425
Cleaning system washer
reservoir 271, 282
Manual headlamp mode 126
Messages in display 355
Replacing bulbs 379
Switch 52, 125
Page 449 of 456
 172
Shoulder support (Multicontour
seats*) 117
Side impact air bag")
448 IndexShifting
Automatic transmission 48, 165
Gear selector lever positions 167
Into optimal gear range (automatic
transmission) 172
Shoulder support (Multicontour
seats*) 117
Side impact air bags 67
Side marker lamps
Cleaning lenses 321
Messages in display 356
Replacing bulbs 379
Side windows see Power windows
Sidewall 310, 432
SmartKey see Key, SmartKey
SmartKey with KEYLESS-GO* see Key,
SmartKey with KEYLESS-GO*
Snow chains 314
Snow tires 313
Spare fuses 370
Spare wheel 386
Mounting 386
Speed settingsCruise control 207
Speedometer 25, 142
SRS 70, 432
Indicator lamp 25, 62, 335
Standing lamps 125
Replacing bulbs 379, 382, 383
Standing water, Driving through 266
Starter switch 23
Positions 34
Starting difficulties, Engine 50
Starting, Engine 48
Steering column 42
Steering wheel 42, 138
Cleaning 324
Electrical adjustment 42
Heated steering wheel* 239
Steering wheel gearshift control
CL 55 AMG and CL 65 AMG
Automatic transmission 173
Stolen vehicle, Recovery services (Tele
Aid) 249Storage compartments 231
Armrest 232, 233
Below the front armrest 232
Between rear seats 233
Cup holders 235
Glove box 231
In front of armrest 232
Parcel nets 234
Storage tray and telephone
holder* 233
Under the front seats 234
Storing, Tires 285
Submenus see Control system submenus
Sun visors 181
Sunroof see Power tilt/sliding sunroof
Sunshade* 182
Supplemental Restraint System see SRS
Symbols used in this operator’s
manual 15