Page 256 of 473
255 Controls in detail
Loading
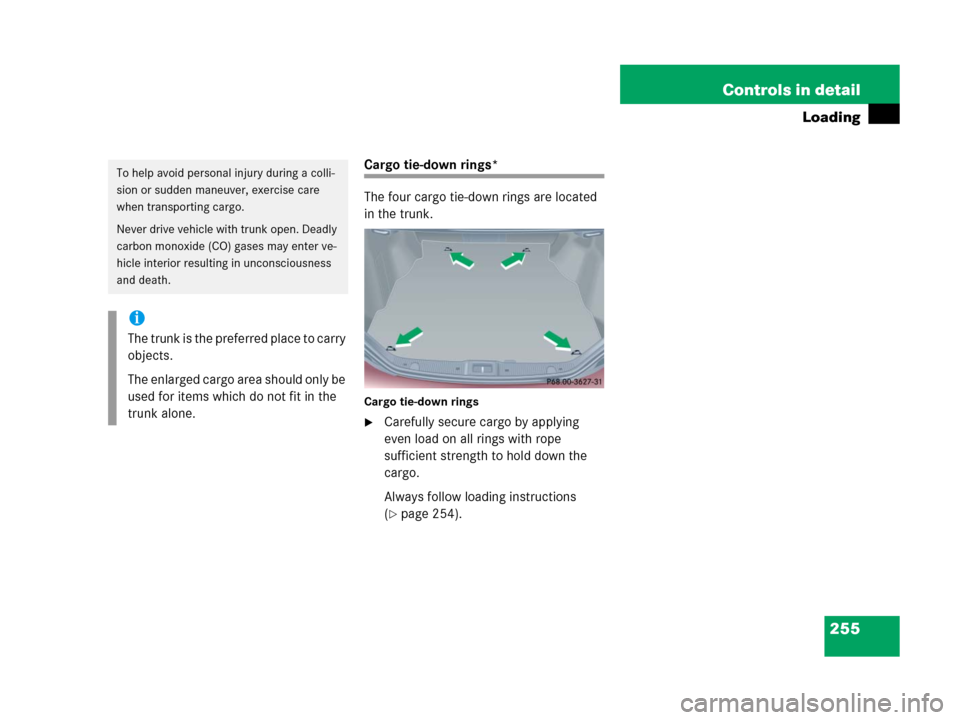
Cargo tie-down rings*
The four cargo tie-down rings are located
in the trunk.
Cargo tie-down rings
�Carefully secure cargo by applying
even load on all rings with rope
sufficient strength to hold down the
cargo.
Always follow loading instructions
(
�page 254).
To help avoid personal injury during a colli-
sion or sudden maneuver, exercise care
when transporting cargo.
Never drive vehicle with trunk open. Deadly
carbon monoxide (CO) gases may enter ve-
hicle interior resulting in unconsciousness
and death.
i
The trunk is the preferred place to carry
objects.
The enlarged cargo area should only be
used for items which do not fit in the
trunk alone.
Page 273 of 473
,
and the reserve SmartKey is not handy:
�Contact the Me")
272 Controls in detail
Useful features
Remote door unlock
In case you have locked your vehicle unin-
tentionally (e.g. SmartKey inside vehicle),
and the reserve SmartKey is not handy:
�Contact the Mercedes-Benz Response
Center at 1-800-756-9018 (in the USA)
or 1-888-923-8367 (in Canada).
You will be asked to provide your pass-
word which you provided when you
completed the subscriber agreement.
�Then return to your vehicle and pull the
trunk recessed handle for a minimum
of 20 seconds until the SOS button is
flashing.
The message
Connecting call
appears in the multifunction display.
As an alternative, you may unlock the vehi-
cle via Internet using the ID and password
sent to you shortly after the completion of
your acquaintance call.
The Response Center will then unlock your
vehicle with the remote door unlocking
feature.Stolen Vehicle Recovery services
In the event your vehicle was stolen:
�Report the incident to the police.
The police will issue a numbered
incident report.
�Pass this number on to the
Mercedes-Benz Response Center along
with your password issued to you when
you subscribed to the service.
The Response Center will then attempt
to covertly contact the vehicle’s
Tele Aid system. Once the vehicle is
located, the Response Center will
contact the local law enforcement and
you. The vehicle’s location will only be
provided to law enforcement.
i
The remote door unlock feature is
available if the relevant cellular phone
network is available.
The SOS button will flash and the
message
Connecting call will appear
in the multifunction display to indicate
receipt of the door unlock command.
Once the vehicle is unlocked, a
Response Center specialist may
attempt to establish voice contact with
the vehicle occupants.
If the tailgate recessed handle was
pulled for more than 20 seconds
before door unlock authorization was
received by the Response Center, you
must wait 15 minutes before pulling
the tailgate recessed handle again.
Page 291 of 473

290 Operation
Driving instructions
Passenger compartment
Driving abroad
Abroad, there is an extensive
Mercedes-Benz service network at your
disposal. If you plan to drive into areas
which are not listed in the index of your
Mercedes-Benz Center directory, you
should request pertinent information from
an authorized Mercedes-Benz Center.Control and operation of radio
transmitters
COMAND*, radio and telephone*Telephones* and two-way radios
Radio transmitters, such as a portable
telephone or a citizens band unit should
only be used inside the vehicle if they are
connected to an antenna that is installed
on the outside of the vehicle.
Refer to the radio transmitter operation
instructions regarding use of an external
antenna.
Warning!G
Always fasten items being carried as
securely as possible.
In an accident, during hard braking or sud-
den maneuvers, loose items will be thrown
around inside the vehicle, and cause injury
to vehicle occupants unless the items are
securely fastened in the vehicle.
The trunk is the preferred place to carry
objects.
Warning!G
Please do not forget that your primary
responsibility is to drive the vehicle safely.
Only operate the COMAND (Cockpit
Management and Data System), radio or
telephone
1 if road, weather and traffic
conditions permit.
Bear in mind that at a speed of just 30 mph
(approximately 50 km/h), your vehicle is
covering a distance of 44 feet
(approximately 14 m) every second.
1Observe all legal requirements
Warning!G
Never operate radio transmitters equipped
with a built-in or attached antenna (i.e. with-
out being connected to an external antenna)
from inside the vehicle while the engine is
running. Doing so could lead to a malfunc-
tion of the vehicle’s electronic system,
possibly resulting in an accident and
personal injury.
Page 380 of 473

379 Practical hints
What to do if …
Display symbolDisplay messagePossible cause/consequencePossible solution
KClose slid./pop-up
sunroofYou have opened the driver’s door with
the SmartKey removed from the starter
switch and the sliding portion of the
tilt/sliding sunroof open.�Close the tilt/sliding sunroof
(
�page 242).
JClose slid./pop-up
sunroofYou have opened the driver’s door with
the SmartKey removed from the starter
switch and the tilting portion of the
tilt/sliding sunroof open.�Close the tilt/sliding sunroof
(
�page 242).
LTele Aid malfunction.
Drive to workshopOne or more main functions of the Tele
Aid system* are malfunctioning.�Have the Tele Aid system* checked by
an authorized Mercedes-Benz Center.
tFunction unavailableThis display appears if buttont
ors on the multifunction steering
wheel is pressed and the vehicle is not
equipped with a telephone*.
ÊTrunk openYou are attempting to drive with the trunk
open.�Close the trunk.
WWasher fluid
please refillThe fluid level has dropped to
about1/3of total reservoir capacity.
�Add washer fluid (�page 304).
Page 381 of 473
380 Practical hints
Where will I find ...?
First aid kit
The first aid kit is located in the trunk on
the left side secured by a hook and loop
fastener.
1First aid kit
2Hook and loop fastener
�Unfasten hook and loop fastener2.
�Remove first aid kit1.
Vehicle tool kit
The vehicle tool kit is located in the storage
compartment underneath the trunk floor.
The following is included:
�Towing eye bolt
�Wheel wrench
�Alignment bolt
�Vehicle jack
�Spare fuses
�Valve extractor
�Protective wrap
�Collapsible wheel chock
�A pair of gloves Removing the vehicle tool kit
�Lift up trunk floor cover and engage
trunk floor handle in upper edge of
trunk.
1Spare wheel with collapsible tire
2Vehicle tool kit (under collapsible tire)
3Retaining screw
�Loosen retaining screw3 by turning it
counterclockwise.
�Remove collapsible tire1.
�Remove vehicle tool kit2.
i
Check expiration dates and contents
for completeness at least once a year
and replace missing/expired items.
Page 382 of 473

381 Practical hints
Where will I find ...?
1Vehicle jack
2Collapsible wheel chock and spare
wheel bolts
3Towing eye bolt
4Alignment bolt
5Wheel wrench
6Spare fuses and valve extractor
7Electric air pumpVehicle jackThe vehicle jack is located in the storage
compartment underneath the trunk floor.
Storage position
�Turn crank handle in the direction of ar-
row as far as it will go.
Warning!G
The jack is designed exclusively for jacking
up the vehicle at the jack take-up brackets
built into both sides of the vehicle. To help
avoid personal injury, use the jack only to lift
the vehicle during a wheel change. Never
get beneath the vehicle while it is supported
by the jack. Keep hands and feet away from
the area under the lifted vehicle. Always
firmly set parking brake and block wheels
before raising vehicle with jack.
Do not disengage parking brake while the
vehicle is raised. Be certain that the jack is
always vertical (plumb line) when in use,
especially on hills. Always try to use the jack
on level surface. Make sure the jack arm is
fully seated in the jack take-up bracket.
Always lower the vehicle onto sufficient
capacity jackstands before working under
the vehicle.
Page 384 of 473

383 Practical hints
Where will I find ...?
Spare wheel
The spare wheel with collapsible tire is lo-
cated in the storage compartment under-
neath the trunk floor.
�Lift up trunk floor cover and engage
trunk floor handle in upper edge of
trunk.
1Spare wheel with collapsible tire
2Vehicle tool kit (under collapsible tire)
3Retaining screwRemoving the spare wheel
�Loosen retaining screw3 by turning it
counterclockwise.
�Remove spare wheel1.
Storing the spare wheel
If you wish to store the spare wheel after
use, carry out the following steps.
Otherwise the spare wheel will not fit the
storage compartment.
�Unscrew the valve cap from the valve
of the collapsible tire.
�Take the valve extractor from the
vehicle tool kit (
�page 381).
�Unscrew the valve insert from the valve
and allow the air to escape.
�Screw the valve insert back into the
valve.
�Screw the valve cap back on the valve.
�Pull the protective wrap provided with
the vehicle tool kit over the spare
wheel.
�Store the spare wheel and the valve ex-
tractor in the storage compartment un-
derneath the trunk floor.
!
Make sure the spare wheel is dry when
storing it.
i
It may take a few minutes for the col-
lapsible tire to deflate completely.
��
Page 385 of 473

384 Practical hints
Where will I find ...?
�Pierce the protective wrap with
retaining screw3.
�Secure the spare wheel by turning re-
taining screw3 clockwise.In case of a flat tire, you may temporarily
use the spare wheel with collapsible tire
when observing the following restrictions:
�Do not exceed a vehicle speed of
50 mph (80 km/h).
�Drive to the nearest tire repair facility
to have the flat tire repaired or
replaced as appropriate.
�Do not operate vehicle with more than
one spare wheel mounted.
For more information, see “Rims and Tires”
(
�page 429).
!
To prevent damage, always disengage
trunk floor handle from upper edge of
trunk and lower trunk floor before
closing the trunk.
Warning!G
The dimensions of the spare wheel with
collapsible tire are different from those of
the road wheels. As a result, the vehicle han-
dling characteristics change when driving
with a spare wheel mounted.
The spare wheel with collapsible tire should
only be used temporarily, and should be re-
placed with a regular road wheel as quickly
as possible.
��