Page 298 of 473

297 Operation
Engine compartment
�Engine compartment
Hood
Opening
The hood lock release lever is located to
the left of the steering wheel under the
dashboard.
1Hood lock release lever�Pull lever1 downwards (�page 297).
The hood is unlocked and handle2.
2Lever for opening the hood�Push lever2 under the hood upwards.
�Pull up on the hood and then release it.
The hood will be automatically held
open at shoulder height by gas-filled
struts.
Warning!G
Do not pull the release lever while the
vehicle is in motion. Otherwise the hood
could be forced open by passing air flow.
!
To avoid damage to the windshield
wipers or hood, never open the hood if
the wiper arms are folded forward away
from the windshield.
Warning!G
To help prevent personal injury, stay clear of
moving parts when the hood is open and the
engine is running. Make sure the hood is
properly closed before driving. When closing
the hood, use extreme caution not to catch
hands or fingers.
The radiator fan may continue to run for
approximately 30 seconds or even restart
after the engine has been turned off. Stay
clear of fan blades.
Page 345 of 473

344 Operation
Vehicle care
Ornamental moldings
For regular cleaning and care of ornamen-
tal moldings, use a damp cloth.Headlamps, tail lamps, side markers,
turn signal lenses
�Use a mild car wash detergent, such as
Mercedes-Benz approved Car Sham-
poo, with plenty of water.
!
Due to the width of the vehicle, fold in
exterior rear view mirrors prior to run-
ning the vehicle through an automatic
car wash to prevent damage to the
mirrors.
Make sure that the windshield wiper
switch is set to0 (
�page 50). Other-
wise, the rain sensor could activate and
cause the wipers to move unintention-
ally. This may lead to vehicle damage.
i
After running the vehicle through an au-
tomatic car wash, wipe any wax off of
the windshield (
�page 345). This will
prevent smears and reduce wiping
noise which can be caused by residual
wax on the windshield.
When leaving the car wash, make sure
that the mirrors are folded out. Other-
wise they may vibrate.
!
Do not use chrome cleaner on orna-
mental moldings. Although ornamental
moldings may have chrome appear-
ance, they could be made of anodized
aluminum that will be damaged when
cleaned with chrome cleaner. Instead,
use a damp cloth to clean those orna-
mental moldings.
For very dirty ornamental moldings of
which you are sure are chrome-plated,
use a chrome cleaner. If in doubt
whether an ornamental molding is
chrome-plated, contact an authorized
Mercedes-Benz Center.!
Only use window cleaning solutions
that are suitable for plastic lamp lens-
es. Window cleaning solutions which
are not suitable may damage the plas-
tic lamp lenses of the headlamps.
Therefore, do not use abrasives, sol-
vents or cleaners that contain solvents.
Never apply strong force and only use a
soft, non-scratching cloth when clean-
ing the lenses. Do not attempt to wipe
dirty lenses with a dry cloth or sponge.
Otherwise you may scratch or damage
the lens surface.
Page 346 of 473
.
�Turn combination switch to wiper
settingII (
�page 50).
�With wiper arms in vertical positio")
345 Operation
Vehicle care
Cleaning the windows and the wiper
blades
�Switch on the ignition (�page 33).
�Turn combination switch to wiper
settingII (
�page 50).
�With wiper arms in vertical position,
switch off the ignition (
�page 33).
�Fold the wiper arms forward until they
snap into place.
�Clean the wiper blade inserts with a
clean cloth and detergent solution.
�Use a soft, clean cloth and a mild win-
dow cleaning solution on all outside
and inside glass surfaces.
An automotive glass cleaner is recom-
mended.
!
The windshield wipers must be in a ver-
tical position before folding them away
from the windshield. They could other-
wise damage the hood.
Never open the hood when the wiper
arms are folded forward.
Warning!G
For safety reasons, switch off wipers and re-
move SmartKey from starter switch before
cleaning the windshield and/or the wiper
blades. Otherwise, the wiper motor could
suddenly turn on and cause injury.
!
Fold the windshield wiper arms back
onto the windshield before turning the
SmartKey in the starter switch.
Hold on to the wiper when folding the
wiper arm back. If released, the force
of the impact from the tensioning
spring could crack the windshield.
!
To clean the window interior, do not
use a dry cloth, abrasives, solvents or
cleaners containing solvents. Do not
touch the inside of the front, rear or
side windows with hard objects such as
an ice scraper or ring. Doing so may
damage the windows.
Page 403 of 473
402 Practical hints
Replacing wiper blades
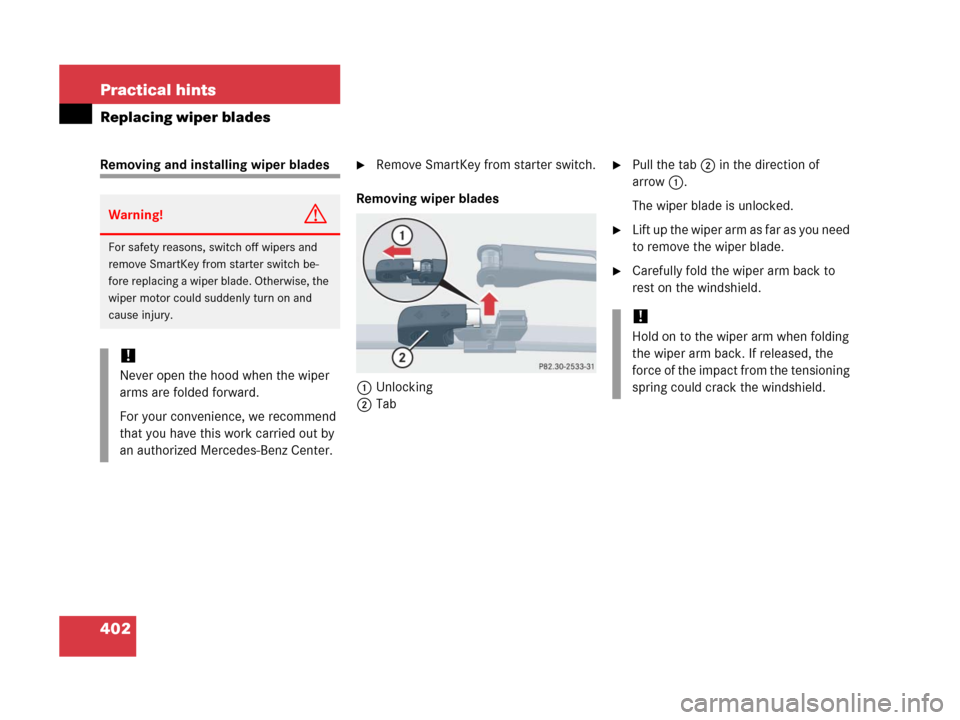
Removing and installing wiper blades�Remove SmartKey from starter switch.
Removing wiper blades
1Unlocking
2Tab�Pull the tab2 in the direction of
arrow1.
The wiper blade is unlocked.
�Lift up the wiper arm as far as you need
to remove the wiper blade.
�Carefully fold the wiper arm back to
rest on the windshield.
Warning!G
For safety reasons, switch off wipers and
remove SmartKey from starter switch be-
fore replacing a wiper blade. Otherwise, the
wiper motor could suddenly turn on and
cause injury.
!
Never open the hood when the wiper
arms are folded forward.
For your convenience, we recommend
that you have this work carried out by
an authorized Mercedes-Benz Center.
!
Hold on to the wiper arm when folding
the wiper arm back. If released, the
force of the impact from the tensioning
spring could crack the windshield.
Page 466 of 473

465 Index
V
Vacuum line routing diagram label 426
Valet locking 103
Vehicle
Battery 411
Breaking-in the vehicle 282
Care 341
Dimensions 435
Individual settings 135, 137
Locking/unlocking 104
Locking/unlocking in an
emergency 386, 387
Lowering 410
Modifications and alterations,
Operating safety 16
Towing 417
Washing 342, 343
Weights 435
Vehicle capacity weight 334
Vehicle Identification Number see VIN
Vehicle jack 381Vehicle loading
Cargo tie-down rings* 255
Instructions 254, 308
Load limit 435
Roof rack* 248
Split rear bench seat* 252
Terminology 331
Vehicle maximum load on the tire 334
Vehicle recovery services, Stolen
(Tele Aid*) 264
Vehicle status message memory 134
Vehicle tool kit 380
Removing 380
VIN 426, 448
Voice control system*,
Hands-free microphone 29
W
Warning lamps see Lamps, indicator and
warning
Warning sounds
Driver or front passenger seat belt 69
Parking brake 47
Seat belt telltale 355
Warranty coverage 10, 425
Washer fluid see Windshield washer fluid
Washer reservoir level 295Washing the vehicle 341
Wear pattern (tires) 335
Weights, Vehicle 435
Wheel
Bolts 385
Removing 406
Spare 383, 433
Tightening torque 410
Wheels, Tires 305
Window curtain air bags 66
Windows see Power windows
Windshield
Cleaning 345
Defogging 180, 191
Replacing wiper blades 402
Washer fluid 304, 442
Washer system 442
Windshield washer fluid 442
Message in display 379
Mixing ratio 442
Refilling 304
Wiping with 51
Windshield washer system 442
Windshield wipers 50
Cleaning 345
Replacing wiper blades 402