Page 299 of 473
.
The hood will lock audibly.
�Check to make sure the hood is fully
closed.
If you can raise t")
298 Operation
Engine compartment
Closing
�Let the hood drop from a height of
approximately 1 ft (30 cm).
The hood will lock audibly.
�Check to make sure the hood is fully
closed.
If you can raise the hood at a point
above the headlamps, then it is not
properly closed. Open it again and let it
drop with somewhat greater force.
Engine oil
The amount of oil your engine needs will
depend on a number of factors, including
driving style. Higher oil consumption can
occur when
�the vehicle is new
�the vehicle is driven frequently at
higher engine speeds
Engine oil consumption checks should only
be made after the vehicle break-in period.
Warning!G
If you see flames or smoke coming from the
engine compartment, or if the coolant tem-
perature gauge indicates that the engine is
overheated, do not open the hood. Move
away from vehicle and do not open the hood
until the engine has cooled. If necessary,
call the fire department.
Warning!G
The engine is equipped with a transistorized
ignition system. Because of the high voltage
it is dangerous to touch any components
(ignition coils, spark plug sockets, diagnos-
tic socket) of the ignition system
�with the engine running
�while starting the engine
�if ignition is “on” and the engine is
turned manually
Warning!G
Be careful that you do not close the hood on
anyone.
i
Do not use any special lubricant addi-
tives, as these may damage the drive
assemblies. Using special additives not
approved by Mercedes-Benz may
cause damage not covered by the
Mercedes-Benz Limited Warranty.
More information on this subject is
available at any Mercedes-Benz
Center.
Page 303 of 473

302 Operation
Engine compartment
The coolant expansion tank is located on
the passenger side of the engine compart-
ment.
1Coolant expansion tank
2Cap
�Using a rag, turn cap2 slowly approx-
imately one half counterclockwise to
release any excess pressure.
�Continue turning the cap counterclock-
wise and remove it.
The coolant level is correct if the level
�for cold coolant: reaches the black
top part of the reservoir
�for warm coolant: is approx. 0.6 in
(1.5 cm) higher
�Add coolant as required.
�Replace and tighten cap.
For more information on coolant, see
“Coolants” (
�page 439).
Warning!G
In order to avoid any possibly serious burns:
�Use extreme caution when opening the
hood if there are any signs of steam or
coolant leaking from the cooling system,
or if the coolant temperature gauge indi-
cates that the coolant is overheated.
�Do not remove pressure cap on coolant
reservoir if coolant temperature is
above 158°F (70°C). Allow engine to
cool down before removing cap. The
coolant reservoir contains hot fluid and
is under pressure.
�Using a rag, slowly open the cap
approximately1/2 turn to relieve excess
pressure. If opened immediately, scald-
ing hot fluid and steam will be blown out
under pressure.
�Do not spill antifreeze on hot engine
parts. Antifreeze contains ethylene
glycol which may burn if it comes into
contact with hot engine parts.
Page 346 of 473
.
�Turn combination switch to wiper
settingII (
�page 50).
�With wiper arms in vertical positio")
345 Operation
Vehicle care
Cleaning the windows and the wiper
blades
�Switch on the ignition (�page 33).
�Turn combination switch to wiper
settingII (
�page 50).
�With wiper arms in vertical position,
switch off the ignition (
�page 33).
�Fold the wiper arms forward until they
snap into place.
�Clean the wiper blade inserts with a
clean cloth and detergent solution.
�Use a soft, clean cloth and a mild win-
dow cleaning solution on all outside
and inside glass surfaces.
An automotive glass cleaner is recom-
mended.
!
The windshield wipers must be in a ver-
tical position before folding them away
from the windshield. They could other-
wise damage the hood.
Never open the hood when the wiper
arms are folded forward.
Warning!G
For safety reasons, switch off wipers and re-
move SmartKey from starter switch before
cleaning the windshield and/or the wiper
blades. Otherwise, the wiper motor could
suddenly turn on and cause injury.
!
Fold the windshield wiper arms back
onto the windshield before turning the
SmartKey in the starter switch.
Hold on to the wiper when folding the
wiper arm back. If released, the force
of the impact from the tensioning
spring could crack the windshield.
!
To clean the window interior, do not
use a dry cloth, abrasives, solvents or
cleaners containing solvents. Do not
touch the inside of the front, rear or
side windows with hard objects such as
an ice scraper or ring. Doing so may
damage the windows.
Page 369 of 473
.
Display symbolDisplay messagePossib")
368 Practical hints
What to do if …
During severe operating conditions and
stop-and-go city traffic, the coolant tem-
perature may rise close to 248°F (120°C).
Display symbolDisplay messagePossible cause/consequencePossible solution
•Coolant
Stop, engine off!The coolant is too hot. �Stop the vehicle in a safe location and
turn off the engine.
�Only start the engine again after the
message disappears. You could
otherwise damage the engine.
Warning!G
Driving when your engine is badly over-
heated can cause some fluids which may
have leaked into the engine compartment to
catch fire. You could be seriously burned.
Steam from an overheated engine can cause
serious burns and can occur just by opening
the hood. Stay away from the engine if you
see or hear steam coming from it.
Turn off the engine, get out of the vehicle
and do not stand near the vehicle until the
engine has cooled down.
!
The engine should not be operated with
the coolant temperature above 248°F
(120°C). Doing so may cause serious
engine damage which is not covered by
the Mercedes-Benz Limited Warranty.
Page 374 of 473
373 Practical hints
What to do if …
Display symbolDisplay messagePossible cause/consequencePossible solution
4Check gas cap.
See Operator’s ManualA loss of pressure has been detected in
the fuel system. The fuel cap may not be
closed properly or the fuel system may be
leaky.�Check the fuel cap (�page 293).
If it is not closed properly:
�Close the fuel cap.
If it is closed properly:
�Have the fuel system checked by an
authorized Mercedes-Benz Center.
YHood openYou are attempting to drive with the hood
open.�Close the hood (�page 297).
IRemove key.You have forgotten to remove the
SmartKey.�Remove the SmartKey from the starter
switch.
Replace key
Drive to workshopNo additional code available for
SmartKey.�Change the SmartKey.
Page 398 of 473
397 Practical hints
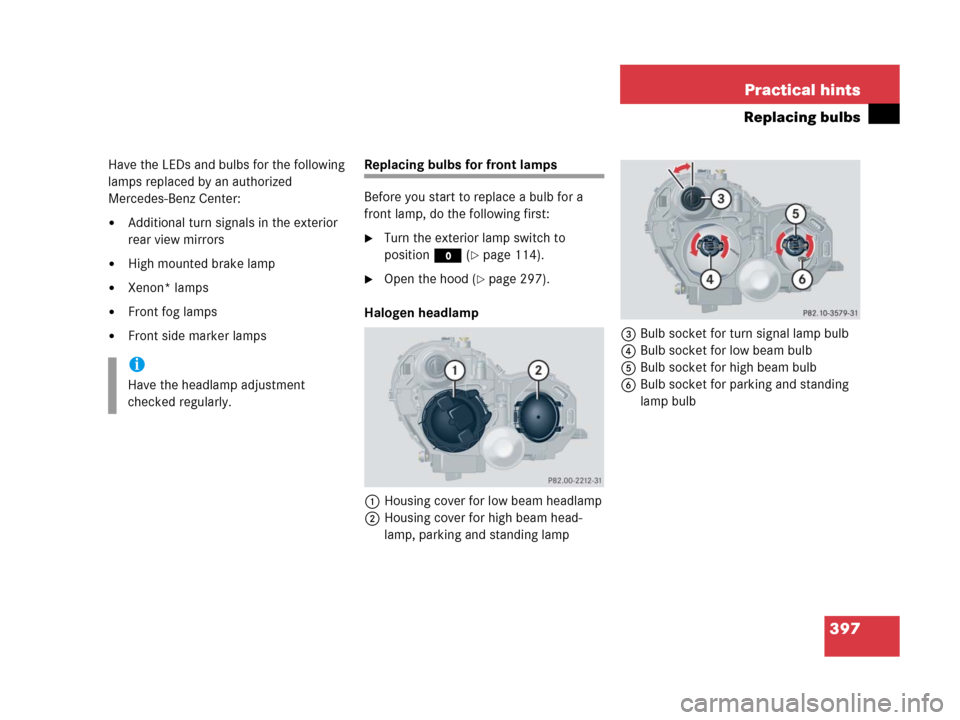
Replacing bulbs
Have the LEDs and bulbs for the following
lamps replaced by an authorized
Mercedes-Benz Center:
�Additional turn signals in the exterior
rear view mirrors
�High mounted brake lamp
�Xenon* lamps
�Front fog lamps
�Front side marker lamps
Replacing bulbs for front lamps
Before you start to replace a bulb for a
front lamp, do the following first:
�Turn the exterior lamp switch to
positionM (
�page 114).
�Open the hood (�page 297).
Halogen headlamp
1Housing cover for low beam headlamp
2Housing cover for high beam head-
lamp, parking and standing lamp3Bulb socket for turn signal lamp bulb
4Bulb socket for low beam bulb
5Bulb socket for high beam bulb
6Bulb socket for parking and standing
lamp bulb
i
Have the headlamp adjustment
checked regularly.
Page 403 of 473
402 Practical hints
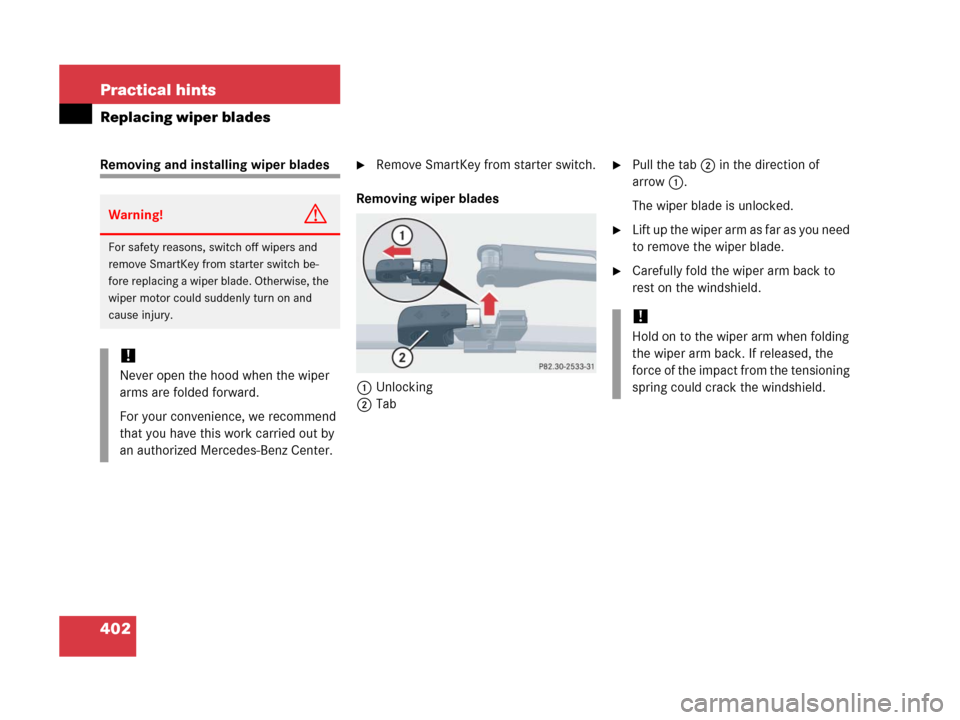
Replacing wiper blades
Removing and installing wiper blades�Remove SmartKey from starter switch.
Removing wiper blades
1Unlocking
2Tab�Pull the tab2 in the direction of
arrow1.
The wiper blade is unlocked.
�Lift up the wiper arm as far as you need
to remove the wiper blade.
�Carefully fold the wiper arm back to
rest on the windshield.
Warning!G
For safety reasons, switch off wipers and
remove SmartKey from starter switch be-
fore replacing a wiper blade. Otherwise, the
wiper motor could suddenly turn on and
cause injury.
!
Never open the hood when the wiper
arms are folded forward.
For your convenience, we recommend
that you have this work carried out by
an authorized Mercedes-Benz Center.
!
Hold on to the wiper arm when folding
the wiper arm back. If released, the
force of the impact from the tensioning
spring could crack the windshield.
Page 413 of 473

412 Practical hints
Battery
1Negative terminal
2Positive terminal cover
Disconnecting the battery
�Depress the parking brake pedal.
�Make sure the gear selector lever is set
to positionP.
�Turn off all electrical consumers.
�Turn off the engine (�page 56).
�Remove SmartKey from starter switch.
�Open the hood (�page 297).
�Remove the filter box (�page 411).
�Disconnect the battery negative lead
from negative terminal1.
�Remove cover2 from the positive
terminal.
�Disconnect the battery positive lead.
Removing the battery
�Remove the screw-nuts securing the
battery.
�Remove the battery bracket.
�Pull out the battery ventilation hose
from the battery (depending on battery
arrangement in your vehicle model, the
ventilation hose is located either on the
left or right side of the battery).
�Take out the battery.
Warning!G
With a disconnected battery
�you will no longer be able to turn the
SmartKey in the starter switch
�the gear selector lever will remain
locked in positionP
!
Always disconnect the battery in the
order described below. Otherwise the
vehicle’s electronics can be damaged.