Page 303 of 473

302 Operation
Engine compartment
The coolant expansion tank is located on
the passenger side of the engine compart-
ment.
1Coolant expansion tank
2Cap
�Using a rag, turn cap2 slowly approx-
imately one half counterclockwise to
release any excess pressure.
�Continue turning the cap counterclock-
wise and remove it.
The coolant level is correct if the level
�for cold coolant: reaches the black
top part of the reservoir
�for warm coolant: is approx. 0.6 in
(1.5 cm) higher
�Add coolant as required.
�Replace and tighten cap.
For more information on coolant, see
“Coolants” (
�page 439).
Warning!G
In order to avoid any possibly serious burns:
�Use extreme caution when opening the
hood if there are any signs of steam or
coolant leaking from the cooling system,
or if the coolant temperature gauge indi-
cates that the coolant is overheated.
�Do not remove pressure cap on coolant
reservoir if coolant temperature is
above 158°F (70°C). Allow engine to
cool down before removing cap. The
coolant reservoir contains hot fluid and
is under pressure.
�Using a rag, slowly open the cap
approximately1/2 turn to relieve excess
pressure. If opened immediately, scald-
ing hot fluid and steam will be blown out
under pressure.
�Do not spill antifreeze on hot engine
parts. Antifreeze contains ethylene
glycol which may burn if it comes into
contact with hot engine parts.
Page 381 of 473
380 Practical hints
Where will I find ...?
First aid kit
The first aid kit is located in the trunk on
the left side secured by a hook and loop
fastener.
1First aid kit
2Hook and loop fastener
�Unfasten hook and loop fastener2.
�Remove first aid kit1.
Vehicle tool kit
The vehicle tool kit is located in the storage
compartment underneath the trunk floor.
The following is included:
�Towing eye bolt
�Wheel wrench
�Alignment bolt
�Vehicle jack
�Spare fuses
�Valve extractor
�Protective wrap
�Collapsible wheel chock
�A pair of gloves Removing the vehicle tool kit
�Lift up trunk floor cover and engage
trunk floor handle in upper edge of
trunk.
1Spare wheel with collapsible tire
2Vehicle tool kit (under collapsible tire)
3Retaining screw
�Loosen retaining screw3 by turning it
counterclockwise.
�Remove collapsible tire1.
�Remove vehicle tool kit2.
i
Check expiration dates and contents
for completeness at least once a year
and replace missing/expired items.
Page 383 of 473
382 Practical hints
Where will I find ...?
�Turn crank handle clockwise.
Before storing the vehicle jack in its
compartment:
�It should be fully collapsed.
�The handle must be folded in (storage
position).Setting up the collapsible wheel chock
The collapsible wheel chock serves to
additionally secure the vehicle, e.g. while
changing the wheel.
1Tilt the plate upward
2Fold the lower plate outward
3Insert the plate
�Tilt both plates upward1.
�Fold the lower plate outward2.
�Guide the tabs of the lower plate all the
way into the openings of the base
plate3.
Page 384 of 473

383 Practical hints
Where will I find ...?
Spare wheel
The spare wheel with collapsible tire is lo-
cated in the storage compartment under-
neath the trunk floor.
�Lift up trunk floor cover and engage
trunk floor handle in upper edge of
trunk.
1Spare wheel with collapsible tire
2Vehicle tool kit (under collapsible tire)
3Retaining screwRemoving the spare wheel
�Loosen retaining screw3 by turning it
counterclockwise.
�Remove spare wheel1.
Storing the spare wheel
If you wish to store the spare wheel after
use, carry out the following steps.
Otherwise the spare wheel will not fit the
storage compartment.
�Unscrew the valve cap from the valve
of the collapsible tire.
�Take the valve extractor from the
vehicle tool kit (
�page 381).
�Unscrew the valve insert from the valve
and allow the air to escape.
�Screw the valve insert back into the
valve.
�Screw the valve cap back on the valve.
�Pull the protective wrap provided with
the vehicle tool kit over the spare
wheel.
�Store the spare wheel and the valve ex-
tractor in the storage compartment un-
derneath the trunk floor.
!
Make sure the spare wheel is dry when
storing it.
i
It may take a few minutes for the col-
lapsible tire to deflate completely.
��
Page 385 of 473

384 Practical hints
Where will I find ...?
�Pierce the protective wrap with
retaining screw3.
�Secure the spare wheel by turning re-
taining screw3 clockwise.In case of a flat tire, you may temporarily
use the spare wheel with collapsible tire
when observing the following restrictions:
�Do not exceed a vehicle speed of
50 mph (80 km/h).
�Drive to the nearest tire repair facility
to have the flat tire repaired or
replaced as appropriate.
�Do not operate vehicle with more than
one spare wheel mounted.
For more information, see “Rims and Tires”
(
�page 429).
!
To prevent damage, always disengage
trunk floor handle from upper edge of
trunk and lower trunk floor before
closing the trunk.
Warning!G
The dimensions of the spare wheel with
collapsible tire are different from those of
the road wheels. As a result, the vehicle han-
dling characteristics change when driving
with a spare wheel mounted.
The spare wheel with collapsible tire should
only be used temporarily, and should be re-
placed with a regular road wheel as quickly
as possible.
��
Page 387 of 473
386 Practical hints
Unlocking/locking in an emergency
Unlocking the vehicle
If you are unable to unlock the vehicle with
the SmartKey, open the driver’s door and
the trunk using the mechanical key. Removing the mechanical key
1Mechanical key locking tab
2Mechanical key
�Move locking tab1 in direction of
arrow.
�Slide mechanical key2 out of the
housing.Unlocking the driver’s door
1Unlocking
�Insert the mechanical key into the
driver’s door lock until it stops.
�Turn the mechanical key counterclock-
wise to position1.
The driver’s door is unlocked.
i
Unlocking and opening the driver’s
door and/or the trunk with the me-
chanical key will trigger the anti-theft
alarm system*.
To cancel the alarm, do one of the
following:
�Press buttonŒ or‹ on the
SmartKey.
�Insert the SmartKey in the starter
switch.
Page 388 of 473
 is required to open the trunk lid.
The trunk lid lock is located n")
387 Practical hints
Unlocking/locking in an emergency
Unlocking and opening the trunk
A minimum height clearance of 5.71 ft
(1.74 m) is required to open the trunk lid.
The trunk lid lock is located next to the
handle above the rear license plate recess.
1Unlocking in an emergency
2Handle�Insert the mechanical key into the
trunk lid lock until it stops.
�Turn the mechanical key
counterclockwise to position1.
The trunk lid unlocks.
�Pull on handle2.
The trunk opens.
�Turn the mechanical key back and
remove it from the trunk lid lock.
Locking the vehicle
If you can not lock the vehicle with the
SmartKey, do the following:
�Close the passenger door, the rear
doors and the trunk.
�Press the central locking switch in the
center console (
�page 104).
�Check to see whether the locking
knobs on the doors have moved down.
�If necessary push them down manually.
�Remove the mechanical key out of the
SmartKey (
�page 386).
�Check whether the trunk is locked.
�If necessary, lock the trunk with the
mechanical key (
�page 103).
�Close the driver’s door.
Except for the driver’s door, the vehicle
should now be locked.
!
The trunk lid swings open upwards
automatically. Always make sure there
is sufficient overhead clearance.
��
Page 389 of 473
388 Practical hints
Unlocking/locking in an emergency
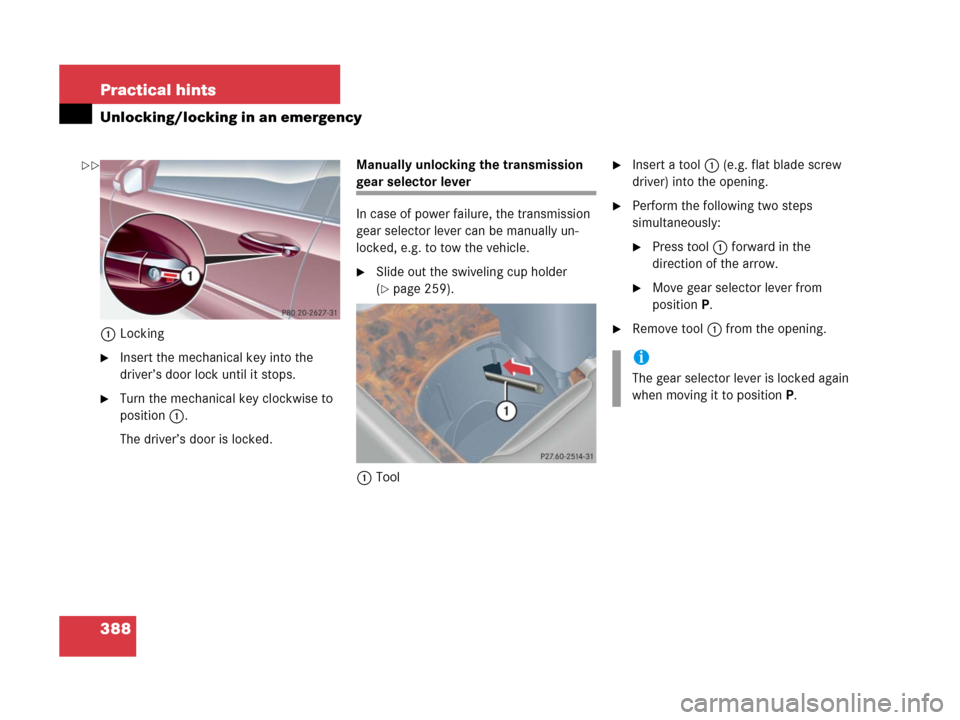
1Locking
�Insert the mechanical key into the
driver’s door lock until it stops.
�Turn the mechanical key clockwise to
position1.
The driver’s door is locked.Manually unlocking the transmission
gear selector lever
In case of power failure, the transmission
gear selector lever can be manually un-
locked, e.g. to tow the vehicle.
�Slide out the swiveling cup holder
(
�page 259).
1Tool
�Insert a tool1 (e.g. flat blade screw
driver) into the opening.
�Perform the following two steps
simultaneously:
�Press tool1 forward in the
direction of the arrow.
�Move gear selector lever from
positionP.
�Remove tool1 from the opening.
i
The gear selector lever is locked again
when moving it to positionP.
��