Page 99 of 473

98 Controls in detail
Locking and unlocking
Checking the batteries
�Press button‹ orŒ.
Battery check lamp5 (
�page 94)
comes on briefly to indicate that the
SmartKey batteries are in order.Unlocking and opening the trunk
You can unlock and open the trunk
separately.
A minimum height clearance of 5.71 ft
(1.74 m) is required to open the trunk lid.
�Press buttonŠ until trunk lid
unlocks and begins to open.Loss of SmartKey or mechanical key
If you lose a SmartKey or mechanical key,
you should do the following:
�Have the SmartKey deactivated by an
authorized Mercedes-Benz Center.
�Report the loss of the SmartKey or the
mechanical key immediately to your
car insurance company.
�If necessary, have the mechanical lock
replaced.
Your authorized Mercedes-Benz Center
will be glad to supply you with a replace-
ment.
i
If battery check lamp5 does not
come on briefly during check, then the
SmartKey batteries are discharged.
Replace the batteries (
�page 393).
You can obtain the required batteries
at any authorized Mercedes-Benz
Center.
i
If the batteries are checked within
signal range of the vehicle, pressing
the‹ orŒ button will lock or
unlock the vehicle accordingly.
!
The trunk lid swings open upwards
automatically. Always make sure there
is sufficient overhead clearance.
i
If the trunk does not open, it is still
locked separately (
�page 103).
Page 103 of 473
102 Controls in detail
Locking and unlocking
Trunk emergency release
With the emergency release button, the
trunk can be opened from inside the trunk.
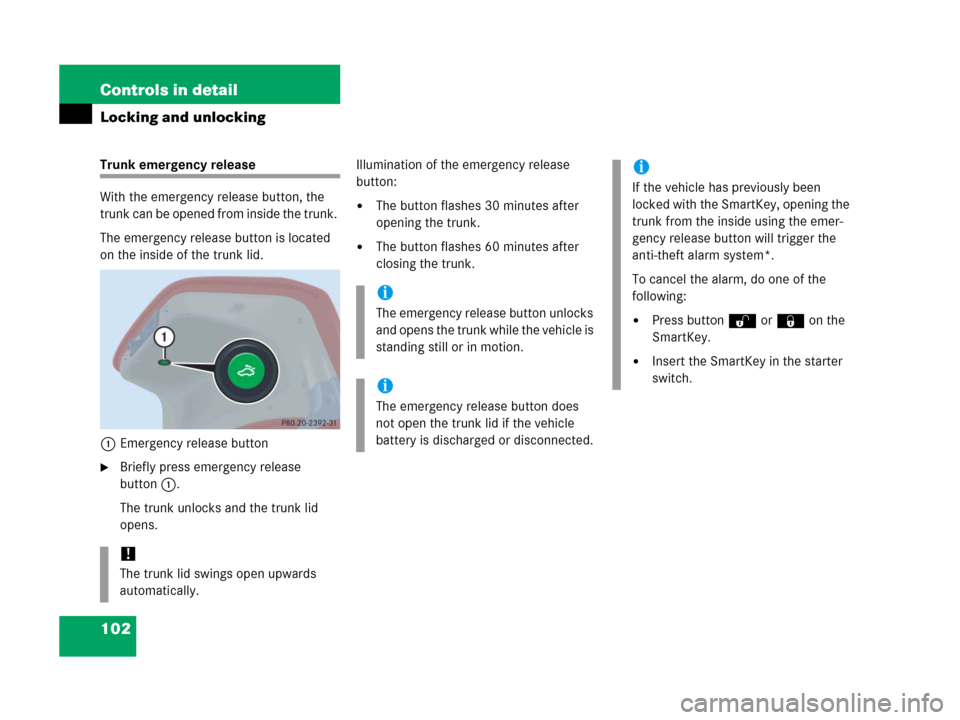
The emergency release button is located
on the inside of the trunk lid.
1Emergency release button
�Briefly press emergency release
button1.
The trunk unlocks and the trunk lid
opens.Illumination of the emergency release
button:
�The button flashes 30 minutes after
opening the trunk.
�The button flashes 60 minutes after
closing the trunk.
!
The trunk lid swings open upwards
automatically.
i
The emergency release button unlocks
and opens the trunk while the vehicle is
standing still or in motion.
i
The emergency release button does
not open the trunk lid if the vehicle
battery is discharged or disconnected.
i
If the vehicle has previously been
locked with the SmartKey, opening the
trunk from the inside using the emer-
gency release button will trigger the
anti-theft alarm system*.
To cancel the alarm, do one of the
following:
�Press buttonŒ or‹ on the
SmartKey.
�Insert the SmartKey in the starter
switch.
Page 121 of 473
120 Controls in detail
Lighting
Interior lighting
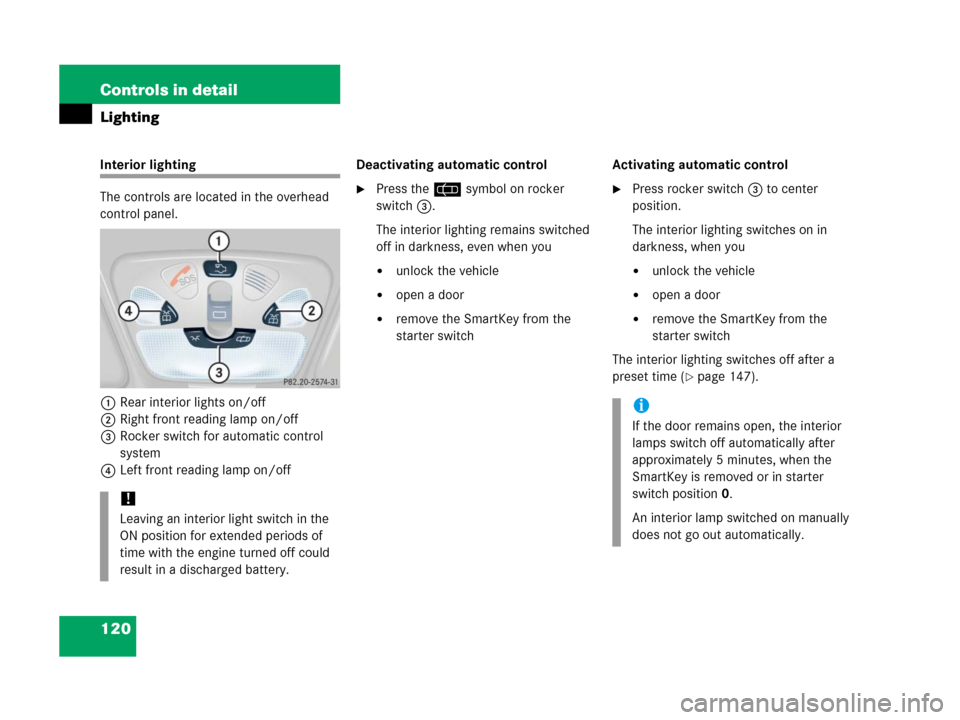
The controls are located in the overhead
control panel.
1Rear interior lights on/off
2Right front reading lamp on/off
3Rocker switch for automatic control
system
4Left front reading lamp on/offDeactivating automatic control
�Press the= symbol on rocker
switch3.
The interior lighting remains switched
off in darkness, even when you
�unlock the vehicle
�open a door
�remove the SmartKey from the
starter switchActivating automatic control
�Press rocker switch3 to center
position.
The interior lighting switches on in
darkness, when you
�unlock the vehicle
�open a door
�remove the SmartKey from the
starter switch
The interior lighting switches off after a
preset time (
�page 147).
!
Leaving an interior light switch in the
ON position for extended periods of
time with the engine turned off could
result in a discharged battery.
i
If the door remains open, the interior
lamps switch off automatically after
approximately 5 minutes, when the
SmartKey is removed or in starter
switch position0.
An interior lamp switched on manually
does not go out automatically.
Page 174 of 473
173 Controls in detail
Good visibility
Rear window defroster
The rear window defroster uses a large
amount of power. To keep the battery
drain to a minimum, switch off the
defroster as soon as the rear window is
clear.
The defroster is automatically deactivated
after approximately 6 to 17 minutes of op-
eration depending on the outside tempera-
ture.
�Switch on the ignition (�page 33).Activating
�Press buttonF or 1 in the
climate control panel (
�page 175) or
automatic climate control panel*
(
�page 185).
The indicator lamp on the button
comes on.
Deactivating
�Press buttonF or 1 again.
The indicator lamp on the button goes
out.
Warning!G
Any accumulation of snow and ice should be
removed from the rear window before
driving. Visibility could otherwise be
impaired, endangering you and others.
!
If the rear window defroster switches
off too soon and the indicator lamp
starts flashing, this means that too
many electrical consumers are
operating simultaneously and there is
insufficient voltage in the battery. The
system responds automatically by
deactivating the rear window defroster.
As soon as the battery has sufficient
voltage, the rear window defroster
automatically turns itself back on.
Page 197 of 473
196 Controls in detail
Automatic climate control* (Canada only)
Deactivating
�Press button9 (�page 185).
The indicator lamp on the button goes
out.
The residual heat is automatically turned
off:
�when the ignition is switched on
�after about 30 minutes
�if the battery voltage drops
Rear passenger compartment
adjustable air vents
The air conditioning for the rear passenger
compartment is controlled via the auto-
matic climate control panel (
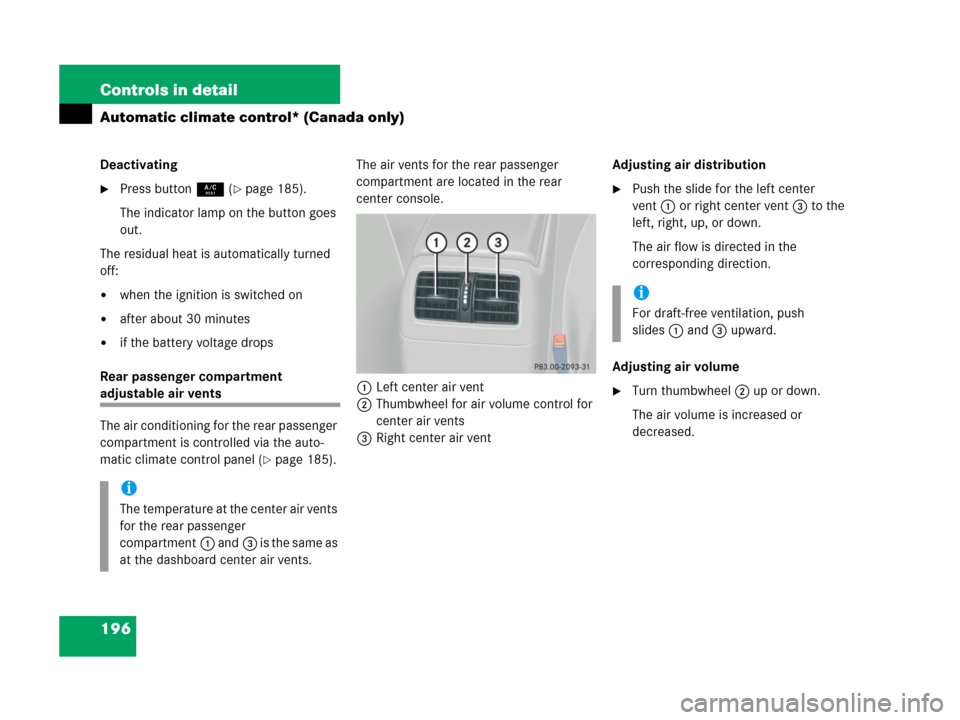
�page 185).The air vents for the rear passenger
compartment are located in the rear
center console.
1Left center air vent
2Thumbwheel for air volume control for
center air vents
3Right center air ventAdjusting air distribution
�Push the slide for the left center
vent1 or right center vent3 to the
left, right, up, or down.
The air flow is directed in the
corresponding direction.
Adjusting air volume
�Turn thumbwheel2 up or down.
The air volume is increased or
decreased.
i
The temperature at the center air vents
for the rear passenger
compartment1 and3 i s t h e s a m e a s
at the dashboard center air vents.
i
For draft-free ventilation, push
slides1 and3 upward.
Page 241 of 473
240 Controls in detail
Power windows
Stopping windows
�Press or pull respective switch again.
Synchronizing power windows
The power windows must be
resynchronized each time
�after the battery has been
disconnected or discharged.
�if the power windows cannot be fully
opened (Express-open) or closed
(Express-close).
�Switch on the ignition (�page 33).
�Pull the power window switches until
the side windows are closed.
�Hold the switches for approximately
1 second.
The power windows are synchronized.
!
If the upward movement of the window
is blocked during the closing
procedure, the window will stop and
open slightly.
Remove the obstruction, pull the
switch again past the resistance point
and release.
If the window still does not close when
there is no obstruction, then pull and
hold the switch again. The side window
will then close without the obstruction
sensor function.Warning!G
Driver’s door only:
If within 5 seconds you again pull the switch
past the resistance point and release, the
automatic reversal will not function.
Page 245 of 473
244 Controls in detail
Power tilt/sliding sunroof
Stopping the power tilt/sliding sunroof
during Express-operation
�Move the sunroof switch in any
direction.Synchronizing the power tilt/sliding
sunroof
The tilt/sliding sunroof must be
synchronized
�after the battery has been
disconnected or discharged
�after the tilt/sliding sunroof has been
closed manually (
�page 389)
�after a malfunction
�if the tilt/sliding sunroof does not open
smoothly
�Switch on the ignition (�page 33).
�Move and hold the sunroof switch in di-
rection of arrow1 (
�page 242) until
the tilt/sliding sunroof is fully raised at
the rear.
�Hold the sunroof switch for
approximately 1 second.
�Check the Express-open feature
(
�page 243).
If the tilt/sliding sunroof opens
completely, the tilt/sliding sunroof is
synchronized. Otherwise repeat the
above steps.
i
If the movement of the tilt/sliding
sunroof is blocked during the closing
procedure, the tilt/sliding sunroof will
stop and reopen slightly.
Page 266 of 473
265 Controls in detail
Useful features
The Tele Aid system
(Tele
matic Alarm Identification on
D
emand)
The Tele Aid system consists of three
types of response:
�automatic and manual emergency
�roadside assistance
�information
The Tele Aid system is operational provid-
ing that the vehicle’s battery is charged,
properly connected, not damaged and cel-
lular and GPS coverage is available.The speaker volume of a Tele Aid call can
be adjusted when using the volume control
on the audio system or COMAND* System
or on the multifunction steering wheel. To
raise, turn the rotary volume control on au-
dio system or COMAND* System clock-
wise or press buttonæ on the
multifunction steering wheel. To lower,
turn the rotary volume control on audio
system or COMAND* System control
counterclockwise or press buttonç on
the multifunction steering wheel.
�To activate, press the SOS button, the
Roadside Assistance button• or
the Information button¡, depend-
ing on the type of response required.
i
The SOS button is located in the over-
head control panel (
�page 267).
The Roadside Assistance button•
and the Information button¡ are
located in the armrest storage com-
partment (
�page 257).
!
The Tele Aid system utilizes the cellular
network for communication and the
GPS (G
lobal Positioning System) satel-
lites for vehicle location. If either of
these signals are unavailable, the
Tele Aid system may not function and if
this occurs, assistance must be sum-
moned by other means.