Page 410 of 474
�
Clean contact surfaces of wheel and
whee")
409 Practical hints
Flat tire
Mounting the spare wheel
1Wheel bolt for light alloy rims
2Wheel bolt for Minispare wheel (locat-
ed in trunk with spare wheel)�
Clean contact surfaces of wheel and
wheel hub.
�
Guide spare wheel onto the alignment
bolt and push it on.
�
Insert wheel bolts and tighten them
slightly.
!Wheel bolts2 must be used when
mounting the Minispare wheel or other
steel rims. The use of any wheel bolts
other than wheel bolts2 for the
Minispare wheel will physically damage
the vehicle’s brakes.
!To avoid paint damage, place wheel flat
against hub and hold it there while
installing first wheel bolt.Warning!
G
Always replace wheel bolts that are
damaged or rusted.
Never apply oil or grease to wheel bolts.
Damaged wheel hub threads should be
repaired immediately. Do not continue to
drive under these circumstances! Contact
an authorized Mercedes-Benz Center or call
Roadside Assistance.
Incorrect wheel bolts or improperly tight-
ened wheel bolts can cause the wheel to
come off. This could cause an accident.
Make sure to use the correct wheel bolts.
Page 411 of 474
410 Practical hintsFlat tire�
Unscrew the alignment bolt, install last
wheel bolt and tighten slightly.Lowering the vehicle
�
Lower vehicle by turning crank
counterclockwise until vehicle is
resting fully on its own weight.
�
Remove the jack.
1 - 5Wheel bolts
�
Tighten the five wheel bolts evenly,
following the diagonal sequence
illustrated (1to5), until all bolts are
tight. Observe a tightening torque
of 80 lb-ft (110 Nm).Before storing the jack, it should be fully
collapsed, with handle folded in (storage
position) (
�page 385).
�
Store the jack and the other vehicle
tools in the trunk.
Warning!
G
Only use genuine equipment
Mercedes-Benz wheel bolts. Other wheel
bolts may come loose.
Do not tighten the wheel bolts when the
vehicle is raised. Otherwise the vehicle
could fall off the jack.
Warning!
G
Have the tightening torque checked after
changing a wheel. The wheels could come
loose if they are not tightened to a torque
of 80 lb-ft (110 Nm).
Page 421 of 474
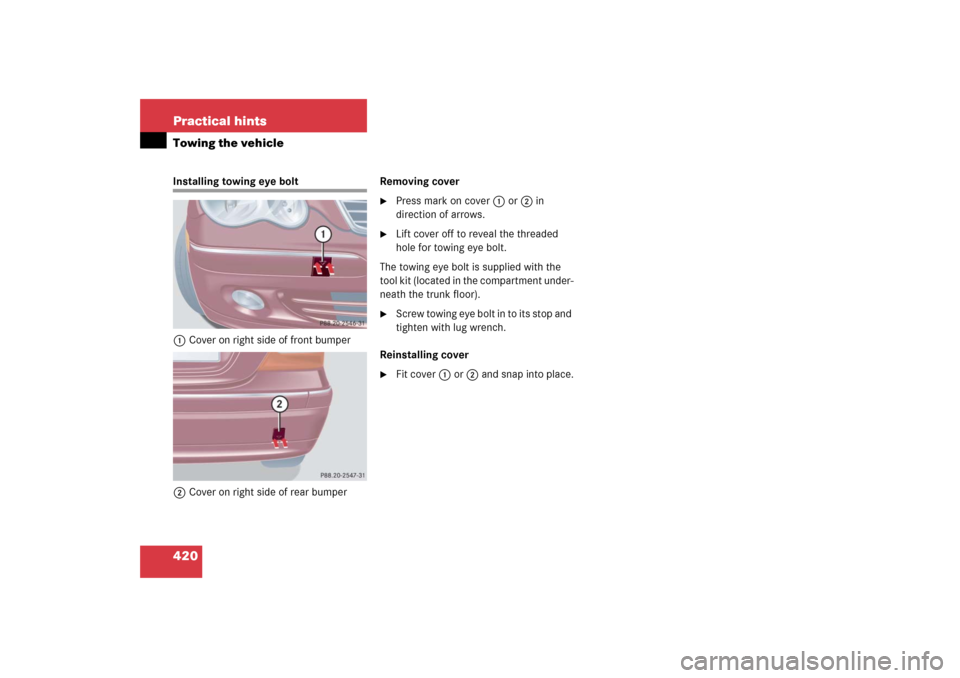
420 Practical hintsTowing the vehicleInstalling towing eye bolt
1Cover on right side of front bumper
2Cover on right side of rear bumperRemoving cover
�
Press mark on cover1 or2 in
direction of arrows.
�
Lift cover off to reveal the threaded
hole for towing eye bolt.
The towing eye bolt is supplied with the
tool kit (located in the compartment under-
neath the trunk floor).
�
Screw towing eye bolt in to its stop and
tighten with lug wrench.
Reinstalling cover
�
Fit cover1 or2 and snap into place.
Page 422 of 474

and systems secured by that fuse w")
421 Practical hintsFuses
�Fuses
Fuses are designed to protect the electri-
cal circuits in your vehicle from a short cir-
cuit. If a fuse is blown, the component(s)
and systems secured by that fuse will stop
operating.
The following aids are available to help you
replace fuses (
�page 421):
�
Fuse chart
�
Spare fuses
�
Fuse extractor
The electrical fuses are located in different
fuse boxes:
�
Main fuse box in passenger
compartment (
�page 422)
�
Fuse box in engine compartment
(�page 422)
�
Fuse box in trunk (
�page 423)
Aids for replacing fuses
Fuse chart
The fuse chart is located in the main fuse
box in the passenger compartment
(�page 422). The amperages of the fuses
are also given there.
Spare fuses
Spare fuses are located in the vehicle tool
kit in the trunk (
�page 383).
Fuse extractor
The fuse extractor is located in the fuse
box cover in the trunk (
�page 423).
Warning!
G
Only use fuses approved by Mercedes-Benz
with the specified amperage for the system
in question. Using other fuses may cause an
overload leading to a fire, and/or cause
damage to electrical components and/or
systems.
!Never attempt to repair or bridge a
blown fuse. Have the cause determined
and remedied by an authorized
Mercedes-Benz Center.!Keep the fuse boxes free by contamina-
tion and wetness. Otherwise, electrical
parts or systems could be damaged.
Page 424 of 474
423 Practical hintsFuses
Closing fuse box�
Make sure that the sealing rubber is
properly positioned.
�
Press fuse box cover4 down and
secure with clamps5.
Installing cover
�
Insert cover1 sideways into
retainer3.
�
Twist screws2 90° clockwise.
Fuse box in trunk
The fuse box is located in the trunk behind
the left-hand trim panel.
1Trim panel
2Fuse extractor
3Fuse box coverOpening fuse box
�
Pull away trim panel1.
�
Remove fuse box cover3.
Closing fuse box
�
Insert fuse box cover3.
�
Insert trim panel1.
Page 440 of 474
439 Technical data
Weights
�Weights
Roof load max.
220 lb (100 kg)
Trunk load max.
220 lb (100 kg)
Page 458 of 474

457 Index
Brake lamps
Cleaning lenses 344
Messages in display 377
Replacing bulbs 403
Brake pads
Message in display 370
Brakes 284
Warning lamp 25, 351
Break-in period 282
Bulbs, replacing see Replacing bulbs
C
CAC 449
California retail buyers and lessees,
important notice 11
CAN system 449
Cargo area see Trunk
Cargo tie-down rings* 256
Carpets, cleaning 347
Catalytic converter 291
CD changer* 216
CD player* 137, 216
Centigrade see Temperature display
mode 142Central locking
Automatic 107, 152
From inside 107
Locking/unlocking from inside 107
Switch 107
Certification label 428
Charcoal filter
Automatic climate control*
(Canada only) 194
Children in the vehicle 74
Air bags 64
Blocking rear door window
operation 85
Indicator lamp, front passenger
air bag 80, 356
Infant and child restraint systems 74
LATCH-type child seat anchors 83
Occupant Classification System
(OCS) 77
Cigarette lighter 262
Climate control system 176
Control panel 177
Defrosting, Front 181
Rear window defroster 175Clock 25, 130
Setting time 145, 146
Cockpit 22, 449
Cockpit Management and Data System
see COMAND
Cold tire inflation pressure 331
Collapsible wheel chock 386
COMAND* 449
COMAND* see separate COMAND
operating instructions
Combination switch 52, 122
Control system 130, 450
Multifunction display 130
Multifunction steering wheel 131
Resetting to factory default 140
Control system menu 130, 450
AUDIO 136
Menus overview 133
NAV* 138
Settings 140
Standard display 135
TEL* 157
Trip computer 155
Vehicle status message
memory 138
Page 460 of 474

459 Index
DOT 331
Downhill driving
Cruise control 248
Drinking and driving 283
Driving
Abroad 290
Hydroplaning 287
In winter 289
Instructions 45, 283
Problems 56
Safety systems 87
Systems 247
Through standing water 290
Driving safety systems
4MATIC 92
ABS 87
BAS 88
ESP
®
89E
Easy-entry/exit feature* 42, 153
Electrical fuses see Fuses
Electrical outlet 263
Electrical system, Technical data 437
Electronic Stability Program see ESP
®
Emergency calls
911 calls 237
Tele Aid* calls 267, 268, 271
Emergency operation
(Limp Home Mode) 169
Emergency operations
Fuel filler flap 391
Gear selector lever, Unlocking 392
Locking/unlocking the vehicle 389
Power tilt/sliding sunroof*,
Manual operation 393
Remote door unlock 272
Trunk lid, Releasing from inside 105
Trunk lid, Unlocking 390
Emergency Tensioning Device see ETDEmergency, in case of
Battery, Jump starting 415
First aid kit 350, 383
Flat tire, Changing 406
Fuses 421
Hazard warning flasher 124
Instrument cluster,
Indicator lamps 350–355
Roadside Assistance 12, 268
Towing the vehicle 417
Emission control 292
Information label 428
System warranties 10
Engine
Belt layout 429
Block heater (Canada only) 337
Brake-in recommendations 282
Cleaning 343
Compartment 297
Malfunction indicator lamp 25, 352
Maximum engine speed 430