Page 44 of 202
42 Audio
Radio operation
Weather Band WB
�In the FM or AM Radio main menu,
press the
WB soft key.
An automatic scan is starting and the
COMAND plays and displays the
channel of the first strong WB station.
Switching back to FM or AM band
�Press the FM/AM soft key.
or
�Press the WB soft key
The station last tuned to will begin to
play.
Switching back to the Audio menu
�Press the Back soft key.
The Weather Band WB station will con-
tinue to play.You can use the following functions:
�Automatic seek tuning (�page 43)
�Manual tuning (�page 43)
�Station selection from the preset menu
(
�page 44)
�Station selection via direct frequency
entry (FM, AM) (
�page 43)
�Automatic station scan (FM, AM)
(
�page 44)
�Station selection from the FM/AM
Autostore presets (
�page 49)
i
With the number keys 1 - 7 it is pos-
sible to choose a channel.
The message
No channel will appear
if the system could not detect a chan-
nel.
Selecting a station
Page 45 of 202
43 Audio
Radio operation
Automatic seek tuning
�Press g or h.
or
�Push the joystick to gor G.
The radio will tune in to the next
receivable station (FM, AM) or channel
(WB) with descending/ascending
frequency depending on the direction
of seek.
WB direct channel selection
�Press a number key 1 through 7.Manual tuning (FM, AM)
�Activate the desired wave band
(
�page 41).
�Press g or h longer than 2 se-
conds.
The function rapidly scans the
frequencies.
�Press g or h repeatedly to
change the frequency step by step.
or
�Push the joystick to H or h.
Each push of the joystick will change
the frequency by one step.
FM Band
The frequency displayed will change in in-
crements of 0.2 MHz.
AM Band
Tuning will take place in increments of
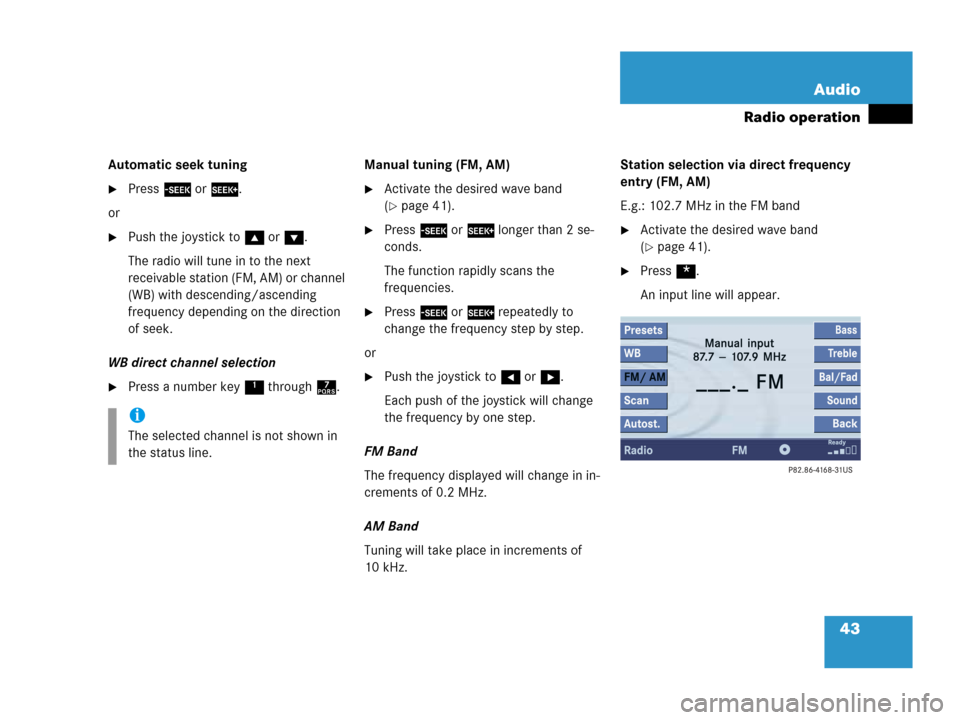
10 kHz.Station selection via direct frequency
entry (FM, AM)
E.g.: 102.7 MHz in the FM band
�Activate the desired wave band
(
�page 41).
�Press *.
An input line will appear.
i
The selected channel is not shown in
the status line.
Page 46 of 202

44 Audio
Radio operation
�Enter the desired frequency with the
number keys within 8 seconds, e.g.
1027 for 102.7 MHz.
The station you have selected will
begin to play.
FM, AM band
Entries outside the frequency range are
not accepted. The message
Please
observe frequency range 87.7 -
107.9 MHz
will appear briefly.Preset station selection via number
keypad
FM- and AM-Bands
�Press one of the number keys, such as
2 briefly.
The radio will tune to the frequency as-
signed to that memory location. If none
has been set by you, the radio will not
change the station.Automatic station scan (FM, AM)
The stations on the same band (FM, AM)
can be scanned one after the other for 8
seconds each.
Start scan function
�Activate the desired wave band
(
�page 41).
�Press the Scan soft key.
Frequency bandFrequency range
FM
AM87.7 - 107.9 MHz
530 - 1710 kHz
i
If you do not make another entry within
8 seconds, the function will be canceled
and you will continue listening to the
station last tuned to.
i
FM and AM presets are independent
and can only be accessed while in the
corresponding band.
Saving stations for FM and AM
(
�page 46).
i
In the AM band, two search runs take
place. During the first run, stations with
good reception are played. During the
second run, stations with weaker
reception are played.
Page 48 of 202

�Saving stations automatically FM, AM
(
�page 48)
�Selecting a station from the FM/AM
preset menu (
�")
46 Audio
Radio operation
You can use the following functions:
�Saving stations manually (FM, AM)
�Saving stations automatically FM, AM
(
�page 48)
�Selecting a station from the FM/AM
preset menu (
�page 49)
�Selecting a station from the FM/AM
Auto presets (
�page 49)Saving stations manually (FM, AM)
In the Radio main menu
�Activate the desired wave band
(
�page 41).
�Press one of the number keys, e.g. 2,
longer than 2 seconds.
You will hear a verification beep if the
beep tones option was activated in the
system settings (
�page 178).
The radio saves the current station at
the memory preset selected. The me-
mory preset selected will appear in the
status bar, e.g.
FM2.On the memory list
�Activate the desired wave band
(
�page 41).
�Press the Presets soft key.
The memory Preset menu will appear.
�Push the joystick to H, h or g,
G to highlight the desired memory
preset.
Memory functions
i
There are 10 presets available (1 -
9, 0).
An existing entry is overwritten in the
memory list when a new input is given.
Page 49 of 202
47 Audio
Radio operation
�Press E longer than 2 seconds.
You will hear a verification beep if the
beep tones option was activated in the
system settings (
�page 178).
The current station will be saved at the
memory preset selected.You will see the Radio main menu
�automatically after 8 seconds
�if you press the Back soft key.
i
There are 2 presets for each of the FM
and AM waveband
�standard FM/AM presets (saving
stations manually) and
�Auto presets (saving stations
automatically).
The standard FM/AM presets are not
affected by the Auto presets. This is a
second option for storing a station ran-
ge you are currently receiving.
Page 51 of 202

�Activate the FM or AM memory
(
�page 46).
You can use one of the following two ways
to select a station from the FM/AM
p")
49 Audio
Radio operation
Selecting a station from the preset
menu (FM, AM)
�Activate the FM or AM memory
(
�page 46).
You can use one of the following two ways
to select a station from the FM/AM
presets
�Press the corresponding number key,
e.g. 3, to select the desired station.
or
�Push the joystick to H, h or g,
G to highlight a memory preset in the
FM/AM preset list (
�page 46).
�Press E.
In both cases, you will see the main
radio menu
�automatically after 8 seconds
�if you press the Back soft key.
The Radio main menu indicating the
memory preset number.Selecting a station from the FM/AM
autostore presets
�Activate the FM or AM autostore preset
menu (
�page 48).
You can use one of the following two ways
to select a station from the FM/AM
autostore presets
�Press the corresponding number key,
e.g. 3, to select the desired station.
or
�Push the joystick to H, h or g,
G to highlight a memory position.
�Press E.
In both cases, you will see the main
radio menu
�automatically after 8 seconds
�if you press the Back soft key.
Page 80 of 202

78 Satellite radio*
Important notes
� Important notes
In chapter “Satellite radio”, you will find
detailed information regarding
�selecting a station and a program cate-
gory
�memory functions
�sound adjustments
If you have not done so already, please fa-
miliarize yourself with these functions by
reading chapter “At a glance”.
i
Additional optional satellite radio equip-
ment and a subscription to satellite ra-
dio service provider are required for the
satellite radio operation described here.
Contact your authorized Mercedes-
Benz Center for details and availability
for your vehicle.
i
Note that categories and channels
shown in illustrations are dependent on
programming content delivered by the
service provider. Programming content
is subject to change. Therefore, channel
and categories shown in illustrations
and descriptions contained in this ma-
nual may differ from the channels and
categories delivered by the service pro-
vider.
Satellite radio service may be unavai-
lable or interrupted from time to time
for a variety of reasons, such as envi-
ronmental or topographic conditions
and other things we can’t control. Ser-
vice might also not be available in cer-
tain places (e.g., in tunnels, parking
garages, or within or next to buildings)
or near other technologies.
i
Sirius Satellite Radio provides approxi-
mately 100 channels, so called
streams, of digital-quality radio, among
others music, sports, news, and enter-
tainment commercial-free.
Sirius Satellite Radio uses a fleet of
high-power satellites to broadcast 24
hours per day, coast-to-coast, in the
contiguous U.S.
This diverse, satellite-delivered pro-
gramming is available for a monthly
subscription fee. For more information,
call the Sirius Service Center
(
�page 79) or contact
www.siriusradio.com.
Page 81 of 202

79 Satellite radio*
Subscribing
� Subscribing
�Press B to switch to satellite radio
operation.
The Satellite radio main menu will ap-
pear and displays the
Preview chan-
nel. You cannnot select any other
station.
�Press the Service soft key to display
the Service information display.
The Service information display will ap-
pear.
Service information display
1Phone number of the provider,
(SIRIUS) or “Call Service Provider”
2The Electronical Serial Number (ESN)
of your satellite receiver
�Contact satellite radio service provider
at the telephone number displayed in
the screen.After the connection is made:
�Follow the instructions given by the
operator.
The activation process may take up to
10 minutes. If it is successful, you will
see the display with the message
Acquiring Signal... (�page 80)
followed by the Satellite radio main
menu (
�page 80).
Subscribing to satellite radioi
Depending on subscription status, soft
keys may or may not appear on the left
and right side of the service information
display.
i
Credit card information may be re-
quired for your application.
The activation process takes up to ap-
proximately 10 minutes.
If a satellite receiver is not installed or
not properly installed:
The message
No Satellite Radio
will appear.