Page 204 of 378

Black plate (204,1)
Antenna
qDetachable Type
To remove the antenna, turn it
counterclockwise.
To install the antenna, turn it clockwise.
Make sure the antenna is securely
installed.
Remove
Install
CAUTION
To prevent damage to the antenna,
remove it before entering a car wash
facility or passing beneath a low
overhead clearance.
NOTE
When leaving your vehicle unattended,
we recommend that you remove the
antenna and store it inside the vehicle.
Operating Tips for Audio
System
WARNING
Do Not Adjust Audio While Driving
the Vehicle:
Adjusting the audio while driving the
vehicle is dangerous as it could
distract your attention from the vehicle
operation which could lead to a
serious accident. Always adjust the
audio while the vehicle is stopped.
Even if the audio control switches are
equipped on the steering wheel, learn
to use the switches without looking
down at them so that you can keep
your maximum attention on the road
while driving the vehicle.
CAUTION
For the purposes of safe driving, adjust
the audio volume to a level that allows
you to hear sounds outside of the
vehicle.
NOTE
lDo not use the audio for long periods
of time while the engine is off.
Otherwise the battery could go dead.
lIf a digital cellular phone or CB
radio is used in or near the vehicle, it
could cause noise to occur from the
audio system, however, this does not
indicate that the system has been
damaged.
6-10
Interior Comfort
Audio System
MX-5_8U35-EA-05F_Edition4 Page204
Thursday, October 6 2005 11:4 AM
Form No.8U35-EA-05F
Page 213 of 378
Black plate (213,1)
Audio Set
CD PlayerIn-Dash CD Changer
Illustration is of a representative audio unit.
Power/Volume/Sound Controls .............................................................................. page 6-20
Clock ...................................................................................................................... page 6-24
Operating the Radio ............................................................................................... page 6-26
Operating the Compact Disc (CD) Player .............................................................. page 6-28
Operating the In-Dash CD Changer ....................................................................... page 6-30
Error Indications ..................................................................................................... page 6-35
Interior Comfort
Audio System
6-19
MX-5_8U35-EA-05F_Edition4 Page213
Thursday, October 6 2005 11:4 AM
Form No.8U35-EA-05F
Page 218 of 378

Black plate (218,1)
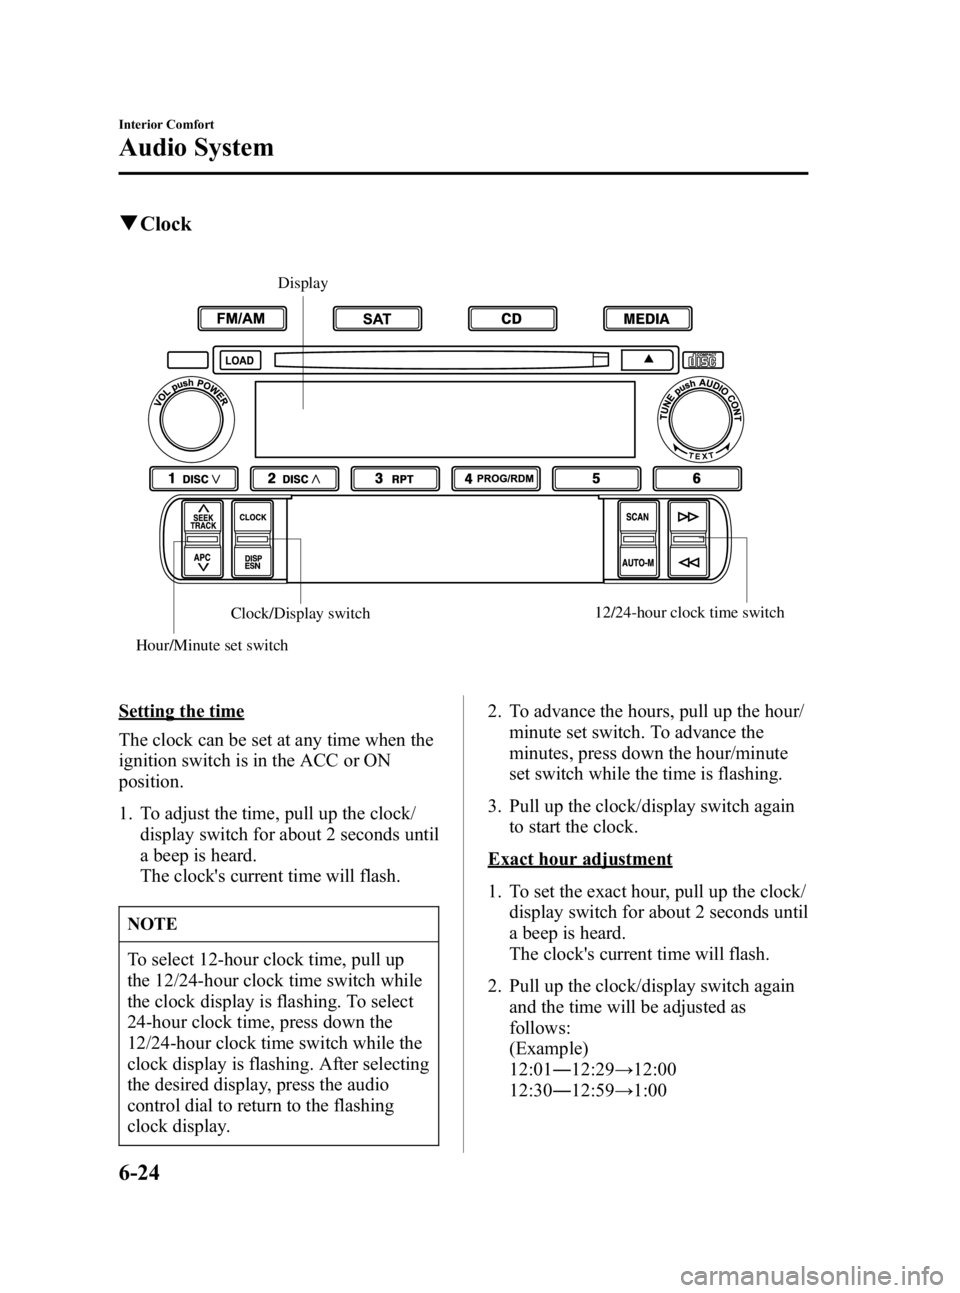
qClock
Display
Hour/Minute set switch
Clock/Display switch12/24-hour clock time switch
Setting the time
The clock can be set at any time when the
ignition switch is in the ACC or ON
position.
1. To adjust the time, pull up the clock/
display switch for about 2 seconds until
a beep is heard.
The clock's current time will flash.
NOTE
To select 12-hour clock time, pull up
the 12/24-hour clock time switch while
the clock display is flashing. To select
24-hour clock time, press down the
12/24-hour clock time switch while the
clock display is flashing. After selecting
the desired display, press the audio
control dial to return to the flashing
clock display. 2. To advance the hours, pull up the hour/
minute set switch. To advance the
minutes, press down the hour/minute
set switch while the time is flashing.
3. Pull up the clock/display switch again to start the clock.
Exact hour adjustment
1. To set the exact hour, pull up the clock/
display switch for about 2 seconds until
a beep is heard.
The clock's current time will flash.
2. Pull up the clock/display switch again and the time will be adjusted as
follows:
(Example)
12:01 ―12:29 →12:00
12:30 ―12:59 →1:00
6-24
Interior Comfort
Audio System
MX-5_8U35-EA-05F_Edition4 Page218
Thursday, October 6 2005 11:4 AM
Form No.8U35-EA-05F
Page 219 of 378
Black plate (219,1)
NOTE
lWhen the clock/display switch is
released, the seconds are reset to
“00 ”.
lIf the power supply to the unit is
interrupted (if the fuse blows or the
vehicle's battery is disconnected), the
clock will need to be reset.
Interior Comfort
Audio System
6-25
MX-5_8U35-EA-05F_Edition4 Page219
Thursday, October 6 2005 11:4 AM
Form No.8U35-EA-05F
Page 224 of 378

Black plate (224,1)
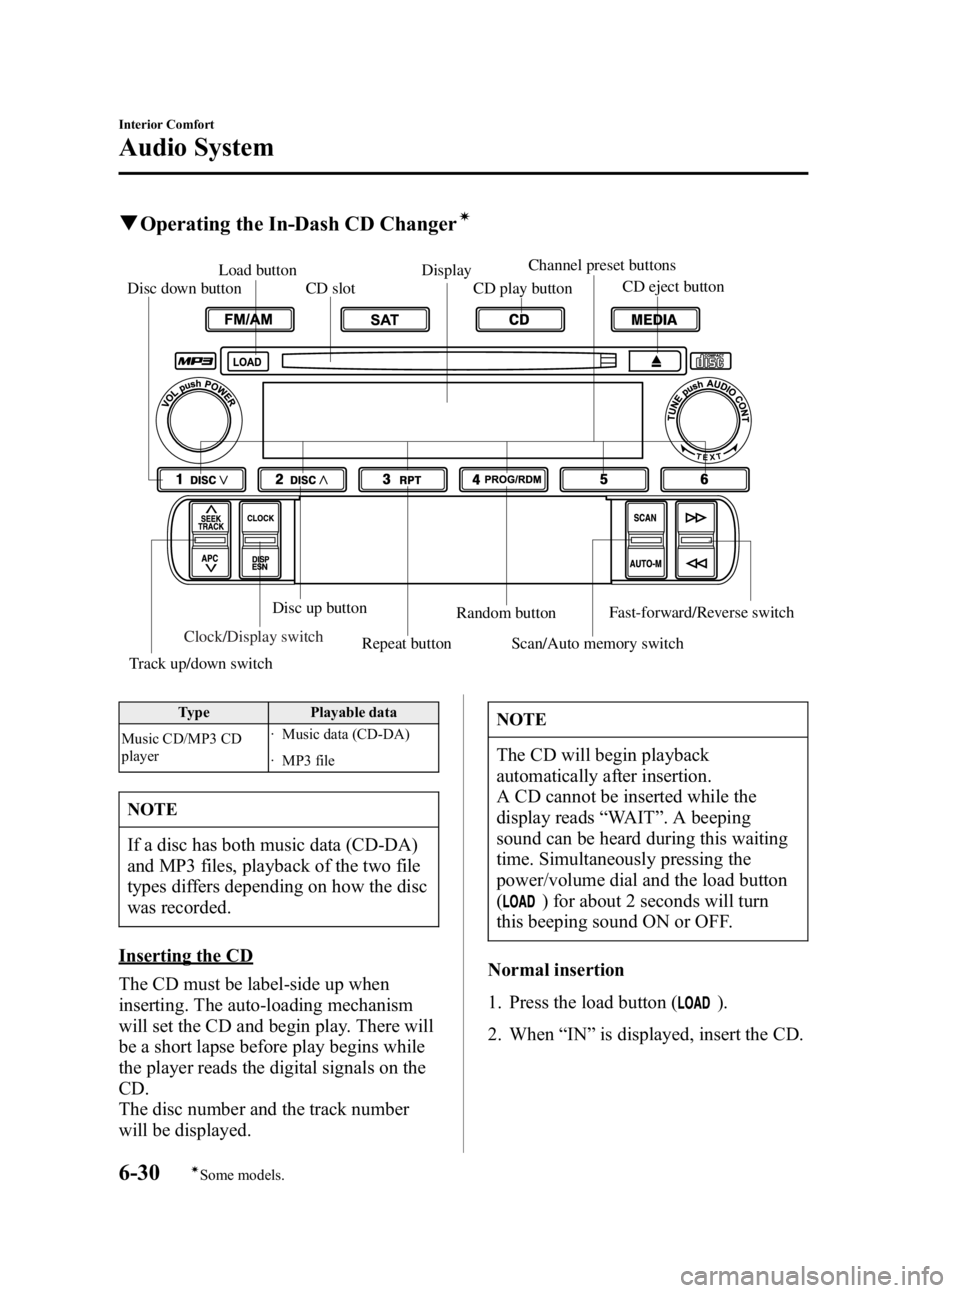
qOperating the In-Dash CD Changerí
Load button
CD play button
CD slot
Fast-forward/Reverse switchDisc down buttonDisplay
Track up/down switchRepeat button Scan/Auto memory switchRandom button
Disc up button
CD eject button
Channel preset buttons
Clock/Display switch
Type
Playable data
Music CD/MP3 CD
player · Music data (CD-DA)
· MP3 file
NOTE
If a disc has both music data (CD-DA)
and MP3 files, playback of the two file
types differs depending on how the disc
was recorded.
Inserting the CD
The CD must be label-side up when
inserting. The auto-loading mechanism
will set the CD and begin play. There will
be a short lapse before play begins while
the player reads the digital signals on the
CD.
The disc number and the track number
will be displayed.
NOTE
The CD will begin playback
automatically after insertion.
A CD cannot be inserted while the
display reads
“WAIT ”. A beeping
sound can be heard during this waiting
time. Simultaneously pressing the
power/volume dial and the load button
(
) for about 2 seconds will turn
this beeping sound ON or OFF.
Normal insertion
1. Press the load button (
).
2. When “IN ”is displayed, insert the CD.
6-30
Interior Comfort
íSome models.
Audio System
MX-5_8U35-EA-05F_Edition4 Page224
Thursday, October 6 2005 11:4 AM
Form No.8U35-EA-05F
Page 225 of 378

Black plate (225,1)
Inserting CDs into desired tray number
1. Press and hold the load button (
)
for about 2 seconds until a beep sound
is heard.
2. Press the channel preset button for the desired tray number while “WAIT ”is
displayed.
3. When “IN ”is displayed, insert the CD.
NOTE
The CD cannot be inserted to the
desired tray number if the number is
already occupied.
Multiple insertion
1. Press and hold the load button (
)
for about 2 seconds until a beep sound
is heard.
2. When “IN ”is displayed, insert the CD.
3. When “IN ”is displayed again, insert
the next CD.
NOTE
The first-inserted CD will be played
automatically when:
lNo other CD is inserted within 15
seconds after “IN ”is displayed.
lThe CD trays are full.
Displaying the CD-inserted tray
number
When you want to know the number for a
CD-inserted tray, press down the clock/
display switch. The tray number will be
displayed for 5 seconds.
Ejecting the CD
Normal ejection
1. Press the CD eject button (
). The
disc number and “DISC ”“OUT ”will
be displayed.
2. Pull out the CD.
NOTE
When the CD is ejected during play, the
next CD will be played automatically.
Ejecting CDs from desired tray number
1. Press and hold the CD eject button (
)
for about 2 seconds until a beep sound
is heard.
The “DISC ”“OUT ”display flashes.
2. Press the channel preset button for the desired CD number for less than 5
seconds after the beep sound is heard.
3. Pull out the CD.
Multiple ejection
1. Press and hold the CD eject button (
)
for about 2 seconds until a beep sound
is heard.
The “DISC ”“OUT ”display flashes.
2. Press the CD eject button (
) again
for less than 5 seconds after the beep
sound is heard.
NOTE
If the button is not pressed and about 5
seconds have elapsed while “DISC ”
“ OUT ”is flashing, CDs are
automatically ejected.
3. Pull out the CD, then the next CD will be ejected.
Interior Comfort
Audio System
6-31
MX-5_8U35-EA-05F_Edition4 Page225
Thursday, October 6 2005 11:4 AM
Form No.8U35-EA-05F
Page 230 of 378
Black plate (230,1)
Audio Control Switch
Operation (Steering Wheel)
í
When the audio unit is turned on,
operation of the audio unit from the
steering wheel is possible.
NOTE
Because the audio unit will be turned
off under the following conditions, the
switches will be inoperable.
lWhen the ignition switch is turned to
the LOCK position.
lWhen the power button on the audio
unit is pressed and the audio unit is
turned off.
lWhen all CDs are ejected.
qAdjusting the Volume
To increase the volume, pull up the
volume switch.
To decrease the volume, press down the
volume switch.
qChanging the Source
Press the mode switch () to change
the audio source (FM1 radio> FM2 radio>
AM radio> CD player or CD changer>
SIRIUS1> SIRIUS2> SIRIUS3>
cyclical).
6-36
Interior Comfort
íSome models.
Audio System
MX-5_8U35-EA-05F_Edition4 Page230
Thursday, October 6 2005 11:4 AM
Form No.8U35-EA-05F
Page 231 of 378

Black plate (231,1)
NOTE
CD, CD changer, and SIRIUS digital
satellite radio modes cannot be selected
in the following cases:
lSIRIUS digital satellite radio unit is
not equipped on the audio system.
lCD has not been inserted.
qSeek Switch
When listening to the radio
Pull up or press down the seek switch, the
radio switches to the next/previous stored
station in the order that it was stored
(1― 6).
Pull up or press down the seek switch for
about 2 seconds until a beep sound is
heard to seek all usable stations at a
higher or lower frequency whether
programmed or not.
When playing a CD
Pull up the seek switch to skip to the next
track.
Press down the seek switch to repeat the
current track.
q Mute Switch
Press the mute switch () once to mute
audio, press it again to resume audio
output.
NOTE
lThe mute will be canceled in the
following cases:
lThe ignition switch is turned to the
LOCK position.
lThe power/volume dial is turned to
ON.
lThe mode switch is pressed to
change to another source.
lThe volume switch is operated.
lThe seek switch is operated.
Interior Comfort
Audio System
6-37
MX-5_8U35-EA-05F_Edition4 Page231
Thursday, October 6 2005 11:4 AM
Form No.8U35-EA-05F