2006 MAZDA MODEL 5 change time
[x] Cancel search: change timePage 204 of 426

Black plate (204,1)
qOperating the In-Dash CD Changerí
CD slot
CD play button CD eject button
Load buttonRepeat button
Scan button
Reverse button Fast-forward button
Random buttonDisplay button
Track up
button
Disc up
button
Disc down
button
Track down
button
Inserting the CD
The CD must be label-side up when
inserting. The auto-loading mechanism
will set the CD and begin play. There will
be a short lapse before play begins while
the player reads the digital signals on the
CD.
The disc number and the track number
will be displayed.
NOTE
A CD cannot be inserted while the
display reads
“WAIT ”. A beeping
sound can be heard during this waiting
time. Simultaneously pressing the
power/volume dial and the load button
(
) for about 2 seconds will turn
this beeping sound ON or OFF. Normal insertion
1. Press the load button (
).
2. When “IN ”is displayed, insert the CD.
Inserting CDs into desired tray number
1. Press and hold the load button (
)
for about 2 seconds until a beep sound
is heard.
2. Press the channel preset button for the desired tray number while “WAIT ”is
displayed.
3. When “IN ”is displayed, insert the CD.
NOTE
The CD cannot be inserted to the
desired tray number if the number is
already occupied.
6-34
Interior Comfort
íSome models.
Audio System
Mazda3_8U55-EA-05G_Edition3 Page204
Tuesday, September 13 2005 10:43 AM
Form No.8U55-EA-05G
Page 216 of 426

Black plate (216,1)
qClock
NOTE
When the trip computer is being
displayed, press the CLOCK button to
change the display to the time.
When the ignition switch is in the ACC or
ON position, the time is displayed.
Time setting
NOTE
For trip computer-equipped vehicles,
press the INFO button instead of the
SET button when setting the time.
1. Press the CLOCK button until a beep sounds, and “12Hr ”and “24Hr ”will be
displayed.
2. Press the SET button to switch between “12Hr ”and “24Hr ”displays. The
selected display will flash.
To select the desired clock setting,
press the CLOCK button again while
the preferred setting is flashing. 3.
“Hr. ADJUST ”will be displayed next,
and the hour portion of the display will
flash. Press the SET button to set the
hour, then press the CLOCK button.
4. “Min. ADJUST ”will be displayed
next, and the minutes portion of the
display will flash. Press the SET button
to set the minutes, then press the
CLOCK button.
Time resetting
NOTE
For trip computer-equipped vehicles,
press the INFO button instead of the
SET button when resetting the time.
While the clock is displayed, press the
SET button 1.5 seconds or more. When
the button is released, a beep will sound
and the clock will be reset as follows:
(Example)
12:01 ―12:29 →12:00
12:30 ―12:59 →1:00
NOTE
When the SET button is released, the
seconds are reset to “00 ”.
q Ambient Temperature Displayí
With manual type air conditioner
When the ignition switch is in the ON
position, the ambient temperature is
displayed.
6-46
Interior Comfort
íSome models.
Interior Equipment
Mazda3_8U55-EA-05G_Edition3 Page216
Tuesday, September 13 2005 10:43 AM
Form No.8U55-EA-05G
Page 217 of 426

Black plate (217,1)
With fully automatic type air
conditioner
When the ignition switch is in the ON
position, press the AMB button (page
6-11) on the air conditioner control panel
to display the ambient temperature.
Press the AMB button again to switch the
display from ambient temperature to the
temperature set for the air conditioner.
NOTE
lThe displayed ambient temperature
may vary from the actual ambient
temperature depending on the
surrounding area and vehicle
conditions.
lPress the Power/volume button and
MEDIA button (page 6-24)
simultaneously for 5 seconds or
more to switch the display from
Fahrenheit to Centigrade or vice
versa.
qClimate Control Display (Fully
Automatic Type)
The climate control system status is
displayed. To operate the climate control
system, refer to “Climate Control System ”
(page 6-2).
q Audio Display
The audio system status is displayed. To
operate the audio system, refer to
“Audio System ”(page 6-16).
q Trip Computerí
The trip computer can display the
following:
lThe current fuel economy.
lThe average fuel economy.
lThe approximate distance you can
travel on the available fuel.
lThe average vehicle speed.
The ignition switch must be in the ON
position.
Press the INFO button to change the
display mode.
NOTE
When the time is being displayed, press
the INFO button to change the display
to the trip computer.
If you have any problems with your trip
computer, consult an Authorized Mazda
Dealer.
Current fuel economy mode
This mode displays the current fuel
economy by calculating the amount of
fuel consumption and the distance
traveled.
Current fuel economy will be calculated
and displayed every 2 seconds.
When this mode is selected, CONSUM
CUR will be displayed.
Interior Comfort
Interior Equipment
6-47íSome models.
Mazda3_8U55-EA-05G_Edition3 Page217
Tuesday, September 13 2005 10:43 AM
Form No.8U55-EA-05G
Page 219 of 426

Black plate (219,1)
U.S.A.
CANADA
NOTE
lEven though the distance-to-empty
display may indicate a sufficient
amount of remaining mileage before
refueling is required, refuel as soon
as possible if the fuel gauge needle
nears E or the low fuel warning light
illuminates.
lThe display won't change unless you
add more than approximately 20 L
(5.3 gal) of fuel.
Average vehicle speed mode
This mode displays the average vehicle
speed by calculating the distance and the
time traveled since connecting the battery
or resetting the data.
Average vehicle speed will be calculated
and displayed every 10 seconds.
When this mode is selected, AV will be
displayed.
U.S.A.
CANADA
To clear the data being displayed, press
the INFO button for more than 1 second.
After pressing the INFO button,——
km/h ( ——mile/h) will be displayed for
about 1 minute before the vehicle speed is
recalculated and displayed.
Interior Comfort
Interior Equipment
6-49
Mazda3_8U55-EA-05G_Edition3 Page219
Tuesday, September 13 2005 10:43 AM
Form No.8U55-EA-05G
Page 276 of 426

Black plate (276,1)
Inspect fluid level in the washer fluid
reservoir; add fluid if necessary.
To inspect the washer fluid level in the
front reservoir, pull off the cap. Then,
holding your thumb over the hole in the
center of the cap, lift it straight up. The
fluid level can be seen from the fluid
column in the pipe. Add fluid if necessary.
Use plain water if washer fluid is
unavailable. But use only washer fluid in
cold weather to prevent it from freezing.
NOTE
Front and rear washer fluid is supplied
from the same reservoir.
Body Lubrication
All moving points of the body, such as
door and hood hinges and locks, should
be lubricated each time the engine oil is
changed. Use a nonfreezing lubricant on
locks during cold weather.
Make sure the hood's secondary latch
keeps the hood from opening when the
primary latch is released.
8-28
Maintenance and Care
Owner Maintenance
Mazda3_8U55-EA-05G_Edition3 Page276
Tuesday, September 13 2005 10:45 AM
Form No.8U55-EA-05G
Page 376 of 426

4
Before Use
Safety Information
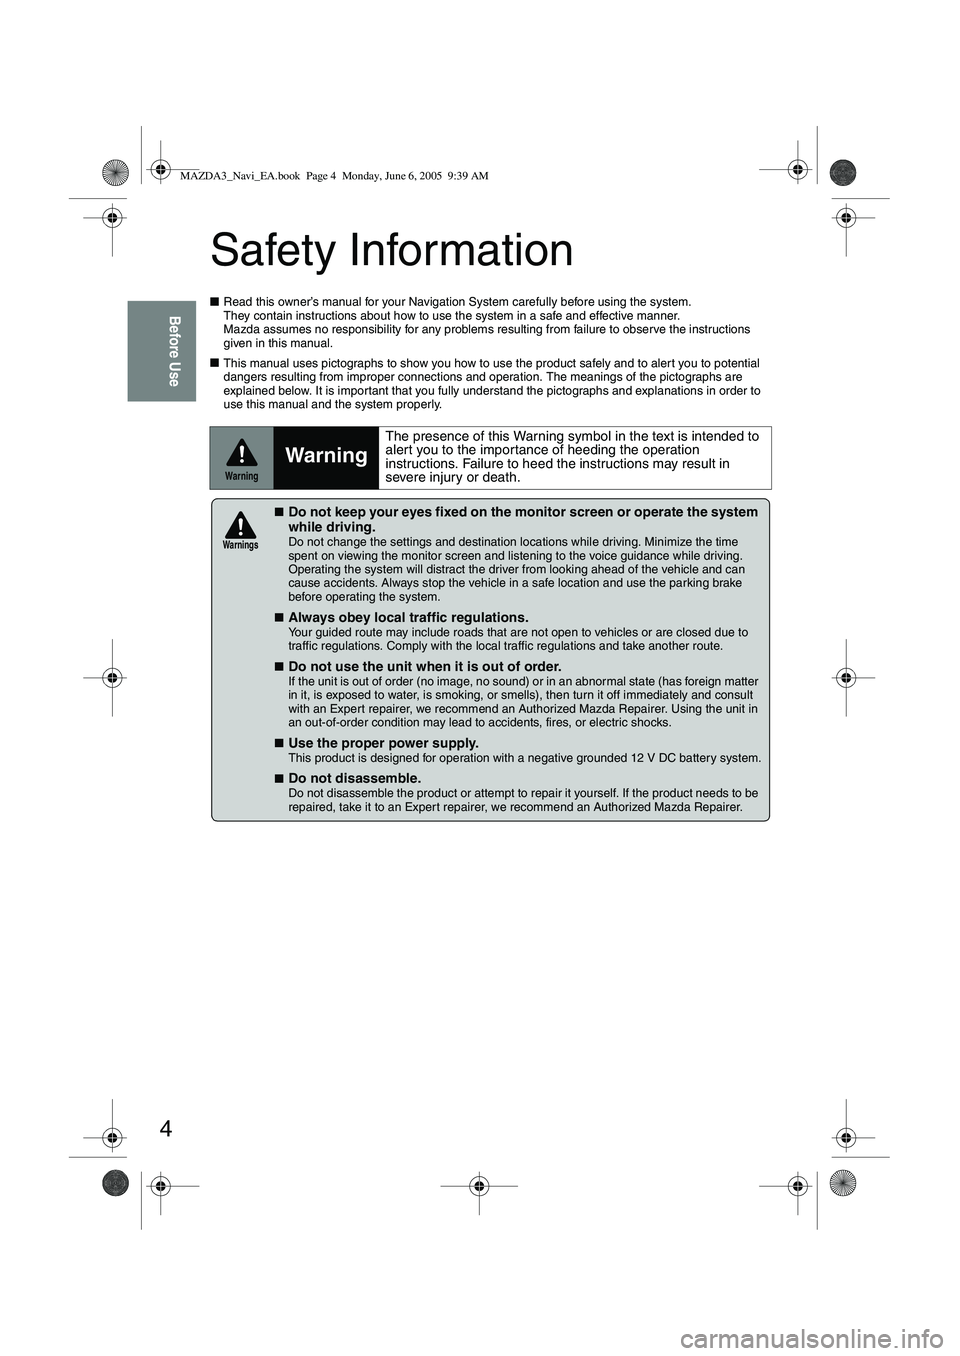
■Read this owner’s manual for your Navigation System carefully before using the system.
They contain instructions about how to use the system in a safe and effective manner.
Mazda assumes no responsibility for any problems resulting from failure to observe the instructions
given in this manual.
■ This manual uses pictographs to show you how to use the product safely and to alert you to potential
dangers resulting from improper connections and operation. The meanings of the pictographs are
explained below. It is important that you fully understand the pictographs and explanations in order to
use this manual and the system properly.
Warning
Warning
The presence of this Warning symbol in the text is intended to
alert you to the importance of heeding the operation
instructions. Failure to heed the instructions may result in
severe injury or death.
■Do not keep your eyes fixed on the monitor screen or operate the system
while driving.
Do not change the settings and destination locations while driving. Minimize the time
spent on viewing the monitor screen and listening to the voice guidance while driving.
Operating the system will distract the driver from looking ahead of the vehicle and can
cause accidents. Always stop the vehicle in a safe location and use the parking brake
before operating the system.
■
Always obey local traffic regulations. Your guided route may include roads that are not open to vehicles or are closed due to
traffic regulations. Comply with the local traffic regulations and take another route.
■
Do not use the unit when it is out of order.
If the unit is out of order (no image, no sound) or in an abnormal state (has foreign matter
in it, is exposed to water, is smoking, or smells), then turn it off immediately and consult
with an Expert repairer, we recommend an Authorized Mazda Repairer. Using the unit in
an out-of-order condition may lead to accidents, fires, or electric shocks.
■
Use the proper power supply. This product is designed for operation with a negative grounded 12 V DC battery system.
■
Do not disassemble. Do not disassemble the product or attempt to repair it yourself. If the product needs to be
repaired, take it to an Expert repairer, we recommend an Authorized Mazda Repairer.
Warnings
MAZDA3_Navi_EA.book Page 4 Monday, June 6, 2005 9:39 AM
Page 382 of 426

10
Getting started
Activation
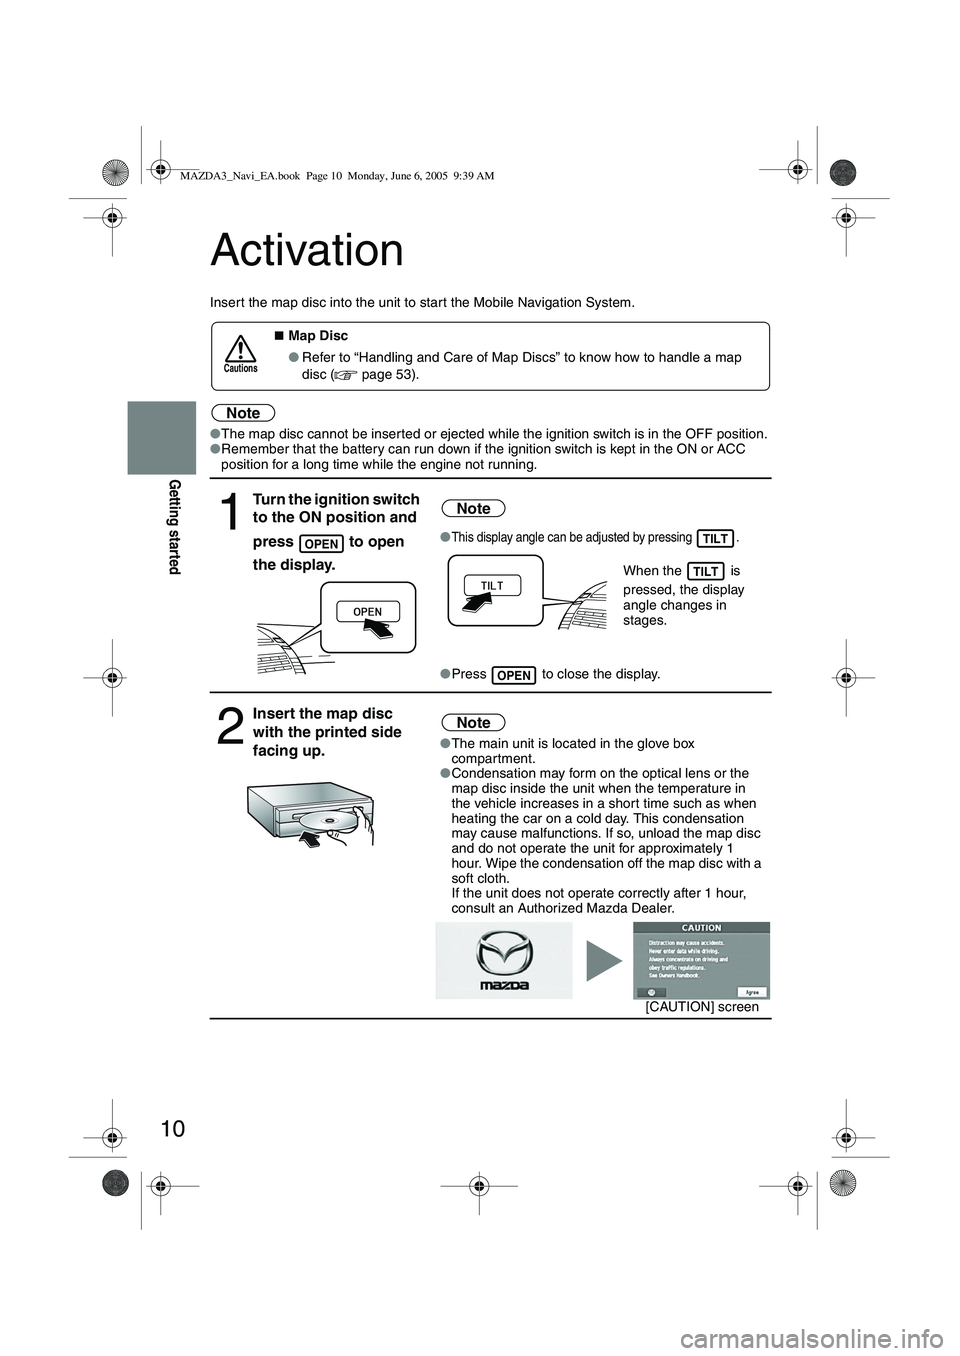
Insert the map disc into the unit to star t the Mobile Navigation System.
Note
●The map disc cannot be inserted or ejected while the ignition switch is in the OFF position.
● Remember that the battery can run down if the ignition switch is kept in the ON or ACC
position for a long time while the engine not running.
■Map Disc
● Refer to “Handling and Care of Map Discs” to know how to handle a map
disc (
page 53).
1
Turn the ignition switch
to the ON position and
press
to open
the display.
Note
●This display angle can be adjusted by pressing .
When the is
pressed, the display
angle changes in
stages.
● Press to close the display.
2
Insert the map disc
with the printed side
facing up.Note
●The main unit is located in the glove box
compartment.
● Condensation may form on the optical lens or the
map disc inside the unit when the temperature in
the vehicle increases in a shor t time such as when
heating the car on a cold day. This condensation
may cause malfunctions. If so, unload the map disc
and do not operate the unit for approximately 1
hour. Wipe the condensation off the map disc with a
soft cloth.
If the unit does not operate correctly after 1 hour,
consult an Authorized Mazda Dealer.
Cautions
OPENTILT
TILT
OPEN
[CAUTION] screen
MAZDA3_Navi_EA.book Page 10 Monday, June 6, 2005 9:39 AM
Page 384 of 426

12
Getting started
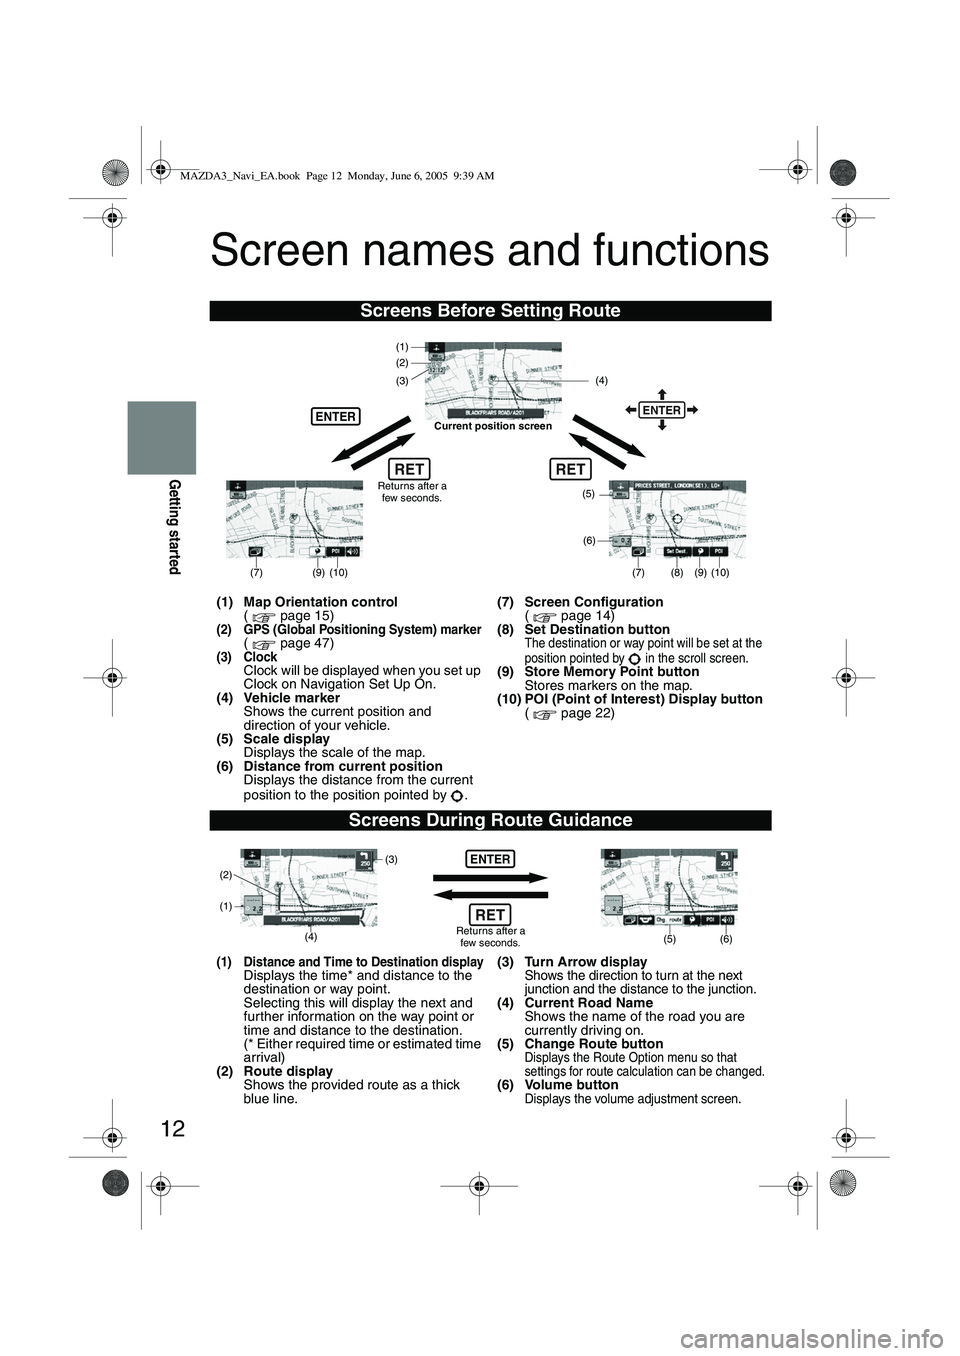
Screen names and functions
Screens Before Setting Route
(1) Map Orientation control( page 15)
(2) GPS (Global Positioning System) marker( page 47)(3) ClockClock will be displayed when you set up
Clock on Navigation Set Up On.
(4) Vehicle marker Shows the current position and
direction of your vehicle.
(5) Scale display Displays the scale of the map.
(6) Distance from current position Displays the distance from the current
position to the position pointed by . (7) Screen Configuration
( page 14)
(8) Set Destination button
The destination or way point will be set at the
position pointed by in the scroll screen.
(9) Store Memory Point button Stores markers on the map.
(10) POI (Point of Interest) Display button ( page 22)
Screens During Route Guidance
(1) Distance and Time to Destination displayDisplays the time* and distance to the
destination or way point.
Selecting this will display the next and
fur ther information on the way point or
time and distance to the destination.
(* Either required time or estimated time
arrival)
(2) Route display Shows the provided route as a thick
blue line. (3) Turn Arrow displayShows the direction to turn at the next
junction and the distance to the junction.
(4) Current Road Name
Shows the name of the road you are
currently driving on.
(5) Change Route button
Displays the Route Option menu so that
settings for route calculation can be changed.
(6) Volume buttonDisplays the volume adjustment screen.
RET
(6)
(7)
(8) (9) (10)
(5)
(4)
(3)
ENTER
(1)(2)
Returns after a
few seconds.
ENTER
RET
Current position screen
(7)
(9) (10)
ENTER
(5) (6)(4) (3)
(1)
(2)
Returns after a few seconds.RET
MAZDA3_Navi_EA.book Page 12 Monday, June 6, 2005 9:39 AM