Page 109 of 651

GAUGES, METERS AND SERVICE REMINDER INDICATORS
88The following
information is displayed when you push the
“INFO” button with the ignition switch turned on.
Each time you push the “INFO” button, the display toggles
through this information.
(1) Driving time after engine start
(2) Average vehicle speed after engine start
(3) Average fuel consumption after refueling
(4) Instantaneous fuel consumption
(5) Driving distance after engine start
(6) Driving range
The displayed values in the cruise information display indicate
general driving conditions. Accuracy varies with driving habits
and road conditions.
When the ignition switch is on, the last previously used mode
displayed just before the ignition switch is off will appear. If the electrical power source has been disconnected from the
cruise information display,
the display will automatically be set
to the initial mode.
When the instrument panel lights are turned on, the brightness
of the display will be reduced.
You can adjust the brightness of the display. To adjust the
brightness, see “Multi −display light control” on page 91.
CAUTION
Do not adjust the display while the vehicle is moving.
Be sure to adjust the display only when the vehicle is
stopped.
(1) Driving time after engine start
(“E/T”)
The elapsed time after the engine starts is displayed.
When the engine is started, driving time is counted from 0:00.
Up to 11:59 (11 hours, 59 minutes) can be displayed. When the
driving time exceeds 11:59, the counter returns to 0:00.
The calculation is reset when the ignition switch is turned off.
Page 119 of 651

2Meter ring light
3Ignition switch light
4Center console spot lights
5Front interior light (with the “DOOR” position)
6Inside door handle light")
INTERIOR EQUIPMENT
98�
1Foot lights (on some models)
2Meter ring light
3Ignition switch light
4Center console spot lights
5Front interior light (with the “DOOR” position)
6Inside door handle lights (on some models)
7Rear interior light (with the “DOOR” position)
8Scuff plate lights (on some models)
All of the lights except the center console spot lights and
meter ring light will come on when any of the side doors
are opened.* After all the doors are closed, the lights
remain on for about 15 seconds before fading out.** NOTE:
* The operating condition can be changed.
** The duration of lighting can be changed.
Ask your Lexus dealer for details. However, in
the following cases, the lights go out immediately:
� All of the lights except the center console spot lights and
meter ring light — All the side doors and back door are
locked.
� Ignition switch light, front interior light, rear interior light and
scuff plate lights — All the side doors are closed and the
ignition key is in the “ACC” or “ON” position.
When any of the side doors is unlocked, all of the lights except
the center console spot light and meter ring light will come on
and remain on for about 15 seconds before fading out.
To prevent the battery from being discharged, all of the lights
will automatically turn off when the ignition key is removed and
the door is left opened for about 20 minutes.
Ignition switch light, front interior light, rear interior light
and scuff plate lights
The ignition switch light, front interior light, rear interior light and
scuff plate lights also come on and remain on for about 15
seconds before fading out when the ignition switch is turned to
the “LOCK” position.
Page 121 of 651
INTERIOR EQUIPMENT
100You can adjust the brightness of the display. To adjust the
brightness, see “Multi
−display light control” on page 91.
If the electrical power source has been disconnected from the
clock, the time display will automatically be set to 1:00 (one
o’clock).
OUTSIDE TEMPERATURE DISPLAY
This display shows the outside temperature when the
ignition switch is on.
The displayed temperature ranges from −30�C (− 22�F) up to
50 �C (122�F). If the temperature does not appear on the
display or it shows “−−”, take your vehicle to your Lexus dealer.
When the instrument panel lights are turned on, the brightness
of the display will be reduced.
You can adjust the brightness of the display. To adjust the
brightness, see “Multi −display light control” on page 91.
Page 123 of 651
.
� To prevent the battery from b")
INTERIOR EQUIPMENT
102
NOTICE
�To prevent the fuse from being blown, do not use the
electricity over the total vehicle capacity of 12V/120W
(all the outlets together).
� To prevent the battery from being discharged, do not
use the power outlets longer than necessary when
the engine is not running.
� Close the power outlet lids when the power outlets
are not in use. Inserting anything other than an
appropriate plug that fits the outlet, or allowing any
liquid into the outlet may cause electrical failure or
short circuits.
11 5 VA C
This power outlet is designed for use as a power supply
for the audio device connected to the input terminal
adapter.
The key must be in the “ON” position for the power outlet to be
used.
The maximum capacity for this power outlet is 115 V AC/100W.
If you attempt to use an appliance that requires more than 115
VAC or 100W, the protection circuit will activate and cut the
power supply. The power supply will restart automatically
when you use an appliance that operates within the 115
VAC/100W limits.
Page 139 of 651
INTERIOR EQUIPMENT
11 8To use the luggage cover:
1Attach the front hooks of the luggage cover to the head
restraints.
2Pull out the rear luggage cover and hook it onto the
anchors.
CAUTION
Do not place anything on the luggage cover. Such items
may be thrown about and possibly injure people in the
vehicle during sudden braking or a collision.
Automatic retract function
The rear luggage cover is retracted automatically when
the back door is opened.
Page 140 of 651
INTERIOR EQUIPMENT
11 9
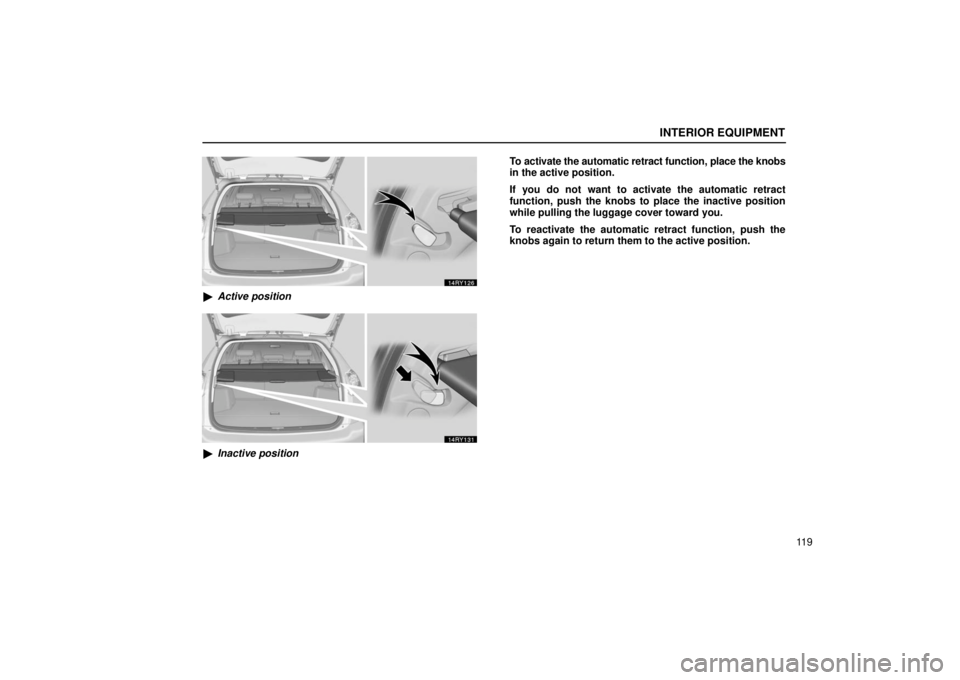
�Active position
�Inactive position To activate the automatic retract function, place the knobs
in the active position.
If you do not want to activate the automatic retract
function, push the knobs to place the inactive position
while pulling the luggage cover toward you.
To reactivate the automatic retract function, push the
knobs again to return them to the active position.
Page 152 of 651

EXTERIOR EQUIPMENT
131
If the moon roof does not operate
automatically
If the moon roof does not operate automatically or jam
protection function does not operate correctly, you should
normalize the moon roof.
To normalize the moon roof, push and hold the slide control
switch toward the front or “TILT” switch on the rear side. The
moon roof will tilt up and down, then slide open and close. After
the slide close operation, release the switch.
Make sure that the moon roof opens and closes automatically.
If the moon roof cannot be operated properly, have it checked
by your Lexus dealer.
CAUTION
To avoid serious personal injury, you must do the
following.
� While the vehicle is moving, always keep the heads,
hands and other parts of the bodies of all occupants
away from the roof opening. Otherwise, they could
be seriously injured if the vehicle stops suddenly or
if the vehicle is involved in an accident.
� Before you close the moon roof, always make sure
there is nobody around the moon roof. You must also
make sure nobody places his or her head, hands and
other parts of the body in the roof opening. If
someone’s neck, head or hands get caught in the
closing roof, it could result in death or serious injury.
When anyone closes the moon roof, first make sure
it is safe to do so.
� Be sure to remove the ignition key when you leave
your vehicle.
� Never leave anyone (particularly a small child) alone
in your vehicle, especially with the ignition key still
inserted. Otherwise, he/she could use the moon roof
switches and get trapped in the roof opening.
Unattended person (particularly a small child) can be
involved in a serious accident.
� Never sit on top of the vehicle around the roof
opening.
� Never try jamming any part of your body to activate
the jam protection function intentionally, as it could
result in a serious injury.
� The jam protection function may not work if
something gets caught just before the moon roof is
fully closed.
Page 153 of 651

To open the moon roof, push the slide control switch
toward the back. The front panel tilts up and the center
and rear panels fully open. To stop")
EXTERIOR EQUIPMENT
132
MOON ROOF (multi�panel type)
To open the moon roof, push the slide control switch
toward the back. The front panel tilts up and the center
and rear panels fully open. To stop partway, push either
side of the slide control switch or the “TILT” switch briefly.
The sunshade can be opened or closed manually. However,
if you open the moon roof, the sunshade will be opened with
the moon roof.
Before opening the moon roof, make sure the radio antenna is
in the lock position. Otherwise, the antenna may get caught
between the moon roof and frame.
To close the moon roof, push the slide control switch
toward the front. The center and rear panels fully close.
Then push and hold the slide control switch toward the
front or the “TILT” switch on the front side until the front
panel is fully down. To stop partway, push either side of
the slide control switch or the “TILT” switch briefly.
The center and rear panels will not close automatically when
the center panel position is near its closed position. In this
case, push the slide control switch toward the front until the
panels fully close.