Page 358 of 651

AUDIO
337
DVD video/DVD audio player operation
NOTE: The playback condition of some DVD discs may be
determined by a DVD software producer . This DVD player
plays a disc as the software producer intended. So, some
functions may not work properly. Be sure to read the
instruction manual for the DVD disc separately provided.
For the detailed information about DVD video discs, see
“DVD video disc information” on page 366.
Precautions for DVD video discs
When recording on a DVD video, DVD audio, video CD or
audio tracks may not record in some cases while the menu is
displayed. As audio will not play in this case, verify that the
video tracks are playing and then activate playback.
When playback of a disc is completed:
� If an audio CD is playing, the first track starts.
� If a DVD video, DVD audio or video CD is playing, playback
will stop or the menu screen will be displayed.
The title/chapter number and playback time display may not
appear while playing back certain DVD video discs.CAUTION
Conversational speech on some DVDs is recorded at a
low volume to emphasize the impact of sound effects.
If you adjust the volume assuming that the
conversations represent the maximum volume level
available for the DVD, you may be startled by louder
sound effects or when you change to a different audio
source. Loud sounds may have a significant impact on
the human body or pose a driving hazard. Keep this in
mind when you adjust the volume.
Page 368 of 651
AUDIO
347
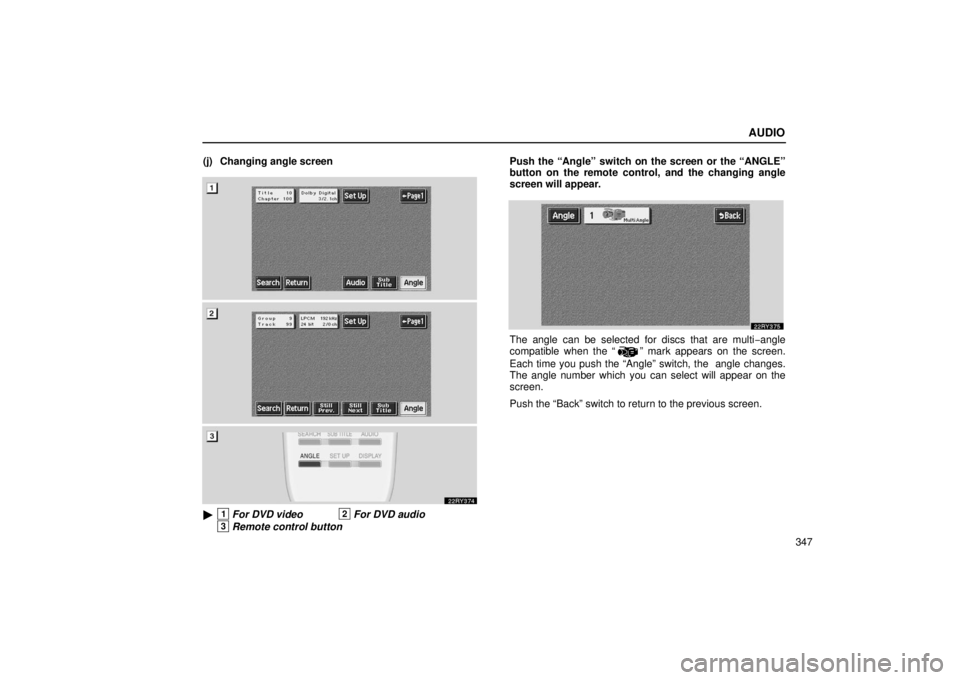
(j) Changing angle screen
�1For DVD video2For DVD audio
3Remote control button
Push the “Angle” switch on the screen or the “ANGLE”
button on the remote control, and the changing angle
screen will appear.
The angle can be selected for discs that are multi
−angle
compatible when the “” mark appears on the screen.
Each time you push the “Angle” switch, the angle changes.
The angle number which you can select will appear on the
screen.
Push the “Back” switch to return to the previous screen.
Page 374 of 651
AUDIO
353
Push the number for the password and the “Enter” switch. The
“Select Restriction Level” screen will appear.
If you enter a wrong number, push the “Clear” switch to delete
the number.
You cannot change the setting without inputting the password.
When you forget or change the password, push the “Clear”
switch ten times to initialize the password.
To return to the “Setup Menu 1” screen, push the “Back” switch.Push a parental level (1 — 8). The smaller the level number,
the stricter the age limit. Push the “Back” switch to return to the
“Setup Menu 1” screen.
Page 375 of 651
AUDIO
354(q) Setting the display mode
Each time you push the “Display Mode” switch on the
“Setup
Menu 2” screen, the display mode is changed from
wide mode to auto mode. (r) Language code list
Code
Language
1001Japanese
0514English
0618French
0405German
0920Italian
0519Spanish
2608Chinese
1412Dutch
1620Portuguese
1922Swedish
1821Russian
111 5Korean
0512Greek
0101Afar
0102Abkhazian
0106Afrikaans
0113Amharic
0118Arabic
0119Assamese
0125Aymara
Page 405 of 651

STARTING AND DRIVING
384
ENGINE EXHAUST CAUTION
CAUTION
�Avoid inhaling the engine exhaust. It contains
carbon monoxide, which is a colorless and odorless
gas. It can cause unconsciousness or even death.
� Make sure the exhaust system has no holes or loose
connections. The system should be checked from
time to time. If you hit something, or notice a change
in the sound of the exhaust, have the system checked
immediately.
� Do not run the engine in a garage or enclosed area
except for the time needed to drive the vehicle in or
out. The exhaust gases cannot escape, making this
a particularly dangerous situation.
� Do not remain for a long time in a parked vehicle with
the engine running. If it is unavoidable, however, do
so only in an unconfined area and adjust the heating
or cooling system to force outside air into the vehicle.
� Keep the back door closed while driving. An open or
unsealed back door may cause exhaust gases to be
drawn into the vehicle.
� To allow proper operation of your vehicle’s
ventilation system, keep the inlet grilles in front of the
windshield clear of snow, leaves, or other
obstructions.
� If you smell exhaust fumes in the vehicle, drive with
the windows open and the back door closed. Have
the cause immediately located and corrected.
Page 425 of 651
 position. The transmission
will downshift to second gear when the vehicle speed is or
becomes lower than 83 km/h (52 mph) and more pow")
STARTING AND DRIVING
404�
Shift into the “2” (second range) position. The transmission
will downshift to second gear when the vehicle speed is or
becomes lower than 83 km/h (52 mph) and more powerful
engine braking than that of the “3” (third range) position will
be enabled.
If you drive in the “D” position: Shift the selector lever to
the “S” position and shift the lever down to the “ −” position
twice to select “2” (second range).
If you drive in the “S” position: Shift the selector lever
down to the “− ” position to select “2” (second range).
� Shift into the “1” (first range) position. The transmission will
downshift to first gear when the vehicle speed is or becomes
lower than 39 km/h (24 mph) and maximum engine braking
will be enabled.
If you drive in the “D” position: Shift the selector lever to
the “S” position and shift the lever down to the “ −” position
three times to select “1” (first range).
If you drive in the “S” position: Shift the selector lever
down to the “− ” position to select “1” (first range).
CAUTION
Be careful when downshifting on a slippery surface.
The abrupt change in engine speed could cause the
vehicle to skid or spin.
Page 466 of 651

STARTING AND DRIVING
445
�1Higher2Lower
3Height control indicator lights
� Changing the mode
You can change the easy access mode to the “LO”, “N” or “HI”\
mode when the engine is running.
To change easy access mode to “LO” mode: Push the
height select switch on the “ ” (higher) side once.
To change easy access mode to “N”mode: Push the height
select switch on the “ ” (higher) side twice.
In the following cases, the vehicle’s height is automatically
changed to “N” (normal) mode.
� The vehicle speed exceeds approximately 12 km/h (8 mph).
� The engine is restarted and the easy access mode is
canceled. To change easy access
mode to “HI” mode: Push the height
select switch on the “ ” (higher) side for three times.
The “LO”, “N” or “HI” indicator light blinks while the\
vehicle’s
height changes. When the vehicle’s height reaches the “LO”,
“N” or “HI” mode, the indicator light remains on.
If the vehicle’s height is changed frequently, the raising or
lowering will take longer than usual. There is no problem in the
electronically modulated air suspension.
CAUTION
If you select easy access mode, check under the vehicle
to make sure nothing that could damage the vehicle or
no one who could be injured is there and that the
underbody of the vehicle does not touch the ground
before the engine is stopped.
Page 470 of 651
 Parking and stopping tips
If you immediately stop the engine to park the vehicle after
off−road driving, the vehicle height is lowered slightly as the
vehicle becomes co")
STARTING AND DRIVING
449
(h) Parking and stopping tips
If you immediately stop the engine to park the vehicle after
off−road driving, the vehicle height is lowered slightly as the
vehicle becomes cool. When parking, make sure there is
nothing that will be in contact with the underbody of the vehicle.
If the “HI” (high) mode is selected when you start the engine,
the vehicle returns to the “HI” (high) height. If the “LO” (\
low) or
“N” (normal) mode is selected when you start the engine, the
vehicle height is change to “N” (normal) mode.
If you park the vehicle for a long time, the vehicle height may
be gradually lowered. When parking for a long time, make sure
there is nothing that will be in contact with the underbody of the
vehicle. If the “HI” (high) mode is selected when you start the
engine, the vehicle returns to the “HI” (high) height. If the “LO”\
(low) or “N” (normal) mode is selected when you start the
engine, the vehicle height is change to “N” (normal) mode.
If you stop the engine, the vehicle height may change in
accordance with the change in the temperature. When you
start the engine, the vehicle returns to the “HI” (high) height.\
If the “LO” (low) or “N” (normal) mode is selected when \
you
start the engine, the vehicle height is change to “N” (normal)
mode.
TRACTION CONTROL SYSTEM
(two�wheel drive models)
The traction control system automatically helps prevent
the spinning of front wheels when the vehicle is started or
accelerated on slippery road surfaces.
When the ignition key is turned to “ON”, the system
automatically turns on.
CAUTION
Under certain slippery road conditions, full traction of
the vehicle and power against front wheels cannot be
maintained, even though the traction control system is
in operation. Do not drive the vehicle under any speed
or maneuvering conditions which may cause the
vehicle to lose traction control. In situations where the
road surface is covered with ice or snow, your vehicle
should be fitted with snow tires or tire chains. Always
drive at an appropriate and cautious speed for the
present road conditions.

 Setting the display mode
Each time you push the “Display Mode” switch on the
“Setup
Menu 2” screen, the display mode is changed from
wide mode to auto mode. (r) Language code lis")