Page 308 of 651
:
When the audio sound
becomes dif ficult to be heard due to road noise, wind noise, etc.
during driving, the system adjusts to the optimum volume and
tone qu")
AUDIO
287
Automatic Sound Levelizer (ASL):
When the audio sound
becomes dif ficult to be heard due to road noise, wind noise, etc.
during driving, the system adjusts to the optimum volume and
tone quality according to the noise level. While the Automatic
Sound Levelizer is on, “ASL” appears on the display.
Push the “AUDIO CONTROL” knob until the desired mode.
Turn the knob to suit your preference.
(c) Your radio antennas
Detachable antenna: To remove an detachable antenna,
carefully turn it counterclockwise.
NOTICE
To prevent damage to the antenna, make sure it is
removed before driving your vehicle through an
automatic car wash.
Wire antenna: The wire antenna is mounted inside the back
door window.
NOTICE
� When cleaning the inside of the back door window, be
careful not to scr atch or damage the wire antennas or
connectors.
� Putting a window tint (especially, conductive or
metallic type) on the quarter windows may affect the
reception of radio or mobile telephone. For the
installation of the window tint, consult with your
Lexus dealer.
(d) Your cassette player
When you insert a cassette, the exposed tape should face to
the right.
NOTICE
Never try to disassemble or oil any part of the cassette
player. Do not insert anything other than cassette tapes
into the slot.
Page 309 of 651
AUDIO
288(e) Your CD player with changer
Your CD player with changer can store up to 6 CDs and play
selected
CDs or continuously play all the CDs set in the player.
When you set CDs into the player, make sure their labels face
up. If not, the player will display “ERROR 1” and the CD
number.
NOTICE
� Do not stack up two CDs for insertion, or it will cause
damage to the CD changer. Insert only one CD into
slot at a time.
� Never try to disassemble or oil any part of the CD
player. Do not insert anything other than CDs into the
slot.
The player is intended for use with 12 cm (4.7 in.) CDs only.
Page 315 of 651
 Playing a cassette tape
When you insert a cassette tape, the exposed tape should
face to the right.
The player will automatically start when you insert a c")
AUDIO
294
Cassette tape player operation
(a) Playing a cassette tape
When you insert a cassette tape, the exposed tape should
face to the right.
The player will automatically start when you insert a cassette
tape. At this time, “TAPE” appears on the display.
To stop or eject the cassette tape, push the “
” (eject) button.
Auto�reverse feature: After the cassette player reaches the
end of a tape, it automatically reverses and begins to play the
other side, regardless of whether the cassette was playing or
fast forwarding.
If a cassette is already in the slot, push the “TAPE” button.
Dolby\b Noise Reduction* feature: If you are listening to a
tape that was recorded with Dolby \b Noise Reduction*, push
the “
” button. The display will indicate that the Dolby noise
reduction system is on.
The Dolby NR mode reduces tape noise by about 10 dB. For
best sound reproduction, play your tapes with the Dolby NR on
or off according to the mode used for recording the tape.
To play a tape recorded without Dolby NR, push the button
again to turn off the Dolby NR.
* Dolby noise reduction manufactured under license from Dolby
Laboratories Licensing Corporation. “DOLBY” and the double −D
symbol
are trademarks of Dolby Laboratories Licensing
Corporation.
Page 317 of 651

AUDIO
296
“Automatic program selection” button: The automatic
program selection feature allows you to program your cassette
player to skip forward or backward to locate the song you want
to hear. You can skip up to 9 programs at a time.
Push this button on the “
” side to skip forward. “FF” and the
number will appear on the display. Push the button until the
number you want to skip appears on the display. After that, the
player will automatically skip forward.
When the end of the tape is reached, the player automatically
reverses sides and resumes normal play. Push this button on the “
” side to skip backward. Push the
button until “REW” and the number you want to skip appear on
the display.
� If you set “REW 1”, the player will rewind to the beginning
of the current program.
� When c ounting the number of programs you want to rewind,
remember to count the current program as well. For
example, if you want to rewind to a song that is two before
the song you are listening to, push this button until “REW
3” appears on the display.
When a beginning of the tape is reached, the player
automatically resumes normal play.
There must be at least 3 seconds of blank space between
programs for this feature to work correctly.
“RPT” and “Automatic program selection” features:
These features may not work well with some spoken word, live
or classical recordings.
Page 318 of 651
 Inserting or ejecting CDs
The ignition switch must be in the “ACC” or “ON” position.
Your CD player with changer can store up to 6 CDs.
�Setting a single CD:")
AUDIO
297
CD player operation
(a) Inserting or ejecting CDs
The ignition switch must be in the “ACC” or “ON” position.
Your CD player with changer can store up to 6 CDs.
�Setting a single CD:
1. Push the “LOAD” button briefly.
The umber indicators at both ends of the slot start blinking and
“WAIT” appears on the display. After the blinking indicators
change to green and stay on, and “WAIT” changes to the
“LOAD”, the CD door opens. 2. Insert only one CD while the CD door is open.
You can set a CD at the lowest empty CD number.
After insertion, the set CD is automatically loaded.
If the label faces down, the CD cannot be played. In this case,
“ERROR 1” and CD number appear on the display.
If you need to insert the next CD, repeat the same procedure
to insert another CD.
�
Setting all the CDs:
1. Push the “LOAD” button until you hear a beep.
The umber indicators at both ends of the slot start blinking and
“WAIT” appears on the display. After the blinking indicators
change to green and stay on, and “WAIT” changes to the
“LOAD”, the CD door opens.
2. Insert only one CD while the CD door is open.
The CD door closes and “WAIT” appears again.
3. Insert the next CD after the “WAIT” changes to the
“LOAD” and the CD door opens.
4. Repeat this procedure until you insert all the CDs.
To cancel the operation, push the “LOAD” or “DISC” button.
If you do not insert CDs within 15 seconds after pushing the
“LOAD” button and “LOAD” is displayed, the operation will be
canceled automatically.
Page 319 of 651
AUDIO
298
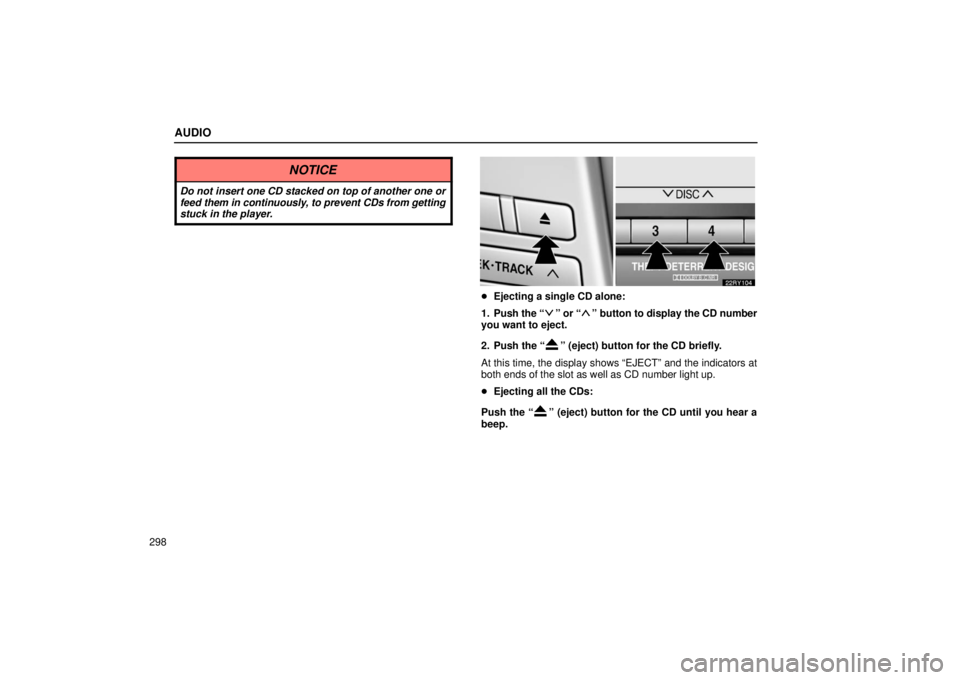
NOTICE
Do not insert one CD stacked on top of another one or
feed them in continuously, to prevent CDs from getting
stuck in the player.
� Ejecting a single CD alone:
1. Push the “
” or “” button to display the CD number
you want to eject.
2. Push the “
” (eject) button for the CD briefly.
At this time, the display shows “EJECT” and the indicators at
both ends of the slot as well as CD number light up.
� Ejecting all the CDs:
Push the “
” (eject) button for the CD until you hear a
beep.
Page 320 of 651
AUDIO
299
(b) Playing a CD
Push the “DISC” button if the CDs are already loaded in
the player.
“CD” appears on the display.
The CDs set in the player are played continuousl
y, starting with
the last CD you inserted. The CD number of the CD currently
being played, the track number and the time from the beginning
of the program appear on the display.
When play of one CD ends, the first track of the following CD
starts. When play of the final CD ends, play of the first CD
starts again.
The player will skip any empty CD trays. (c) Selecting a desired CDSearching for a desired CD:
Push the “
” or “” button to select the CD number.
Push the button several times until the desired CD number
appears on the display.
Page 321 of 651
AUDIO
300(d) Searching for a desired track or CD
Searching for a desired track:
Push the “SCAN” button briefly. “SCAN” will appear on the
display.
The CD player will play the next track for 10 seconds,
then scan again. To select a track, push the “SCAN” button a
second time. If the player reaches the end of the CD, it will
continue scanning at track 1.
After all the tracks are scanned in one pass, normal play
resumes. Searching for a desired CD:
Push
the “SCAN” button until you hear a beep. With “
”
on the display, the program at the beginning of each CD will be
played for 10 seconds. To continue listening to the program of
your choice, push the button a second time.
After all the CDs in the automatic changer are scanned in one
pass, the scan function is cancelled.
 Your CD player with changer
 can store up to 6 CDs and play
selected
CDs or continuously play all the CDs set in the player.
When you set CDs into the player,")
 Playing a CD
Push the “DISC” button if the CDs are already loaded in
the player.
“CD” appears on the display.
The CDs set in the player are played continuousl
y, starting with
th")
 Searching for a desired track or CD
Searching for a desired track:
Push the “SCAN” button briefly. “SCAN” will appear on the
display.
The CD player will play the next track for")