Page 10 of 419
AB
Steering switches P.195
Compass
P.238
Rear electronic sunshade switch
P.225
Pictorial indexInstrument panel
Damping mode select switch P.138
Height control switch P.138
Driving pattern selector switch P.99
Automatic air conditioning controls P.162
Rear window defogger P.170
Audio system P.174
Glove box P.202
Clock P.210
Multi-information display
control switch
P.107
Automatic transmission selector lever
P.98
Traction control system off switch
P.141
Cigarette lighter and ashtray P.211
Seat heater switches/ Climate control
seat switches
P.218
Headlight cleaner switch P.117
Rear seat and rear head restraints
return switch
P.23
Page 38 of 419
22
1-3. Adjustable components
Front seats
Adjusting the front passenger’s seat from the driver’s seat
Seatback angle
Seat position
Adjust the seat positions using the switches.
Seat position fore/aft control
switch
For driver’s seat only:
Height of the head restraint also
moves upward or downward with
the seat movements.
Seatback angle control switch
Seat cushion (front) angle con-
trol switch
Vertical height adjust switch
Seat cushion length control
switch (driver’s seat only)
Lumbar support switch
For Passenger ’s Seat
1
2
3
4
5
6
Front Passenger’s Seat1
2
Page 41 of 419

25
1
1-3. Adjustable components
Before driving
Driving position memory system
The vehicle will memorize the position of the driver’s seat, the height of the
head restraint of the driver’s seat, the seat cushion length of the driver’s seat,
the height of the shoulder belt anchor of the driver’s seat belt, and the posi
-
tions of the tilt and telescopic steering column and outside r
ear view mirrors.
Three different driving position profiles can be entered into the computer’s
memory.
■ Setting the driving position
With the transmission selector lever in the “P” position, turn the
ignition switch to the ON position.
Adjust the driver’s seat, driver’s head restraint height and seat
cushion length, driver’s shoulder belt anch
or, tilt and telescopic
steering and outside rear view mirrors to the desired positions.
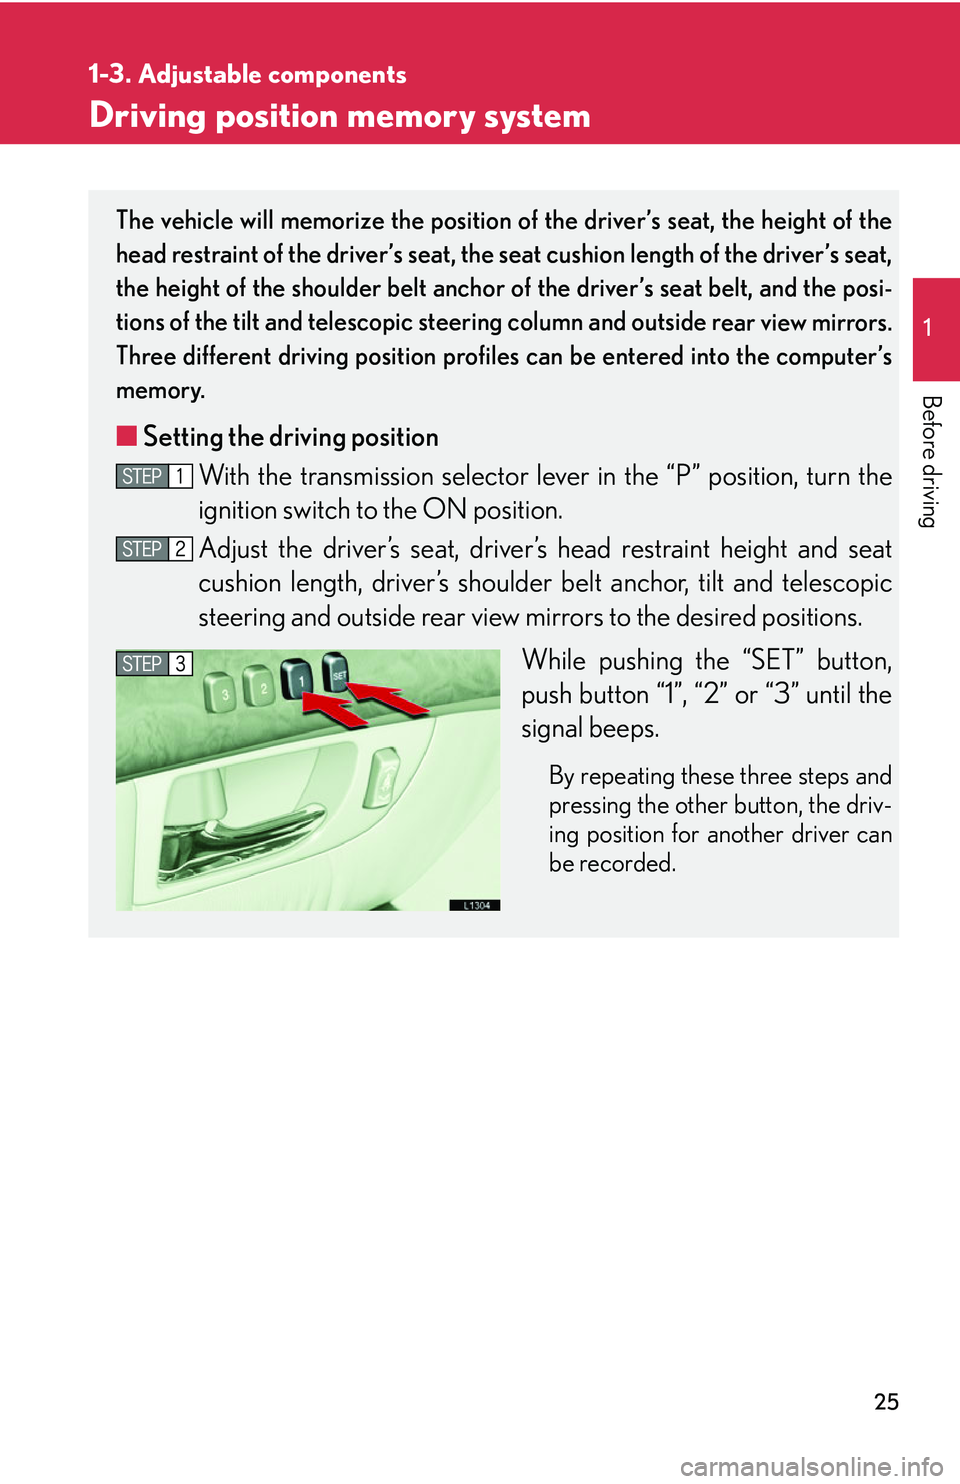
While pushing the “SET” button,
push bu
tton “1”, “2” or “3” until the
signal beeps.
By repeating these three steps and
pressing the other button, the driv -
ing position for another driver can
b
e recorded.
Page 43 of 419

27
1-3. Adjustable components
1
Before driving
■Recalling the driving position
Driver’s seat position, head restraint height, seat cushion length, shoulder
belt height, and ou
tside rear view mirrors are adjus ted to memorized
position when you unlock the driver’s door with the wireless remote con-
trol or the smart access system, if equipped.
The tilt and telescopic steering column position is ad justed to the memo-
rized position when you push the ignitio n switch, or inser
t the key into the
key slot depending on the model.
■ Er
asing the previous memory
Close the driver’s door and select the ignition switch in OFF posi-
tion and remove the key.
Push the “SET” button and the “LOCK” or “UNLOCK” button at the same time for about one second until you hear two beeps.
■To change the memorized position
Adjust the desired positions of the driver ’
s seat, tilt and telescopic steering
column and outside mirrors.
Push the “SET” button and the “1”, “2” or “3” button at the same time until
you hear a beep.
■Retained accessory power operation
Memorized positions (except for the tilt a
nd telescopic steering column) can be
activated within 30 seconds after the driver’s door is opened, even if the ignition
switch is turned off.
■If any position memory button is push ed while the adjustments are being made
The operation will stop. To reactivate the sy stem
, push the desired button (“1”, “2” or
“3”) again.
Page 45 of 419
29
1
1-3. Adjustable components
Before driving
Rear seat position memory system
You can set the position of the rear seats and the height of the rear head
restraints into memory.
■ Setting the rear seat position
Turn the ignition switch to the ON position
Adjust the rear seat position and height of the head r
estraint to
the desired position. ( P23 )
Push the “SET” button until you
hear a beep
.
■ R
ecalling the memorized position
Push the “M” button until you hear
a beep
.
Page 47 of 419
31
1
1-3. Adjustable components
Before driving
Head restraints
The vertical and horizontal positions of the head restraint can be adjusted.
■Front seats
Push button up or down to
adjust height.
Grip head restraint and twist to
tilt forward or backward.
■ Outboar
d rear seats
Powered seats
Push button forward or back-
ward to adjust height.
Grip head restraint and twist to
tilt forward or backward.
Manual seats
Grip head restraint and move it
up or down.
Push and hold the lock release but -
ton when lowering.
Grip head restraint and twist to
tilt forward or backward.
Removing
Remove the head restraint while
pushing the release button.
1
2
Lock release button
Page 48 of 419
32
1-3. Adjustable components
■Adjusting the height of the head restraints
■Returning the rear head restraints from the front seats
P. 2 3
■Head restraints of different seats
The head restraints are specially designed for the seats which they are installed.
■Center rear seat
Pull on the top to raise.
Push the button to return.1
2
Make sure that the head restraints are
adjusted so that the center of the head
restraint is closest to the top of the passen-
ger’s ears.Front
Rear
Page 51 of 419
35
1-3. Adjustable components
1
Before driving
Seat belt comfort guide (outboard rear seat only)
If the shoulder belt sits close to a
person’s neck, slide the seat belt
comfort guide forward.
■ Adjusting the height of the belt
Up
Down1
2