Page 262 of 622
TOUCH SCREEN
241
(g) Changing the settings of the Bluetooth phone
G18008
Touch the “Settings” switch to display “Settings” screen.
G18009
You can change the settings of the phone.
Page 263 of 622
TOUCH SCREEN
242To change the phone book—
The system has two phone books. You can select either
phone book.
G18009
Touch the “Phone Book 1” or “Phone Book 2” switch.
To transfer the telephone number—
You can
transfer the telephone numbers in your Bluetooth
phone to the system. Up to 500 numbers can be registered
in one phone book.
Transfer it while the engine is running.
G18009
1. Touch the “Start Transfer” switch to display “Data
Transfer” screen.
Page 264 of 622
TOUCH SCREEN
243
G18027
2. Touch the “Overwrite” or “Add” switch.
G18028
3. Transfer the phone book data to the system using the
Bluetooth phone.
This screen appears while transferring. To cancel it, touch the
“Cancel” switch. If the transferring is interrupted on the way,
the phone book data transferred until then can be memorized
in the system.
Page 265 of 622
TOUCH SCREEN
244To register the one touch dial—
You can register the desired telephone number from
phone
books, dialed numbers and received calls. Up to 17
one touch dial numbers a phone book can be registered.
G18029
1. Touch the “Set One T ouch” switch in which you want to
register the phone number.
G18030
2. Touch the desired telephone number.
G18031
Select the new registration from 1�18 except 6 and touch
the switch.
A latest received number is registered in the 6th item.
Page 266 of 622
TOUCH SCREEN
245
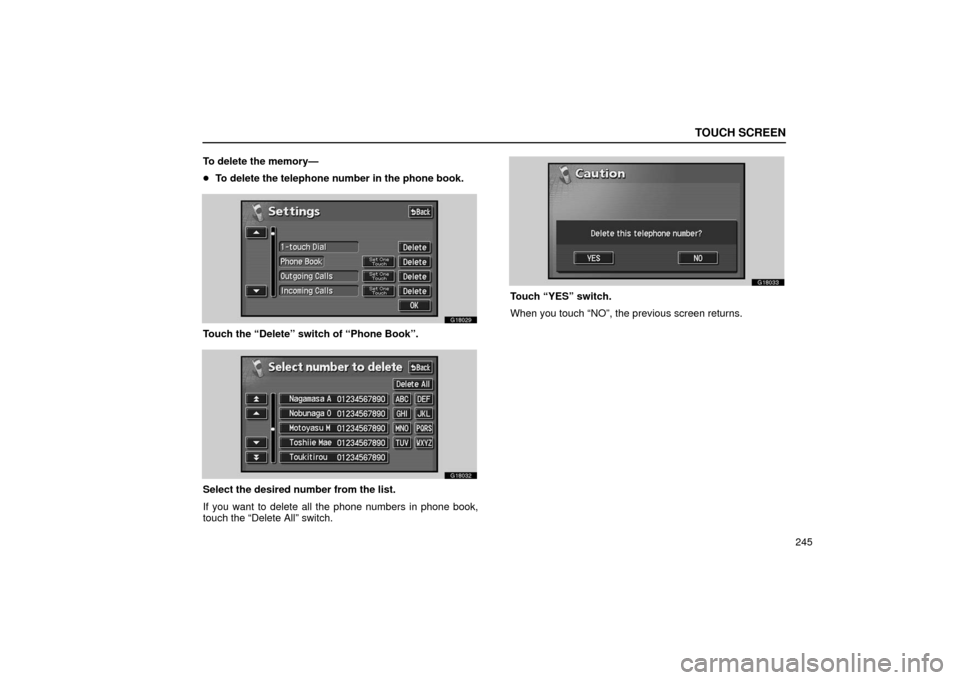
To delete the memory—
�
To delete the telephone number in the phone book.
G18029
Touch the “Delete” switch of “Phone Book”.
G18032
Select the desired number from the list.
If you want to delete all the phone numbers in phone book,
touch the “Delete All” switch.
G18033
Touch “YES” switch.
When you touch “NO”, the previous screen returns.
Page 304 of 622
 AUDIO
283
�
If a Mark Levinson brand audio system is installed:
G22066
Automatic sound levelizer (ASL):
When the audio sound becomes difficult to be heard due to
road noise, wind noise, etc. during dr")
AUDIO
283
�
If a Mark Levinson brand audio system is installed:
G22066
Automatic sound levelizer (ASL):
When the audio sound becomes difficult to be heard due to
road noise, wind noise, etc. during driving, touch the “ASL”
switch. The system adjusts to the optimum volume and tone
quality according to the noise level.
When the system is on, the sound adjustment level is
displayed on the screen.
SURROUND:
If you touch “SURROUND”, surround sound will be enabled. (d) Your radio antenna
The wire antenna is mounted inside the rear window.
NOTICE
�
When cleaning the inside of the rear window, be
careful not to scratch or damage the wire antenna.
� Putting a window tint (especially, conductive or
metallic type) on the rear window may affect the
reception of radio or mobile telephone. For the
installation of the window tint, consult with your
Lexus dealer.
(e) Your cassette player
When you insert a cassette, the exposed tape should be to the
right.
NOTICE
Do not oil any part of the cassette player, and do not
insert anything except a cassette tape into the slot.
Page 315 of 622
 AUDIO
294(h) If the satellite radio tuner malfunctions
When
problems occur with the XM tuner, a message will appear on the display. Referring to the table below to identify the problem,
take the sug")
AUDIO
294(h) If the satellite radio tuner malfunctions
When
problems occur with the XM tuner, a message will appear on the display. Referring to the table below to identify the problem,
take the suggested corrective action.
ANTENNA
The XM antenna is not connected. Check whether the XM antenna cable is \
attached securely.
A short−circuit occurs in the antenna or the surrounding antenna cable. See a L\
exus certified
dealer.
UPDATING
You have not subscribed to the XM satellite radio. The radio is being up\
dated with the latest
encryption code. Contact the XM satellite radio for subscription inform\
ation. When a contact is
canceled, you can choose the “CH000” and all free −to− air channels.
The premium channel you selected is not authorized. Wait for about 2 seconds until the radio
returns to the previous channel or “CH001”. If it does not change\
automatically, select another
channel. If you want to listen to the premium channel, contact the XM s\
atellite radio.
NO SIGNALThe XM signal is too weak at the current location. Wait until your vehicle reaches a location
with a stronger signal.
LOADINGThe unit is acquiring audio or program information. Wait until the unit has received the
information.
OFF AIRThe channel you selected is not broadcasting any programming. Select an\
other channel.
−−−−−There is no song/program title or artist name/feature associated with th\
e channel at that time.
No action needed.
−−−
The channel you selected is no longer available. Wait for about 2 seconds until the radio
returns to the previous channel or “CH001”. If it does not change\
automatically, select another
channel.
The XM Listener Care Center is also available on the phone, please call \
(800) 852 −9696 during the following hours:
Monday – Saturday: 7 a.m. – 1 a.m. Sunday: 12 p.m – 12 a.m.
Page 354 of 622
 AUDIO
333
Audio system operating hints
NOTICE
To ensure correct audio system operations:
�Be careful not to spill beverages over the audio
system.
� Do not put anything other than a cassette tape or d")
AUDIO
333
Audio system operating hints
NOTICE
To ensure correct audio system operations:
�Be careful not to spill beverages over the audio
system.
� Do not put anything other than a cassette tape or disc
into the cassette tape slot or disc slot.
� The use of a cellular phone inside or near the vehicle
may cause a noise from the speakers of the audio
system which you are listening to. However, this
does not indicate a malfunction.
Radio reception
FM broadcasts have a range of about 40 km or 25 miles. When
driving away from a station, you may have to fine −tune your
radio and turn up the volume as the station gets weaker.
Because FM uses a line −of− sight signal, tall buildings or hills
may sometimes block reception. These are all normal
characteristics of FM recept ion and do not indicate any
problem with the radio itself. Caring for your cassette player and tapes
For the best performance for your cassette player and tapes:
Clean the tape head and other parts regularly.
�
A dirty tape head or tape path can decrease sound quality
and tangle your cassette tapes. The easiest way to clean
them is by using a cleaning tape. (A wet type is
recommended.)
Use high− quality cassettes:
� Low −quality cassette tapes can cause many problems,
including poor sound, inconsistent playing speed, and
constant auto− reversing. They can also get stuck or
tangled in the cassette player.
� Do not use a cassette if it has been damaged or tangled or
if its label is peeling off.
� Do not leave a cassette in the player if you are not listening
to it, especially if it is hot outside.
� Store cassettes in their cases and out of direct sunlight.
� Avoid using cassettes with a total playing time longer than
100 minutes (50 minutes per side). The tape used in these
cassettes is thin and could get stuck or tangled in the
cassette player.
 TOUCH SCREEN
241
(g) Changing the settings of the Bluetooth phone
G18008
Touch the “Settings” switch to display “Settings” screen.
G18009
You can change the settings of the phone.")
 TOUCH SCREEN
242To change the phone book—
The system has two phone books. You can select either
phone book.
G18009
Touch the “Phone Book 1” or “Phone Book 2” switch.
To transfer the telepho")
 TOUCH SCREEN
243
G18027
2. Touch the “Overwrite” or “Add” switch.
G18028
3. Transfer the phone book data to the system using the
Bluetooth phone.
This screen appears while transferring. To ca")
 TOUCH SCREEN
244To register the one touch dial—
You can register the desired telephone number from
phone
books, dialed numbers and received calls. Up to 17
one touch dial numbers a phone book can")