Page 62 of 622
 KEYS AND DOORS
41
G11006
�Security indicator light
Setting the system
1. Turn the engine switch off.
The engine immobilizer causes the indicator light to flash.
2. Close and lock all the doors, trunk")
KEYS AND DOORS
41
G11006
�Security indicator light
Setting the system
1. Turn the engine switch off.
The engine immobilizer causes the indicator light to flash.
2. Close and lock all the doors, trunk and hood using entry
function, wireless remote control or a mechanical key.
If you lock them with entry function or wireless remote control,
the turn signal lights flash once and one beep will sound.*
NOTE:
* The turn signal lights can be set not to flash and beep can
be set not to sound.
Ask your Lexus dealer for details.
3. At this time, the system is set.
Cancelling the system
When you unlock any door or trunk using entry function,
wireless remote control or a mechanical key, the system
is cancelled.
If you unlock them with entry function or wireless remote
control, the turn signal lights flash twice and two beeps will
sound.* NOTE:
* The turn signal lights can be set not to flash and beep can
be set not to sound.
Ask your Lexus dealer for details.
Activating the system
The alarm sounds for 60 seconds if any of the following are
operated:
�Unlocking any door or trunk without using entry function,
wireless remote control or a mechanical key.
� Opening the hood forcibly.
� Reconnecting the battery.
If any door is unlocked during the alarm sounding, its door is
automatically locked.
To stop the alarm: Use either of the following methods.
� Unlock the door or trunk using entry function, wireless
remote control or a mechanical key.
� Turn the engine switch to “IG− ON” mode.
Page 66 of 622
 SWITCHES
45
G12002
The automatic light control sensor is on top center of the
instrument panel.
Do not place anything on the instrument panel, and/or do not
affix anything on the windshield to block t")
SWITCHES
45
G12002
The automatic light control sensor is on top center of the
instrument panel.
Do not place anything on the instrument panel, and/or do not
affix anything on the windshield to block this sensor.
When the headlights come on, the lights automatically turn off
about 30 seconds after any of the doors is opened and closed
with the engine switch off.* To turn them on again, select the
engine switch in “IG− ON” mode, or turn the headlight switch off
and then twist the knob until the first or second clickstop.
If you are going to park for over one week, make sure the
headlight switch is off.
When the headlight switch is on with all the doors locked and
the trunk closed, pushing the ”LOCK” button on the electronic
key turns off the headlights.
NOTE:
*The time before turning off the lights can be changed.
Ask your Lexus dealer for details. Daytime Running Light System
The headlights turn on at reduced intensity when the parking
brake is released with the engine started, even with the light
switch in the ”OFF” position. They will not
go off until the engine
switch is turned off.
To turn on the other exterior lights and instrument panel lights,
twist the knob to the first clickstop.
Twist the knob to the second clickstop to turn on the headlights
to full intensity for driving at night.
When setting the knob to the third clickstop (”AUTO”), the
headlights will automatic ally adjust to full intensity and/or turn
on the other lights depending on the darkness of the
surroundings. Likewise, as the surroundings become brighter,
the headlights will turn to reduced intensity, ultimately turning
off the other lights.
NOTICE
To prevent the battery from being discharged, do not
leave the lights on longer than necessary when the
engine is not running.
Page 70 of 622
 SWITCHES
49
WINDSHIELD WIPER AND WASHERSWITCHES
Variable intermittent wipers
G12007
� 1Interval adjuster 2Washer on
To turn the wipers on, move the lever down until you reach
the desired speed setti")
SWITCHES
49
WINDSHIELD WIPER AND WASHERSWITCHES
Variable intermittent wipers
G12007
� 1Interval adjuster 2Washer on
To turn the wipers on, move the lever down until you reach
the desired speed setting.
The engine switch must be selected in “IG −ON” mode.
There are 3 settings:
”INT” position: Intermittent operation
”LO” position: Low speed operation
”HI” position: High speed operation
Twist the interval adjuster upward to increase the wiping
time interval between sweeps, and downward to decrease
it. The wiper lever must be in the ”INT” position.
The time interval between sw
eeps is shortened when the
vehicle speed increases. When the vehicle speed reaches
more than about 20 km/h (12 mph) with the interval adjuster
twisted down to the lowest position, the time interval becomes
the shortest 1.5 seconds.
If you stop the vehicle with the wiper switch in the “LO” position,
the wiper speed automatically changes from low speed to
intermittent operation speed.* This function does not work with
the interval adjuster twisted down to the lowest position.
NOTE:
* This feature can be deactivated.
Ask your Lexus dealer for details.
For mist wiper operations (a single wipe), pull the lever up
and release it.
To make the washer squirt, push the lever toward you and
release it.
If the wiper lever is in the “OFF” position, the wipers will
automatically make 3 wipes and then a single wipe later to
sweep the windshield completely.* The interval between the
3 wipes and the last wipe will depend on the vehicle speed.
The last sweep does not happen if the vehicle speed exceeds
about 170 km/h (106 mph). NOTE:
*This function can be changed as follows: �The time before the last single wipe can be set for
about 3 seconds.
� The last single wipe can be deactivated.
Ask your Lexus dealer for details.
Page 71 of 622
SWITCHES
50The warning message “LOW WASHER FLUID” is displayed in
the multi−information display when the fluid level in the tank
becomes
very low. For information on adding washer fluid, see
“Adding washer fluid” on page 579.
In cold weather, warm the windshield with the defroster before
using the washer. This will help prevent icing, which could
block your vision.
NOTICE
Do not operate the wipers if the windshield is dry. It may
scratch the glass.
Rain�sensing windshield wipers
G12008
� 1 Automatic control adjuster 2Washer on
To turn the wipers on, move the lever down until you reach
the desired speed setting.
The engine switch must be selected in “IG −ON” mode.
There are 3 settings:
“AUTO” position: Automatic operation
“LO” position: Low speed operation
“HI” position: High speed operation
Page 76 of 622
SWITCHES
55
HEADLIGHT CLEANER SWITCH
The headlight cleaner switch is located in the switch box.
G12010
Push the button to use the switch box. To spray fluid on
the headlights, push the switch with the headlights on.
The engine switch must be selected in “IG−ON” mode.
The warning message “LOW WASHER FLUID” is displayed in
the multi−information display when the fluid level in the tank
becomes very low. For information on adding washer fluid, see
“Adding washer fluid” on page 579.
After operation, be sure to close the switch box to its original
position.
CAUTION
To reduce the chance of injury in case of an accident or
a sudden stop, keep the switch box closed when not in
use while driving.
NOTICE
Do not turn the headlight cleaner on with the washer
fluid tank empty. It may cause the cleaner motor to
overheat.
Page 78 of 622
SWITCHES
57
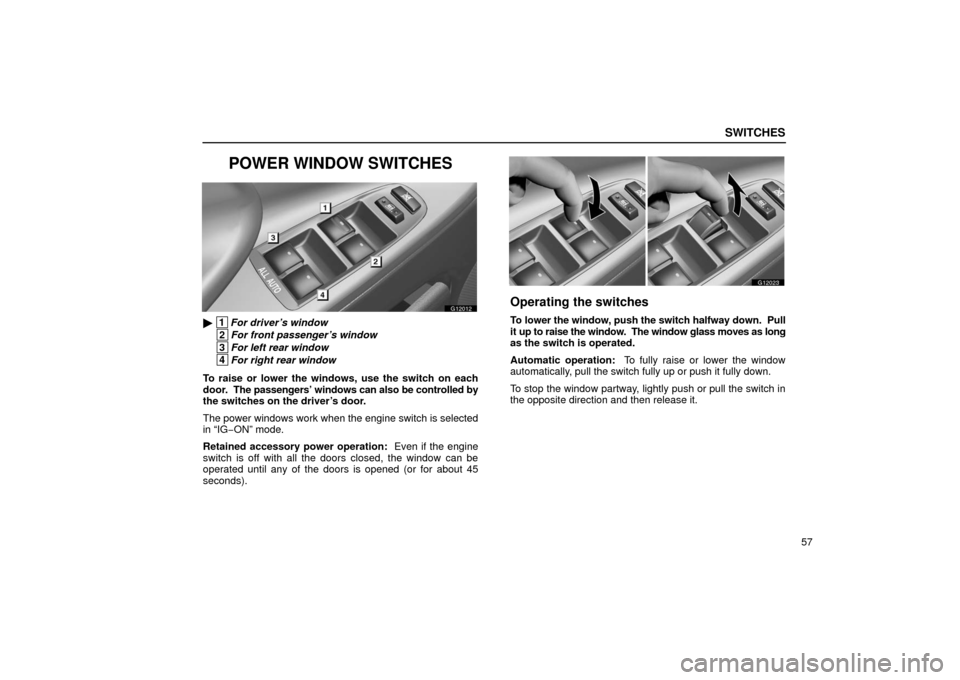
POWER WINDOW SWITCHES
G12012
� 1For driver’s window
2For front passenger’s window
3For left rear window
4For right rear window
To raise or lower the windows, use the switch on each
door. The passengers’ windows can also be controlled by
the switches on the driver’s door.
The power windows work when the engine switch is selected
in “IG− ON” mode.
Retained accessory power operation: Even if the engine
switch is off with all the doors closed, the window can be
operated until any of the doors is opened (or for about 45
seconds).
G12023
Operating the switches
To lower the window, push the switch halfway down. Pull
it up to raise the window. The window glass moves as long
as the switch is operated.
Automatic operation: To fully raise or lower the window
automatically, pull the switch fully up or push it fully down.
To stop the window partway, lightly push or pull the switch in
the opposite direction and then release it.
Page 89 of 622
 GAUGES, METERS AND SERVICE REMINDER INDICATORS
68
FUEL GAUGE
G13001
�Low fuel level warning light
The gauge indicates the approximate quantity of fuel
remaining in the tank when the engine switch is")
GAUGES, METERS AND SERVICE REMINDER INDICATORS
68
FUEL GAUGE
G13001
�Low fuel level warning light
The gauge indicates the approximate quantity of fuel
remaining in the tank when the engine switch is selected
in “IG�ON” mode.
It is a good idea to keep the tank over 1/4 full.
If the fuel level approaches ”E” or the low fuel level warning light\
comes on, fill the fuel tank as soon as possible.
On inclines or curves, due to the movement of fuel in the tank,
the fuel gauge needle may fluctuate or the low fuel level
warning light may come on earlier than usual.
If the fuel tank is completely empty, the malfunction indicator
lamp comes on. Fill the fuel tank immediately.
The indicator lamp goes off after driving several times. If the
indicator lamp does not go off, contact your Lexus dealer as
soon as possible. See the inner back cover for fuel capacity and recommended
fuel selection.
ENGINE COOLANT
TEMPERATURE GAUGE
G13002
� Normal range
The gauge indicates the engine coolant temperature when
the engine switch is selected in “IG�ON” mode. The
engine operating temperature will vary with changes in
weather and engine load.
If the needle points to the red zone or higher, stop your vehicle
and allow the engine to cool.
Your vehicle may overheat during severe operating conditions,
such as:
� Driving up a long hill on a hot day.
� Reducing speed or stopping after high speed driving.
Page 91 of 622
 GAUGES, METERS AND SERVICE REMINDER INDICATORS
70
ODOMETER AND TRIP METER
G13045
This meter displays the odometer and two trip meters. To
change the mode indication, use the “ODO TRIP” switch.
T")
GAUGES, METERS AND SERVICE REMINDER INDICATORS
70
ODOMETER AND TRIP METER
G13045
This meter displays the odometer and two trip meters. To
change the mode indication, use the “ODO TRIP” switch.
The “ODO TRIP” switch is located in the switch box.
G13004
Push the button to use the switch box and then push the
“ODO TRIP” switch. The odometer records the total distance the vehicle has
been driven. The twin trip meter records two different
distances independently.
For example, you can use one meter to calculate the fuel
economy and the other to measure the distance on each trip.
To change the trip meter indication from one trip to the
other, push the “ODO TRIP” change switch. To set the A
trip meter to
zero, display the A meter reading, then push
the “RESET” switch. The same applies for the B trip
meter.
The data of trip meters will be cancelled if the electrical power
source is disconnected.
After operation, be sure to close the switch box to its original
position.
CAUTION
To reduce the chance of injury in case of an accident or
a sudden stop, keep the switch box closed when not in
use while driving.
 SWITCHES
50The warning message “LOW WASHER FLUID” is displayed in
the multi−information display when the fluid level in the tank
becomes
very low. For information on adding washer fluid, see
�")
 SWITCHES
55
HEADLIGHT CLEANER SWITCH
The headlight cleaner switch is located in the switch box.
G12010
Push the button to use the switch box. To spray fluid on
the headlights, push the switch with th")