Page 1 of 26

SECTION 1 – 4
97
INSTRUMENTS AND CONTROLS
Interior equipment
Sun visors98 . . . . . . . . . . . . . . . . . . . . . . . . . . . . . . . . . . . . . . . . . . . . . . .
Interior lights98 . . . . . . . . . . . . . . . . . . . . . . . . . . . . . . . . . . . . . . . . . . . . .
Personal lights99 . . . . . . . . . . . . . . . . . . . . . . . . . . . . . . . . . . . . . . . . . . .
Illuminated entry system100 . . . . . . . . . . . . . . . . . . . . . . . . . . . . . . . . . .
Luggage compartment lights103 . . . . . . . . . . . . . . . . . . . . . . . . . . . . . .
Clock103 . . . . . . . . . . . . . . . . . . . . . . . . . . . . . . . . . . . . . . . . . . . . . . . . . .
Outside temperature display106 . . . . . . . . . . . . . . . . . . . . . . . . . . . . . . .
Cigarette lighter and ashtray107 . . . . . . . . . . . . . . . . . . . . . . . . . . . . . . .
Power outlet108 . . . . . . . . . . . . . . . . . . . . . . . . . . . . . . . . . . . . . . . . . . . .
Rear console box109 . . . . . . . . . . . . . . . . . . . . . . . . . . . . . . . . . . . . . . . .
Glove box11 0 . . . . . . . . . . . . . . . . . . . . . . . . . . . . . . . . . . . . . . . . . . . . . . .
Garage door opener111 . . . . . . . . . . . . . . . . . . . . . . . . . . . . . . . . . . . . . .
Cupholders11 5 . . . . . . . . . . . . . . . . . . . . . . . . . . . . . . . . . . . . . . . . . . . . .
Coin boxes11 6 . . . . . . . . . . . . . . . . . . . . . . . . . . . . . . . . . . . . . . . . . . . . . .
Overhead console box11 7 . . . . . . . . . . . . . . . . . . . . . . . . . . . . . . . . . . . .
Door pockets11 8 . . . . . . . . . . . . . . . . . . . . . . . . . . . . . . . . . . . . . . . . . . . .
Trunk storage extension11 9 . . . . . . . . . . . . . . . . . . . . . . . . . . . . . . . . . .
Floor mat11 9 . . . . . . . . . . . . . . . . . . . . . . . . . . . . . . . . . . . . . . . . . . . . . . .
Rear electric sunshade120 . . . . . . . . . . . . . . . . . . . . . . . . . . . . . . . . . . .
Tie−down hooks122 . . . . . . . . . . . . . . . . . . . . . . . . . . . . . . . . . . . . . . . . .
First−aid kit holder122 . . . . . . . . . . . . . . . . . . . . . . . . . . . . . . . . . . . . . . .
Page 7 of 26
INTERIOR EQUIPMENT
103
LUGGAGE COMPARTMENT LIGHT
G14035
To turn on the luggage compartment light, open the trunk
lid or push the switch. Closing the trunk lid will turn the
light off.
CLOCK
G14007
The digital clock indicates the time with the engine switch
in “ACC” or “IG−ON” mode.
Vehicles with navigation system: T he c loc k c an b e
corrected manually or automatically using signals from the
GPS. For details, see the separate “Navigation System
Owner’s Manual”.
Vehicles without navigation system: To adjust the clock or
set the daylight saving time, follow the procedures below.
Page 8 of 26
INTERIOR EQUIPMENT
104
G14054
1. Push the “INFO” button to display the setting screen.
G14055
2. Touch the “Adjust Clock” switch to display the adjust
clock screen.
When the headlight switch is turned to the first or second click
stop, the brightness of the display will be reduced.
You can brighten the display. To adjust the brightness, see
“Instrument panel light control” on page 96.
Page 9 of 26
INTERIOR EQUIPMENT
105 (a) To adjust a clock
G14056
You can adjust the clock manually with “H”, “M” and “:00”
switches.
“H”: To set the hour
“M”: To set the minute.
“:00”: To adjust the time to the nearest hour.
For example, if the “:00” switch is pressed when the time is
between 9:30 − 9:59 or between 10:01 − 10:29, the time will
change to 10:00.
If the electrical power source has been disconnected from the
clock, the time display will automatically be set to 1:00.
After adjustment, touch “OK”.(b) To set the daylight saving time
G14057
You can set or cancel the daylight saving time.
“ON”: To set the daylight saving time.
“OFF”: To cancel the daylight saving time.
After setting, touch “OK”.
Page 14 of 26
INTERIOR EQUIPMENT
11 0
CAUTION
�To reduce the chance of injury in case of an accident
or a sudden stop, always keep the rear console box
closed while driving.
�Do not apply excessive load over the tray with your
hand, or closing the console box lid may injure your
fingers.
�Do not open the rear console box while operating the
rear vents, or closing the console box lid may injure
your fingers.
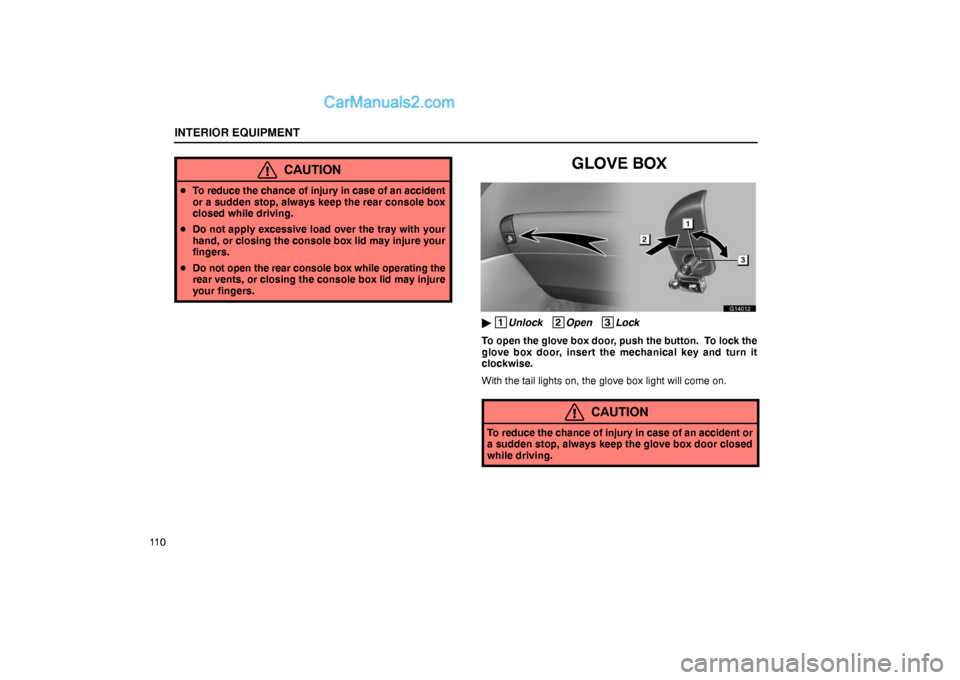
GLOVE BOX
G14012
� 1
Unlock 2
Open 3
Lock
To open the glove box door, push the button. To lock the
glove box door, insert the mechanical key and turn it
clockwise.
With the tail lights on, the glove box light will come on.
CAUTION
To reduce the chance of injury in case of an accident or
a sudden stop, always keep the glove box door closed
while driving.


 To adjust a clock
G14056
You can adjust the clock manually with “H”, “M” and “:00”
switches.
“H”: To set the hour
“M”: To set the minute.
“:00”: T")