Page 235 of 442

AUDIO
ccxxi
Use high−
quality cassettes:
� Low−quality cassette tapes can cause many problems,
including poor sound, inconsistent playing speed, and
constant auto−reversing. They can also get stuck or tangled
in the cassette player.
� Do not use a cassette if it has been damaged or tangled or
if its label is peeling off.
� Do not leave a cassette in the player if you are not listening
to it, especially if it is hot outside.
� Store cassettes in their cases and out of direct sunlight.
� Avoid using cassettes with a total playing time longer than
100 minutes (50 minutes per side). The tape used in these
cassettes is thin and could get stuck or tangled in the
cassette player. Caring for your CD player and CDs
�
Your CD player is intended for use with 12 cm (4.7 in.) CDs
only.
� Extremely high temperature can keep your CD player from
working. On hot days, use air conditioning to cool the
vehicle interior before you listen to a CD.
� Bumpy roads or other vibrations may make your CD player
skip.
� If moisture gets into your CD player, you may not hear any
sound even though your CD player appears to be working.
Eject all CDs from the player and wait until the player dries.
CAUTION
CD players use an invisible laser beam which could
cause hazardous radiation exposure if directed outside
the unit. Be sure to operate the player correctly.
Page 236 of 442
AUDIO
ccxxii
�Use only CDs marked as shown above. The following
products may not be playable on your CD player.
Copy−protected CDs
CD− Rs (CD− Recordable)
CD−RWs (CD− Re−writable)
CD−ROMs� Special shaped CDs
�Transparent/translucent CDs
Page 237 of 442
AUDIO
ccxxiii
�Low quality CDs
�Labeled CDs
NOTICE
Do not use special shaped, transparent/translucent, low
quality or labeled CDs such as those shown in the
illustrations. The use of such CDs may damage the
player or changer, or it may be impossible to eject the
CD.
Page 238 of 442
AUDIO
ccxxiv
�Correct �Wrong
� Handle CDs carefully, especially when you set them into the
player. Hold them on the edge and do not bend them. A void
getting fingerprints on them, particularly on the shiny side.
� Dirt, scratches, warping, pin holes, or other CD damage
could cause the player to skip or to repeat a section of a
track. (To see a pin hole, hold the CD up to the light.)To clean a CD: Wipe it with a soft, lint −free cloth that has been
dampened with water. Wipe in a straight line from the center
to the edge of the CD (not in a circle). Do not use a
conventional record cleaner or anti −static device.
Page 242 of 442

AUDIO
ccxxviii
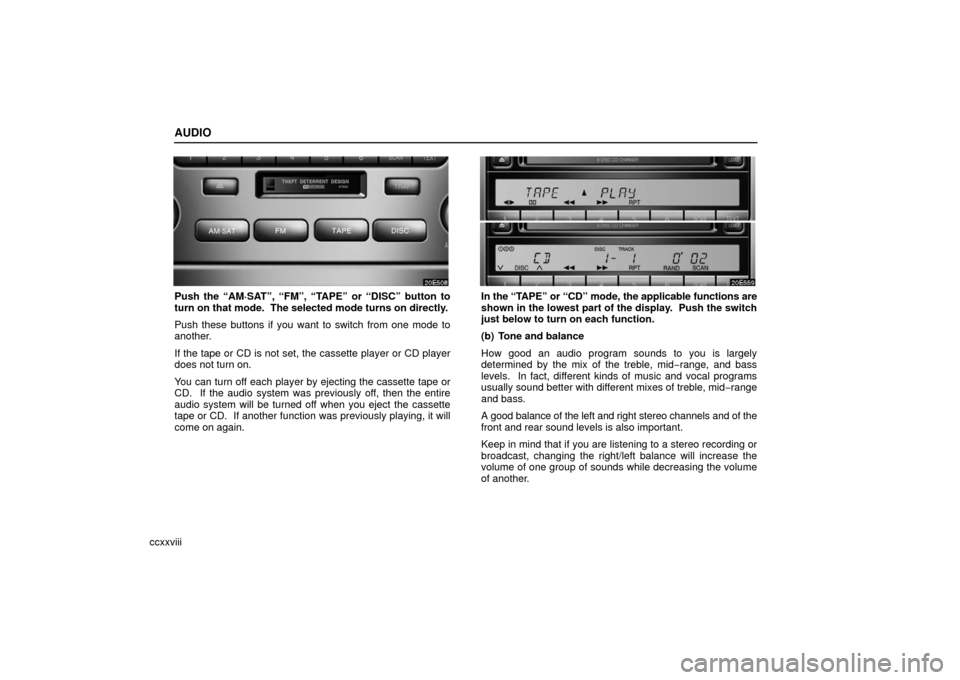
Push the “AM·SAT”, “FM”, “TAPE” or “DISC” button to
turn on that mode. The selected mode turns on directly.
Push these buttons if you want to switch from one mode to
another.
If the tape or CD is not set, the cassette player or CD player
does not turn on.
You can turn off each player by ejecting the cassette tape or
CD. If the audio system was previously off, then the entire
audio system will be turned off when you eject the cassette
tape or CD. If another function was previously playing, it will
come on again.In the “TAPE” or “CD” mode, the applicable functions are
shown in the lowest part of the display. Push the switch
just below to turn on each function.
(b) Tone and balance
How good an audio program sounds to you is largely
determined by the mix of the treble, mid−range, and bass
levels. In fact, different kinds of music and vocal programs
usually sound better with different mixes of treble, mid −range
and bass.
A good balance of the left and right stereo channels and of the
front and rear sound levels is also important.
Keep in mind that if you are listening to a stereo recording or
broadcast, changing the right/left balance will increase the
volume of one group of sounds while decreasing the volume
of another.
Page 243 of 442

AUDIO
ccxxix
Each time you push the “AUDIO CONTROL” knob, the
display changes as in the following. To adjust the tone and
balance or turn on or off the Automatic Sound Levelizer,
turn the knob.
BAS: Adjusts low− pitched tones.
MID: Adjusts mid− pitched tones.
TRE: Adjusts high− pitched tones.
FAD: Adjusts the sound balance between the front and rear
speakers.
BAL: Adjusts the sound balance between the right and left
speakers.
ASL: Turns on or off the Automatic Sound Levelizer.
Automatic Sound Levelizer (ASL): When the audio sound
becomes dif ficult to be heard due to road noise, wind noise, etc.
during driving, the system adjusts to the optimum volume and
tone quality according to the noise level. While the Automatic
Sound Levelizer is on, “ASL” appears on the display. (c) Your radio antennas
The wire antenna is mounted inside the rear window.
NOTICE
�
When cleaning the inside of the rear window, be
careful not to scratch or damage the wire antenna.
� Putting a film (especially, a conductive or metallic
film) on the rear window may affect the reception of
radio or mobile telephone. For the installation of the
window tint, consult with your Lexus dealer.
(d) Your cassette player
When you insert a cassette, the exposed tape should face to
the right.
NOTICE
Never try to disassemble or oil any part of the cassette
player. Do not insert anything other than cassette tapes
into the slot.
Page 244 of 442
AUDIO
ccxxx(e) Your CD player with changer
Your CD player with changer can store up to 6 CDs and play
selected
CDs or continuously play all the CDs set in the player.
When you set CDs into the player, make sure their labels face
up. If not, the player will display “ERROR 1” and the CD
number.
NOTICE
� Do not stack up two CDs for insertion, or it will cause
damage to the CD changer. Insert only one CD into
slot at a time.
� Never try to disassemble or oil any part of the CD
player. Do not insert anything other than CDs into the
slot.
The player is intended for use with 12 cm (4.7 in.) CDs only.
Radio operation
(a) Listening to the radio
Push these buttons to choose either an AM or FM station.
“AM”, “FM1” or “FM2” appears on the display.
Page 255 of 442

AUDIO
ccxli
Cassette tape player operation
(a) Playing a cassette tape
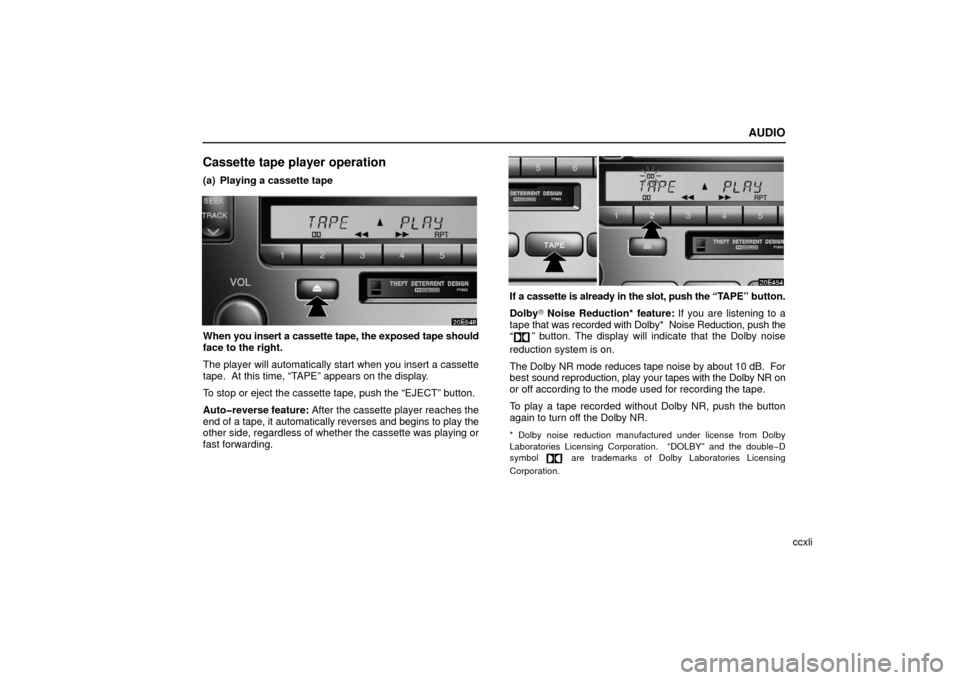
When you insert a cassette tape, the exposed tape should
face to the right.
The player will automatically start when you insert a cassette
tape. At this time, “TAPE” appears on the display.
To stop or eject the cassette tape, push the “EJECT” button.
Auto�reverse feature: After the cassette player reaches the
end of a tape, it automatically reverses and begins to play the
other side, regardless of whether the cassette was playing or
fast forwarding.
If a cassette is already in the slot, push the “TAPE” button.
Dolby� Noise Reduction* feature: If you are listening to a
tape that was recorded with Dolby* Noise Reduction, push the
“
” button. The display will indicate that the Dolby noise
reduction system is on.
The Dolby NR mode reduces tape noise by about 10 dB. For
best sound reproduction, play your tapes with the Dolby NR on
or off according to the mode used for recording the tape.
To play a tape recorded without Dolby NR, push the button
again to turn off the Dolby NR.
* Dolby noise reduction manufactured under license from Dolby
Laboratories Licensing Corporation. “DOLBY” and the double −D
symbol
are trademarks of Dolby Laboratories Licensing
Corporation.