2006 KIA Sedona lock
[x] Cancel search: lockPage 121 of 347
Features of your vehicle112
3Calibration procedureThe compass may not indicate the cor-
rect compass direction when you are dri-
ving in certain areas (tunnel, parking
garage, underground parking lot, near
transformer substation, etc.), and the fol-
lowing may occur:
The compass headings become inac-
curate.
The compass heading doesn't change when the vehicle changes direction.
Some compass headings are not dis- played.
The compass headings are inaccurate in long distance driving.
If the vehicle's compass headings
become inaccurate continuously, the
compass should be manually calibrated
as follows: 1. Move the vehicle away from any large
steel structures or power generating
cables or equipment.
2. Check the terrestrial deviation angle value by pressing and holding the
MODE button for 4.5 seconds until the
current terrestrial deviation angle
value appears in the display.
3. If the terrestrial deviation angle value is different for your country, set the cor-
rect angle referring to “Setting the
compass zone” and perform the
“Calibration procedure” again.
4. Make sure the vehicle windshield wipers are turned off. 5. Press and hold the MODE button
again for 2~4.5 seconds until the “turn”
appears and “DIR” blinks in the display
and release the button.
6. Drive your vehicle in at least 1 com- plete (either clockwise or counter-
clockwise) circle at less than 5 km/h (3
mph) within 10 minutes until the com-
pass heading appears.
7. If the vehicle’s compass headings become inaccurate again, repeat
steps 1 through 6 above.
✽ ✽NOTICEIf you press the MODE button before
the calibration is completed or the vehi-
cle is not rotated within 10 minutes after
“turn” appears and “DIR” blinks, the
correction will be cancelled.
1VQA2316
Page 126 of 347
3 117
Features of your vehicle
Checking operation All warning lights are checked by turning
the ignition switch ON (do not start the
engine). Any light that does not illuminate
should be checked by an Authorized Kia
Dealer.
After starting the engine, check to make
sure that all warning lights are off. If any
are still on, this indicates a situation that
needs attention. When releasing the
parking brake, the brake system warning
light should go off. The fuel warning light
will stay on if the fuel level is low.
Air bag warning lightThis warning light will illuminate for
approximately 6 seconds each time you
turn the ignition switch to the ON posi-
tion.
If this indicator does not go out, or if it illu-
minates while the vehicle is being driven,
see an authorized Kia Dealer for immedi-
ate service.Anti-lock brake system
(ABS) warning light This light illuminates if the key is turned
to ON and goes off in approximately 3
seconds if the system is operating nor-
mally.
If the light stays on, you may have a
problem with your ABS system. Contact
an authorized Kia dealer as soon as pos-
sible.
Electronic brake force
distribution (EBD) sys-
tem warning lightIf two warning lights illumi-
nate at the same time while
driving, your vehicle has a
problem with ABS and EBD
system.
In this case, your ABS system and regu-
lar brake system may not work normally.
Have the vehicle checked by an
Authorized Kia Dealer as soon as possi-
ble.
WARNINGS AND INDICATORS
WARNING
If the both ABS and Brake warning
lights are ON and stay ON, your
vehicle’s brake system will not work
normally. So you may experience an
unexpected and dangerous situa-
tion during sudden braking. In this
case, avoid high speed driving and
abrupt braking. Have your vehicle
checked by Authorized Kia Dealer
as soon as possible.
AIR
BAG
Page 130 of 347
3 121
Features of your vehicle
ESC indicator
(Electronic Stability
Control) (if equipped)The ESC indicator will illuminate when
the ignition switch is turned ON, but
should go off after approximately 3 sec-
onds. When the ESC is on, it monitors
the driving conditions and under normal
driving conditions, the ESC light will
remain off. When a slippery or low trac-
tion condition is encountered, the ESC
will operate, and the ESC indicator will
blink to indicate the ESC is operating.ESC OFF indicator
(if equipped)The ESC OFF indicator will illuminate
when the ignition switch is turned ON,
but should go off after approximately 3
seconds. To switch to ESC OFF mode,
press the ESC OFF button. The ESC
OFF indicator will illuminate indicating
the ESC is deactivated. If this indicator
stays on in the ESC ON mode, the ESC
may have a malfunction. Take your car to
the authorized Kia dealer and have the
system checked.
Cruise indicator (if equipped)CRUISE indicator
The indicator light illuminates when the
cruise control system is enabled.
Cruise SET indicator
The indicator light illuminates when the
cruise function switch (COAST/SET or
RES/ACCEL) is ON.
Lights on warning chimeThe lights on warning chime will sound if
the headlight switch is left in the 1st or
2nd position and the driver’s door is
opened.Key reminder warning chimeIf the driver’s door is opened while the
ignition key is left in the ignition switch
(ACC or LOCK position), the key
reminder warning chime will sound. This
is to prevent you from locking your keys
in the vehicle.
ESCESCOFF
CRUISESET
Page 132 of 347
3 123
Features of your vehicle
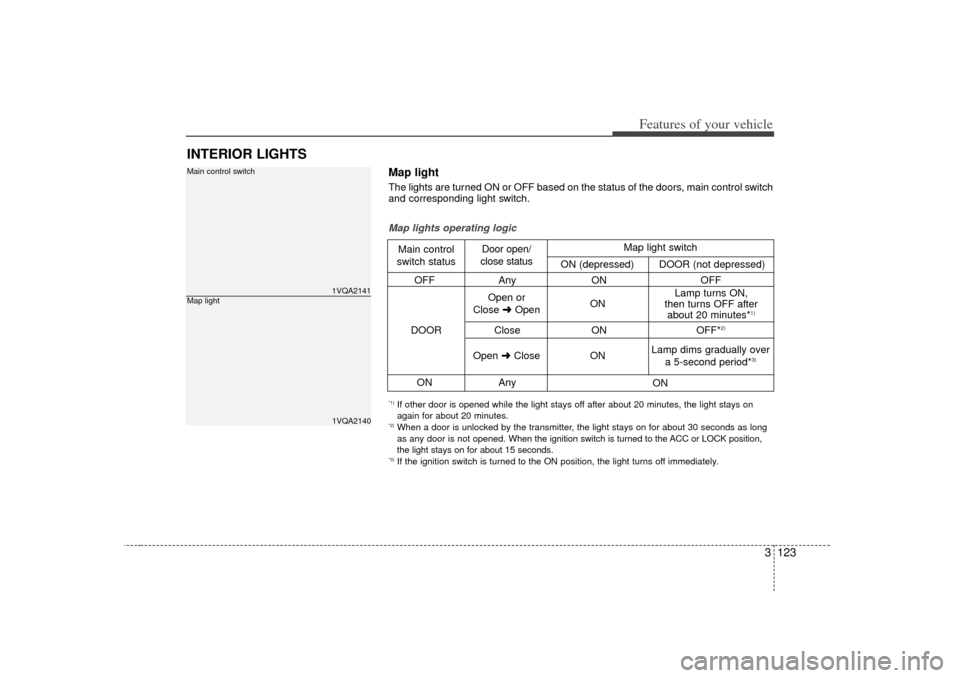
INTERIOR LIGHTS
1VQA21411VQA2140
Main control switchMap light
OFFAny ON OFF
Close ON OFF*
2)
ONAny
Map lights operating logicMain control
switch status Door open/
close status
DOOR Open or
Close \bOpen ON Lamp turns ON,
then turns OFF after about 20 minutes*
1)
Open \bClose
ON
ON
Lamp dims gradually over
a 5-second period*
3)
Map light switch
ON (depressed) DOOR (not depressed)
*1) If other door is opened while the light stays off after about 20 minutes, the light stays on
again for about 20 minutes.*2) When a door is unlocked by the transmitter, the light stays on for about 30 seconds as long
as any door is not opened.
When the ignition switch is turned to the ACC or LOCK position,
the light stays on for about 15 seconds.*3) If the ignition switch is turned to the ON position, the light turns off immediately.Map lightThe lights are turned ON or OFF based on the status of the doors, main control switch
and corresponding light switch.
Page 133 of 347
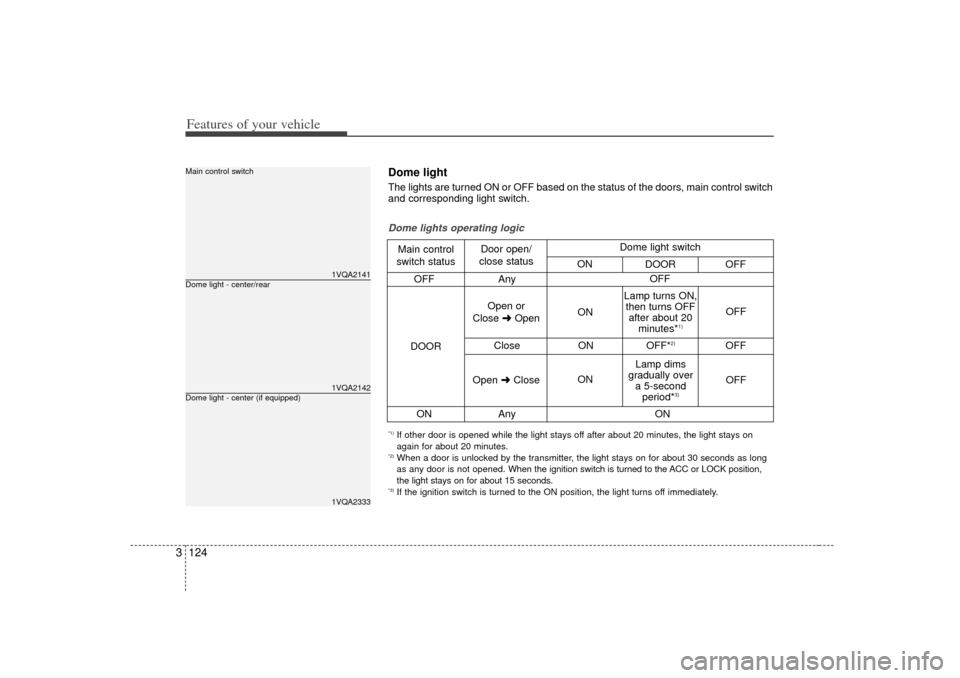
Features of your vehicle124
3
1VQA21411VQA21421VQA2333
Dome light - center/rearMain control switchDome light - center (if equipped)
OFF Any
Close ONOFF*
2)
OFF
ON Any
Dome lights operating logicMain control
switch status Door open/
close status
DOOR Open or
Close \bOpen ON
ON OFF
OFF
Lamp turns ON,
then turns OFF after about 20 minutes*
1)
Lamp dims
gradually over a 5-second period*
3)
Open \bClose OFF
ON
Dome light switch
ON DOOR OFF
*1) If other door is opened while the light stays off after about 20 minutes, the light stays on
again for about 20 minutes.*2) When a door is unlocked by the transmitter, the light stays on for about 30 seconds as long
as any door is not opened. When the ignition switch is turned to the ACC or LOCK position,
the light stays on for about 15 seconds.*3) If the ignition switch is turned to the ON position, the light turns off immediately.Dome lightThe lights are turned ON or OFF based on the status of the doors, main control switch
and corresponding light switch.
Page 176 of 347

3 167
Features of your vehicle
Rolling code programmingTo train a garage door opener (or other
rolling code equipped devices) with the
rolling code feature, follow these instruc-
tions after completing the “Programming”
portion of this text. (A second person
may make the following training proce-
dures quicker & easier.)
4. Locate the “learn” or “smart” button onthe device’s motor head unit. Exact
location and color of the button may
vary by product brand. If there is diffi-
culty locating the “learn” or “smart” but-
ton, reference the device’s owner’s
manual or contact HomeLink at 1-800-
355-3515 or on the internet at
www.homelink.com.
5. Press and release the “learn” or “smart” button on the device’s motor
head unit. You have 30 seconds to
complete step number 6.
6. Return to the vehicle and firmly press and release the programmed
HomeLink button up to three times.
The rolling code equipped device
should now recognize the HomeLink
signal and activate when the
HomeLink button is pressed. The
remaining two buttons may now be
programmed if this has not previously
been done. Refer to the
“Programming” portion of this text.
Operating HomeLink To operate, simply press the pro-
grammed HomeLink button. Activation
will now occur for the trained product
(garage door, security system, entry door
lock, estate gate, or home or office light-
ing). For convenience, the hand-held
transmitter of the device may also be
used at any time. The HomeLink
Wireless Controls System (once pro-
grammed) or the original hand-held
transmitter may be used to activate the
device (e.g. garage door, entry door lock,
etc.). In the event that there are still pro-
gramming difficulties, contact HomeLink
at 1-800-355-3515 or on the internet at
www.homelink.com.
Erasing programmed HomeLink
buttonsTo erase the three programmed buttons
(individual buttons cannot be erased):
Press and hold the left and centerbuttons simultaneously, until the indi-
cator light begins to flash (approxi-
mately 20 seconds). Release both but-
tons. Do not hold for longer than 30
seconds.
HomeLink is now in the train (or learning)
mode and can be programmed at any
time.
OVQ036306N
Flashing
Page 179 of 347
Features of your vehicle170
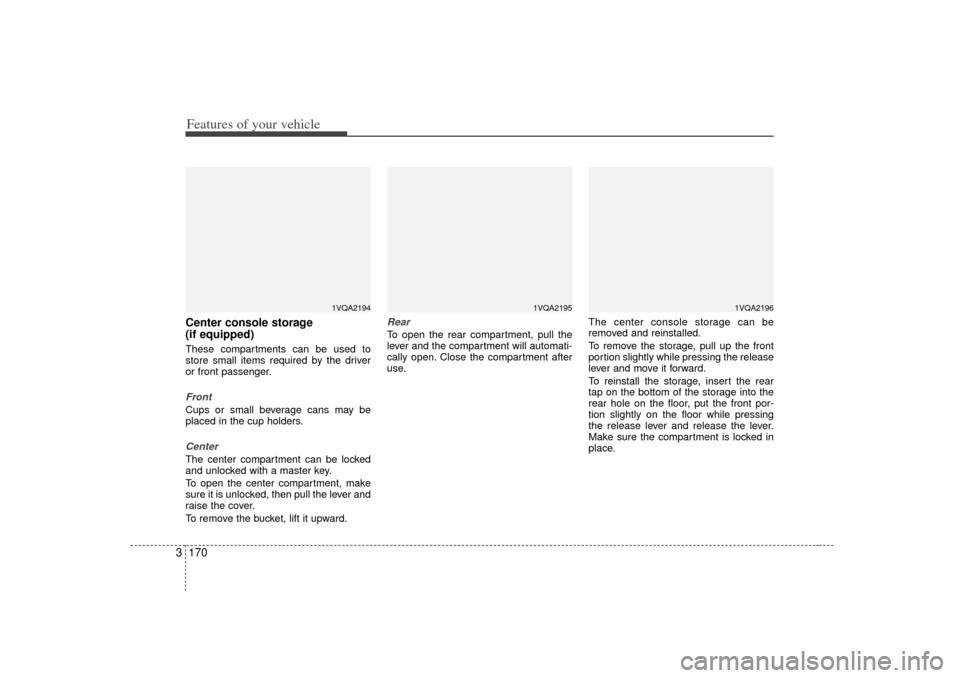
3Center console storage
(if equipped)These compartments can be used to
store small items required by the driver
or front passenger.FrontCups or small beverage cans may be
placed in the cup holders.CenterThe center compartment can be locked
and unlocked with a master key.
To open the center compartment, make
sure it is unlocked, then pull the lever and
raise the cover.
To remove the bucket, lift it upward.
RearTo open the rear compartment, pull the
lever and the compartment will automati-
cally open. Close the compartment after
use. The center console storage can be
removed and reinstalled.
To remove the storage, pull up the front
portion slightly while pressing the release
lever and move it forward.
To reinstall the storage, insert the rear
tap on the bottom of the storage into the
rear hole on the floor, put the front por-
tion slightly on the floor while pressing
the release lever and release the lever.
Make sure the compartment is locked in
place.
1VQA2194
1VQA2195
1VQA2196
Page 180 of 347

3 171
Features of your vehicle
Glove boxThe glove box can be locked and
unlocked with a master key.
To open the glove box, make sure it is
unlocked, then pull the handle (1) and
the glove box will automatically open (2).
Close the glove box after use.
WARNING
Never leave the removed center
storage console in the vehicle
unsecured. The storage console
can be thrown about in the vehicle
in a sudden stop or an accident
causing serious injuries or death to
the vehicle occupants. Always
make sure the storage console is
locked in place.
1VQA2191
CAUTION
Since key is not fully inserted intothe center console storage key set,do not apply excessive force. Doing so may damage the parts.
WARNING
To reduce the risk of injury in an
accident or sudden stop, always
keep the center console storage
cover closed while driving.