2006 KIA PICANTO instrument panel
[x] Cancel search: instrument panelPage 112 of 281

411
1 23456789
Driving your vehicle
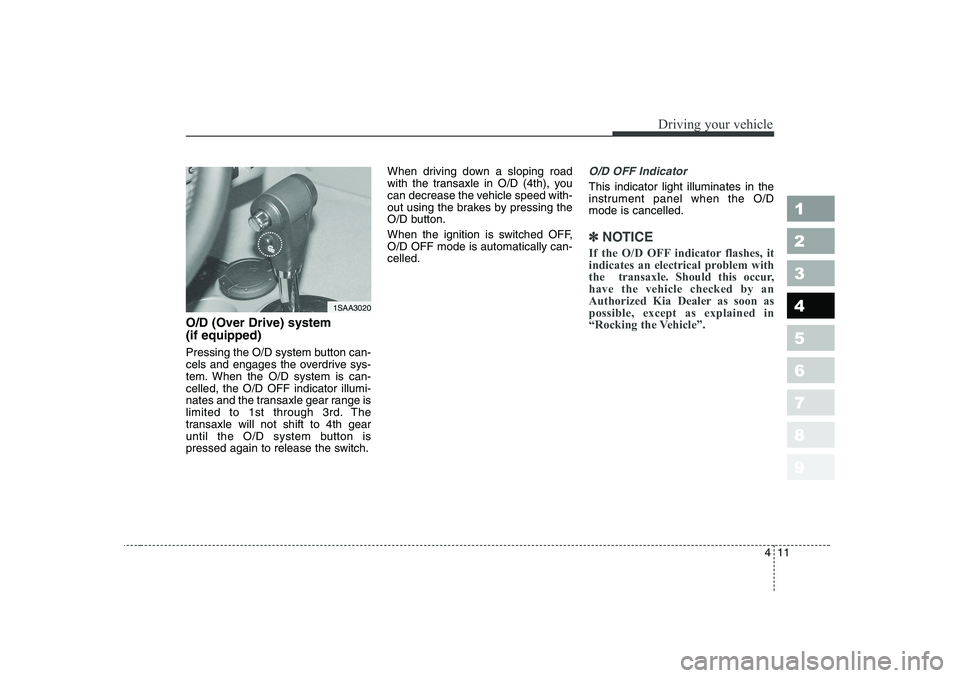
O/D (Over Drive) system (if equipped)
Pressing the O/D system button can-
cels and engages the overdrive sys-
tem. When the O/D system is can-celled, the O/D OFF indicator illumi-
nates and the transaxle gear range is
limited to 1st through 3rd. The
transaxle will not shift to 4th gear
until the O/D system button is
pressed again to release the switch.When driving down a sloping road
with the transaxle in O/D (4th), you
can decrease the vehicle speed with-
out using the brakes by pressing the
O/D button.
When the ignition is switched OFF, O/D OFF mode is automatically can-celled.
O/D OFF Indicator
This indicator light illuminates in the
instrument panel when the O/Dmode is cancelled.
✽✽
NOTICE
If the O/D OFF indicator flashes, it
indicates an electrical problem with
the transaxle. Should this occur,have the vehicle checked by an
Authorized Kia Dealer as soon aspossible, except as explained in
“Rocking the Vehicle”.
1SAA3020
Page 122 of 281

421
1 23456789
Driving your vehicle
Tilt steering (if equipped)
A tilt steering wheel allows you to
adjust the steering wheel before you
drive. You can also raise it to the
highest level to give your legs more
room when you exit and enter the
vehicle.
The steering wheel should be posi-
tioned so that it is comfortable for
you to drive, while permitting you to
see the instrument panel warning
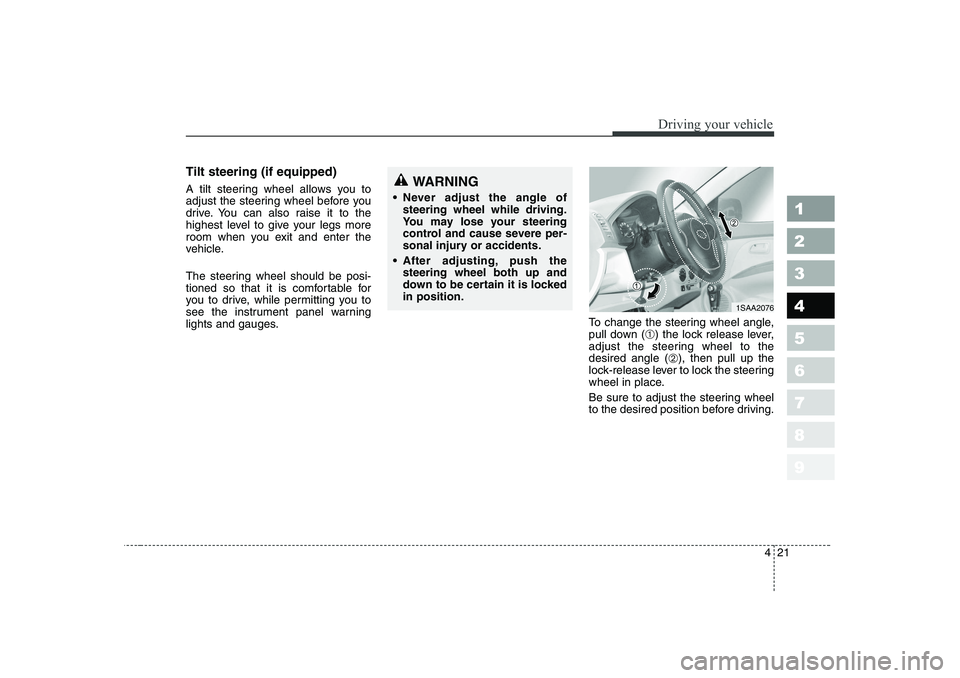
lights and gauges.To change the steering wheel angle,
pull down (
➀) the lock release lever,
adjust the steering wheel to thedesired angle ( ➁), then pull up the
lock-release lever to lock the steering
wheel in place.
Be sure to adjust the steering wheel
to the desired position before driving.WARNING
Never adjust the angle of steering wheel while driving.
You may lose your steering
control and cause severe per-
sonal injury or accidents.
After adjusting, push thesteering wheel both up and
down to be certain it is lockedin position.
1SAA2076
Page 134 of 281

433
1 23456789
Driving your vehicle
Battery saver function (if equipped) The purpose of this feature is to
prevent the battery from being dis-
charged. The system automatically
turns off the small light when the
driver removes the ignition key and
opens the driver- side door.
With this feature, the parklight will
be turned off automatically if the
driver parks on the side of road atnight.
If necessary, to keep the lights on
when the ignition key is removed,
perform the following :
1) Open the driver-side door.
2) Turn the parklights OFF and ON again using the light switch on the
steering column. Lighting control
The light switch has a Headlight and
a Parklight position.
To operate the lights, turn the knob at
the end of the control lever to one of
the following positions: ➀
OFF position
➁ Parklight position
➂ Headlight position
Parklight position ( )
When the light switch is in the park- light position (1st position), the tail,
position, license and instrumentpanel lights are ON.
LIGHTING
1SAA21021SAA2101
Page 135 of 281

Driving your vehicle
34
4
1 23456789
Headlight position ( )
When the light switch is in the head- light position (2nd position) the head,
tail, position, license and instrumentpanel lights are ON. High - beam operation
To turn on the high beam headlights,
push the lever away from you. Pull it
back for low beams. The high-beam indicator will light when the headlight high beams are
switched on.
To prevent the battery from being
discharged, do not leave the lights
on for a prolonged time while the
engine is not running.
Flashing headlights
To flash the headlights, pull the lever
towards you. It will return to the nor-
mal (low-beam) position when
released. The headlight switch doesnot need to be on to use this flashing
feature.
1SAA21031SAA21051SAA2106
Page 136 of 281

435
1 23456789
Driving your vehicle
Turn signals ( )
The ignition switch must be on for the
turn signals to function. To turn on
the turn signals, move the lever up or
down. Green arrow indicators on the
instrument panel indicate which turn
signal is operating. They will self-
cancel after a turn is completed. If
the indicator continues to flash after
a turn, manually return the lever tothe OFF position.
Lane change signals ( )
To signal a lane change, move the
turn signal lever slightly and hold it in
position. The lever will return to theOFF position when released.
If an indicator stays on and does not
flash or if it flashes abnormally, one
of the turn signal bulbs may be
burned out and will require replace-ment.
✽✽
NOTICE
If an indicator flash is abnormally
quick or slow, bulb may be burned
out or have a poor electrical con-
nection in the circuit.
1SAA2107
A
B
Page 147 of 281

Driving your vehicle
46
4
1 23456789
Floor position
Most of the air flow is
directed to the floor, with asmall amount of the airbeing directed to the wind-
shield and side window
defroster.
(outlet port: , , )
Floor - defrost position
Most of the air flow is directed to the floor andthe windshield with asmall amount directed to
the side window
defrosters.
(outlet port: , , )
Defrost position
Most of the air flow is directed to the windshieldwith a small amount of airdirected to the side win-
dow defrosters.
(outlet port: , )
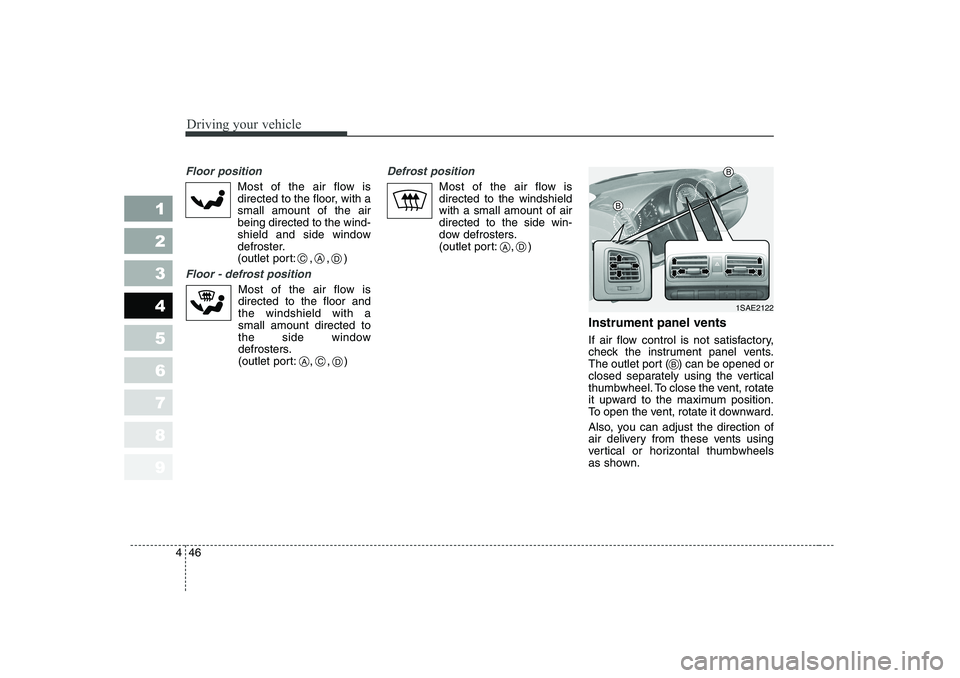
Instrument panel vents
If air flow control is not satisfactory,
check the instrument panel vents.
The outlet port ( ) can be opened or
closed separately using the vertical
thumbwheel. To close the vent, rotate
it upward to the maximum position.
To open the vent, rotate it downward.
Also, you can adjust the direction of
air delivery from these vents using
vertical or horizontal thumbwheels
as shown.
CAD
ACD
AD
1SAE2122
B
B
B
Page 173 of 281

Driving tips
18
5
1 23456789
Following distance
Stay at least twice as far behind the
vehicle ahead as you would when
driving your vehicle without a trailer.
This can help you avoid situations
that require heavy braking and sud-
den turns.
Passing
You’ll need more passing distance
up ahead when you’re towing a trail-
er. And, because you’re a good deal
longer, you’ll need to go much farther
beyond the passed vehicle before
you can return to your lane.
Backing up
Hold the bottom of the steering
wheel with one hand. Then, to move
the trailer to the left, just move your
hand to the left. To move the trailer to
the right, move your hand to the
right. Always back up slowly and, if
possible, have someone guide you.
Making turns
When you’re turning with a trailer,
make wider turns than normal. Do
this so your trailer won’t strike soft
shoulders, curbs, road signs, trees,
or other objects. Avoid jerky or sud-
den maneuvers. Signal well in
advance.
Turn signals when towing a trailer
When you tow a trailer, your vehicle
has to have a different turn signal
flasher and extra wiring. The green
arrows on your instrument panel will
flash whenever you signal a turn or
lane change. Properly connected,
the trailer lights will also flash to alert
other drivers you’re about to turn,
change lanes, or stop.
When towing a trailer, the green
arrows on your instrument panel will
flash for turns even if the bulbs on
the trailer are burned out. Thus, you
may think drivers behind you are
seeing your signals when, in fact,
they are not. It’s important to check
occasionally to be sure the trailer
bulbs are still working. You must also
check the lights every time you dis-connect and then reconnect the
wires.
Page 279 of 281

Index
2
9
1 23456789
Air cleaner ·································································· 7-31
Airbags-supplemental restraint system ··················· 3-56
Antenna ······································································· 3-91
Automatic transaxle ··········································· 4-7, 7-27
Battery ········································································ 7-37
Before driving ······························································ 5-5
Brake system ······························································ 4-13
Brakes and clutch ······················································ 7-20
Bulb replacement ······················································· 7-47
Climate control air filter ············································ 7-33
Defroster ····································································· 4-41
Door locks ····································································· 3-8
Drive belts ··································································· 7-22
Electrical circuit protection ········································ 6-7
Emergency commodity ·············································· 6-34
Emergency starting ····················································· 6-4
Emission control system ·············································· 5-3 Engine compartment ················································· 7-12
Engine cooling system ··············································· 7-17
Engine oil and oil filter ·············································· 7-14
Exterior care ······························································ 7-56
Exterior overview ························································ 2-2
Fuel filler lid ······························································· 3-76
Fuel filter ······································································7-31
Fuel requirements ························································ 5-2
Gauges ········································································· 4-25
Hazard warning flasher ············································ 4-42
Hood ············································································ 3-75
How to use this manual ··············································· 1-2
If you have a flat tire
(If the vehicle is equipped with spare tire) ··········· 6-19
If you have a flat tire (If the vehicle is
equipped with TireMobilityKit) ······························ 6-25
Ignition switch ······························································ 4-2
Immobilizer system ······················································ 3-7
Instrument cluster ····················································· 4-23
Instrument panel overview ········································· 2-5
A
B
C
D
E
F
G
H
I