2006 KIA PICANTO tire pressure
[x] Cancel search: tire pressurePage 178 of 281

523
Driving tips
1 23456789
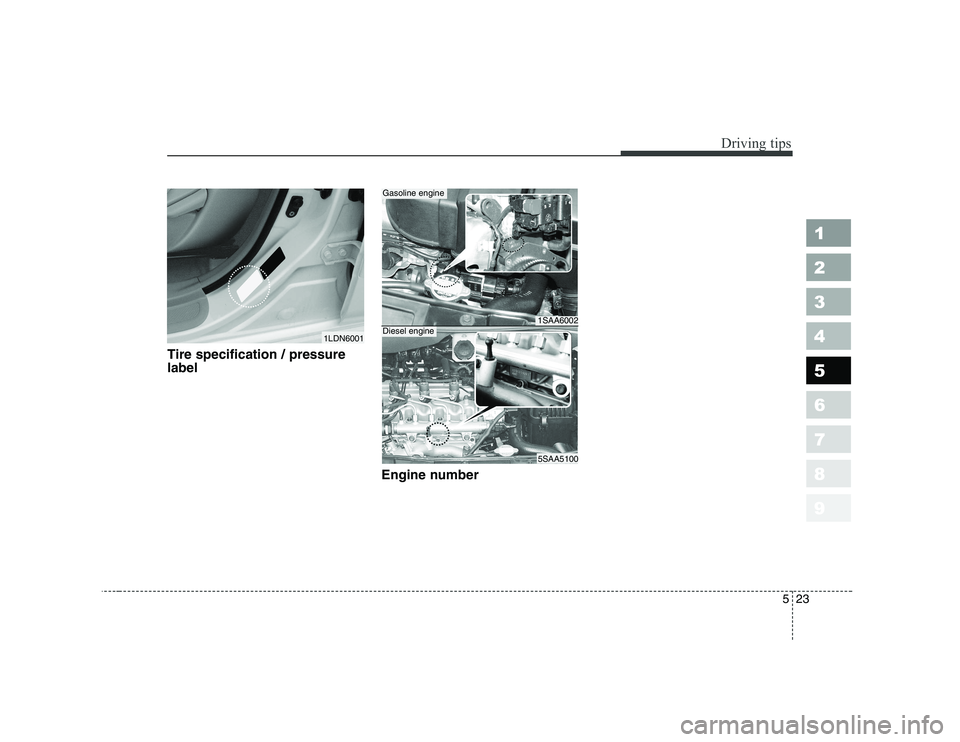
Tire specification / pressure labelEngine number
1LDN6001
1SAA6002
5SAA5100
Gasoline engine
Diesel engine
Page 198 of 281

In case of an emergency
20
6
The compact spare should be inflat-
ed to 60 psi (420 kPa).
✽✽
NOTICE
Check the inflation pressure after
installing the spare tire. Adjust it to
the specified pressure, as necessary.
When using a compact spare tire,
observe the following precautions:
Under no circumstances should you exceed 50 mph (80 km/h); a higher speed could damage the
tire.
Ensure that you drive slowly enough for the road conditions to
avoid all hazards. Any road hazard,
such as a pothole or debris, could
seriously damage the compact
spare.
Any continuous road use of this tire could result in tire failure, loss of
vehicle control, and possible per-
sonal injury.
Do not exceed the vehicle’s maxi- mum load rating or the load-carry-
ing capacity shown on the sidewall
of the compact spare tire.
Avoid driving over obstacles. The compact spare tire diameter issmaller than the diameter of a con-
ventional tire and reduces the
ground clearance approximately 1inch (25 mm), which could result in
damage to the vehicle. Do not take this vehicle through an
automatic car wash.
Do not use tire chains on this tire. Because of the smaller size, a tire
chain will not fit properly. This could
damage the vehicle and result inloss of the chain.
This tire should not be installed on the front axle if the vehicle must be
driven in snow or on ice.
Do not use the compact spare tire on any other vehicle because thistire has been designed especially
for your vehicle.
The compact spare tire’s tread life is shorter than a regular tire.
Inspect your compact spare tire
regularly and replace worn com-
pact spare tires with the same sizeand design, mounted on the samewheel.
1 23456789
CAUTION
This spare tire should be used
only for VERY short distances.Compact spares should NEVER be used for long drives orextended distances.
Page 202 of 281

In case of an emergency
24
6
1 23456789
11. Once the wheel lug nuts have
been tightened, lower the vehicle
fully to the ground and continue to
tighten the lug nuts until they are
fully secured. Tighten the wheel
lug nuts firmly in a “X” pattern.
If you are unsure of the tightness
of the wheel lug nuts, have them
checked at the nearest service
station. The specified tighteningtorque is 9~11 kgm (65-79 lbft,
88-107 Nm). Improperly tight-
ened wheel lug nuts could cause
brake pedal vibration while brak-ing. To prevent the jack, jack handle,
wheel lug nut wrench and spare tire
from rattling while the vehicle is in
motion, store them properly.
1SAE4017
CAUTION
Your vehicle has metric threads
on the wheel studs and nuts.Make certain during wheelremoval that the same nuts removed are reinstalled - or, ifreplaced, that nuts with metricthreads and the same chamfer configuration are used.Installation of a non-metricthread nut on a metric stud or vice-versa will not secure thewheel to the hub properly andwill damage the stud so that it must be replaced.
Note that most lug nuts do nothave metric threads. Be sure touse extreme care in checkingfor thread style before installing aftermarket lug nuts or wheels.If in doubt, consult anAuthorized Kia Dealer.
WARNING - Wheel studs
If the studs are damaged, they
may lose their ability to retain
the wheel. This could lead to theloss of the wheel and a colli-sion.
WARNING
Check the inflation pressures as
soon as possible after installing
the spare tire. Adjust it to the
specified pressure, if necessary.
Refer to Section 8, Specifications.
Page 203 of 281

625
In case of an emergency
1 23456789
IF YOU HAVE A FLAT TIRE (IF THE VEHICLE IS EQUIPPED WITH TIREMOBILITYKIT)
Please read the instructions before
using the TireMobilityKit. Introduction
With the TireMobilityKit you stay
mobile even after experiencing a tire
puncture. The system of compressor
and sealing compound effectively
and comfortably seals most punc-tures in a passenger car tire caused
by nails or similar objects and rein-
flates the tire. After you ensured that
the tire is properly sealed you can
drive cautiously on the tire (up to 200
km / 120 miles) at a max. speed of 80km/h / 50 mph in order to reach a
vehicle or tire dealer to have the tirereplaced.
It is possible that some tires, espe- cially with larger punctures or dam-
age to the sidewall, cannot be sealed
completely. Air pressure loss in the
tire may adversely effect tire per-
formance. For this reason, you
should avoid abrupt steering or other
driving manoeuvres, especially if the
vehicle is heavily loaded or if a trailer
is in use. The TireMobilityKit is not
designed or intended as a perma-nent tire repair method and is to be
used for one tire only.This instruction manual shows you
step by step how to temporarily seal
the puncture simply and reliably.
Read the section "Notes on the safe
use of the TireMobilityKit".
WARNING
Do not use the TireMobilityKit if
a tire is severely damaged bydriving run flat or with insuffi-
cient air pressure. Only punc-tured areas located within thetread region of the tire can be
sealed using the TireMobilityKit.
Damage to the sidewall must
not be repaired due to safetyreasons.
1SAE6101
1SAE6106
Page 204 of 281

In case of an emergency
26
6
1 23456789
What to do when a tire is punctured
A punctured tire is repaired in two
stages. In the 1st stage, sealingcompound and air is inflated into the
tire and the vehicle driven a shortdistance (3 km / 2 miles) to spread
the compound inside the tire. In the
2nd stage, the inflation pressure is
checked and, if necessary, more air
is added into the tire. It is then possi-
ble to drive cautiously with the tire up
to 200 km / 120 miles at a maximumspeed of 80 km/h / 50 mph in order
to reach a vehicle or tire dealer to
have the tire replaced. If so inform
other drivers that the TireMobilityKit
has been used and provide advice
and warnings about changed driving
behaviour. 1st Stage: Pump sealing com- pound and air into the tire
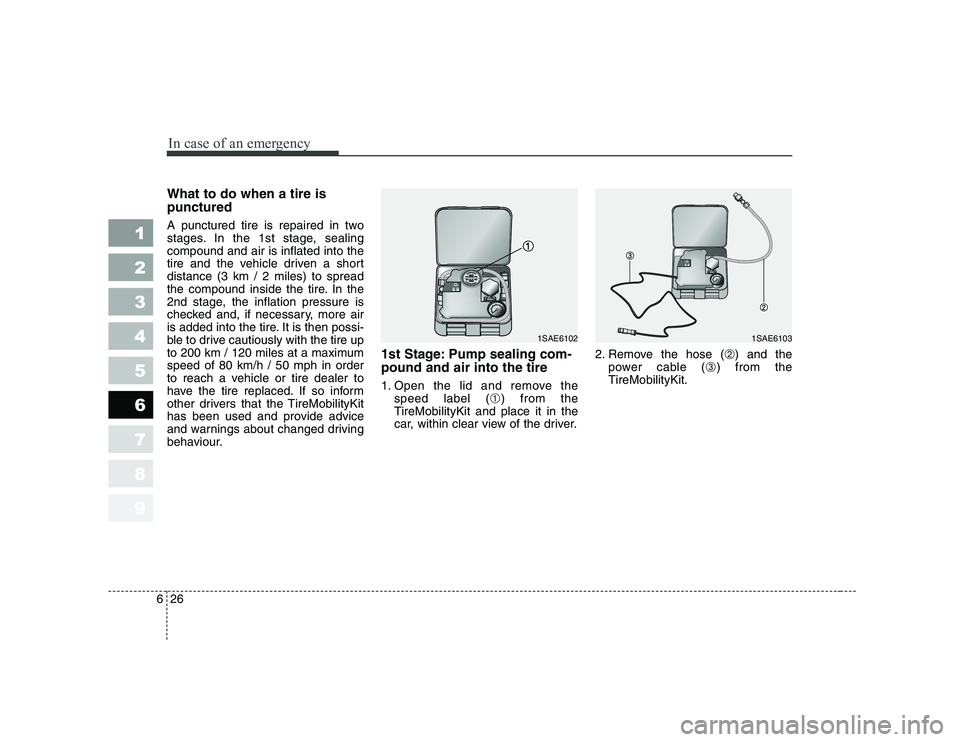
1. Open the lid and remove the
speed label ( ➀) from the
TireMobilityKit and place it in the
car, within clear view of the driver. 2. Remove the hose (
➁) and the
power cable ( ➂) from the
TireMobilityKit.
1SAE61021SAE6103
Page 206 of 281

In case of an emergency
28
6
1 23456789
10. Switch the On/Off switch (
➇) to
the "I"-position.
Please note: When the sealing compound is added through the
tire valve the pressure gauge
could increase from approxi-
mately 4-6 bar (60-90 psi), but itwill drop again after about 30
seconds. 11. Inflate the tire to at least 1.8 bar
(26 psi) and at most 3.5 bar (51
psi) within 7 minutes. Switch off
the compressor briefly by press-
ing "O" so as to be able to readthe actual tire inflation pressure
on the gauge.
CAUTION
During the tire inflation opera-
tion do not stand next to thedamaged tire. Check the side-wall of the tire for unusual bulges or deformations.Discontinue the inflation opera-tion and deflate the tire by using the pressure release (
➉), if any
unusual appearance is noticed.
CAUTION
If a tire inflation pressure of 1.8 bar (26 psi) is not achievablewithin 7 minutes, the tire is tooseverely damaged and you must not drive on the tire. Call forroad side service or towing.
1SAE6105
Page 207 of 281

629
In case of an emergency
1 23456789
12. If a tire inflation pressure of 1.8bar (26 psi) is reached, turn the
on / off switch to the "0" position,
quickly unscrew the hose from
the tire. Unplug the cable from
the cigarette lighter. Do not
unscrew the bottle. Stow theTireMobilityKit, the bottle cap and
the bottle holder cap safely in the
vehicle in an easily accessible
place, as it will be needed again
to check tire pressure.
13. Drive immediately and cautiously for about 3 km / 2 miles so thatthe sealing compound can seal
the puncture. Do not exceed 80
km/h / 50 mph. If while driving,
you experience any unusual
vibration, ride disturbance or
noise, reduce your speed and
drive with caution until you can
safely pull off of the side of the
road. Call for road side service or
towing. 2nd Stage: Check tire pressure
14. Stop after driving for about 3 km
/ 2 miles and check the pressure
of the punctured tire as follows:
a) Ensure that the On/Off-switch (➇ ) of the compressor is in the
"O"-position.
b) Screw the hose onto the valve of the punctured tire.
c) Plug the power cable into the cigarette lighter (12 volt socket).
d) Read the inflation pressure on the gauge of the TireMobilityKit.CAUTION
If the inflation pressure is below
1.3 bar (19 psi), do not continueto drive. Call for road side serv- ice or towing.
1SAE6105
Page 208 of 281

In case of an emergency
30
6
1 23456789
15. If the inflation pressure is 1.3 bar
(19 psi) or more, turn the on/off
switch to the "I"-position andadjust the inflation pressure tothe recommended inflation pres-
sure (see service manual of the
vehicle). Reduce any excessive
pressure by using the pressure
release valve ( ➉).
16. Turn kit off by pressing "O". Unscrew the hose from the tire
valve and unplug the electric plug
from the socket. 17. Do not unscrew the bottle. Stow
the TireMobilityKit safely in the
vehicle. 18. Drive to the next vehicle or tire
dealer to replace the tire.
✽✽NOTICE
After a long period without driving,
the inflation pressure must be
checked before driving.
19. After using the TireMobilityKit to seal your tire, replace the hose, the sealing compound and con-
nected parts. See last page of
this manual. When replacing the
damaged tire inform the tiremechanic that a sealing com-
pound was used before the tire isdemounted!
CAUTION
After the sealing compound has
been used, the max. permissiblespeed is 80 km/h / 50 mph andthe damaged tire is to be replaced promptly, at least with-in a distance of 200 km / 120miles. If while driving, you expe- rience any unusual vibration,ride disturbance or noise,reduce your speed and drive with caution until you can sefelypull off of the side of the road.Call for road side service or tow- ing.
1SAE6105