2006 KIA CERATO recommended oil
[x] Cancel search: recommended oilPage 261 of 315
Maintenance
16
7
1 23456789
ENGINE OIL AND OIL FILTER
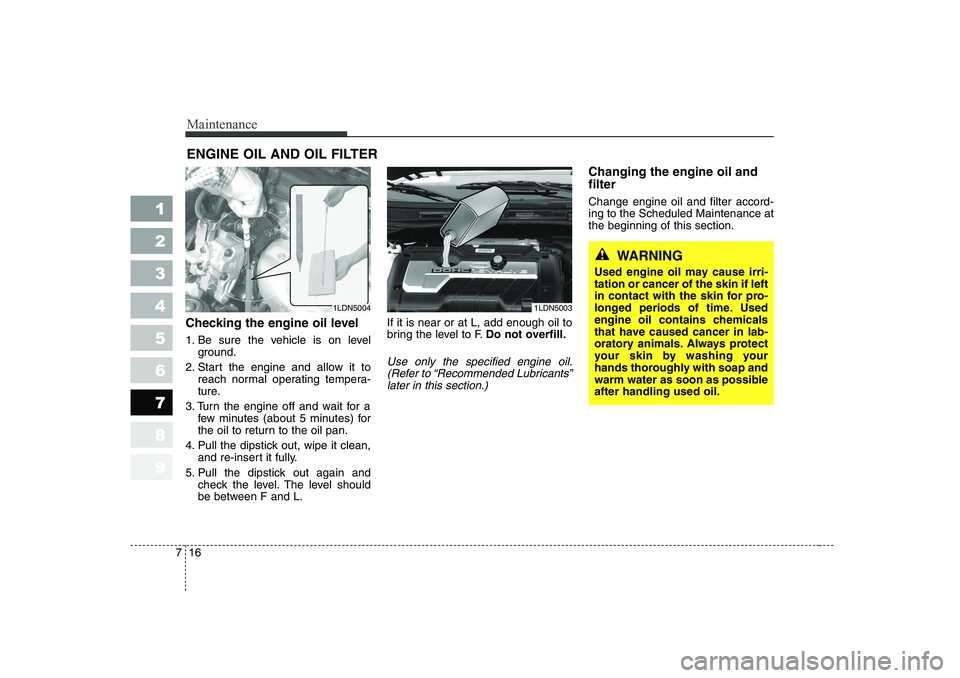
Checking the engine oil level
1. Be sure the vehicle is on level ground.
2. Start the engine and allow it to reach normal operating tempera-
ture.
3. Turn the engine off and wait for a few minutes (about 5 minutes) for
the oil to return to the oil pan.
4. Pull the dipstick out, wipe it clean, and re-insert it fully.
5. Pull the dipstick out again and check the level. The level should
be between F and L. If it is near or at L, add enough oil to
bring the level to F.
Do not overfill.
Use only the specified engine oil.
(Refer to “Recommended Lubricants”later in this section.)
Changing the engine oil and filter Change engine oil and filter accord- ing to the Scheduled Maintenance atthe beginning of this section.
1LDN50031LDN5004
WARNING
Used engine oil may cause irri- tation or cancer of the skin if left
in contact with the skin for pro-
longed periods of time. Used
engine oil contains chemicals
that have caused cancer in lab-
oratory animals. Always protect
your skin by washing your
hands thoroughly with soap and
warm water as soon as possibleafter handling used oil.
Page 263 of 315
Maintenance
18
7
1 23456789
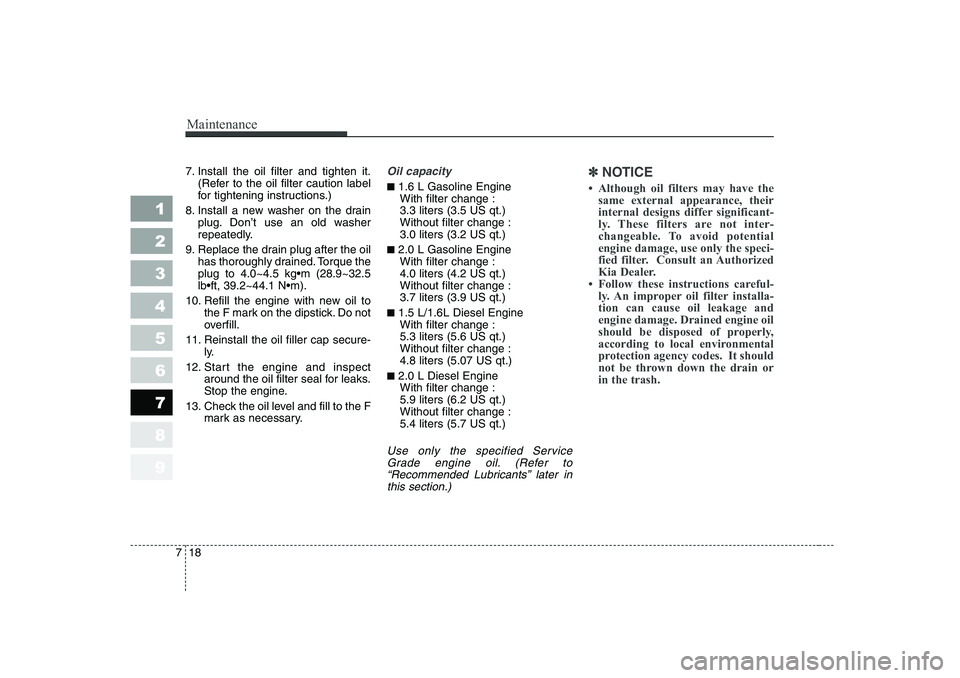
7. Install the oil filter and tighten it.
(Refer to the oil filter caution label
for tightening instructions.)
8. Install a new washer on the drain plug. Don’t use an old washer
repeatedly.
9. Replace the drain plug after the oil has thoroughly drained. Torque theplug to 4.0~4.5 kgm (28.9~32.5lbft, 39.2~44.1 Nm).
10. Refill the engine with new oil to the F mark on the dipstick. Do not
overfill.
11. Reinstall the oil filler cap secure- ly.
12. Start the engine and inspect around the oil filter seal for leaks.
Stop the engine.
13. Check the oil level and fill to the F mark as necessary.Oil capacity
■1.6 L Gasoline Engine
With filter change : 3.3 liters (3.5 US qt.)Without filter change :3.0 liters (3.2 US qt.)
■ 2.0 L Gasoline Engine
With filter change :4.0 liters (4.2 US qt.)Without filter change :3.7 liters (3.9 US qt.)
■ 1.5 L/1.6L Diesel Engine
With filter change :5.3 liters (5.6 US qt.)Without filter change :4.8 liters (5.07 US qt.)
■ 2.0 L Diesel Engine
With filter change :5.9 liters (6.2 US qt.)Without filter change :5.4 liters (5.7 US qt.)
Use only the specified Service
Grade engine oil. (Refer to“Recommended Lubricants” later inthis section.)
✽✽ NOTICE
Page 272 of 315

727
Maintenance
1 23456789
3. Verify that the oil level reaches thebottom of the fill/check hole. Fill as
necessary.
If the oil level is low, check for leaks
before adding oil. Do not overfill. Use only the specified manual transaxleoil. (Refer to “RecommendedLubricants” later in this section.)
4. Install a new washer on the fill/check plug and tighten the plugto 3.0~3.5 kgm (22~25 lbft,30~35 Nm) - Gasoline Engineand 3.5~4.5 kgm (25~33 lbft,
35~45 Nm) - Diesel Engine. Changing the manual transaxle oil
1. Raise and suitably support the
vehicle.
2. Remove the drain plug on the bot-tom of the transaxle.
3. After the oil has drained complete- ly, install a new washer on the
plug, reinstall the drain plug andtighten to 3.0~3.5 kgm (22~25lbft, 30~35 Nm).
2LDA70041LDN7026
WARNING - Lifting your
vehicle
If you raise your vehicle, always
ensure that it is supported at all
four jacking or lift points for the
vehicle. Do not use jacks meant
for tire changes. Use only lift
equipment specifically recom-
mended for doing maintenance
work under the vehicle. Place
the vehicle and lift equipment
on a hard, level surface capable
of supporting the full weight of
the vehicle without moving or
deforming. If the support is not
stable, the vehicle could fall andcause serious or fatal injuries.
Follow the instructions with the
lift device.
Page 273 of 315
Maintenance
28
7
1 23456789
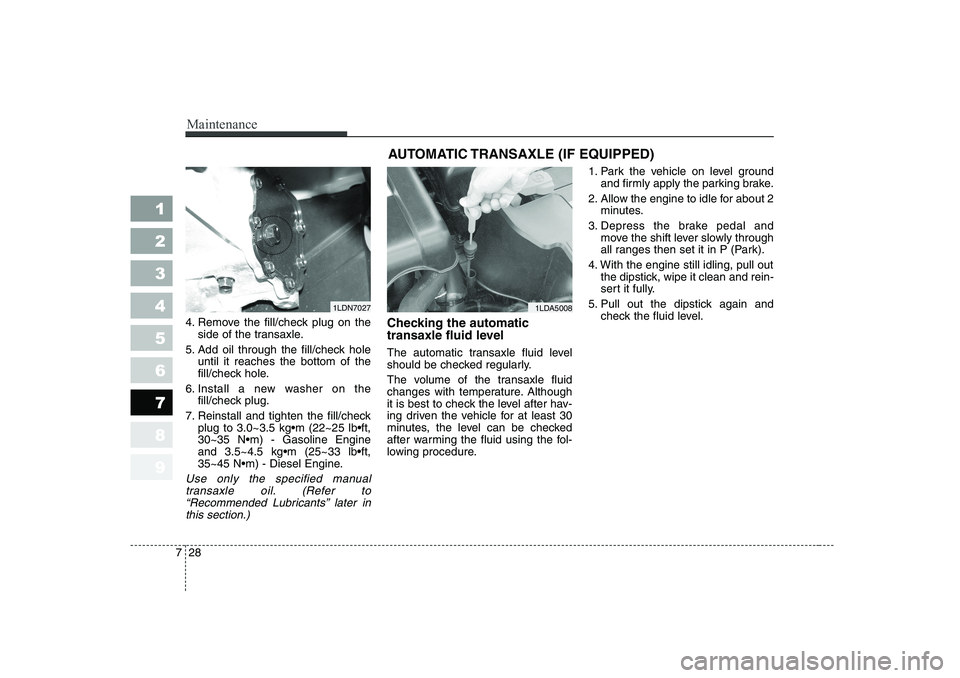
4. Remove the fill/check plug on the
side of the transaxle.
5. Add oil through the fill/check hole until it reaches the bottom of the
fill/check hole.
6. Install a new washer on the fill/check plug.
7. Reinstall and tighten the fill/check plug to 3.0~3.5 kgm (22~25 lbft,30~35 Nm) - Gasoline Engineand 3.5~4.5 kgm (25~33 lbft,
35~45 Nm) - Diesel Engine.
Use only the specified manual
transaxle oil. (Refer to“Recommended Lubricants’’ later in this section.)
Checking the automatic
transaxle fluid level
The automatic transaxle fluid level
should be checked regularly.
The volume of the transaxle fluid
changes with temperature. Although
it is best to check the level after hav-
ing driven the vehicle for at least 30
minutes, the level can be checked
after warming the fluid using the fol-
lowing procedure. 1. Park the vehicle on level ground
and firmly apply the parking brake.
2. Allow the engine to idle for about 2 minutes.
3. Depress the brake pedal and move the shift lever slowly through
all ranges then set it in P (Park).
4. With the engine still idling, pull out the dipstick, wipe it clean and rein-
sert it fully.
5. Pull out the dipstick again and check the fluid level.
1LDA50081LDN7027 AUTOMATIC TRANSAXLE (IF EQUIPPED)
Page 275 of 315

Maintenance
30
7
1 23456789
Changing the automatic transaxle fluid
1. Raise and suitably support the
vehicle.
2. Remove the drain plug located atthe bottom of the transaxle pan.
3. After the oil has drained complete- ly, install a new washer on the
plug, reinstall the drain plug, andtighten to 2.9~3.4 kgm (21~24lbft, 29~34 Nm).
4. Lower the vehicle.
5. Remove the automatic transaxle dipstick located near the center of
the engine compartment bulkheadand, using a funnel, add the nec-
essary amount of automatic
transaxle fluid.
Use only the specified automatic
transaxle fluid. (Refer to"Recommended Lubricants" later in this section.)
✽✽ NOTICE
Do NOT overfill the automatic
transaxle reservoir. Doing so cancause a seal “blow out”, loss of fluid,and damage to the transaxle. If you
overfill the reservoir, you must drain
the excess prior to driving the vehi-
cle. It is likely that there will be fluid
left in the transaxle after draining,
especially if the front of the vehicle
was raised to remove the drain plug.
6. Check the fluid level. If necessary, add a small amount of fluid and
check the level again. Continue
this process until the level reads
within “HOT” range.
7. Replace the dipstick and properly dispose of the used transaxle fluid.
WARNING - Lifting your
vehicle
If you raise your vehicle, always
ensure that it is supported at all
four jacking or lift points for the
vehicle. Do not use jacks meant
for tire changes. Use only lift
equipment specifically recom-
mended for doing maintenance
work under the vehicle. Place
the vehicle and lift equipment
on a hard, level surface capable
of supporting the full weight of
the vehicle without moving or
deforming. If the support is not
stable, the vehicle could fall andcause serious or fatal injuries.
Follow the instructions with the
lift device.
1LDN7029
Page 301 of 315
Maintenance
56
7
1 23456789
LUBRICANT SPECIFICATIONS
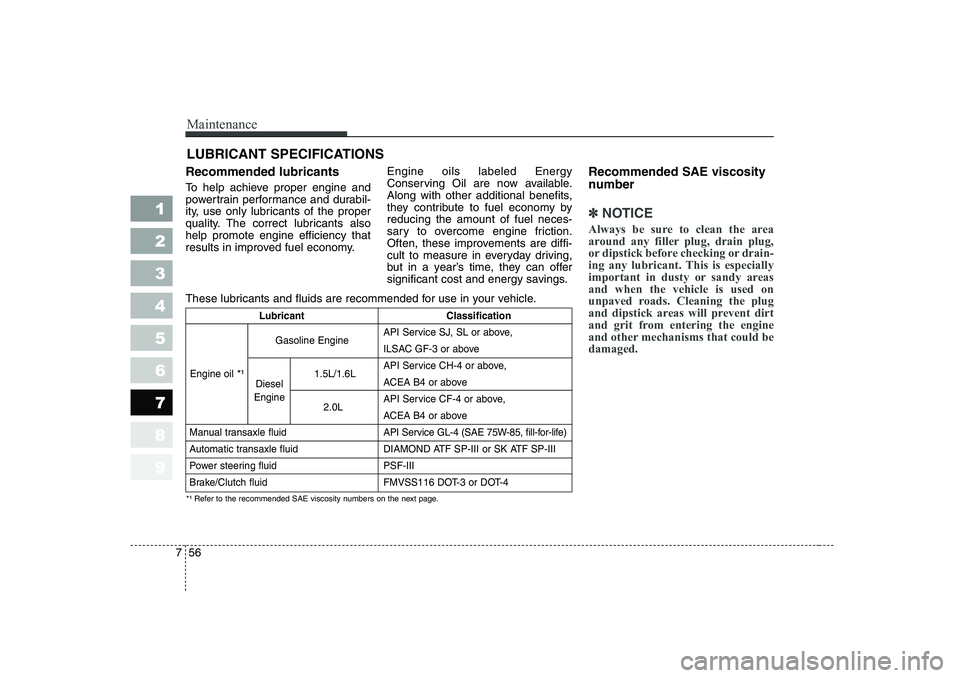
Recommended lubricants
To help achieve proper engine and
powertrain performance and durabil-
ity, use only lubricants of the proper
quality. The correct lubricants alsohelp promote engine efficiency that
results in improved fuel economy. Engine oils labeled Energy
Conserving Oil are now available.
Along with other additional benefits,
they contribute to fuel economy byreducing the amount of fuel neces-
sary to overcome engine friction.
Often, these improvements are diffi-
cult to measure in everyday driving,
but in a year’s time, they can offer
significant cost and energy savings.Recommended SAE viscosity
number
✽✽
NOTICE
Always be sure to clean the area
around any filler plug, drain plug,
or dipstick before checking or drain-
ing any lubricant. This is especially
important in dusty or sandy areasand when the vehicle is used on
unpaved roads. Cleaning the plug
and dipstick areas will prevent dirt
and grit from entering the engine
and other mechanisms that could bedamaged.
*¹ Refer to the recommended SAE viscosity numbers on the next page.
These lubricants and fluids are recommended for use in your vehicle.
Lubricant Classification
API Service SJ, SL or above, ILSAC GF-3 or above
1.5L/1.6L API Service CH-4 or above,
ACEA B4 or above
2.0L API Service CF-4 or above,
ACEA B4 or above
Manual transaxle fluid API Service GL-4 (SAE 75W-85, fill-for-life)
Automatic transaxle fluid DIAMOND ATF SP-III or SK ATF SP-III
Power steering fluid PSF-III
Brake/Clutch fluid FMVSS116 DOT-3 or DOT-4
Engine oil *¹
Gasoline Engine
Diesel
Engine
Page 302 of 315
757
Maintenance
1 23456789
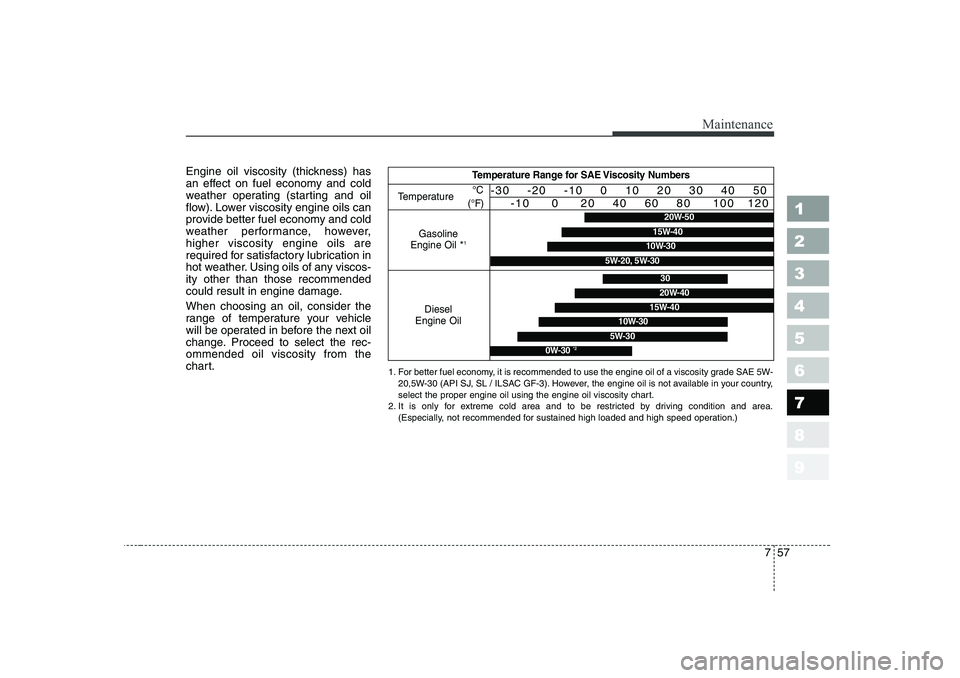
Engine oil viscosity (thickness) has
an effect on fuel economy and cold
weather operating (starting and oil
flow). Lower viscosity engine oils can
provide better fuel economy and cold
weather performance, however,higher viscosity engine oils are
required for satisfactory lubrication in
hot weather. Using oils of any viscos-ity other than those recommended
could result in engine damage. When choosing an oil, consider the
range of temperature your vehicle
will be operated in before the next oil
change. Proceed to select the rec-ommended oil viscosity from the
chart.Temperature Range for SAE Viscosity Numbers
TemperatureGasoline
Engine Oil *
1
°C
(°F)-30 -20 -10 0 10 20 30 40 50 -10 0 20 40 60 80 100 120
Diesel
Engine Oil
10W-30
30
20W-40
15W-40
0W-30 *2
5W-30
1. For better fuel economy, it is recommended to use the engine oil of a viscosity grade SAE 5W-
20,5W-30 (API SJ, SL / ILSAC GF-3). However, the engine oil is not available in your country,
select the proper engine oil using the engine oil viscosity chart.
2. It is only for extreme cold area and to be restricted by driving condition and area. (Especially, not recommended for sustained high loaded and high speed operation.)
20W-50
10W-30
15W-40
5W-20, 5W-30
Page 307 of 315
Maintenance
62
7
1 23456789
INTERIOR CARE
Interior general precautions
Prevent caustic solutions such as perfume and cosmetic oil from con-
tacting the dashboard because they
may cause damage or discoloration.
If they do contact the dashboard,
wipe them off immediately. See the
instructions that follow for the proper
way to clean vinyl.
Cleaning the upholstery and interior trim
Vinyl
Remove dust and loose dirt from
vinyl with a whisk broom or vacuum
cleaner. Clean vinyl surfaces with a
vinyl cleaner.
Fabric
Remove dust and loose dirt from fab-
ric with a whisk broom or vacuum
cleaner. Clean with a mild soap solu-
tion recommended for upholstery or
carpets. Remove fresh spots imme-
diately with a fabric spot cleaner. If
fresh spots do not receive immediate
attention, the fabric can be stained
and its color can be affected. Also, its
fire-resistant properties can be
reduced if the material is not proper-ly maintained. Cleaning the lap/shoulder belt webbing
Clean the belt webbing with any mild
soap solution recommended for
cleaning upholstery or carpet. Follow
the instructions provided with the
soap. Do not bleach or re-dye the
webbing because this may weakenit.
Cleaning the interior window glass
If the interior glass surfaces of the
vehicle become fogged (that is, cov-
ered with an oily, greasy or waxy
film), they should be cleaned with
glass cleaner. Follow the directions
on the glass cleaner container.
✽✽
NOTICE
Do not scrape or scratch the inside
of the rear window. This may result
in damage to the rear window
defroster grid.
CAUTION
Using anything but recommend- ed cleaners and proceduresmay affect the fabric’s appear-ance and fire-resistant proper- ties.