Page 96 of 315

385
1 23456789
Knowing your vehicle
Manual type
Make this adjustment before you
start driving and while the day/night
lever is in the day position.
Pull the day/night lever toward you to reduce glare from the headlights of
vehicles behind you during night
driving.
Remember that you lose somerearview clarity in the night position.
Electric type (if equipped)
When the engine is running, the glare
is automatically controlled by the sen-
sor mounted in the rearview mirror.The sensor mounted in the mirror
senses the light level around the
vehicle, and through a chemical reac-tion, automatically controls the head-
light glare from vehicles behind you.
Whenever the shift lever is shifted
into reverse (R), the mirror will auto-
matically go to the brightest setting in
order to improve the drivers view
behind the vehicle. When the ignition switch is ON, the
automatic- dimming function will turn
on automatically.
Press the ON/OFF button (
➀) to turn
the automatic- dimming function off.
The mirror indicator light will turn off.
Press the ON/OFF button ( ➀) once
again to turn the automatic- dimming function on, the mirror indicator light
will illuminate.
✽✽ NOTICE
When cleaning the mirror, use a
paper towel or similar material
dampened with glass cleaner. Do not
spray glass cleaner directly on the
mirror as that may cause the liquid
cleaner to enter the mirror housing.1LDA2078
Day
Night
Day/Night lever
1KMA3084➀
Page 104 of 315
393
1 23456789
Knowing your vehicle
Front
Cups or small beverage cans may be
placed in the cup holders.
Rear (if equipped)
To use the cup holders in rear seat,
pull the rear cup holder cover (➀)
out. Push the cover to close after
use.
✽✽ NOTICE
Do not place heavy cups or cans in cup holders. Cup holders could bedamaged.
Sunvisor
Use the sunvisor to shield direct light
through the front or side windows.
To use a sunvisor, pull it downward.
To use a sunvisor for a side window,
pull it downward, unsnap it from the
bracket ( ➀) and swing it to the side.
To use the vanity mirror, pull down
the visor and pull up the mirror cover( ➁ ).
1LDA21611LDN21511LDA2160
Page 105 of 315
Knowing your vehicle
94
3
1 23456789
✽✽
NOTICE
Close the vanity mirror cover
securely and return the sunvisor to
its original position after use.
Power socket (if equipped)
The power outlets are designed to
provide power for mobile telephones
or other devices designed to operate
with vehicle electrical systems. The
devices should draw less than 10
amps with the engine running.
✽✽ NOTICE
Page 193 of 315

481
1 23456789
Driving your vehicle
For maximum defrosting, set the
temperature control to the extreme
right/hot position and the fan speedcontrol to the highest speed.
If warm air to the floor is desired
while defrosting or defogging, setthe mode to the floor-defrost posi-tion.
Before driving, clear all snow andice from the windshield, rear win-
dow, outside rear view mirrors, and
all side windows.
Clear all snow and ice from the
hood and air inlet in the cowl grill to
improve heater and defroster effi-ciency and to reduce the probabili-
ty of fogging up inside of the wind-shield. Defogging logic
Manual climate control system
To reduce the probability of fogging up the inside of the windshield, the
air intake control is set to the outside(fresh) air position automatically if
any of following occur.
The mode is selected to the ,
or while the system is acti-
vated.
The ignition switch is turned on while the mode is selected to the
, or .
In this case, the air conditioning will
automatically operate if the mode is
selected to the or .
If you don ’t want the air-conditioning
or outside (fresh) air position, press
the corresponding button to cancel
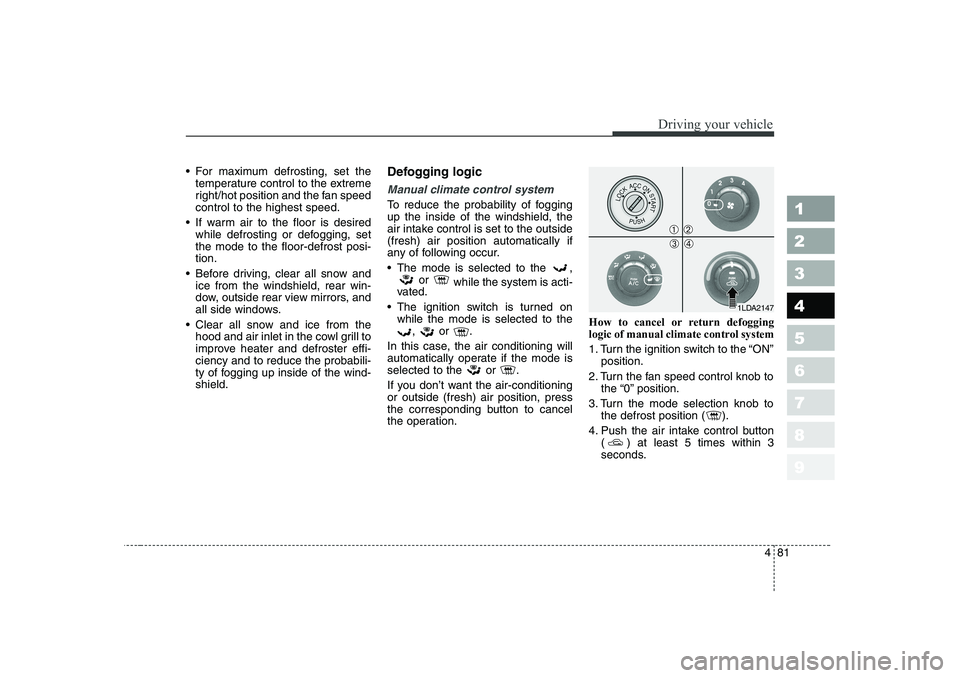
the operation. How to cancel or return defogging
logic of manual climate control system
1. Turn the ignition switch to the
“ON ”
position.
2. Turn the fan speed control knob to the “0”position.
3. Turn the mode selection knob to the defrost position ( ).
4. Push the air intake control button ( ) at least 5 times within 3
seconds.
1LDA2147
➀➁
➂➃
Page 202 of 315

55
Driving tips
BEFORE DRIVING
Before entering vehicle:
Be sure that all windows, outside mirror(s), and outside lights are clean.
Check the condition of the tires.
Check under the vehicle for any sign of leaks.
Be sure there are no obstacles behind you if you intend to back up.
Necessary inspections
Fluid levels, such as engine oil,
engine coolant, brake fluid, and
washer fluid should be checked on a
regular basis, with the exact interval
depending on the fluid. Further
details are provided in Section 7,
Maintenance. Before starting
Close and lock all doors.
Position the seat so that all con-
trols are easily reached.
Adjust the inside and outside rearview mirrors.
Be sure that all lights work.
Check all gauges.
Check the operation of warning lights when the ignition switch is
turned to the ON position.
Release the parking brake and make sure the brake warning lightgoes out.
For safe operation, be sure you are
familiar with your vehicle and itsequipment.
1 23456789
WARNING - Driving under
the influence of alcohol or drugs
Drinking and driving is danger-
ous. Drunk driving is the num-
ber one contributor to the high-
way death toll each year. Even asmall amount of alcohol will
affect your reflexes, perceptions
and judgement.
You are much more likely to
have a serious accident if you
drink and drive.
If you are drinking or taking
drugs, don’t drive. Do not ridewith a driver who has beendrinking or taking drugs.Choose a designated driver orcall a cab. Driving while under the influ-
ence of drugs is as dangerous
or more dangerous than drivingdrunk.
Page 205 of 315

Driving tips
8
5
Driving at night
Because night driving presents more
hazards than driving in the daylight,
here are some important tips to
remember:
Slow down and keep more dis-
tance between you and other vehi-
cles, as it may be more difficult tosee at night, especially in areas
where there may not be any street
lights.
Adjust your mirrors to reduce the glare from other driver's head-
lights.
Keep your headlights clean and properly aimed on vehicles notequipped with the automatic head-
light aiming feature. Dirty or
improperly aimed headlights will
make it much more difficult to seeat night.
Avoid staring directly at the head- lights of oncoming vehicles. You
could be temporarily blinded, and it
will take several seconds for your
eyes to readjust to the darkness. Driving in the rain
Rain and wet roads can make driving
dangerous, especially if you’re not
prepared for the slick pavement.
Here are a few things to consider
when driving in the rain:
A heavy rainfall will make it harder
to see and will increase the dis-
tance needed to stop your vehicle,
so slow down.
Keep your windshield wiping equipment in good shape. Replace
your windshield wiper blades when
they show signs of streaking ormissing areas on the windshield.
If your tires are not in good condi- tion, making a quick stop on wet
pavement can cause a skid and
possibly lead to an accident. Be
sure your tires are in good shape.
Turn on your headlights to make it easier for others to see you.
1 23456789
WARNING - Spinning tires
Do not spin the wheels, espe-
cially at speeds more than 56
km/h (35 mph). Spinning thewheels at high speeds when the
vehicle is stationary could
cause a tire to overheat, explode
and injure bystanders.
Page 214 of 315

517
Driving tips
1 23456789
Safety chains
You should always attach chains
between your vehicle and your trail-
er. Cross the safety chains under the
tongue of the trailer so that thetongue will not drop to the road if it
becomes separated from the hitch.
Instructions about safety chains may
be provided by the hitch manufactur-
er or by the trailer manufacturer.
Follow the manufacturer’s recom-
mendation for attaching safety
chains. Always leave just enough
slack so you can turn with your trail-
er. And, never allow safety chains to
drag on the ground.
Trailer brakes
If your trailer weighs more than the
maximum trailer weight without trailer
brakes loaded, then it needs its own
brakes and they must be adequate.
Be sure to read and follow the
instructions for the trailer brakes so
you’ll be able to install, adjust and
maintain them properly.
Don’t tap into your vehicle's brake system.
Driving with a trailer
Towing a trailer requires a certain
amount of experience. Before setting
out for the open road, you must get
to know your trailer. Acquaint your-
self with the feel of handling and
braking with the added weight of the
trailer. And always keep in mind that
the vehicle you are driving is now a
good deal longer and not nearly so
responsive as your vehicle is by
itself.
Before you start, check the trailer
hitch and platform, safety chains,
electrical connector(s), lights, tires
and mirror adjustment. If the trailer
has electric brakes, start your vehicle
and trailer moving and then apply the
trailer brake controller by hand to be
sure the brakes are working. This lets
you check your electrical connection
at the same time.
During your trip, check occasionally
to be sure that the load is secure,
and that the lights and any trailer
brakes are still working.
WARNING
Do not use a trailer with its own
brakes unless you are absolute-
ly certain that you have properly
set up the brake system. This is
not a task for amateurs. Use an
experienced, competent trailer
shop for this work.
Page 231 of 315

611
In case of an emergency
1 23456789
Description Fuse rating Protected component
ATM 20A Automatic transaxle control
ECU1 10A Engine control unit
STOP 15A Stop light
F/WIPER 20A Front wiper
R/FOG 10A Rear fog light
F/FOG 15A Front fog light
LO HDLP 15A Headlight (low)
HI HDLP 15A Headlight (high)
A/CON 10A Air conditioner
F/PUMP 15A Fuel pump
T/OPEN 10A Trunk lid opener
FOLD 10A Outside rearview mirror folding
HORN 10A Horn
DEICE 15A Deicer
INJ 15A Injection
SNSR 10A O2 sensor
ECU2 30A Engine control unit
SPARE 10A spare fuse
SPARE 15A spare fuse
SPARE 20A spare fuse
SPARE 30A spare fuse
ABS2 30A Anti-lock brake system
ABS1 30A Anti-lock brake system
IP B+ 50A In panel B+
BLOWER 30A Blower
IGN2 30A Ignition
IGN1 30A IgnitionDescription Fuse rating Protected component
RAD 30A Radiator fan
COND 20A Condenser fan
ALT
120A (Gasoline)Alternator
140A (Diesel)
ATM - Automatic transaxle control relay
WIPER - Wiper relay
F/FOG - Front fog light relay
LO HDLP - Headlight relay (low)
HI HDLP - Headlight relay (high)
A/CON - Air conditioner relay
F/PUMP - Fuel pump relay
DRL - Daytime running light relay
COND2 - Condenser fan relay
HORN - Horn relay
MAIN - Main relay
START - Start motor relay
RAD - Radiator fan relay
COND - Condenser fan relay
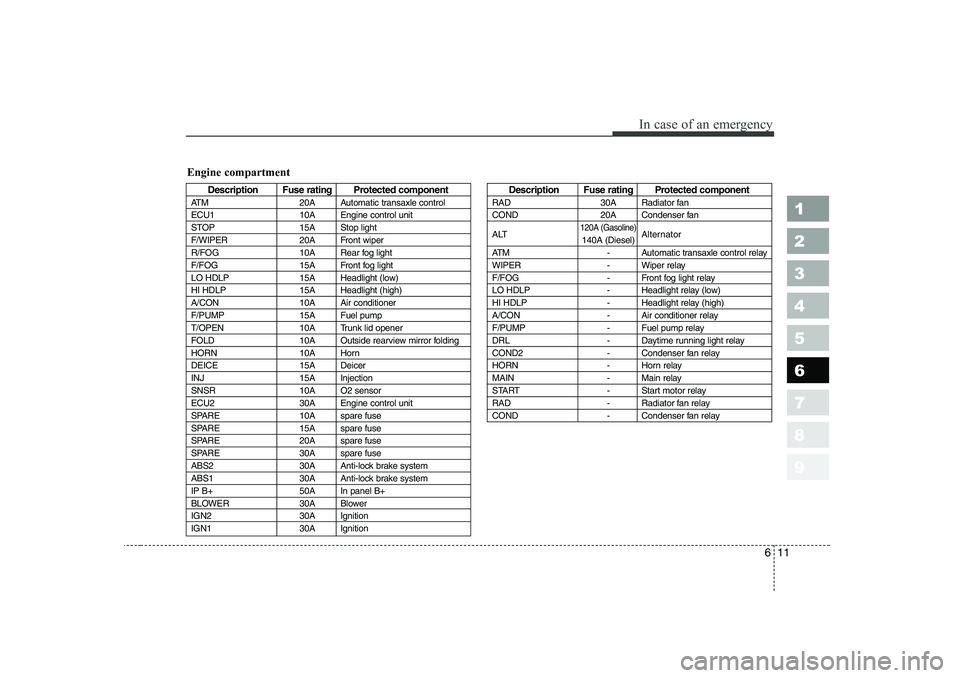
Engine compartment