Page 241 of 315
621
In case of an emergency
1 23456789
4. Remove the wheel lug nut wrench,jack, jack handle, and spare tire
from the vehicle.
5. Block both the front and rear of the wheel that is diagonally opposite
the jack position. 6. Loosen the wheel lug nuts coun-
terclockwise one turn each, but do
not remove any nut until the tire
has been raised off the ground.
WARNING - Changing a tire
To prevent vehicle movement
while changing a tire, always
set the parking brake fully, and
always block the wheel diago-
nally opposite the wheel being
changed.
It is recommended that the wheels of the vehicle be
chocked, and that no person
should remain in a vehicle that
is being jacked.
1LDN40131LDN4014
Page 242 of 315
In case of an emergency
22
6
1 23456789
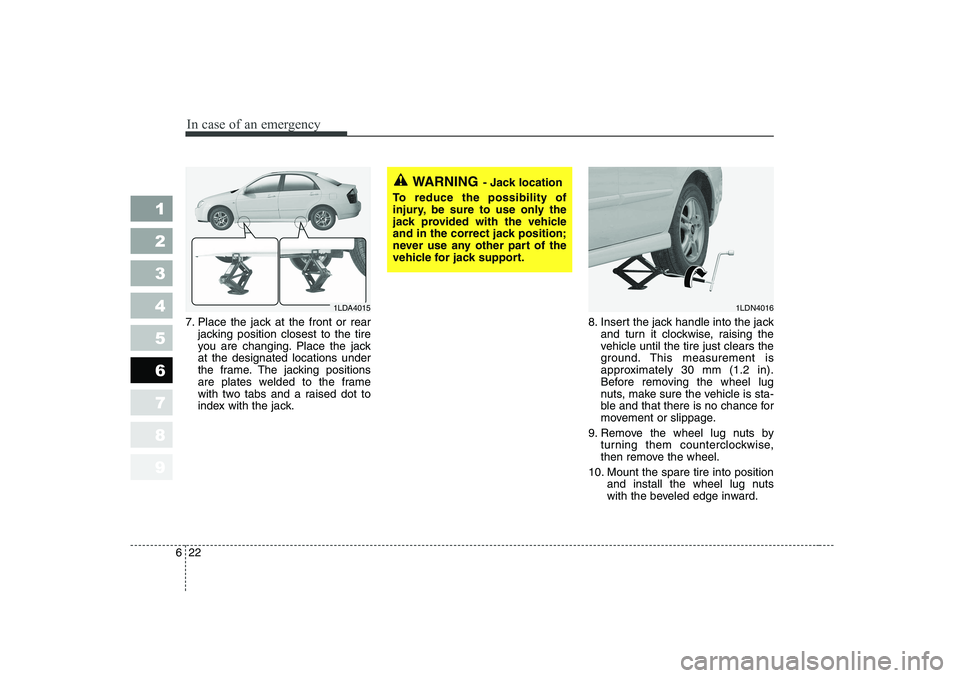
7. Place the jack at the front or rear
jacking position closest to the tire
you are changing. Place the jackat the designated locations under
the frame. The jacking positions
are plates welded to the frame
with two tabs and a raised dot to
index with the jack. 8. Insert the jack handle into the jack
and turn it clockwise, raising the
vehicle until the tire just clears the
ground. This measurement is
approximately 30 mm (1.2 in).
Before removing the wheel lug
nuts, make sure the vehicle is sta-
ble and that there is no chance for
movement or slippage.
9. Remove the wheel lug nuts by turning them counterclockwise,
then remove the wheel.
10. Mount the spare tire into position and install the wheel lug nuts
with the beveled edge inward.
WARNING - Jack location
To reduce the possibility of
injury, be sure to use only the
jack provided with the vehicle
and in the correct jack position;
never use any other part of the
vehicle for jack support.
1LDN40161LDA4015
Page 243 of 315
623
In case of an emergency
1 23456789
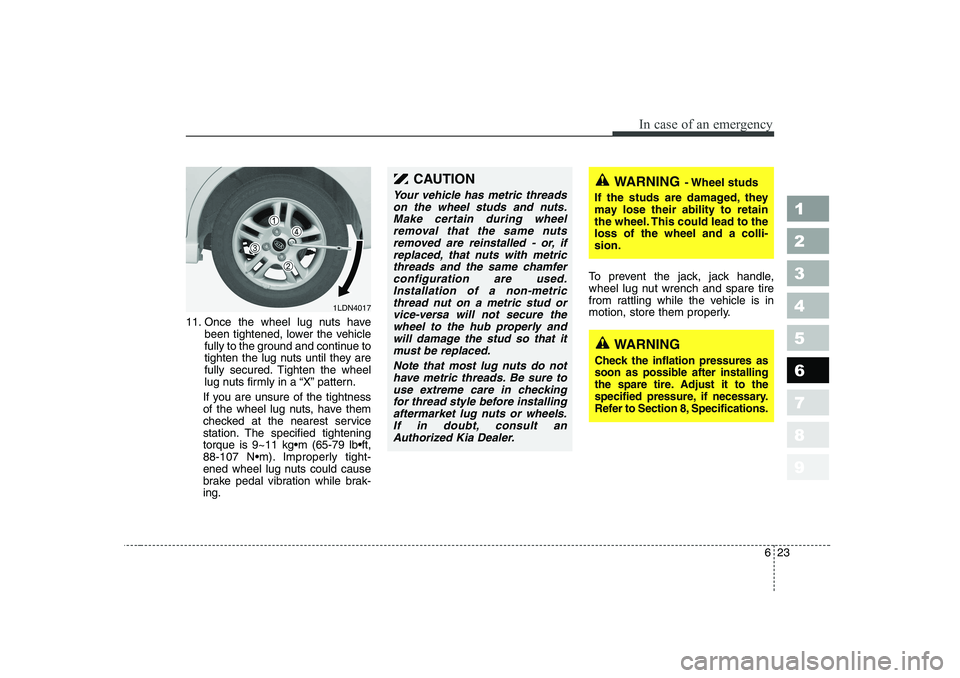
11. Once the wheel lug nuts havebeen tightened, lower the vehicle
fully to the ground and continue to
tighten the lug nuts until they are
fully secured. Tighten the wheel
lug nuts firmly in a “X” pattern.
If you are unsure of the tightness
of the wheel lug nuts, have them
checked at the nearest service
station. The specified tighteningtorque is 9~11 kgm (65-79 lbft,
88-107 Nm). Improperly tight-
ened wheel lug nuts could cause
brake pedal vibration while brak-ing. To prevent the jack, jack handle,
wheel lug nut wrench and spare tire
from rattling while the vehicle is in
motion, store them properly.
1LDN4017
CAUTION
Your vehicle has metric threads
on the wheel studs and nuts. Make certain during wheelremoval that the same nutsremoved are reinstalled - or, if replaced, that nuts with metricthreads and the same chamferconfiguration are used. Installation of a non-metricthread nut on a metric stud orvice-versa will not secure thewheel to the hub properly and will damage the stud so that itmust be replaced.
Note that most lug nuts do nothave metric threads. Be sure to use extreme care in checkingfor thread style before installingaftermarket lug nuts or wheels.If in doubt, consult an Authorized Kia Dealer.
WARNING - Wheel studs
If the studs are damaged, they
may lose their ability to retain
the wheel. This could lead to theloss of the wheel and a colli-sion.
WARNING
Check the inflation pressures as
soon as possible after installing
the spare tire. Adjust it to the
specified pressure, if necessary.
Refer to Section 8, Specifications.
Page 255 of 315
Maintenance
10
7
1 23456789
OWNER MAINTENANCE
Owner maintenance schedule
The following lists are vehicle checks and inspections that should be per-
formed by the owner or an
Authorized Kia Dealer at the fre-quencies indicated to help ensure
safe, dependable operation of your
vehicle.
Any adverse conditions should be
brought to the attention of your deal-
er as soon as possible.
These Owner Maintenance Checks
are generally not covered by war-
ranties and you may be charged for
labor, parts and lubricants used.
When you stop for fuel:
Check the engine oil level.
Check coolant level in coolant reservoir.
Check the windshield washer fluid level.
Look for low or under-inflated tires.
While operating your vehicle:
Note any changes in the sound of the exhaust or any smell of
exhaust fumes in the vehicle.
Check for vibrations in the steering wheel. Notice any increased steer-
ing effort or looseness in the steer-
ing wheel, or change in its straight-ahead position.
Notice if your vehicle constantly turns slightly or “pulls” to one side
when traveling on smooth, levelroad.
When stopping, listen and check for strange sounds, pulling to one
side, increased brake pedal travel
or “hard-to-push” brake pedal.
If any slipping or changes in the operation of your transaxle occurs,
check the transaxle fluid level.
Check automatic transaxle P (Park) function.
Check parking brake.
Check for fluid leaks under your vehicle (water dripping from the air conditioning system after use is
normal).
WARNING
Be careful when checking your
engine coolant level when the
engine is hot. Scalding hot
coolant and steam may blow out
under pressure. This could
cause serious injury.
Page 256 of 315
711
Maintenance
1 23456789
At least monthly:
Check coolant level in the coolantrecovery reservoir.
Check the operation of all exterior lights, including the stoplights, turn
signals and hazard warning flash-
ers.
Check the inflation pressures of all tires including the spare.
At least twice a year
(i.e., every Spring and Fall) :
Check radiator, heater and air con- ditioning hoses for leaks or da-
mage.
Check windshield washer spray and wiper operation. Clean wiper
blades with clean cloth dampened
with washer fluid.
Check headlight alignment.
Check muffler, exhaust pipes, shields and clamps.
Check the lap/shoulder belts for wear and function.
Check for worn tires and loose wheel lug nuts.
At least once a year :
Clean body and door drain holes.
Lubricate door hinges and checks,and hood hinges.
Lubricate door and hood locks and latches.
Lubricate door rubber weather- strips.
Check the air conditioning system before the warm weather season.
Check the power steering fluid level.
Inspect and lubricate automatic transaxle linkage and controls.
Clean battery and terminals.
Check the brake fluid level.
Page 257 of 315
Maintenance
12
7
1 23456789
Owner maintenance precau- tions
Improper or incomplete service may
result in problems. This section gives
instructions only for the maintenance
items that are easy to perform.
As explained earlier in this section,
several procedures can be done only
by an Authorized Kia Dealer with
special tools.
✽✽
NOTICE
Improper owner maintenance dur- ing the warranty period may affect
warranty coverage. For details, read
the separate Kia Warranty &
Maintenance book provided with
the vehicle. If you're unsure about
any servicing or maintenance proce-
dure, have it done by an Authorized
Kia Dealer.
WARNING - Maintenance
work
Performing maintenance work on a vehicle can be danger-
ous. You can be seriously
injured while performing some
maintenance procedures. If
you lack sufficient knowledge
and experience or the propertools and equipment to do the
work, have it done by an
Authorized Kia Dealer.
Working under the hood with the engine running is danger-
ous. It becomes even more
dangerous when you wear
jewelry or loose clothing.These can become entangled
in moving parts and result in
injury. Therefore, if you must
run the engine while working
under the hood, make certain
that you remove all jewelry
(especially rings, bracelets,
watches, and necklaces) and
all neckties, scarves, and sim-
ilar loose clothing before get-ting near the engine or cool-ing fans.
Page 261 of 315
Maintenance
16
7
1 23456789
ENGINE OIL AND OIL FILTER
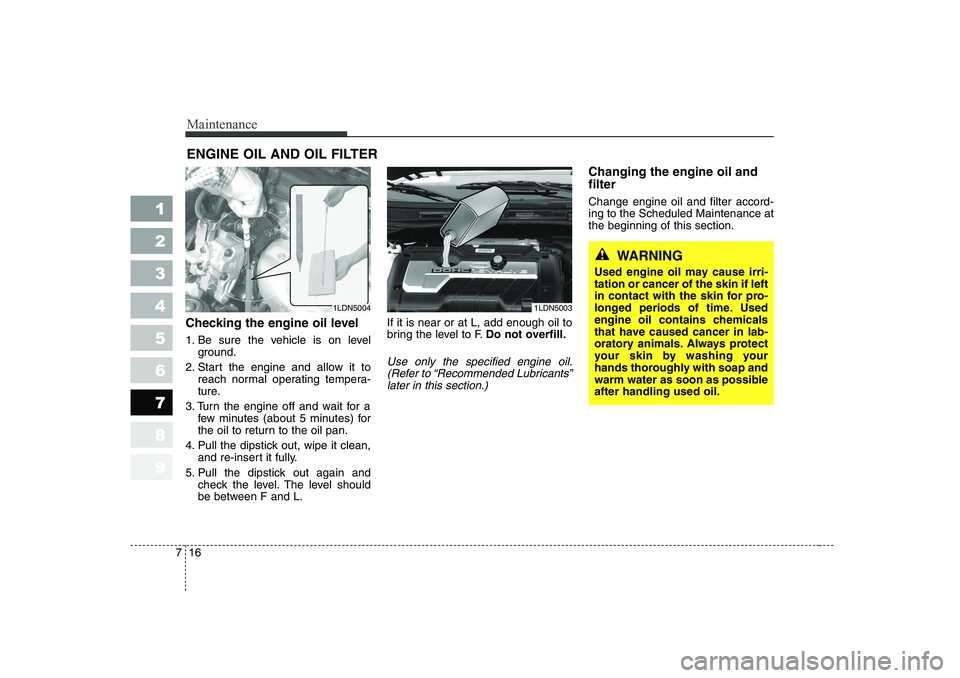
Checking the engine oil level
1. Be sure the vehicle is on level ground.
2. Start the engine and allow it to reach normal operating tempera-
ture.
3. Turn the engine off and wait for a few minutes (about 5 minutes) for
the oil to return to the oil pan.
4. Pull the dipstick out, wipe it clean, and re-insert it fully.
5. Pull the dipstick out again and check the level. The level should
be between F and L. If it is near or at L, add enough oil to
bring the level to F.
Do not overfill.
Use only the specified engine oil.
(Refer to “Recommended Lubricants”later in this section.)
Changing the engine oil and filter Change engine oil and filter accord- ing to the Scheduled Maintenance atthe beginning of this section.
1LDN50031LDN5004
WARNING
Used engine oil may cause irri- tation or cancer of the skin if left
in contact with the skin for pro-
longed periods of time. Used
engine oil contains chemicals
that have caused cancer in lab-
oratory animals. Always protect
your skin by washing your
hands thoroughly with soap and
warm water as soon as possibleafter handling used oil.
Page 262 of 315

717
Maintenance
1 23456789
1. Warm the engine up for a few min-utes and then turn it off. Remove
the oil filler cap.
2. Raise and suitably support the vehicle.
3. Drain the oil into a suitable con-tainer by removing the oil drainplug. 4. Remove the engine oil filter with
an oil filter wrench.
✽✽ NOTICE
Do not allow the oil filter gasket to
remain on the oil filter mounting
surface. This will cause oil leakageand engine damage. Remove the oldgasket completely so that a new gas-
ket may be properly seated.
5. Use a clean rag to clean the oil fil- ter mounting surface on the
engine.
6. Apply a small amount of engine oil to the new oil filter O-ring seal.
CAUTION
Both the oil and engine are
hot. Do not burn yourself.
Keep all engine oil out of the reach of children.
1LDN70161LDN7017
WARNING - Lifting your
vehicle
If you raise your vehicle, always
ensure that it is supported at all
four jacking or lift points for the
vehicle. Do not use jacks meant
for tire changes. Use only lift
equipment specifically recom-
mended for doing maintenance
work under the vehicle. Place
the vehicle and lift equipment
on a hard, level surface capable
of supporting the full weight of
the vehicle without moving or
deforming. If the support is not
stable, the vehicle could fall andcause serious or fatal injuries.
Follow the instructions with the
lift device.