2006 KIA AMANTI mirror
[x] Cancel search: mirrorPage 197 of 322
55
Driving tips
BEFORE DRIVING Before entering vehicle: Be sure that all windows, outsidemirror(s), and outside lights are
clean.
Check the condition of the tires.
Check under the vehicle for any sign of leaks.
Be sure there are no obstacles behind you if you intend to back up.Necessary inspections Fluid levels, such as engine oil,
engine coolant, brake fluid, and
washer fluid should be checked on a
regular basis, with the exact interval
depending on the fluid. Further
details are provided in Section 7,
Maintenance.
Before starting Close and lock all doors.
Position the seat so that all con-trols are easily reached.
Adjust the inside and outside rearview mirrors.
Be sure that all lights work.
Check all gauges.
Check the operation of warning lights when the ignition switch is
turned to the ON position.
Release the parking brake and make sure the brake warning light
goes out.
For safe operation, be sure you are
familiar with your vehicle and its
equipment.
1
2
3
4
5
6
7
8
910
WARNING
- Driving under
the influence of alcohol or
drugs
Drinking and driving is danger-
ous. Drunk driving is the num-
ber one contributor to the high-
way death toll each year. Even a
small amount of alcohol will
affect your reflexes, perceptions
and judgement.
You are much more likely to
have a serious accident if you
drink and drive.
If you are drinking or taking
drugs, don’t drive. Do not ride
with a driver who has been
drinking or taking drugs.
Choose a designated driver or
call a cab.
Driving while under the influ-
ence of drugs is as dangerous
or more dangerous than driving
drunk.
Page 200 of 322
Driving tips85✽
✽NOTICEProlonged rocking may cause engine
over-heating, transaxle damage or
failure, and tire damage.
Driving at night Because night driving presents more
hazards than driving in the daylight,
here are some important tips to
remember:
Slow down and keep more dis-
tance between you and other vehi-
cles, as it may be more difficult to
see at night, especially in areas
where there may not be any street
lights.
Adjust your mirrors to reduce the glare from other driver's head-
lights.
Keep your headlights clean and properly aimed on vehicles not
equipped with the automatic head-
light aiming feature. Dirty or
improperly aimed headlights will
make it much more difficult to see
at night.
Avoid staring directly at the head- lights of oncoming vehicles. You
could be temporarily blinded, and it
will take several seconds for your
eyes to readjust to the darkness.
Driving in the rain Rain and wet roads can make driving
dangerous, especially if you’re not
prepared for the slick pavement.
Here are a few things to consider
when driving in the rain:
A heavy rainfall will make it harderto see and will increase the dis-
tance needed to stop your vehicle,
so slow down.
Keep your windshield wiping equipment in good shape. Replace
your windshield wiper blades when
they show signs of streaking or
missing areas on the windshield.
If your tires are not in good condi- tion, making a quick stop on wet
pavement can cause a skid and
possibly lead to an accident. Be
sure your tires are in good shape.
Turn on your headlights to make it easier for others to see you.
1
2
3
4
5
6
7
8
910
WARNING
- Spinning tires
Do not spin the wheels, espe-
cially at speeds more than 35
mph (56 km/h). Spinning the
wheels at high speeds when the
vehicle is stationary could
cause a tire to overheat, explode
and injure bystanders.
Page 208 of 322
Driving tips16
5
1
2
3
4
5
6
7
8
910
Safety chains You should always attach chains
between your vehicle and your trail-
er. Cross the safety chains under the
tongue of the trailer so that the
tongue will not drop to the road if it
becomes separated from the hitch.
Instructions about safety chains may
be provided by the hitch manufactur-
er or by the trailer manufacturer.
Follow the manufacturer’s recom-
mendation for attaching safety
chains. Always leave just enough
slack so you can turn with your trail-
er. And, never allow safety chains to
drag on the ground.
Trailer brakes If your trailer weighs more than 1000
lbs. (453 kg) loaded, then it needs its
own brakes and they must be ade-
quate. Be sure to read and follow the
instructions for the trailer brakes so
you’ll be able to install, adjust and
maintain them properly.
Don’t tap into your vehicle's brake
system.
Driving with a trailer Towing a trailer requires a certain
amount of experience. Before setting
out for the open road, you must get
to know your trailer. Acquaint your-
self with the feel of handling and
braking with the added weight of the
trailer. And always keep in mind that
the vehicle you are driving is now a
good deal longer and not nearly so
responsive as your vehicle is by
itself.
Before you start, check the trailer
hitch and platform, safety chains,
electrical connector(s), lights, tires
and mirror adjustment. If the trailer
has electric brakes, start your vehicle
and trailer moving and then apply the
trailer brake controller by hand to be
sure the brakes are working. This lets
you check your electrical connection
at the same time.
During your trip, check occasionally
to be sure that the load is secure,
and that the lights and any trailer
brakes are still working.
WARNING
Do not use a trailer with its own
brakes unless you are absolute-
ly certain that you have properly
set up the brake system. This is
not a task for amateurs. Use an
experienced, competent trailer
shop for this work.
Page 215 of 322
523
Driving tips
1
2
3
4
5
6
7
8
910
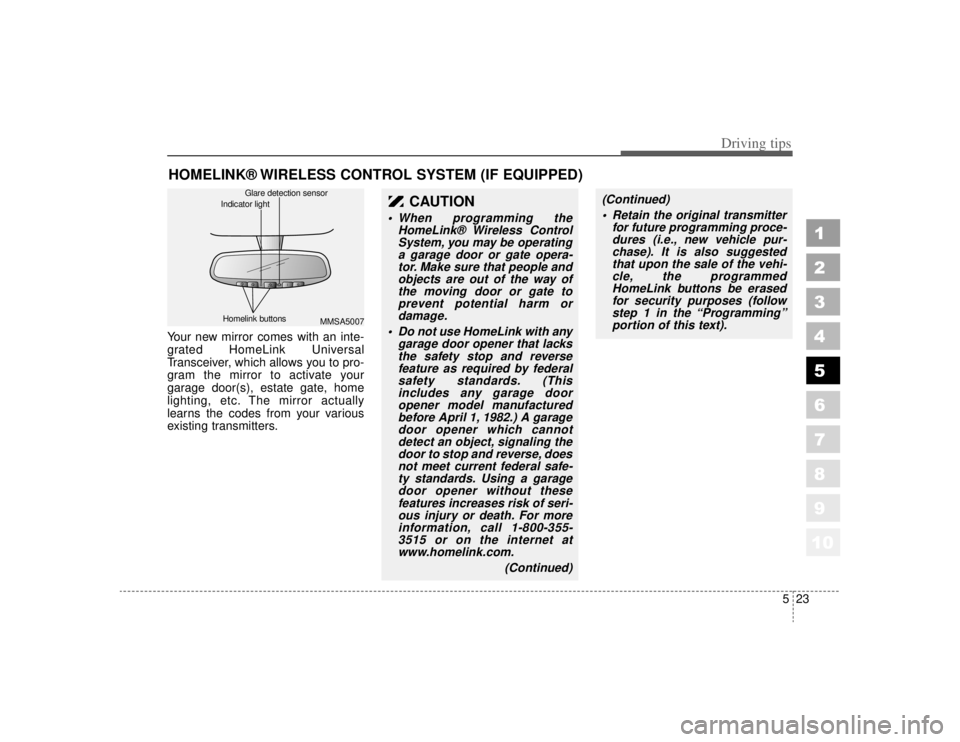
HOMELINK® WIRELESS CONTROL SYSTEM (IF EQUIPPED)Your new mirror comes with an inte-
grated HomeLink Universal
Transceiver, which allows you to pro-
gram the mirror to activate your
garage door(s), estate gate, home
lighting, etc. The mirror actually
learns the codes from your various
existing transmitters.
CAUTION
When programming theHomeLink® Wireless ControlSystem, you may be operatinga garage door or gate opera-tor. Make sure that people andobjects are out of the way ofthe moving door or gate toprevent potential harm ordamage.
Do not use HomeLink with any garage door opener that lacksthe safety stop and reversefeature as required by federalsafety standards. (Thisincludes any garage dooropener model manufacturedbefore April 1, 1982.) A garagedoor opener which cannotdetect an object, signaling thedoor to stop and reverse, doesnot meet current federal safe-ty standards. Using a garagedoor opener without thesefeatures increases risk of seri-ous injury or death. For moreinformation, call 1-800-355-3515 or on the internet atwww.homelink.com.
(Continued)
(Continued) Retain the original transmitter for future programming proce-dures (i.e., new vehicle pur-chase). It is also suggestedthat upon the sale of the vehi-cle, the programmedHomeLink buttons be erasedfor security purposes (followstep 1 in the “Programming”portion of this text).
MMSA5007
Homelink buttons Glare detection sensor
Indicator light
Page 216 of 322
Driving tips24
5
1
2
3
4
5
6
7
8
910
ProgrammingYour vehicle may require the ignition
switch to be turned to the ACC posi-
tion for programming and/or opera-
tion of HomeLink. It is also recom-
mended that a new battery be
replaced in the hand-held transmitter
of the device being programmed to
HomeLink for quicker training and
accurate transmission of the radio-
frequency.
Follow these steps to train your
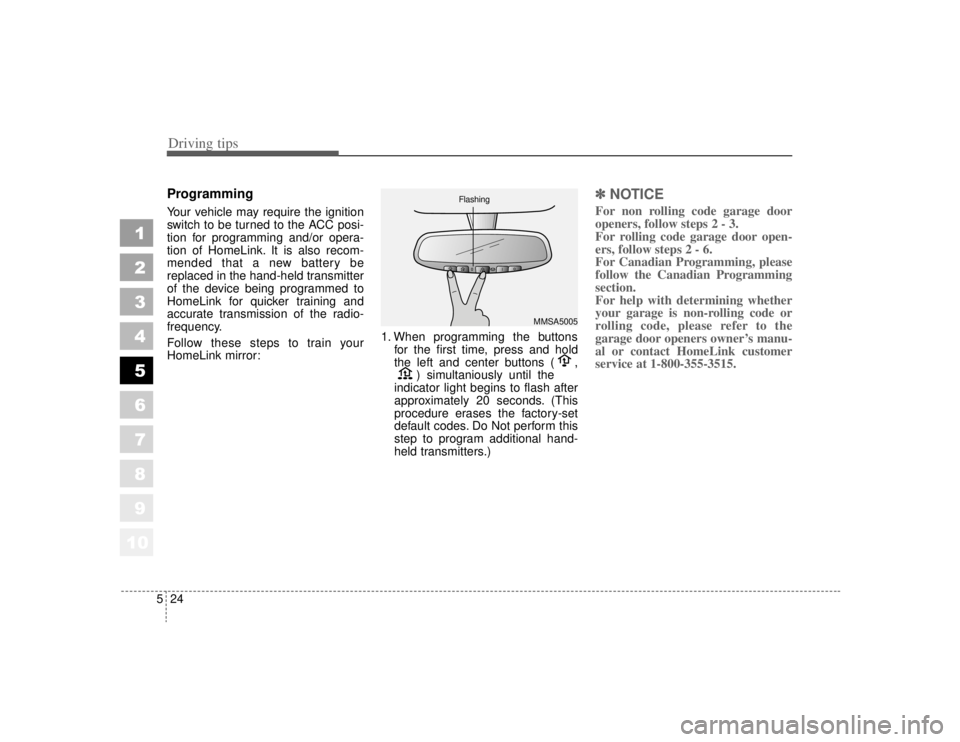
HomeLink mirror: 1. When programming the buttons
for the first time, press and hold
the left and center buttons ( , ) simultaniously until the
indicator light begins to flash after
approximately 20 seconds. (This
procedure erases the factory-set
default codes. Do Not perform this
step to program additional hand-
held transmitters.)
✽ ✽ NOTICEFor non rolling code garage door
openers, follow steps 2 - 3.
For rolling code garage door open-
ers, follow steps 2 - 6.
For Canadian Programming, please
follow the Canadian Programming
section.
For help with determining whether
your garage is non-rolling code or
rolling code, please refer to the
garage door openers owner’s manu-
al or contact HomeLink customer
service at 1-800-355-3515.
MMSA5005
Flashing
Page 217 of 322
525
Driving tips
1
2
3
4
5
6
7
8
910
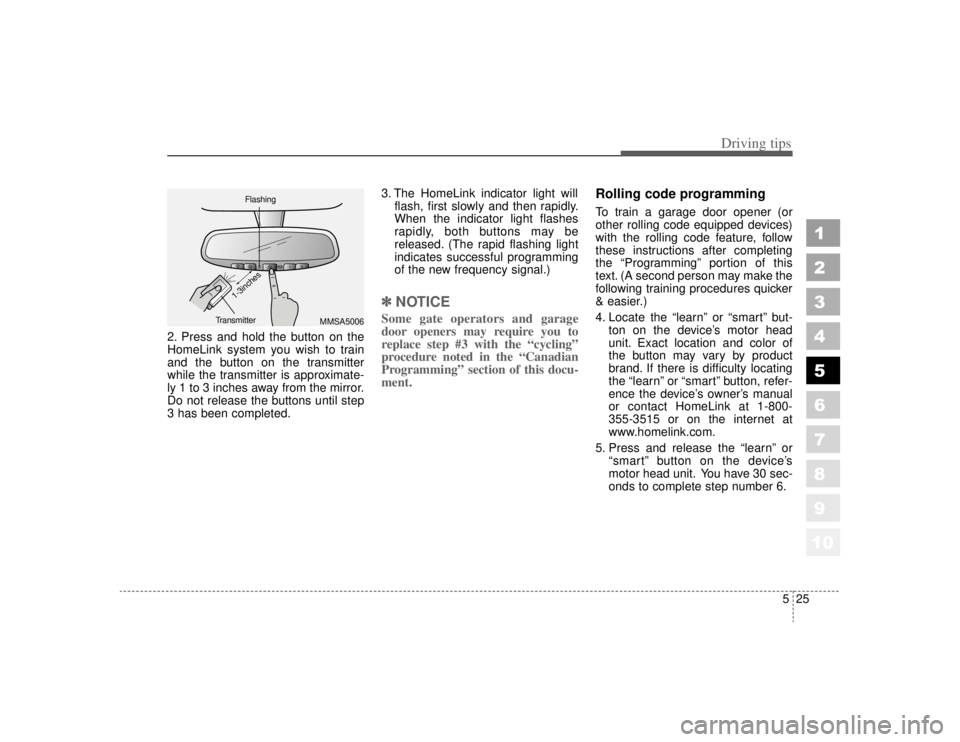
2. Press and hold the button on the
HomeLink system you wish to train
and the button on the transmitter
while the transmitter is approximate-
ly 1 to 3 inches away from the mirror.
Do not release the buttons until step
3 has been completed.3. The HomeLink indicator light will
flash, first slowly and then rapidly.
When the indicator light flashes
rapidly, both buttons may be
released. (The rapid flashing light
indicates successful programming
of the new frequency signal.)
✽ ✽NOTICESome gate operators and garage
door openers may require you to
replace step #3 with the “cycling”
procedure noted in the “Canadian
Programming” section of this docu-
ment.
Rolling code programmingTo train a garage door opener (or
other rolling code equipped devices)
with the rolling code feature, follow
these instructions after completing
the “Programming” portion of this
text. (A second person may make the
following training procedures quicker
& easier.)
4. Locate the “learn” or “smart” but-
ton on the device’s motor head
unit. Exact location and color of
the button may vary by product
brand. If there is difficulty locating
the “learn” or “smart” button, refer-
ence the device’s owner’s manual
or contact HomeLink at 1-800-
355-3515 or on the internet at
www.homelink.com.
5. Press and release the “learn” or “smart” button on the device’s
motor head unit. You have 30 sec-
onds to complete step number 6.
MMSA5006
Flashing
Transmitter
1-3inches
Page 231 of 322
611
In case of an emergency
1
2
3
4
5
6
7
8
910
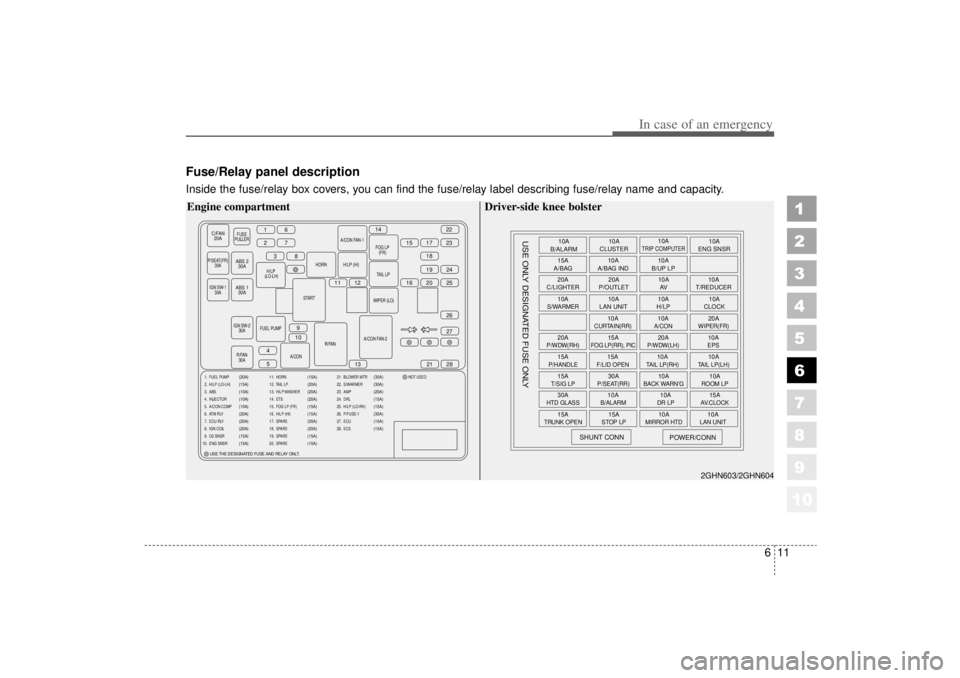
Fuse/Relay panel descriptionInside the fuse/relay box covers, you can find the fuse/relay label describing fuse/relay name and capacity.
C/FAN20A
FUSE
PULLER
P/SEAT(FR) 30A
H/
LP (LO-LH) HORN
START
IGN SW-2 30A
R/FAN 30A R/FAN
A/CON FAN-2WIPER (LO)
TAIL
LP
H/LP (HI)
A/CON FAN-1
FOG
LP(FR)
FUEL PUMP A/CON
16
2738
11 12 16 20
15
14
17
1822
23
19 25 24
27
21
13
9
10
4
5 28
26
IGN SW-1
30A
ABS 230A
ABS 1 30A
1. FUEL PUMP
2. H/LP (LO-LH)
3. ABS
4. INJECTOR
5. A/CON COMP
6. ATM RLY
7. ECU RLY
8. IGN COIL
9. O2 SNSR
10. ENG SNSR
(20A)
(15A)
(10A)
(10A)
(10A)
(20A)
(20A)
(20A)
(15A)
(15A)
11. HORN
12. TAIL LP
13. H/LP WASHER
14. ETS
15. FOG LP (FR)
16. H/LP (HI)
17. SPARE
18. SPARE
19. SPARE
20. SPARE
(15A)
(20A)
(20A)
(20A)
(15A)
(15A)
(30A)
(20A)
(15A)
(10A)
21. BLOWER MTR
22. S/WARMER
23. AMP
24. DRL
25. H/LP (LO-RH)
26. P/FUSE-1
27. ECU
28. ECS NOT USED
(30A)
(30A)
(20A)
(15A)
(15A)
(30A)
(10A)
(15A)
USE THE DESIGNATED FUSE AND RELAY ONLT.
Engine compartment
10A
B/ALARM
15A
A/BAG
20A
C/LIGHTER
10AS/WARMER20AP/WDW(RH)15AP/HANDLE15AT/SIG LP30AHTD GLASS15A
TRUNK OPEN
SHUNT CONN
USE ONLY DESIGNATED FUSE ONLY
POWER/CONN
15ASTOP LP
10A
MIRROR HTD
10ALAN UNIT
10AB/ALARM
10ADR LP
15AAV.CLOCK
30AP/SEAT(RR)
10A
BACK WARN'G
10AROOM LP
15AF/LID OPEN
10ATAIL LP(RH)
10ATAIL LP(LH)
15A
FOG LP(RR), PIC
20AP/WDW(LH)
10AEPS
10A
CURTAIN(RR)
10AA/CON
20AWIPER(FR)
10A
LAN UNIT 10A
H/LP 10A
CLOCK
20A
P/OUTLET 10A
T/REDUCER
10A
AV
10A
A/BAG IND 10A
B/UP LP
10A
CLUSTER 10A
ENG SNSR
10A
TRIP COMPUTER
2GHN603/2GHN604
Driver-side knee bolster
Page 233 of 322
613
In case of an emergency
1
2
3
4
5
6
7
8
910
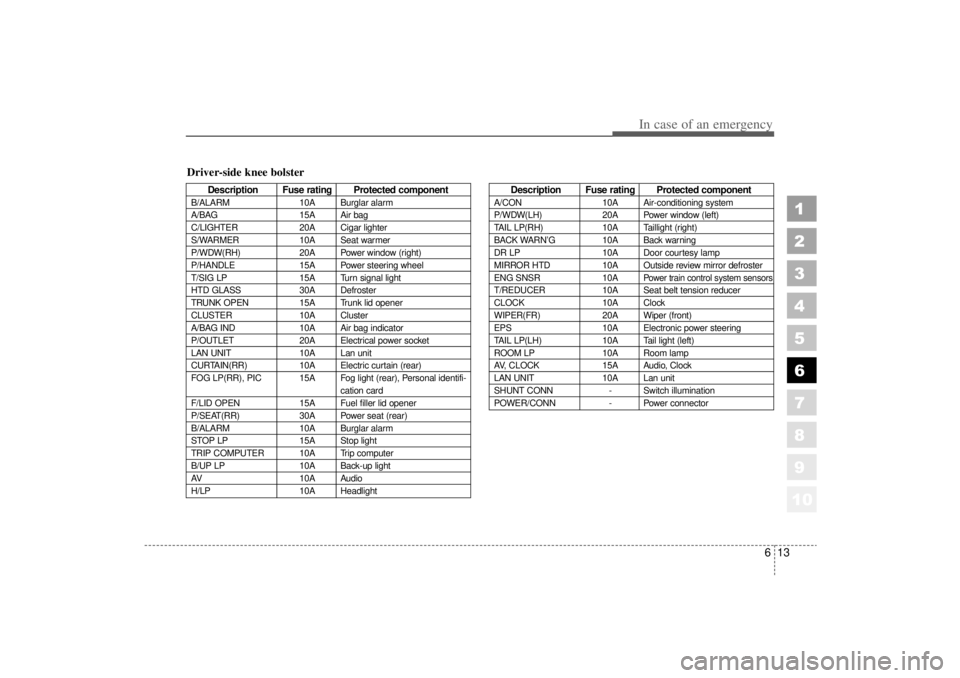
Driver-side knee bolster
Description Fuse rating Protected component
B/ALARM10A Burglar alarm
A/BAG 15A Air bag
C/LIGHTER 20A Cigar lighter
S/WARMER 10A Seat warmer
P/WDW(RH) 20A Power window (right)
P/HANDLE 15A Power steering wheel
T/SIG LP 15A Turn signal light
HTD GLASS 30A Defroster
TRUNK OPEN 15A Trunk lid opener
CLUSTER 10A Cluster
A/BAG IND 10A Air bag indicator
P/OUTLET 20A Electrical power socket
LAN UNIT 10A Lan unit
CURTAIN(RR) 10A Electric curtain (rear)
FOG LP(RR), PIC 15A Fog light (rear), Personal identifi- cation card
F/LID OPEN 15A Fuel filler lid opener
P/SEAT(RR) 30A Power seat (rear)
B/ALARM 10A Burglar alarm
STOP LP 15A Stop light
TRIP COMPUTER 10A Trip computer
B/UP LP 10A Back-up light
AV 10A Audio
H/LP 10A Headlight
Description Fuse rating Protected component
A/CON10A Air-conditioning system
P/WDW(LH) 20A Power window (left)
TAIL LP(RH) 10A Taillight (right)
BACK WARN’ G10A Back warning
DR LP 10A Door courtesy lamp
MIRROR HTD 10A Outside review mirror defroster
ENG SNSR 10A
Power train control system sensors
T/REDUCER10A Seat belt tension reducer
CLOCK 10A Clock
WIPER(FR) 20A Wiper (front)
EPS 10A Electronic power steering
TAIL LP(LH) 10A Tail light (left)
ROOM LP 10A Room lamp
AV, CLOCK 15A Audio, Clock
LAN UNIT 10A Lan unit
SHUNT CONN - Switch illumination
POWER/CONN - Power connector