2006 INFINITI M35 instrument panel
[x] Cancel search: instrument panelPage 1067 of 5621
BL-128
INTELLIGENT KEY SYSTEM/ENGINE START FUNCTION
Revision: 2006 January2006 M35/M45
System DescriptionNIS001Y8
The engine start function of Intelligent Key system is a system that makes it possible to start and stop the
engine without removing the key. It verifies the electronic ID using two-way communications when press-
ing the push-button ignition switch while carrying the Intelligent Key, which operates based on the results
of electronic ID verification for Intelligent Key using two-way communications between the Intelligent Key
and the vehicle (Intelligent Key unit).
NOTE:
The driver should always carry the intelligent key at all times.
Intelligent Key has 2 IDs (for Intelligent Key and for immobilizer). It can perform the door lock/unlock oper-
ation and the push-button ignition switch operation when carrying the registered Intelligent Key.
When the Intelligent Key battery is discharged, it can be used as emergency by inserting the Intelligent
Key to the key slot. At that time, perform the immobilizer ID verification. If it is used when carrying the
Intelligent Key, perform the Intelligent Key ID verification.
If the ID is successfully verified, and when push-button ignition switch is pressed, steering lock will be
released and initiating the engine will be possible.
If the door lock/unlock operation is performed when the Intelligent Key battery is discharged, all doors
lock/unlock can be performed by operating the driver door key cylinder using the mechanical key set into
the Intelligent Key.
Intelligent Key can be registered up to 4 keys (Including the standard Intelligent Key) on request from the
owner.
NOTE:
Refer to BL-44, "INTELLIGENT KEY SYSTEM" for any functions other than engine start function of
Intelligent Key system.
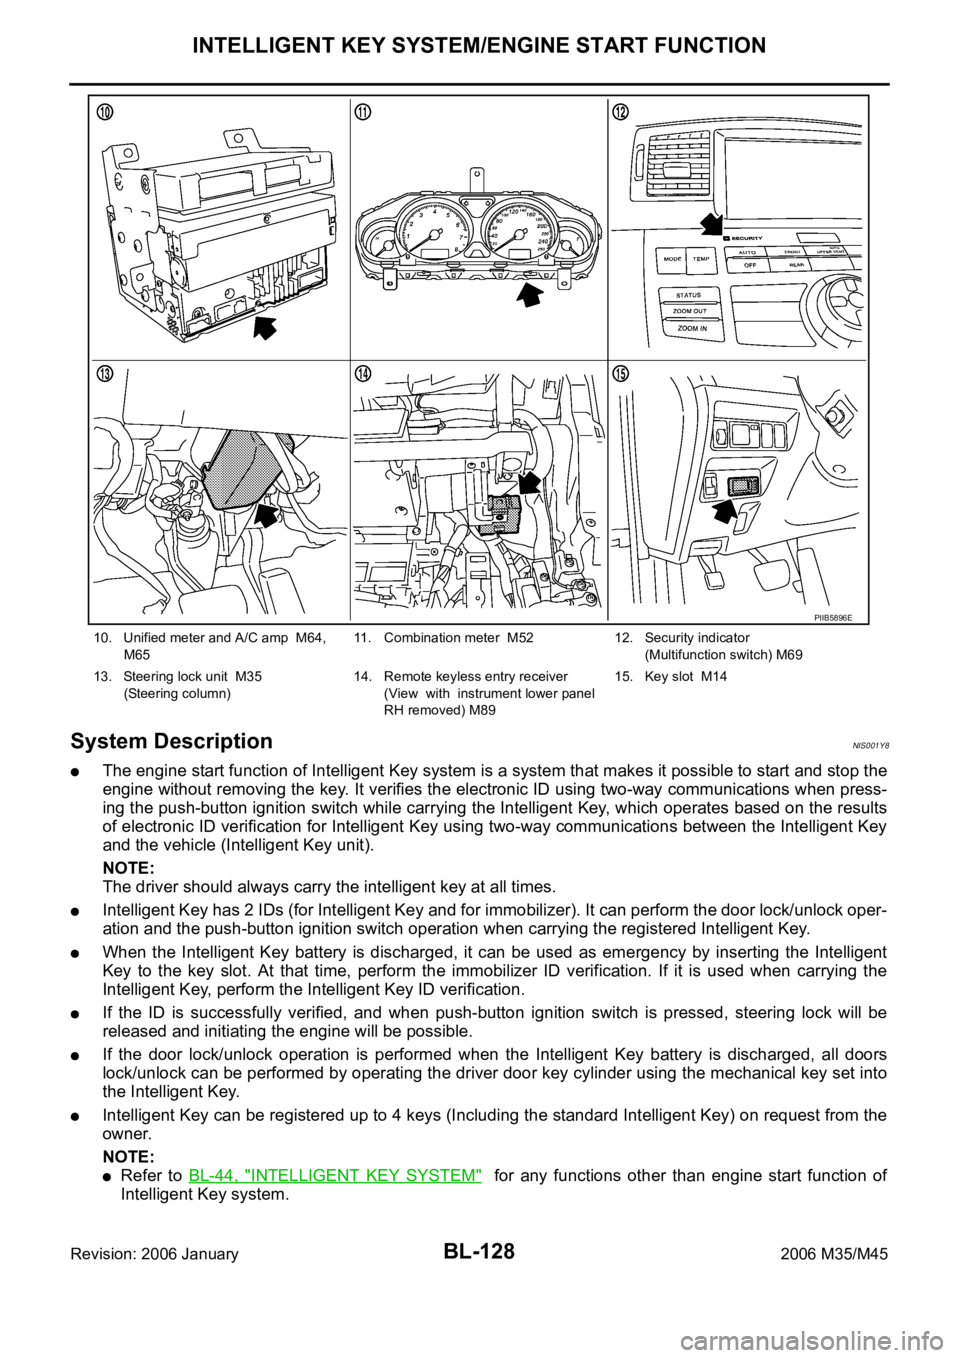
10. Unified meter and A/C amp M64,
M6511. Combination meter M52 12. Security indicator
(Multifunction switch) M69
13. Steering lock unit M35
(Steering column)14. Remote keyless entry receiver
(View with instrument lower panel
RH removed) M89 15. Key slot M14
PIIB5896E
Page 1069 of 5621

BL-130
INTELLIGENT KEY SYSTEM/ENGINE START FUNCTION
Revision: 2006 January2006 M35/M45
starter motor relay. (If the engine initiating has failed, the cranking will stop automatically within 5 sec-
onds.)
CAUTION:
When the Intelligent Key is carried outside of the vehicle (inside key antenna detection area) with
the power supply in ACC or ON position, even if the engine start condition* is satisfied, the engine
cannot be started.
*: For the engine start condition, refer to BL-130, "
PUSH-BUTTON IGNITION SWITCH OPERATION PROCE-
DURE" .
Operation Range
Engine can be started when Intelligent Key is inside the vehicle. However, sometimes engine might not start
when Intelligent Key is on instrument panel or in glove box.
OPERATION WHEN KEY SLOT IS USED
When the Intelligent Key battery is discharged, it performs the immobilizer ID verification between the inte-
grated transponder and BCM by inserting the Intelligent Key into the key slot, and then the engine can be
started.
For details relating to starting the engine using key slot, refer to BL-248, "
IVIS (INFINITI VEHICLE IMMOBI-
LIZER SYSTEM-NATS)" .
PUSH-BUTTON IGNITION SWITCH OPERATION PROCEDURE
The power supply position changing operation can be performed with the following operation.
NOTE:
When an Intelligent Key is within the detection area of inside key antenna and when it is inserted to the
key slot, it is equivalent to the operations below.
When starting the engine, the Intelligent Key unit monitors the engine start conditions (brake pedal operat-
ing condition, A/T selector lever position, and vehicle speed).
Unless each start condition is fulfilled, the engine will not respond regardless of how many times the
engine switch is pushed. At that time, illumination repeats the position in the order of LOCK
AC-
C
ONLOCK.
Power supply positionEngine start/stop condition
Push-button ignition switch
operation frequency
Brake pedal A/T selector lever position
LOCK
ACCNot depressed
(When A/T selector lever is in any
position other than P or N, there
will be no effect even if it is
depressed.)Any position other than P or N
(When the brake pedal is not
depressed, there will be no effect
even if the A/T selector lever is in
P or N position.)1
LOCK
ACC ONNot depressed
(When A/T selector lever is in any
position other than P or N, there
will be no effect even if it is
depressed.)Any position other than P or N
(When the brake pedal is not
depressed, there will be no effect
even if the A/T selector lever is in
P or N position.)2
LOCK
ACC ON
LOCKNot depressed
(When A/T selector lever is in any
position other than P or N, there
will be no effect even if it is
depressed.)Any position other than P or N
(When the brake pedal is not
depressed, there will be no effect
even if the A/T selector lever is in
P or N position.)3
LOCK
START
ACC
START
ON
START
(Engine start)Depressed P or N position (*1)1
[If the switch is pushed once,
the engine starts from any
power supply position (LOCK,
ACC, and ON)]
Engine is running
LOCK
(Engine stop)— P position 1
Page 1160 of 5621
VEHICLE SECURITY (THEFT WARNING) SYSTEM
BL-221
C
D
E
F
G
H
J
K
L
MA
B
BL
Revision: 2006 January2006 M35/M45
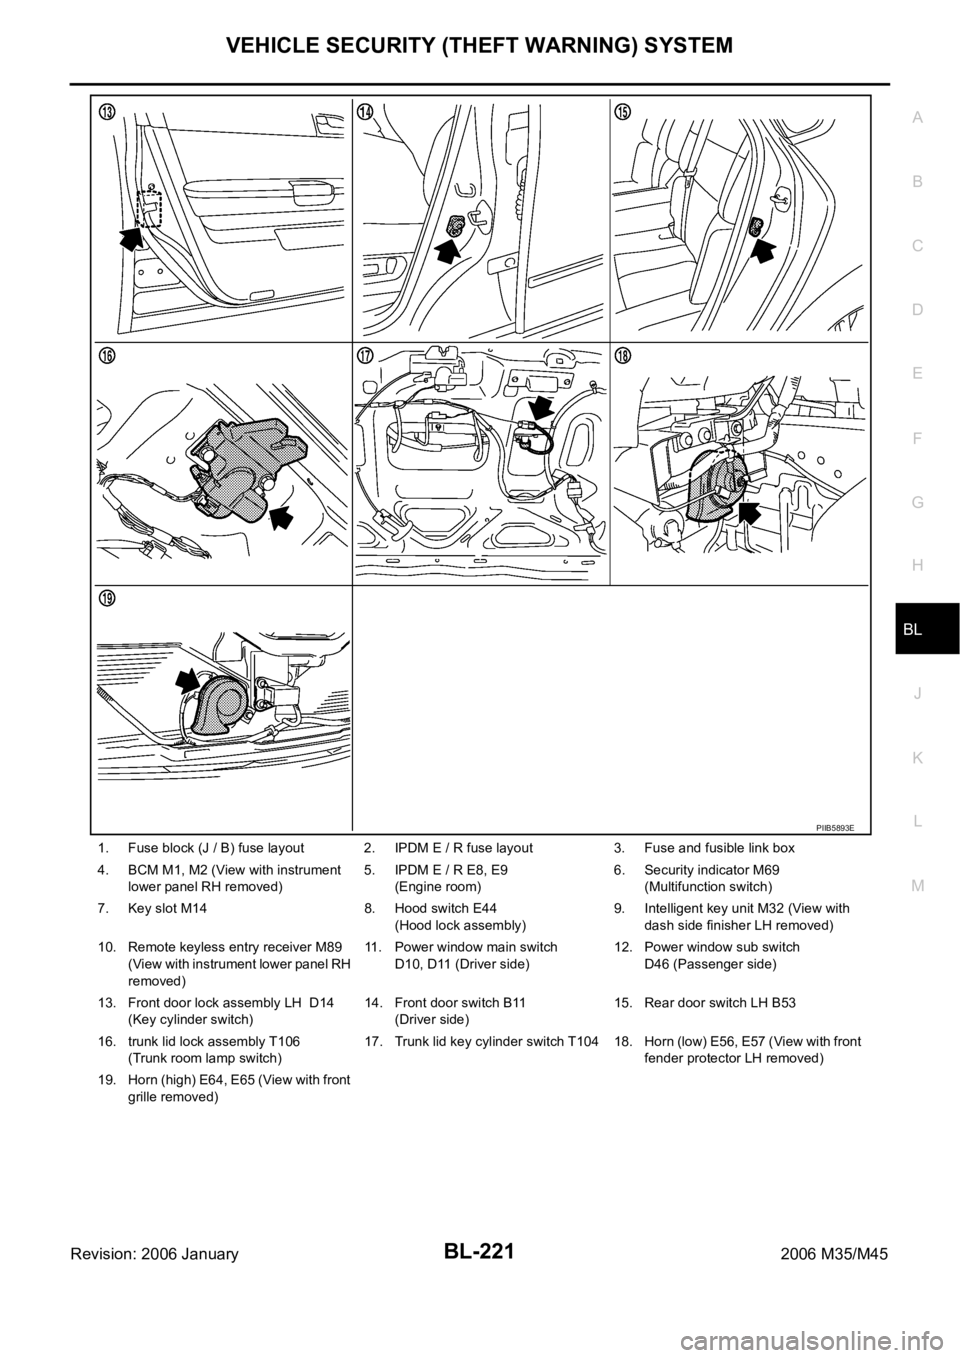
1. Fuse block (J / B) fuse layout 2. IPDM E / R fuse layout 3. Fuse and fusible link box
4. BCM M1, M2 (View with instrument
lower panel RH removed)5. IPDM E / R E8, E9
(Engine room)6. Security indicator M69
(Multifunction switch)
7. Key slot M14 8. Hood switch E44
(Hood lock assembly)9. Intelligent key unit M32 (View with
dash side finisher LH removed)
10. Remote keyless entry receiver M89
(View with instrument lower panel RH
removed)11. Power window main switch
D10, D11 (Driver side)12. Power window sub switch
D46 (Passenger side)
13. Front door lock assembly LH D14
(Key cylinder switch)14. Front door switch B11
(Driver side)15. Rear door switch LH B53
16. trunk lid lock assembly T106
(Trunk room lamp switch)17. Trunk lid key cylinder switch T104 18. Horn (low) E56, E57 (View with front
fender protector LH removed)
19. Horn (high) E64, E65 (View with front
grille removed)
PIIB5893E
Page 1187 of 5621
BL-248
IVIS (INFINITI VEHICLE IMMOBILIZER SYSTEM-NATS)
Revision: 2006 January2006 M35/M45
IVIS (INFINITI VEHICLE IMMOBILIZER SYSTEM-NATS)PFP:28591
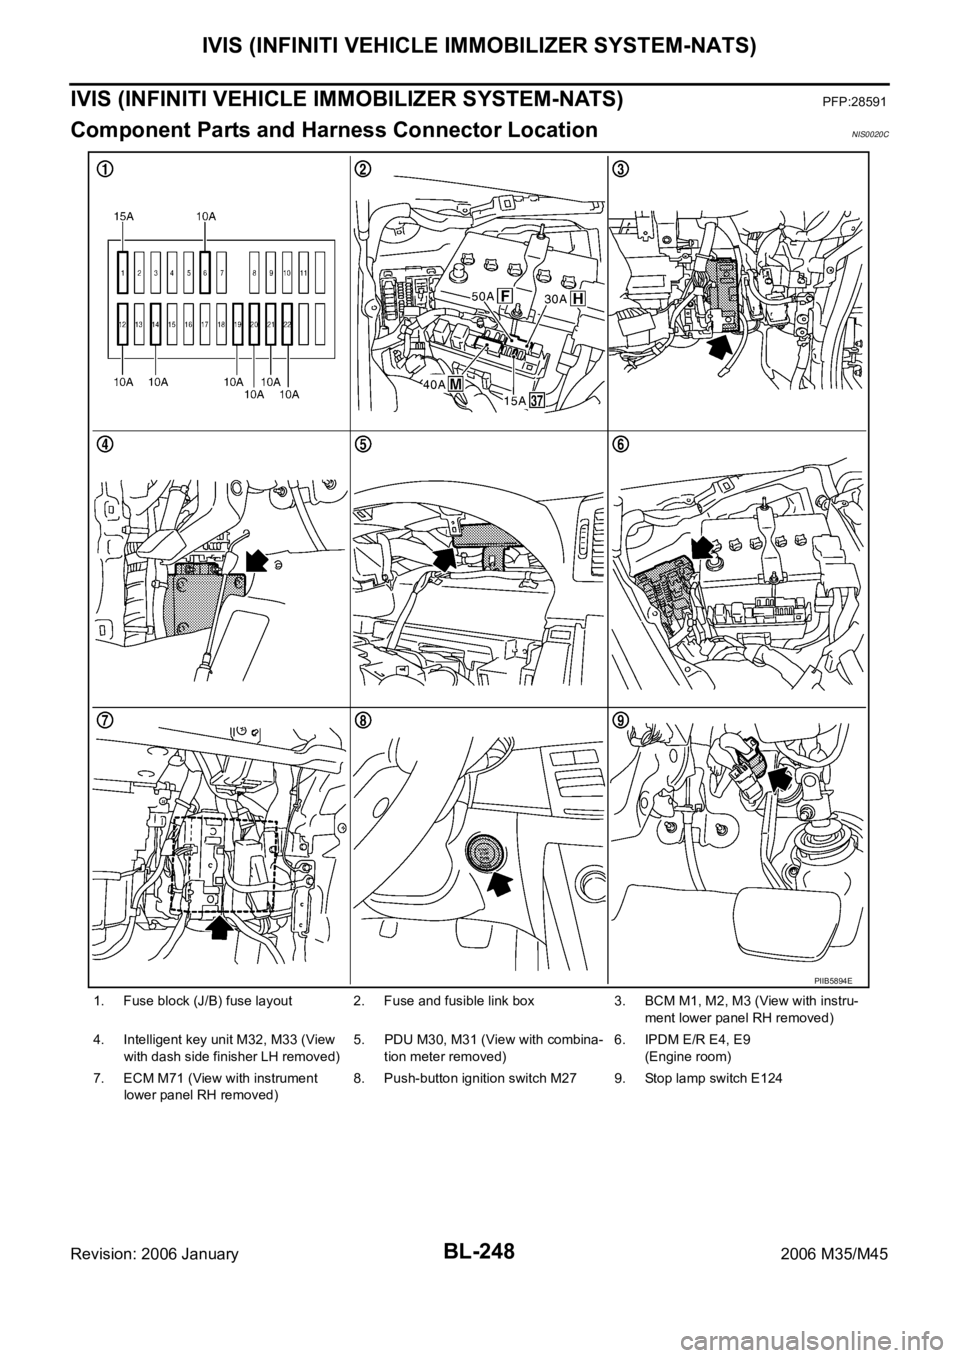
Component Parts and Harness Connector LocationNIS0020C
1. Fuse block (J/B) fuse layout 2. Fuse and fusible link box 3. BCM M1, M2, M3 (View with instru-
ment lower panel RH removed)
4. Intelligent key unit M32, M33 (View
with dash side finisher LH removed) 5. PDU M30, M31 (View with combina-
tion meter removed)6. IPDM E/R E4, E9
(Engine room)
7. ECM M71 (View with instrument
lower panel RH removed)8. Push-button ignition switch M27 9. Stop lamp switch E124
PIIB5894E
Page 1219 of 5621

BL-280
IVIS (INFINITI VEHICLE IMMOBILIZER SYSTEM-NATS)
Revision: 2006 January2006 M35/M45
DTC P1611 ID DISCORD, IMM-ECMNIS0020T
Self-diagnostic results:
“ID DISCORD, IMM-ECM” displayed on CONSULT-II screen
1. CONFIRM SELF-DIAGNOSTIC RESULTS
Confirm SELF-DIAGNOSTIC RESULTS “ID DISCORD, IMM-ECM” displayed on CONSULT-II screen.
NOTE:
“ID DISCORD IMM-ECM”:
Registered ID of BCM is in discord with that of ECM.
Is CONSULT-II screen displayed as shown in figure?
Yes >> GO TO 2.
No >> GO TO BL-271, "
“NATS V5.0” SELF-DIAGNOSTIC
RESULTS ITEM CHART" .
2. PERFORM INITIALIZATION WITH CONSULT-II
Perform initialization with CONSULT-II. Re-register all NATS ignition key IDs.
For initialization, refer to “CONSULT-II Operation Manual NATS-
IVIS/NVIS”.
NOTE:
If the initialization is not completed or malfunctions, CONSULT-II
shows message on the screen.
Can the system be initialized?
Ye s > >Start engine. (END)
(System initialization had not been completed.)
No >> ECM is malfunctioning.
Replace ECM.
Perform initialization with CONSULT-II
For initialization, refer to “CONSULT-II Operation Manual NATS-IVIS/NVIS”
Removal and Installation of Key SlotNIS0020U
REMOVAL
1. Remove instrument driver lower panel. Refer to IP-10, "INSTRUMENT PANEL ASSEMBLY" .
2. Disconnect key slot connector.
3. Remove key slot mounting screw, and then remove key slot.
INSTALLATION
Installation is in the reverse order of removal.
PIIA1262E
SEL297W
PIIB6284E
Page 1283 of 5621
BR-8
BRAKE PEDAL
Revision: 2006 January2006 M35/M45
WITH PRE-CRASH SEAT BELT
NOTE:
Clevis pin can be installed from both left and right.
REMOVAL
1. Remove instrument driver lower panel. Refer to IP-10, "INSTRUMENT PANEL ASSEMBLY" .
2. Remove steering column assembly. Refer to PS-13, "
STEERING COLUMN" .
3. Disconnect stop lamp switch and brake switch connector.
4. Remove stop lamp switch and brake switch from brake pedal assembly.
5. Disconnect brake pedal stroke sensor connector.(With pre-crash seat belt)
CAUTION:
Brake pedal stroke sensor is not detachable. Do not detach it.
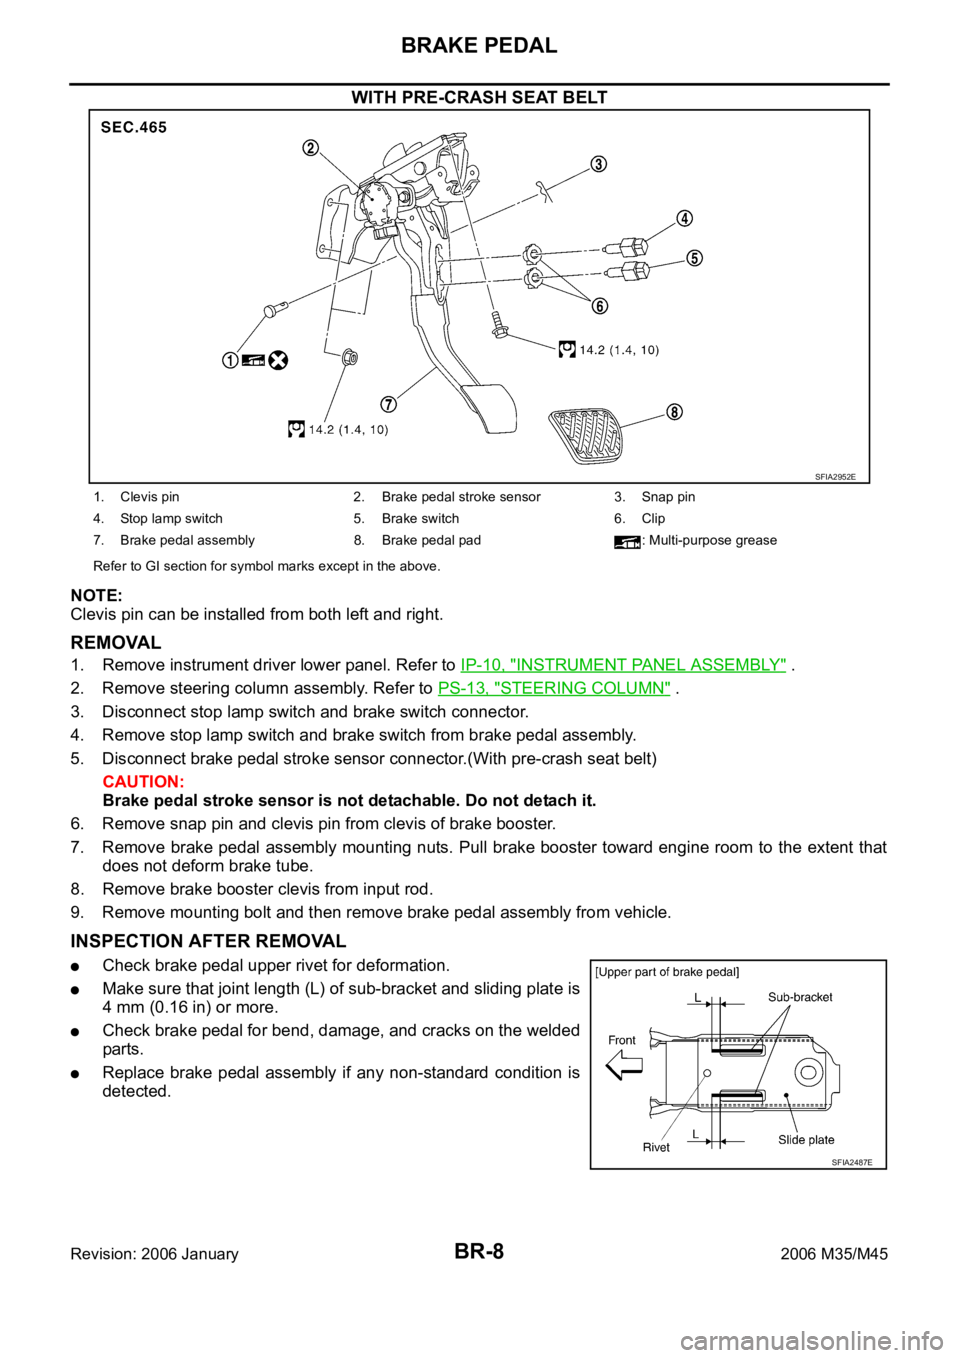
6. Remove snap pin and clevis pin from clevis of brake booster.
7. Remove brake pedal assembly mounting nuts. Pull brake booster toward engine room to the extent that
does not deform brake tube.
8. Remove brake booster clevis from input rod.
9. Remove mounting bolt and then remove brake pedal assembly from vehicle.
INSPECTION AFTER REMOVAL
Check brake pedal upper rivet for deformation.
Make sure that joint length (L) of sub-bracket and sliding plate is
4 mm (0.16 in) or more.
Check brake pedal for bend, damage, and cracks on the welded
parts.
Replace brake pedal assembly if any non-standard condition is
detected.
SFIA2952E
1. Clevis pin 2. Brake pedal stroke sensor 3. Snap pin
4. Stop lamp switch 5. Brake switch 6. Clip
7. Brake pedal assembly 8. Brake pedal pad : Multi-purpose grease
Refer to GI section for symbol marks except in the above.
SFIA2487E
Page 1460 of 5621
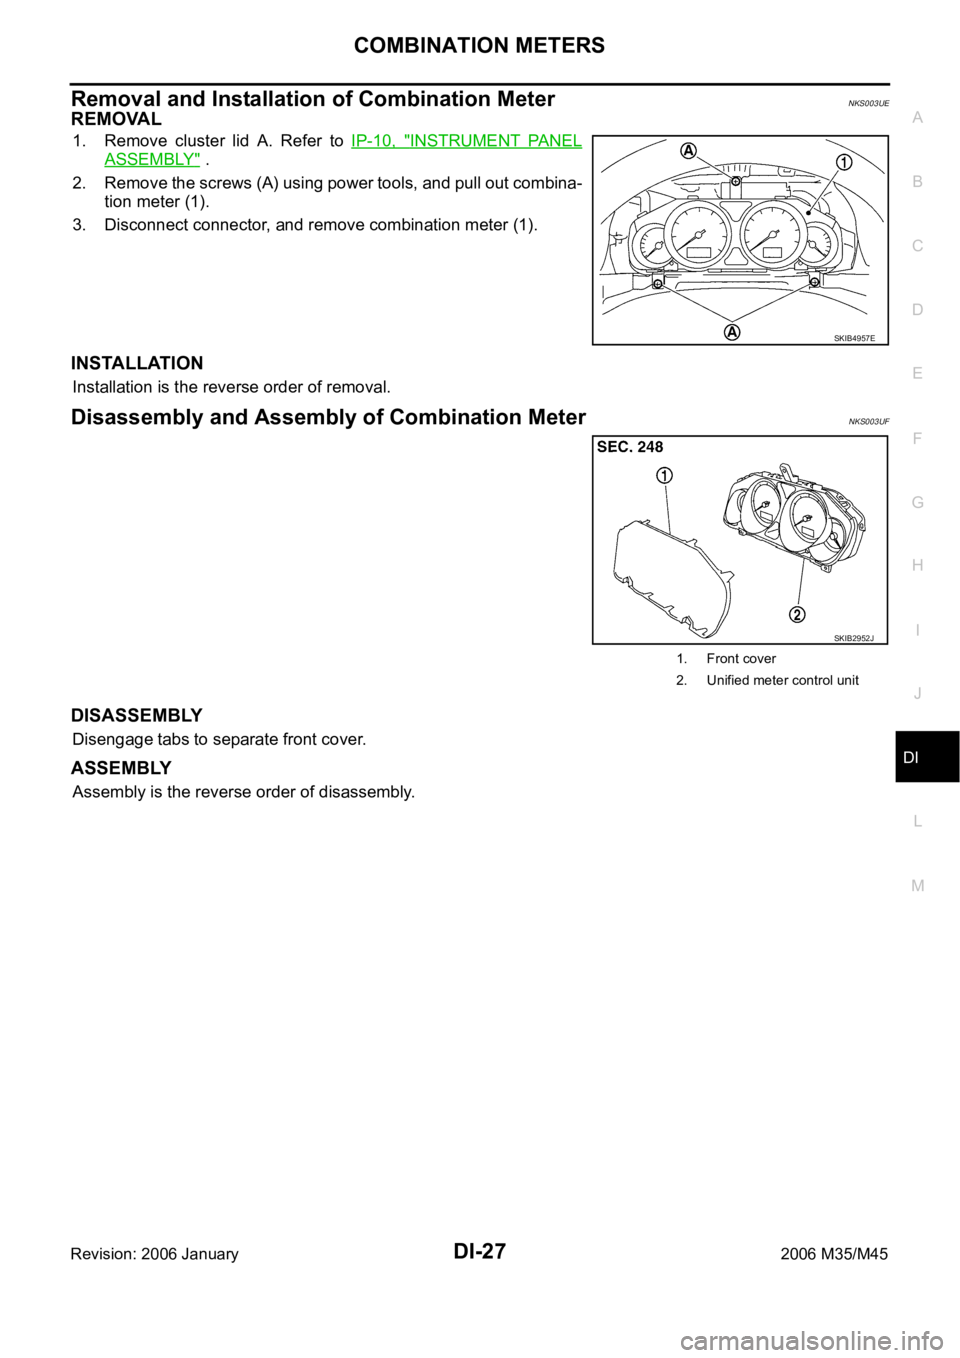
COMBINATION METERS
DI-27
C
D
E
F
G
H
I
J
L
MA
B
DI
Revision: 2006 January2006 M35/M45
Removal and Installation of Combination MeterNKS003UE
REMOVAL
1. Remove cluster lid A. Refer to IP-10, "INSTRUMENT PANEL
ASSEMBLY" .
2. Remove the screws (A) using power tools, and pull out combina-
tion meter (1).
3. Disconnect connector, and remove combination meter (1).
INSTALLATION
Installation is the reverse order of removal.
Disassembly and Assembly of Combination MeterNKS003UF
DISASSEMBLY
Disengage tabs to separate front cover.
ASSEMBLY
Assembly is the reverse order of disassembly.
SKIB4957E
SKIB2952J
1. Front cover
2. Unified meter control unit
Page 1511 of 5621

DI-78
LANE DEPARTURE WARNING SYSTEM
Revision: 2006 January2006 M35/M45
LANE DEPARTURE WARNING SYSTEM PFP:28442
Precautions for Lane Departure Warning (LDW) systemNKS003VF
WAR NING :
Lane Departure Warning (LDW) is only a warning device to inform the driver of an unintended lane
departure. It will not steer the vehicle or prevent loss of control. It is the driver's responsibility to stay
alert, drive safely, keep the vehicle in the traveling lane, and be in control of the vehicle at all times.
LDW system does not operate under the following conditions:
–At speeds below approx. 72 km/h (45 MPH).
–If it cannot detect lane markers.
LDW system may not function properly under the following conditions:
–On roads where a water puddle, dirt or snow is covering the lane markers.
–On roads where the lane markers are faded or are not painted clearly.
–On roads where the lane markers are painted yellow.
LDW system may not monitor the lane markers in certain road, weather or driving conditions.
–On roads where there are sharp curves.
–Where the traveling lane merges or separates.
–On roads where the discontinued lane markers are present, such as near tollgates, etc.
–On roads where there are not general lane markers.
–On roads where the lane width is too narrow.
–During bad weather (rain, fog, snow, etc.).
–When strong light (for example, at sunrise or sunset) is directly shining on the front of the vehicle.
–When entering or exiting a tunnel where sudden changes in brightness occur.
–When traveling close to the vehicle in front of you, which causes obstruction of the camera unit
range.
–When the vehicle's traveling direction does not align with the lane marker.
–When rain, snow or dirt adhere to the windshield in front of the camera unit.
Excessive noise interferes with warning system chime sound and the chime may not be heard.
CAUTION:
To keep the LDW system operating properly, be sure to observe the following:
Always keep the windshield clean. The sensing capability of the camera unit depends on the con-
dition of the windshield. See “Appearance and care” for cleaning instruction.
Never strike or damage the areas around the camera unit.
Never touch the camera lens.
Never attach a sticker (including transparent material) or install an accessory near the camera
unit.
Never place reflective materials, such as a white paper or mirrors on the instrument panel. Reflec-
tion of the sunlight may adversely affect the camera unit's lane marker detection capability.
System DescriptionNKS003VG
LDW SYSTEM OPERATION
The Lane Departure Warning (LDW) system warns the driver when the vehicle is traveling close to either
the left or the right of the traveling lane.
The system monitors lane markers of the traveling lane using the LDW camera unit. When the LDW cam-
era unit detects that the vehicle is traveling close to either the left or the right of the traveling lane, the
LDW indicator lamp flashes and a chime sounds to alert the driver.
NOTE:
When activating turn signal, LDW system does not give a warning to the lane marker on the turn signal
side.
The LDW system can be turned on or off by pushing the LDW switch. When the system is on, the LDW
system ON indicator illuminates.
The LDW system has an automatic mode and manual mode.