2006 INFINITI G35 remove seats
[x] Cancel search: remove seatsPage 47 of 344

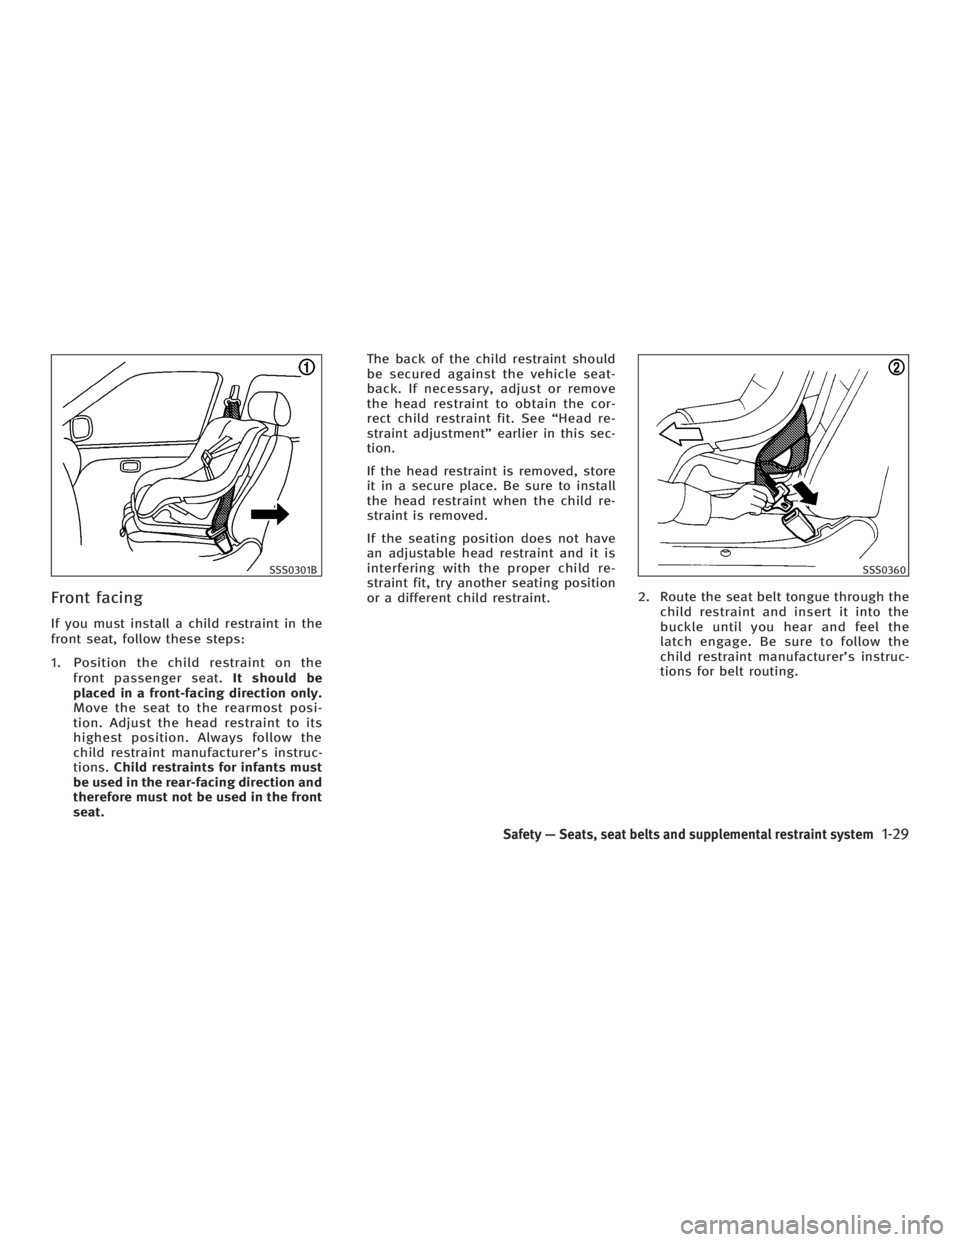
Front facing If you must install a child restraint in the
front seat, follow these steps:
1. Position the child restraint on the
front passenger seat. It should be
placed in a front-facing direction only.
Move the seat to the rearmost posi-
tion. Adjust the head restraint to its
highest position. Always follow the
child restraint manufacturer's instruc-
tions. Child restraints for infants must
be used in the rear-facing direction and
therefore must not be used in the front
seat. The back of the child restraint should
be secured against the vehicle seat-
back. If necessary, adjust or remove
the head restraint to obtain the cor-
rect child restraint fit. See ªHead re-
straint adjustmentº earlier in this sec-
tion.
If the head restraint is removed, store
it in a secure place. Be sure to install
the head restraint when the child re-
straint is removed.
If the seating position does not have
an adjustable head restraint and it is
interfering with the proper child re-
straint fit, try another seating position
or a different child restraint. 2. Route the seat belt tongue through the
child restraint and insert it into the
buckle until you hear and feel the
latch engage. Be sure to follow the
child restraint manufacturer's instruc-
tions for belt routing.SSS0301B SSS0360
Safety Ð Seats, seat belts and supplemental restraint system
1-29
w 06.1.4/V35-D/V5.0
X
Page 48 of 344

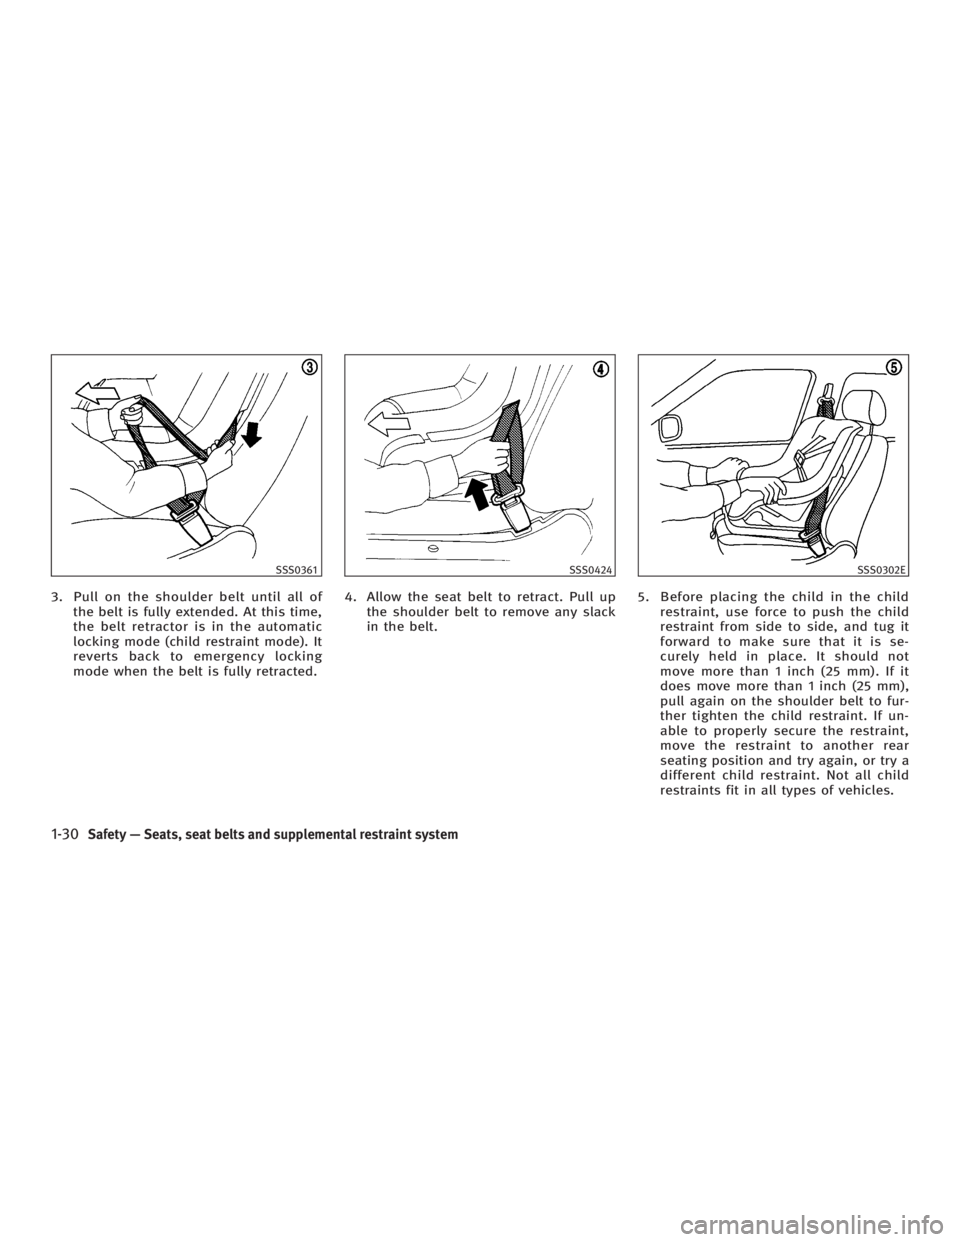
3. Pull on the shoulder belt until all of
the belt is fully extended. At this time,
the belt retractor is in the automatic
locking mode (child restraint mode). It
reverts back to emergency locking
mode when the belt is fully retracted. 4. Allow the seat belt to retract. Pull up
the shoulder belt to remove any slack
in the belt. 5. Before placing the child in the child
restraint, use force to push the child
restraint from side to side, and tug it
forward to make sure that it is se-
curely held in place. It should not
move more than 1 inch (25 mm). If it
does move more than 1 inch (25 mm),
pull again on the shoulder belt to fur-
ther tighten the child restraint. If un-
able to properly secure the restraint,
move the restraint to another rear
seating position and try again, or try a
different child restraint. Not all child
restraints fit in all types of vehicles.SSS0361 SSS0424 SSS0302E
1-30 Safety Ð Seats, seat belts and supplemental restraint system
w 06.1.4/V35-D/V5.0
X
Page 49 of 344

6. Check that the retractor is in the auto-
matic locking mode by trying to pull
more belt out of the retractor. If you
cannot pull any more belt webbing out
of the retractor, the retractor is in the
automatic locking mode.
7. Check to make sure that the child re-
straint is properly secured prior to
each use. If the seat belt is not
locked, repeat steps 3 through 7.
8. Turn the ignition switch to the ON po-
sition. The passenger air bag status
light should illuminate. If this
light is not illuminated, see ªFront
passenger air bag and status lightº
later in this section. Move the child re-
straint to another seating position.
Have the system checked by an IN-
FINITI dealer.
After the child restraint is removed and
the seat belt is fully retracted, the auto-
matic locking mode (child restraint mode)
will be canceled. PRECAUTIONS ON BOOSTER SEATS
WARNING O Infants and small children should always
be placed in an appropriate child re-
straint while riding in the vehicle. Failure
to use a child restraint or booster seat
can result in serious injury or death.
O Infants and small children should never
be carried on your lap. It is not possible
for even the strongest adult to resist the
forces of a severe accident. The child
could be crushed between the adult and
parts of the vehicle. Also, do not put the
same seat belt around both your child
and yourself.
O INFINITI recommends that the booster
seat be installed in the rear seat. Accord-
ing to accident statistics, children are
safer when properly restrained in the
rear seat than in the front seat.
O A booster seat must only be installed in
a seating position that has a
lap/shoulder belt. Failure to use a three- point type seat belt with a booster seat
can result in a serious injury in sudden
stop or collision.
O An improperly installed booster seat
could lead to serious injury or death in
an accident.
BOOSTER SEATS
Safety Ð Seats, seat belts and supplemental restraint system
1-31
w 06.1.4/V35-D/V5.0
X
Page 52 of 344

BOOSTER SEAT INSTALLATION ON
REAR SEAT OUTBOARD OR CENTER
POSITIONS
CAUTIONDo not use a lap/shoulder belt automatic
locking mode when using a booster seat
with the seat belts.
When you install a booster seat in the
rear seat, follow these steps: 1. Position the booster seat on the seat.
Only place it in a front-facing direc-
tion. Always follow the booster seat
manufacturer's instructions.
2. The booster seat should be positioned
on the vehicle seat so that it is stable.
If necessary, adjust or remove the
head restraint to obtain the correct
booster seat fit. See ªHead restraint
adjustmentº earlier in this section. If
the head restraint is removed, store it
in a secure place. Be sure to install
the head restraint when the booster
seat is removed. If the seating posi-
tion does not have an adjustable head restraint and it is interfering with the
proper booster seat fit, try another
seating position or a different booster
seat.
3. Position the lap portion of the seat
belt low and snug on the child's hips.
Be sure to follow the booster seat
manufacturer's instructions for ad-
justing the belt routing.
4. Pull the shoulder belt portion of the
seat belt toward the retractor to take
up extra slack. Be sure the shoulder
belt is positioned across the top,
middle portion of the child's shoulder.
Be sure to follow the booster seat
manufacturer's instructions for ad-
justing the belt routing.
5. Follow the warnings, cautions and in-
structions for properly fastening a seat
belt shown in the ªThree-point type
seat belts with retractorº earlier in
this section.LRS0452
Outboard position LRS0451
Center position
1-34 Safety Ð Seats, seat belts and supplemental restraint system
w 06.1.4/V35-D/V5.0
X
Page 53 of 344

BOOSTER SEAT INSTALLATION ON
FRONT PASSENGER SEAT
WARNINGINFINITI recommends that child restraints be
installed in the rear seat. However, if you
must install a booster seat in the front pas-
senger seat, move the passenger seat to the
rearmost position. Also be sure that the front
passenger air bag status light is illuminated
to indicate the passenger air bag is OFF. See ªFront passenger air bag and status
lightº later in this section for details.
If you must install a booster seat in the
front seat, follow these steps:
1. Move the seat to the rearmost posi-
tion.
2. Position the booster seat on the seat.
Only place it in a front-facing direc-
tion. Always follow the booster seat
manufacturer's instructions.
3. The booster seat should be positioned
on the vehicle seat so that it is stable.
If necessary, adjust or remove the
head restraint to obtain the correct
booster seat fit. See ªHead restraint
adjustmentº earlier in this section. If
the head restraint is removed, store it
in a secure place. Be sure to install
the head restraint when the booster
seat is removed. If the seating posi-
tion does not have an adjustable head
restraint and it is interfering with the
proper booster seat fit, try another
seating position or a different booster
seat. 4. Position the lap portion of the seat
belt low and snug on the child's hips.
Be sure to follow the booster seat
manufacturer's instructions for ad-
justing the belt routing.
5. Pull the shoulder belt portion of the
seat belt toward the retractor to take
up extra slack. Be sure the shoulder
belt is positioned across the top,
middle portion of the child's shoulder.
Be sure to follow the booster seat
manufacturer's instructions for ad-
justing the belt routing.
6. Follow the warnings, cautions and in-
structions for properly fastening a seat
belt shown in the ªThree-point type
seat belt with retractorº earlier in this
section.
7. Turn the ignition switch to the ON po-
sition. The passenger air bag status
light should illuminate. If this
light is not illuminated, see ªFront
passenger air bag and status lightº
later in this section. Move the booster
seat to another seating position. Have
the system checked by an INFINITI
dealer.LRS0454
Safety Ð Seats, seat belts and supplemental restraint system
1-35
w 06.1.4/V35-D/V5.0
X
Page 157 of 344

q 1
Coupe
q 2
Sedan
MEMORY STORAGE FUNCTION Two positions for the driver's seat and
steering column can be stored in the au- tomatic drive positioner memory. Follow
these procedures to use the memory sys-
tem.
1. For vehicles equipped with automatic
transmission, move the selector lever
to the P (Park) position.
For vehicles equipped with manual
transmission, move the shift lever to
the N (Neutral) position and apply the
parking brake.
2. Adjust the driver's seat and steering
column to the desired positions by
manually operating each adjusting
switch. For additional information, see
ªSeatsº in the ª1. Safety Ð Seats, seat
belts and supplemental restraint
systemº section and ªSteering wheelº
earlier in this section.
3. Turn the ignition ON.
4. Push the SET switch and, within 5 sec-
onds, push the memory switch (1 or 2)
fully for at least 1 second.
The indicator light for the pushed
memory switch will come on and stay
on for approximately 5 seconds after
pushing the switch. After the indicator
light goes off, the selected positions are stored in the selected memory (1
or 2).
If a new memory is stored in the same
memory switch, the previous memory
will be deleted.
Linking a keyfob or Intelligent Key
to a stored memory position A keyfob or Intelligent Key can be linked
to a stored memory position with the fol-
lowing procedure.
1. Follow the steps for storing a memory
position.
2. While the indicator light for the
memory switch being set is illumi-
nated for 5 seconds, push the
button on the keyfob or Intelli-
gent Key. The indicator light will blink.
After the indicator light goes off, the
keyfob or Intelligent Key is linked to
that memory setting.
With the key removed from the ignition
switch, push the button on the
keyfob or Intelligent Key. The driver's seat
and steering wheel will move to the
memorized position.SPA2159
Pre-driving checks and adjustments
3-35
w 06.1.4/V35-D/V5.0
X
Page 256 of 344

Occasionally remove loose dust from the
interior trim, plastic parts and seats using
a vacuum cleaner or soft bristled brush.
Wipe the vinyl and leather surfaces with a
clean, soft cloth dampened in mild soap
solution, then wipe clean with a dry soft
bristled cloth.
Regular care and cleaning is required in
order to maintain the appearance of the
leather.
Before using any fabric protector, read
the manufacturer's recommendations.
Some fabric protectors contain chemicals
that may stain or bleach the seat mate-
rial.
Use a cloth dampened only with water, to
clean the meter and gauge lens.
CAUTIONO Never use gasoline, thinner, or any simi-
lar material. O Small dirt particles can be abrasive and
damaging to leather surfaces and should
be removed promptly. Do not use saddle
soap, car waxes, polishes, oils, cleaning
fluids, solvents, detergents or ammonia-
based cleaners as they may damage the
leather's natural finish.
O Never use fabric protectors unless rec-
ommended by the manufacturer.
O Do not use glass or plastic cleaner on
meter or gauge lens covers. It may
damage the lens cover.
FLOOR MATS The use of genuine INFINITI floor mats can
extend the life of your vehicle carpet and
make it easier to clean the interior. No
matter what mats are used, be sure they
are fitted for your vehicle and are properly
positioned in the footwell to prevent inter-
ference with pedal operation. Mats should
be maintained with regular cleaning and
replaced if they become excessively worn. Floor mat positioning aid
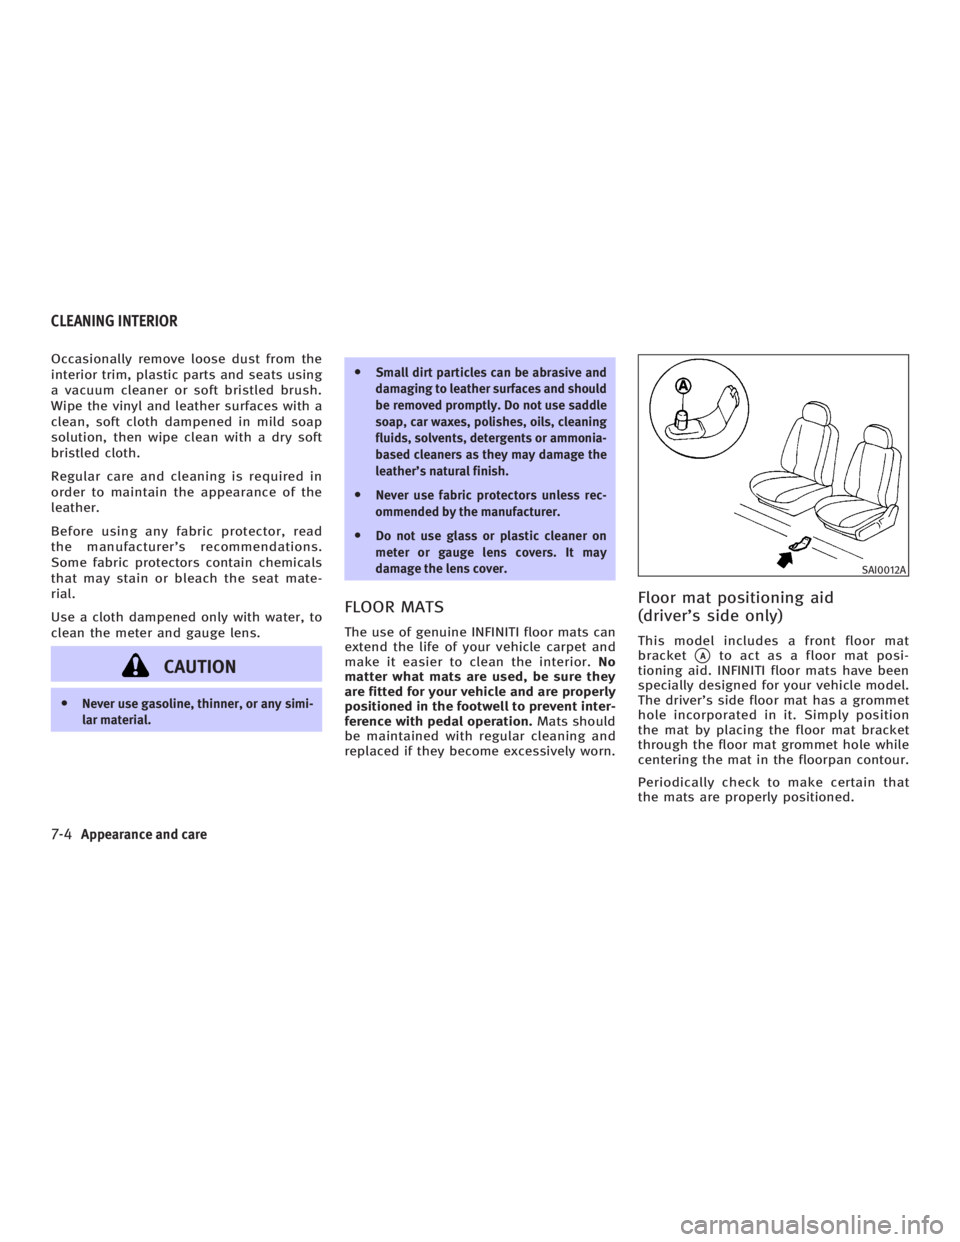
(driver's side only) This model includes a front floor mat
bracket
q A
to act as a floor mat posi-
tioning aid. INFINITI floor mats have been
specially designed for your vehicle model.
The driver's side floor mat has a grommet
hole incorporated in it. Simply position
the mat by placing the floor mat bracket
through the floor mat grommet hole while
centering the mat in the floorpan contour.
Periodically check to make certain that
the mats are properly positioned. SAI0012A
CLEANING INTERIOR
7-4 Appearance and care
w 06.1.4/V35-D/V5.0
X
Page 257 of 344

SEAT BELTS The seat belts can be cleaned by wiping
them with a sponge dampened in a mild
soap solution. Allow the belts to dry com-
pletely before using them. See ªSeat belt
maintenanceº in the ª1. Safety Ð Seats,
seat belts and supplemental restraint sys-
temº section.
WARNINGDo not allow wet seat belts to roll up in the
retractor. NEVER use bleach, dye, or
chemical solvents to clean the seat belts,
since these materials may severely weaken
the seat belt webbing. MOST COMMON FACTORS
CONTRIBUTING TO VEHICLE
CORROSION O The accumulation of moisture-
retaining dirt and debris in body panel
sections, cavities, and other areas.
O Damage to paint and other protective
coatings caused by gravel and stone
chips or minor traffic accidents.
ENVIRONMENTAL FACTORS
INFLUENCE THE RATE OF
CORROSION
Moisture Accumulation of sand, dirt and water on
the vehicle body underside can accelerate
corrosion. Wet floor coverings will not dry
completely inside the vehicle, and should
be removed for drying to avoid floor panel
corrosion.
Relative humidity Corrosion will be accelerated in areas of
high relative humidity, especially those
areas where the temperatures stay above
freezing and where atmospheric pollution
exists and road salt is used. Temperature A temperature increase will accelerate the
rate of corrosion to those parts which are
not well ventilated.
Air pollution Industrial pollution, the presence of salt
in the air in coastal areas, or heavy road
salt use will accelerate the corrosion pro-
cess. Road salt will also accelerate the
disintegration of paint surfaces.
TO PROTECT YOUR VEHICLE FROM
CORROSION O Wash and wax your vehicle often to
keep it clean.
O Always check for minor damage to the
paint and repair it as soon as pos-
sible.
O Keep drain holes at the bottom of the
doors open to avoid water accumula-
tion.
O Check the underbody for accumulation
of sand, dirt or salt. If present, wash
with water as soon as possible.CORROSION PROTECTION
Appearance and care
7-5
w 06.1.4/V35-D/V5.0
X