Page 947 of 4462

INTELLIGENT KEY SYSTEM BL-133
C
D E
F
G H
J
K L
M A
B
BL
Revision: 2006 December 2006 FX35/FX45
Check Door Request SwitchNIS001NS
1. CHECK DOOR REQUEST SWITCH
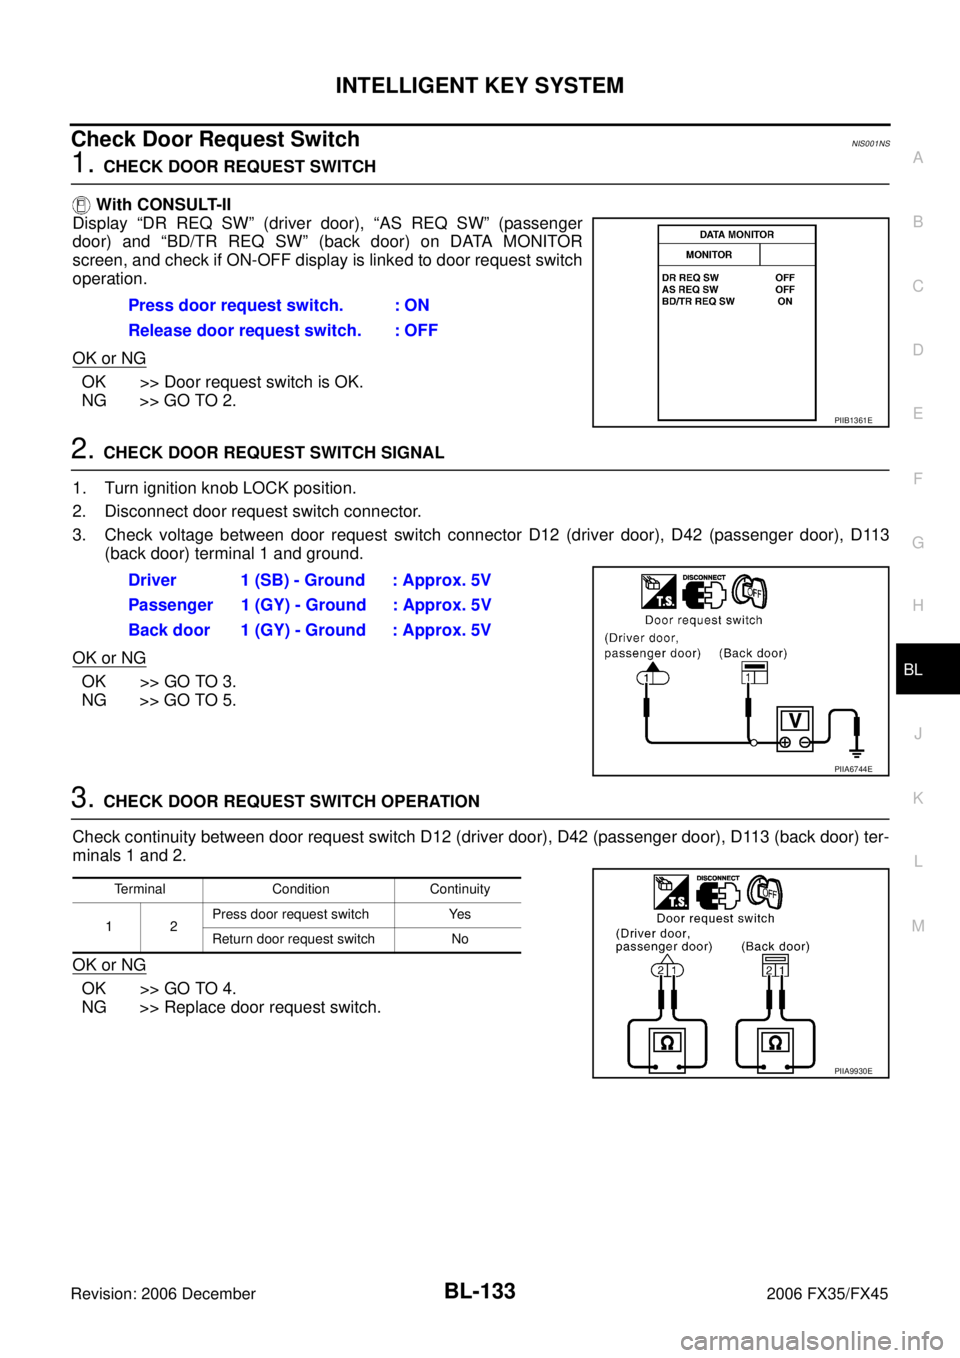
With CONSULT-II
Display “DR REQ SW” (driver door), “AS REQ SW” (passenger
door) and “BD/TR REQ SW” (back door) on DATA MONITOR
screen, and check if ON-OFF display is linked to door request switch
operation.
OK or NG
OK >> Door request switch is OK.
NG >> GO TO 2.
2. CHECK DOOR REQUEST SWITCH SIGNAL
1. Turn ignition knob LOCK position.
2. Disconnect door request switch connector.
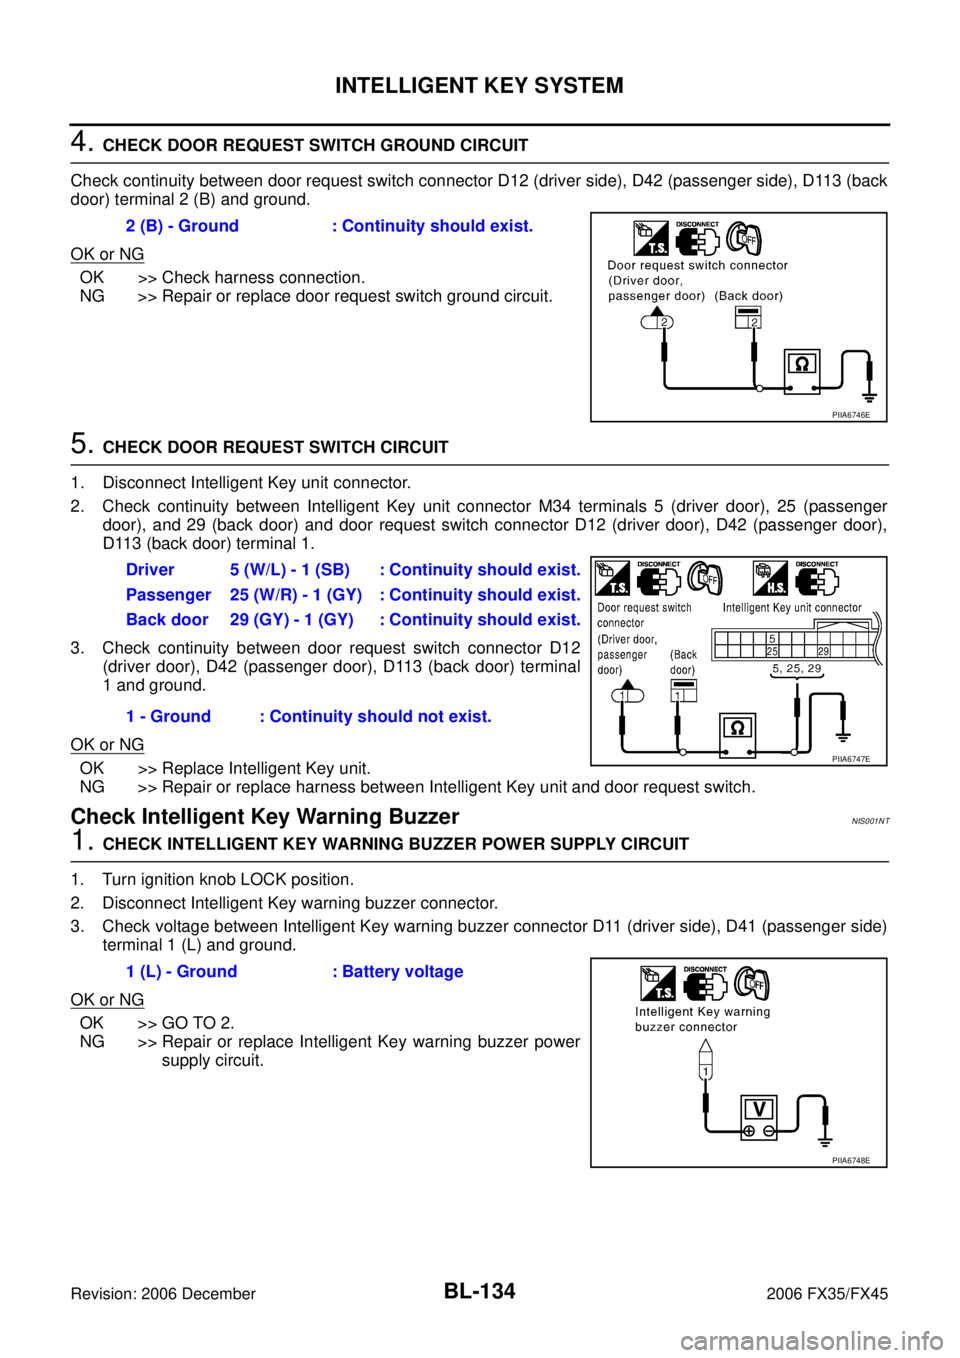
3. Check voltage between door request switch connector D12 (driver door), D42 (passenger door), D113 (back door) terminal 1 and ground.
OK or NG
OK >> GO TO 3.
NG >> GO TO 5.
3. CHECK DOOR REQUEST SWITCH OPERATION
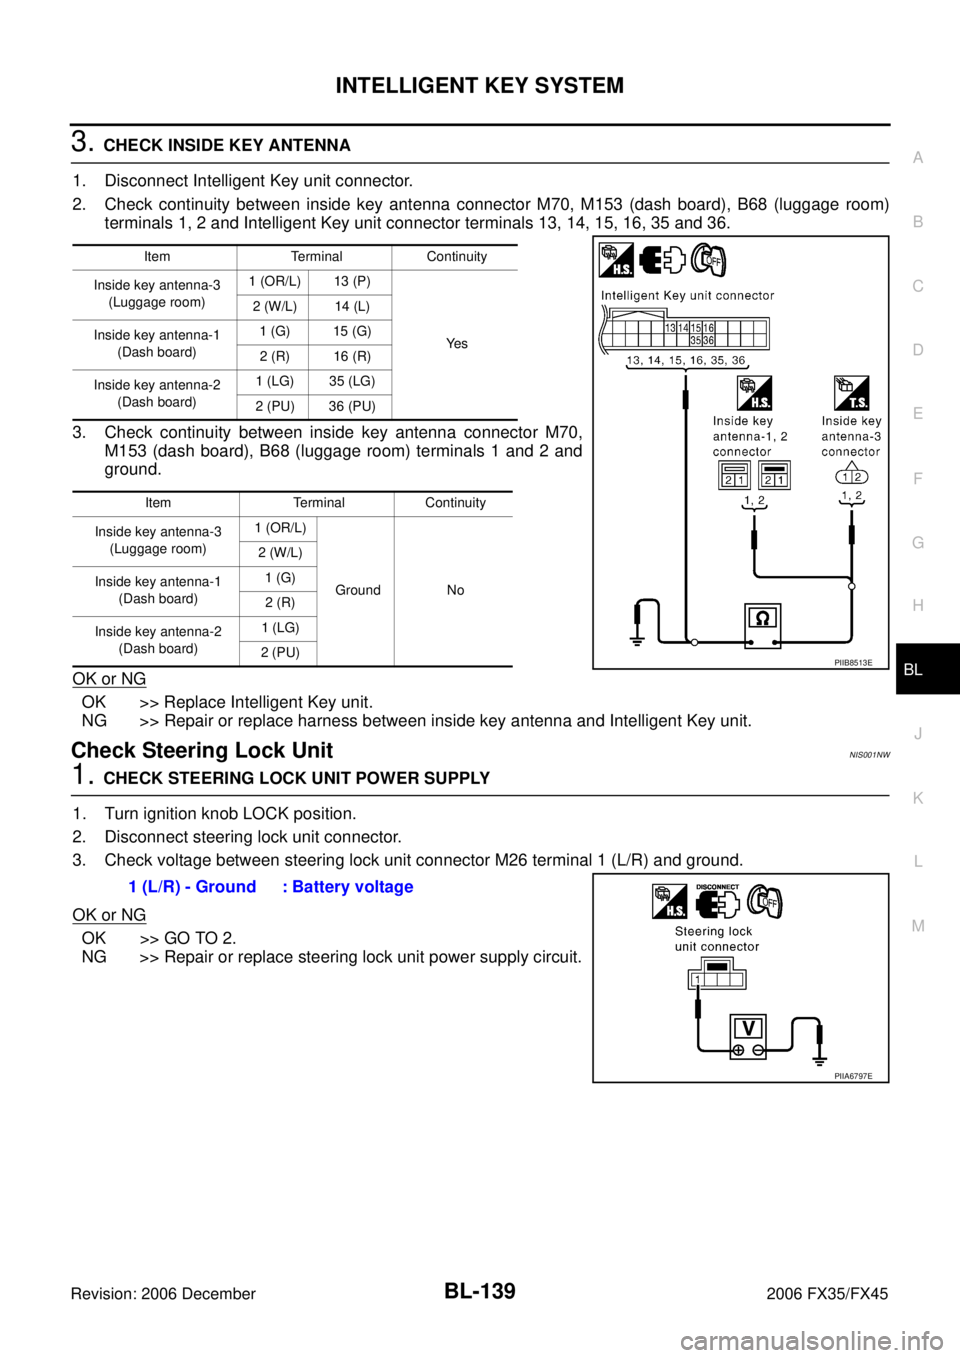
Check continuity between door request switch D12 (driver door), D42 (passenger door), D113 (back door) ter-
minals 1 and 2.
OK or NG
OK >> GO TO 4.
NG >> Replace door request switch. Press door request switch. : ON
Release door request switch. : OFF
PIIB1361E
Driver 1 (SB) - Ground : Approx. 5V
Passenger 1 (GY) - Ground : Approx. 5V
Back door 1 (GY) - Ground : Approx. 5V
PIIA6744E
Terminal Condition Continuity
12 Press door request switch Yes
Return door request switch No
PIIA9930E
Page 948 of 4462

BL-134
INTELLIGENT KEY SYSTEM
Revision: 2006 December 2006 FX35/FX45
4. CHECK DOOR REQUEST SWITCH GROUND CIRCUIT
Check continuity between door request switch connector D12 (driver side), D42 (passenger side), D113 (back
door) terminal 2 (B) and ground.
OK or NG
OK >> Check harness connection.
NG >> Repair or replace door request switch ground circuit.
5. CHECK DOOR REQUEST SWITCH CIRCUIT
1. Disconnect Intelligent Key unit connector.
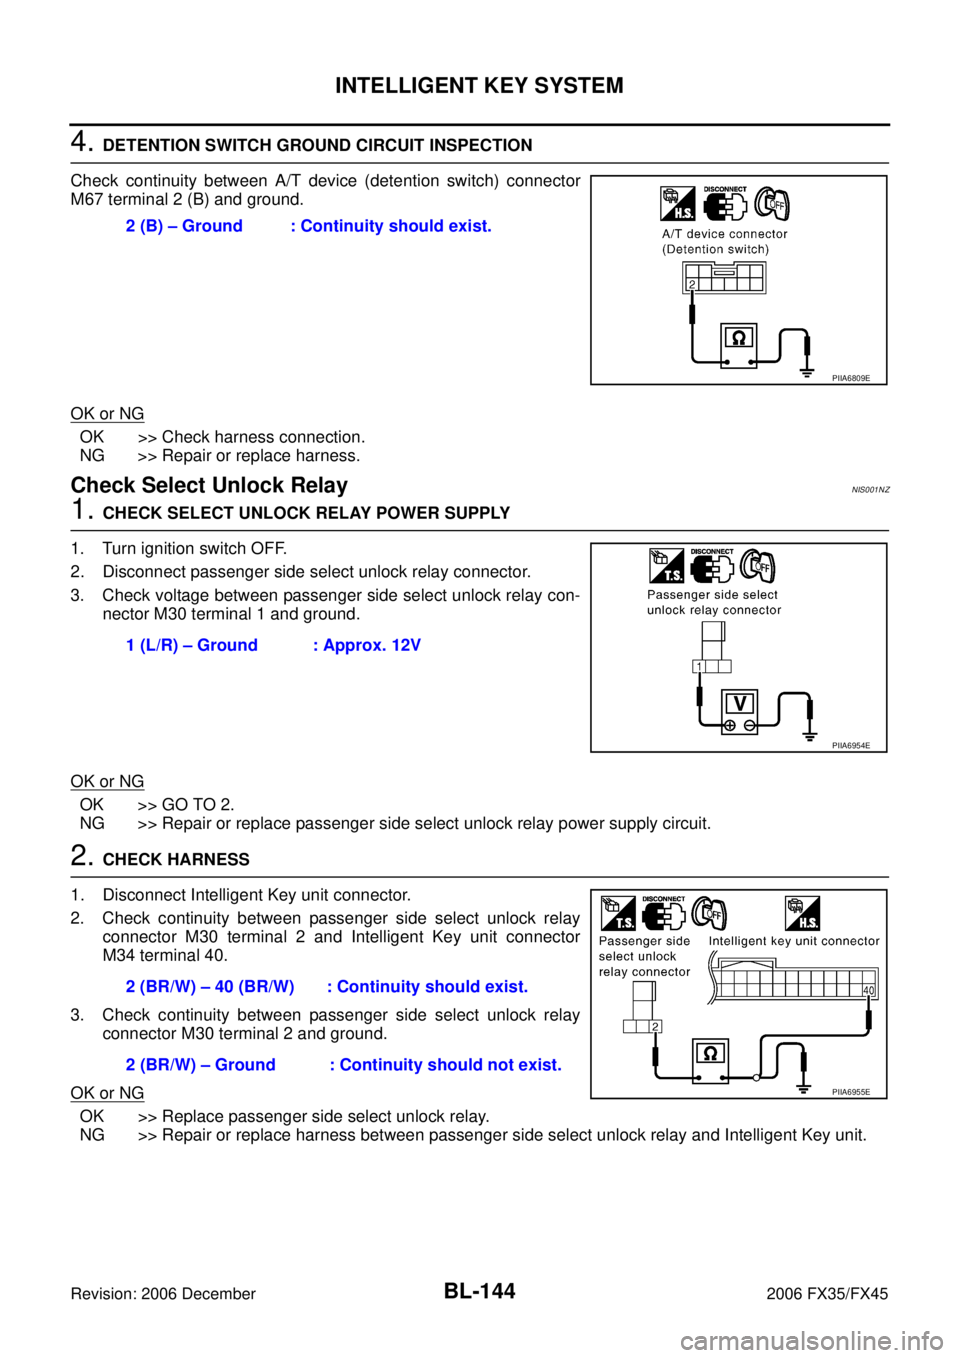
2. Check continuity between Intelligent Key unit connector M34 terminals 5 (driver door), 25 (passenger door), and 29 (back door) and door request switch connector D12 (driver door), D42 (passenger door),
D113 (back door) terminal 1.
3. Check continuity between door request switch connector D12 (driver door), D42 (passenger door), D113 (back door) terminal
1 and ground.
OK or NG
OK >> Replace Intelligent Key unit.
NG >> Repair or replace harness between Intelligent Key unit and door request switch.
Check Intelligent Key Warning BuzzerNIS001NT
1. CHECK INTELLIGENT KEY WARNING BUZZER POWER SUPPLY CIRCUIT
1. Turn ignition knob LOCK position.
2. Disconnect Intelligent Key warning buzzer connector.
3. Check voltage between Intelligent Key warning buzzer connector D11 (driver side), D41 (passenger side) terminal 1 (L) and ground.
OK or NG
OK >> GO TO 2.
NG >> Repair or replace Intelligent Key warning buzzer power
supply circuit.
2 (B) - Ground : Continuity should exist.
PIIA6746E
Driver 5 (W/L) - 1 (SB) : Continuity should exist.
Passenger 25 (W/R) - 1 (GY) : Continuity should exist.
Back door 29 (GY) - 1 (GY) : Continuity should exist.
1 - Ground : Continuity should not exist.
PIIA6747E
1 (L) - Ground : Battery voltage
PIIA6748E
Page 952 of 4462
BL-138
INTELLIGENT KEY SYSTEM
Revision: 2006 December 2006 FX35/FX45
Check Inside Key AntennaNIS001NV
1. CHECK INSIDE KEY ANTENNA POWER SUPPLY CIRCUIT
Push ignition knob and use an oscilloscope to check voltage waveform between Intelligent Key unit connector
M34 terminals 13 (luggage room), 15 (dash board), 35 (dash board) and ground.
OK or NG
OK >> GO TO 2.
NG >> GO TO 3.
2. CHECK INSIDE KEY ANTENNA OPERATION
1. Disconnect inside key antenna connector.
2. Check continuity between inside key antenna connector M70, M153 (dash board), B68 (luggage room) terminals 1 and 2.
OK or NG
OK >> GO TO 3.
NG >> Replace malfunctioning inside key antenna.
Terminal (Wire color) Condition Signal
(Reference value)
(+) (-)
Luggage room:
13 (P)
Ground Push igni-
tion knob.
Dash board:
15 (G)
35 (LG)
PIIA6753ESIIA1910J
1 - 2 : Continuity should exist.
PIIB8512E
Page 953 of 4462

INTELLIGENT KEY SYSTEM BL-139
C
D E
F
G H
J
K L
M A
B
BL
Revision: 2006 December 2006 FX35/FX45
3. CHECK INSIDE KEY ANTENNA
1. Disconnect Intelligent Key unit connector.
2. Check continuity between inside key antenna connector M70, M153 (dash board), B68 (luggage room) terminals 1, 2 and Intelligent Key unit connector terminals 13, 14, 15, 16, 35 and 36.
3. Check continuity between inside key antenna connector M70, M153 (dash board), B68 (luggage room) terminals 1 and 2 and
ground.
OK or NG
OK >> Replace Intelligent Key unit.
NG >> Repair or replace harness between inside key antenna and Intelligent Key unit.
Check Steering Lock UnitNIS001NW
1. CHECK STEERING LOCK UNIT POWER SUPPLY
1. Turn ignition knob LOCK position.
2. Disconnect steering lock unit connector.
3. Check voltage between steering lock unit connector M26 terminal 1 (L/R) and ground.
OK or NG
OK >> GO TO 2.
NG >> Repair or replace steering lock unit power supply circuit.
Item Terminal Continuity
Inside key antenna-3 (Luggage room) 1 (OR/L) 13 (P)
Ye s
2 (W/L) 14 (L)
Inside key antenna-1 (Dash board) 1 (G) 15 (G)
2 (R) 16 (R)
Inside key antenna-2 (Dash board) 1 (LG) 35 (LG)
2 (PU) 36 (PU)
Item Terminal Continuity
Inside key antenna-3 (Luggage room) 1 (OR/L)
Ground No
2 (W/L)
Inside key antenna-1 (Dash board) 1 (G)
2 (R)
Inside key antenna-2 (Dash board) 1 (LG)
2 (PU)
PIIB8513E
1 (L/R) - Ground : Battery voltage
PIIA6797E
Page 954 of 4462
BL-140
INTELLIGENT KEY SYSTEM
Revision: 2006 December 2006 FX35/FX45
2. CHECK STEERING LOCK UNIT GROUND CIRCUIT
Check continuity between steering lock unit connector M26 terminal 4 (Y/B) and ground.
OK or NG
OK >> GO TO 3.
NG >> GO TO 4.
3. CHECK STEERING LOCK COMMUNICATION CIRCUIT
1. Connect steering lock unit connector.
2. Check voltage between Intelligent Key unit connector M34 terminal 1 (R/W) and ground.
3. Immediately after pushing ignition knob, use an oscilloscope to check voltage waveform between Intelli- gent Key unit connector M34 terminal 32 (R/B) and ground.
OK or NG
OK >> GO TO 4.
NG >> Replace Intelligent Key unit. 4 (Y/B) - Ground : Continuity should exist.
PIIA6798E
1 (R/W) - Ground : Approx. 5V
MIIB0385E
Terminal
(Wire color) Condition Signal
(Reference value)
(+) (-)
32
(R/B) Ground Immediately after
ignition knob push-
ing.
MIIB0386ESIIA1911J
Page 956 of 4462
BL-142
INTELLIGENT KEY SYSTEM
Revision: 2006 December 2006 FX35/FX45
3. CHECK STOP LAMP SWITCH GROUND CIRCUIT
1. Check continuity between stop lamp switch connector E210 ter- minal 2 (P) and Intelligent Key unit connector M34 terminal 26
(P/L).
2. Check continuity between stop lamp switch connector E210 ter- minal 2 (P) and ground.
OK or NG
OK >> Stop lamp switch is OK.
NG >> Repair or replace harness.
Check Detention SwitchNIS001NY
1. CHECK DETENTION SWITCH INPUT SIGNAL
1. Turn ignition knob LOCK position.
2. Check voltage between Intelligent Key unit connector and ground.
OK or NG
OK >> Door switch circuit is OK.
NG >> GO TO 2. 2 (P) - 26 (P/L) : Continuity should exist.
2 (P) - Ground : Continuity should not exist.
PIIA6801E
Connector Terminal
(Wire color) Condition Voltage (V)
(Approx.)
(+) (-)
M34 39 (R/Y) Ground When selector lever is locked
at the “P” position 0
When selector lever is not
locked at the “P” position Battery voltage
PIIA6805E
Page 958 of 4462

BL-144
INTELLIGENT KEY SYSTEM
Revision: 2006 December 2006 FX35/FX45
4. DETENTION SWITCH GROUND CIRCUIT INSPECTION
Check continuity between A/T device (detention switch) connector
M67 terminal 2 (B) and ground.
OK or NG
OK >> Check harness connection.
NG >> Repair or replace harness.
Check Select Unlock RelayNIS001NZ
1. CHECK SELECT UNLOCK RELAY POWER SUPPLY
1. Turn ignition switch OFF.
2. Disconnect passenger side select unlock relay connector.
3. Check voltage between passenger side select unlock relay con- nector M30 terminal 1 and ground.
OK or NG
OK >> GO TO 2.
NG >> Repair or replace passenger side select unlock relay power supply circuit.
2. CHECK HARNESS
1. Disconnect Intelligent Key unit connector.
2. Check continuity between passenger side select unlock relay connector M30 terminal 2 and Intelligent Key unit connector
M34 terminal 40.
3. Check continuity between passenger side select unlock relay connector M30 terminal 2 and ground.
OK or NG
OK >> Replace passenger side select unlock relay.
NG >> Repair or replace harness between passenger side select unlock relay and Intelligent Key unit. 2 (B) – Ground : Continuity should exist.
PIIA6809E
1 (L/R) – Ground : Approx. 12V
PIIA6954E
2 (BR/W) – 40 (BR/W) : Continuity should exist.
2 (BR/W) – Ground : Continuity should not exist.
PIIA6955E
Page 960 of 4462
BL-146
INTELLIGENT KEY SYSTEM
Revision: 2006 December 2006 FX35/FX45
2. CHECK IPDM E/R HARNESS
1. Turn ignition switch OFF.
2. Disconnect IPDM E/R and horn relay connector.
3. Check continuity between IPDM E/R connector E9 terminal 51 (SB) and horn relay connector E10 termi- nal 1 (SB).
OK or NG
OK >> Check harness connection.
NG >> Repair or replace harness.
Removal and Installation of Intelligent Key UnitNIS001O4
REMOVAL
1. Remove the instrument lower driver panel. Refer to IP-11, "Removal and Installation" .
2. Disconnect the Intelligent Key unit connector, remove the screw and Intelligent Key unit.
INSTALLATION
Install in the reverse order of removal. 51 (SB) – 1 (SB) : Continuity should exist.
PIIA6404E
PIIA6371E