Page 3592 of 4462

LT-30
HEADLAMP - XENON TYPE -
Revision: 2006 December 2006 FX35/FX45
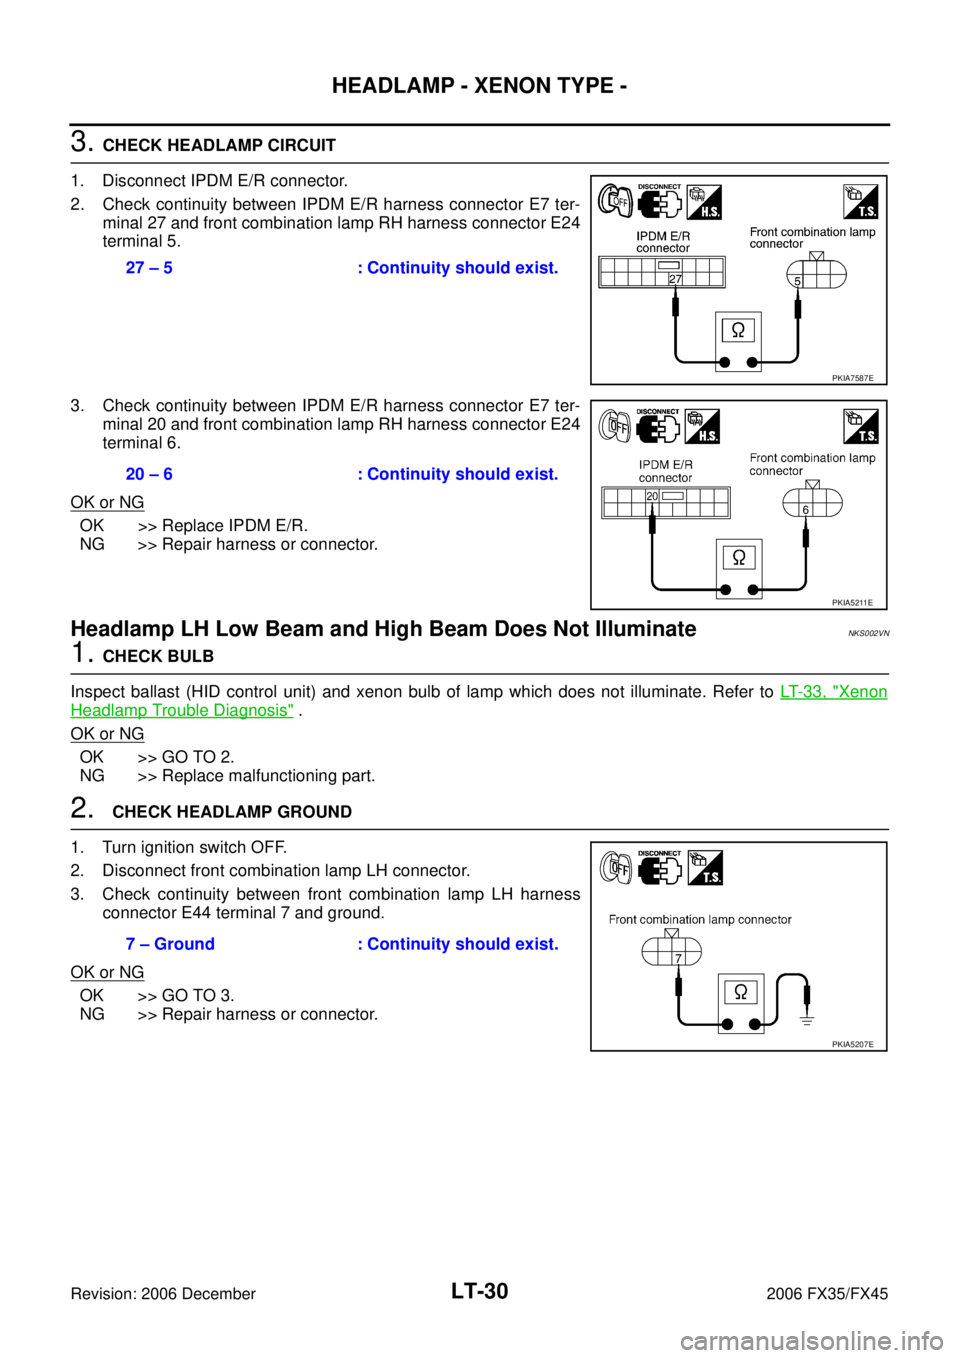
3. CHECK HEADLAMP CIRCUIT
1. Disconnect IPDM E/R connector.
2. Check continuity between IPDM E/R harness connector E7 ter- minal 27 and front combination lamp RH harness connector E24
terminal 5.
3. Check continuity between IPDM E/R harness connector E7 ter- minal 20 and front combination lamp RH harness connector E24
terminal 6.
OK or NG
OK >> Replace IPDM E/R.
NG >> Repair harness or connector.
Headlamp LH Low Beam and High Beam Does Not Illuminate NKS002VN
1. CHECK BULB
Inspect ballast (HID control unit) and xenon bulb of lamp which does not illuminate. Refer to LT- 3 3 , "
Xenon
Headlamp Trouble Diagnosis" .
OK or NG
OK >> GO TO 2.
NG >> Replace malfunctioning part.
2. CHECK HEADLAMP GROUND
1. Turn ignition switch OFF.
2. Disconnect front combination lamp LH connector.
3. Check continuity between front combination lamp LH harness connector E44 terminal 7 and ground.
OK or NG
OK >> GO TO 3.
NG >> Repair harness or connector. 27 – 5 : Continuity should exist.
PKIA7587E
20 – 6 : Continuity should exist.
PKIA5211E
7 – Ground : Continuity should exist.
PKIA5207E
Page 3593 of 4462

HEADLAMP - XENON TYPE - LT-31
C
D E
F
G H
I
J
L
M A
B
LT
Revision: 2006 December 2006 FX35/FX45
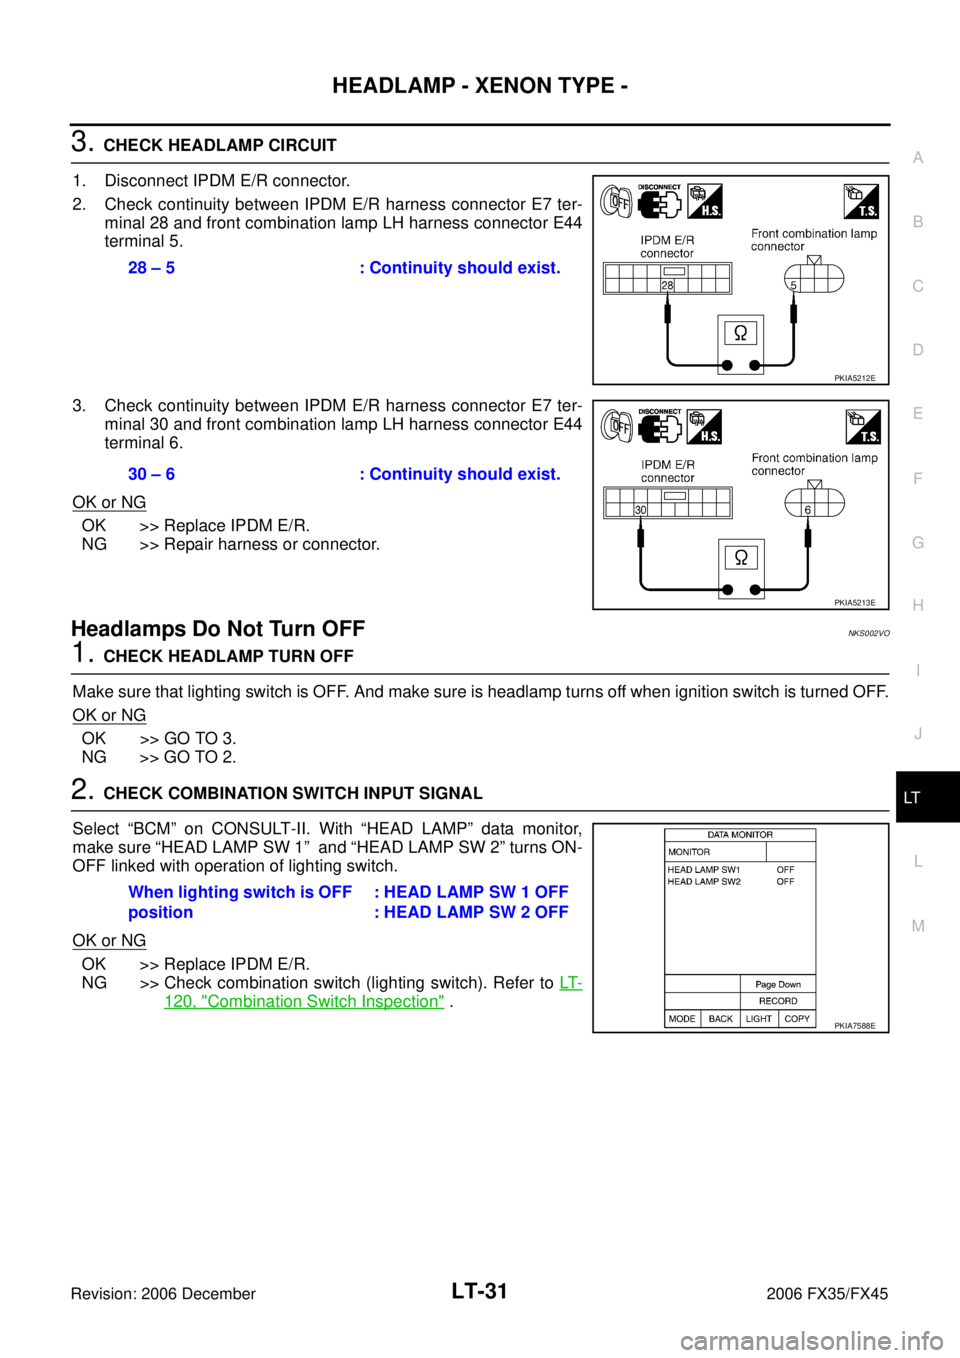
3. CHECK HEADLAMP CIRCUIT
1. Disconnect IPDM E/R connector.
2. Check continuity between IPDM E/R harness connector E7 ter- minal 28 and front combination lamp LH harness connector E44
terminal 5.
3. Check continuity between IPDM E/R harness connector E7 ter- minal 30 and front combination lamp LH harness connector E44
terminal 6.
OK or NG
OK >> Replace IPDM E/R.
NG >> Repair harness or connector.
Headlamps Do Not Turn OFFNKS002VO
1. CHECK HEADLAMP TURN OFF
Make sure that lighting switch is OFF. And make sure is headlamp turns off when ignition switch is turned OFF.
OK or NG
OK >> GO TO 3.
NG >> GO TO 2.
2. CHECK COMBINATION SWITCH INPUT SIGNAL
Select “BCM” on CONSULT-II. With “HEAD LAMP” data monitor,
make sure “HEAD LAMP SW 1” and “HEAD LAMP SW 2” turns ON-
OFF linked with operation of lighting switch.
OK or NG
OK >> Replace IPDM E/R.
NG >> Check combination switch (lighting switch). Refer to LT-
120, "Combination Switch Inspection" .
28 – 5 : Continuity should exist.
PKIA5212E
30 – 6 : Continuity should exist.
PKIA5213E
When lighting switch is OFF
position : HEAD LAMP SW 1 OFF
: HEAD LAMP SW 2 OFF
PKIA7588E
Page 3602 of 4462

LT-40
DAYTIME LIGHT SYSTEM
Revision: 2006 December 2006 FX35/FX45
�to BCM terminal 55,
�through 10A fuse (No. 36, located in fuse, fusible link and relay box)
�to daytime light relay terminals 2 and 5.
When ignition switch is in ON or START position, power is supplied
�through 10A fuse [No. 12, located in fuse block (J/B)]
�to combination meter terminal 7,
�through 15A fuse [No. 1, located in fuse block (J/B)]
�to BCM terminal 38.
Ground is supplied
�to combination meter terminals 5, 6 and 15
�through grounds M35, M45 and M85,
�to BCM terminals 49 and 52
�through grounds M35, M45 and M85.
DAYTIME LIGHT OPERATION
Once the parking brake is turned OFF after ignition switch ON, if the lighting switch is turned OFF while engine
running, the BCM sends daytime light request signal (ON) through CAN communication.
When receiving daytime light request signal (ON), combination meter turns ON daytime light relay. And power
is supplied
�through daytime light relay terminal 1
�to combination meter terminal 10,
�through daytime light relay terminal 3
�to parking lamp RH and LH terminals 1.
Ground is supplied
�to combination meter terminals 5, 6 and 15
�through grounds M35, M45 and M85,
�to parking lamp RH and LH terminals 3
�through grounds E21, E50 and E51.
With power and grounds supplied, the daytime light lamps illuminate.
COMBINATION SWITCH READING FUNCTION
Refer to BCS-3, "COMBINATION SWITCH READING FUNCTION" .
AUTO LIGHT OPERATION
Refer to LT- 5 6 , "System Description" .
CAN Communication System DescriptionNKS002VY
CAN (Controller Area Network) is a serial communication line for real time application. It is an on-vehicle mul-
tiplex communication line with high data communication speed and excellent error detection ability. Many elec-
tronic control units are equipped onto a vehicle, and each control unit shares information and links with other
control units during operation (not independent). In CAN communication, control units are connected with 2
communication lines (CAN H line, CAN L line) allowing a high rate of information transmission with less wiring.
Each control unit transmits/receives data but selectively reads required data only.
CAN Communication UnitNKS002VZ
Refer to LAN-32, "CAN Communication Unit" .
Page 3608 of 4462
LT-46
DAYTIME LIGHT SYSTEM
Revision: 2006 December 2006 FX35/FX45
Terminals and Reference Values for BCMNKS002W2
Termi-
nal No. Wire
color Signal name Measuring condition
Reference value
Ignition
switch Operation or condition
2GY Combination
switch input 5 ON Lighting, turn,
wiper switch
(Wiper intermit-
tent dial position 4) OFF Approx. 0 V
Lighting switch 2ND Approx. 2.0 V
3L/B Combination
switch input 4 ON Lighting, turn,
wiper switch
(Wiper intermit-
tent dial position 4) OFF Approx. 0 V
Front fog lamp switch
(Operate only front fog lamp
switch)
Approx. 0.8 V
Any of the conditions below
�Lighting switch 2ND
�Lighting switch PASSING
(Operates only PASSING
switch)
Approx. 1.0 V
4PU/W Combination
switch input 3 ON Lighting, turn,
wiper switch
(Wiper intermit-
tent dial position 4) OFF Approx. 0 V
Any of the conditions below
�Lighting switch AUTO
Approx. 1.0 V
PKIB4953J
PKIB4955J
PKIB4959J
PKIB4959J
Page 3609 of 4462
DAYTIME LIGHT SYSTEM LT-47
C
D E
F
G H
I
J
L
M A
B
LT
Revision: 2006 December 2006 FX35/FX45
32 GY/R Combination
switch output 5 ON Lighting, turn,
wiper switch
(Wiper intermit-
tent dial position 4) OFF
Approx. 7.2 V
Front fog lamp switch
(Operates only front fog
lamp switch)
Approx. 1.0 V
33 G Combination
switch output 4 ON Lighting, turn,
wiper switch
(Wiper intermit-
tent dial position 4) OFF
Approx. 7.2 V
Lighting switch AUTO Approx. 1.2 V
34 W/B Combination
switch output 3 ON Lighting, turn,
wiper switch
(Wiper intermit-
tent dial position 4) OFF
Approx. 7.2 V
Lighting switch 2ND Approx. 1.2 V
Te r m i -
nal No. Wire
color Signal name Measuring condition
Reference value
Ignition
switch Operation or condition
PKIB4960J
PKIB4956J
PKIB4960J
PKIB4958J
PKIB4960J
PKIB4958J
Page 3610 of 4462

LT-48
DAYTIME LIGHT SYSTEM
Revision: 2006 December 2006 FX35/FX45
How to Proceed With Trouble DiagnosisNKS002W3
1. Confirm the symptom or customer complaint.
2. Understand operation description and function description. Refer to LT- 3 9 , "
System Description" .
3. Perform Preliminary Check. Refer to LT- 4 9 , "
Preliminary Check" .
4. Check symptom and repair or replace the cause of malfunction.
5. Does daytime light lamp operate normally? If YES, GO TO 6. If NO, GO TO 4.
6. INSPECTION END
35 W/G Combination
switch output 2 ON Lighting, turn,
wiper switch
(Wiper intermit-
tent dial position 4) OFF
Approx. 7.2 V
Any of the conditions below
�Lighting switch 2ND
�Lighting switch PASSING
(Operates only PASSING
switch)
Approx. 1.2 V
38 W/L Ignition switch
(ON) ON — Battery voltage
39 L CAN − H— — —
40 P CAN − L— — —
42 L/R Battery power
supply OFF — Battery voltage
49 B Ground ON — Approx. 0 V
52 B Ground ON — Approx. 0 V
55 G Battery power
supply OFF — Battery voltage
Termi-
nal No. Wire
color Signal name Measuring condition
Reference value
Ignition
switch Operation or condition
PKIB4960J
PKIB4958J
Page 3611 of 4462

DAYTIME LIGHT SYSTEM LT-49
C
D E
F
G H
I
J
L
M A
B
LT
Revision: 2006 December 2006 FX35/FX45
Preliminary CheckNKS002W4
CHECK POWER SUPPLY AND GROUND CIRCUIT
1. CHECK FUSES
Check for blown fuses.
Refer to LT- 4 2 , "
Wiring Diagram — DTRL —" .
OK or NG
OK >> GO TO 2.
NG >> If fuse is blown, be sure to eliminate cause of malfunction before installing new fuse. Refer to PG-
3, "POWER SUPPLY ROUTING CIRCUIT" .
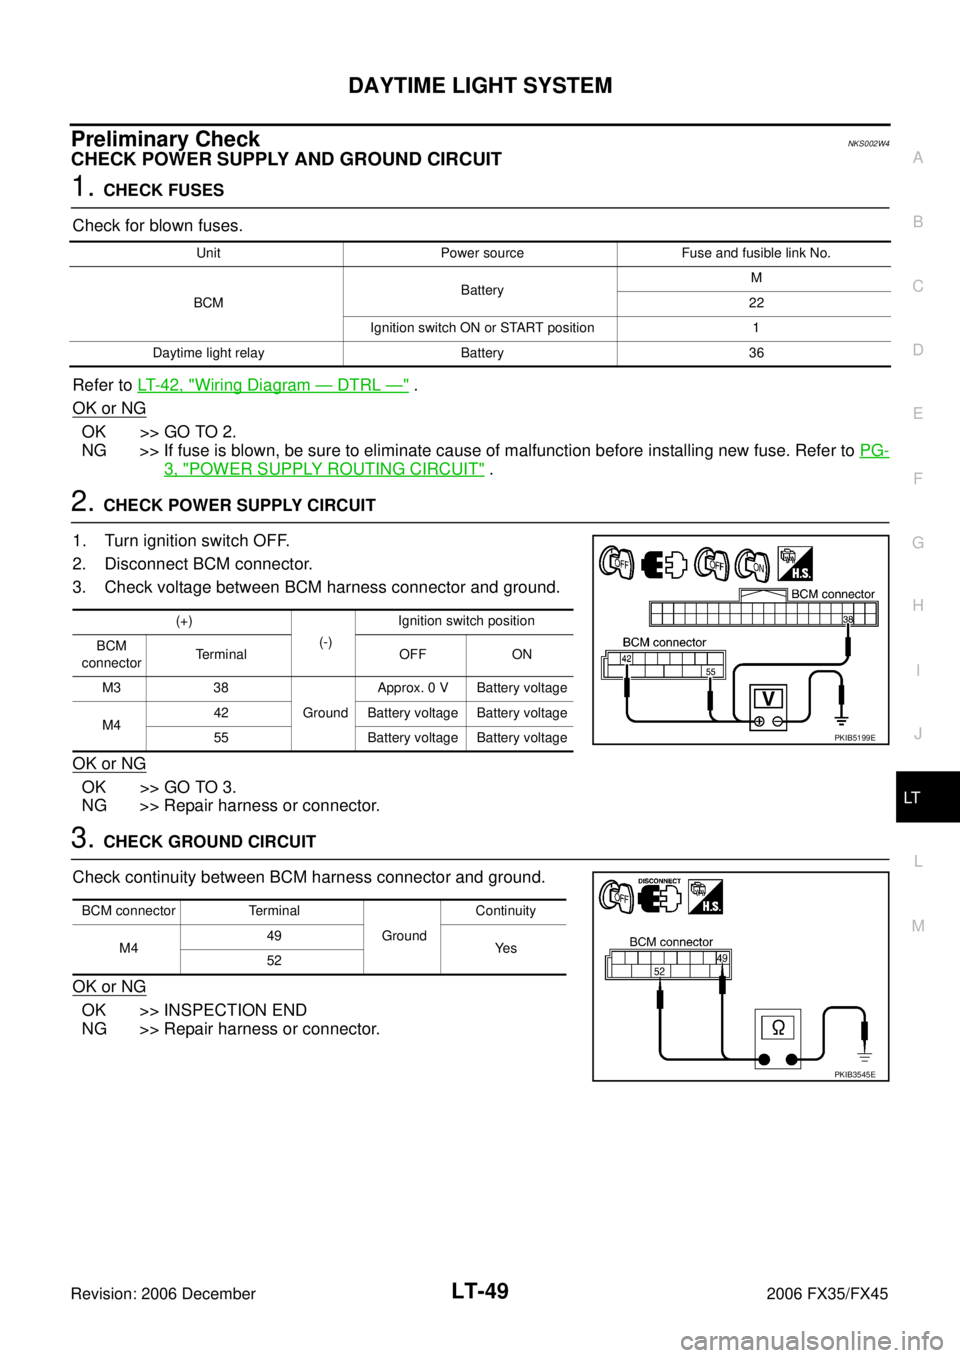
2. CHECK POWER SUPPLY CIRCUIT
1. Turn ignition switch OFF.
2. Disconnect BCM connector.
3. Check voltage between BCM harness connector and ground.
OK or NG
OK >> GO TO 3.
NG >> Repair harness or connector.
3. CHECK GROUND CIRCUIT
Check continuity between BCM harness connector and ground.
OK or NG
OK >> INSPECTION END
NG >> Repair harness or connector.
Unit Power source Fuse and fusible link No.
BCM Battery
M
22
Ignition switch ON or START position 1
Daytime light relay Battery 36
(+) (-) Ignition switch position
BCM
connector Te r m i n a l O F F O N
M3 38 Ground Approx. 0 V Battery voltage
M4 42 Battery voltage Battery voltage
55 Battery voltage Battery voltage
PKIB5199E
BCM connector Terminal Ground Continuity
M4 49
Ye s
52
PKIB3545E
Page 3612 of 4462

LT-50
DAYTIME LIGHT SYSTEM
Revision: 2006 December 2006 FX35/FX45
INSPECTION PARKING BRAKE SWITCH CIRCUIT
1. CHECK BRAKE INDICATOR
1. Turn ignition switch ON.
2. When a parking brake is made ON/OFF, it checks whether brake indicator lamp of combination meter lights up / puts out the light.
OK or NG
OK >> INSPECTION END
NG >> GO TO 2.
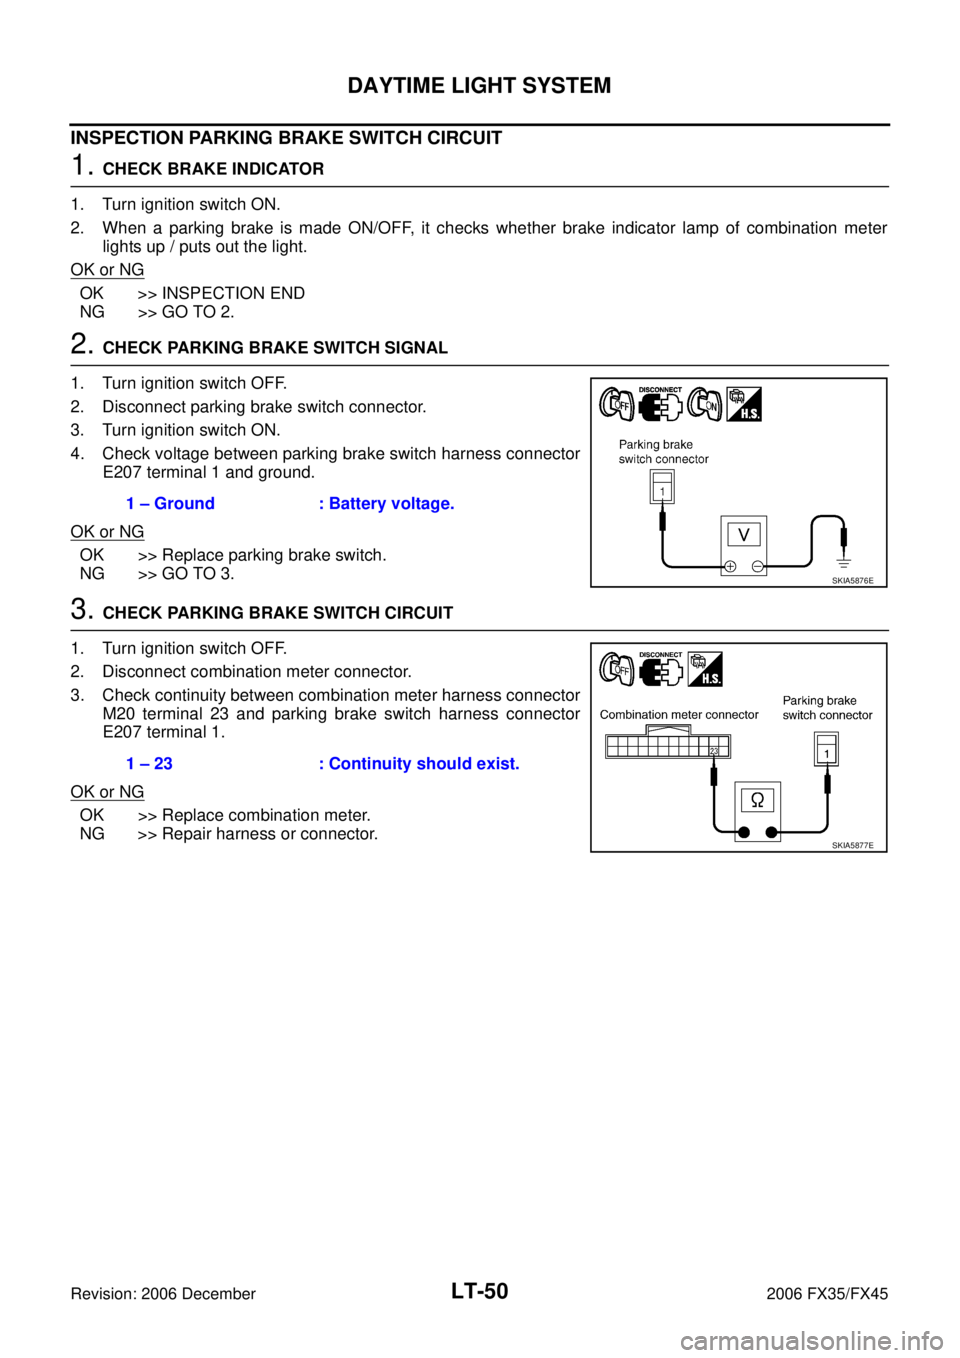
2. CHECK PARKING BRAKE SWITCH SIGNAL
1. Turn ignition switch OFF.
2. Disconnect parking brake switch connector.
3. Turn ignition switch ON.
4. Check voltage between parking brake switch harness connector E207 terminal 1 and ground.
OK or NG
OK >> Replace parking brake switch.
NG >> GO TO 3.
3. CHECK PARKING BRAKE SWITCH CIRCUIT
1. Turn ignition switch OFF.
2. Disconnect combination meter connector.
3. Check continuity between combination meter harness connector M20 terminal 23 and parking brake switch harness connector
E207 terminal 1.
OK or NG
OK >> Replace combination meter.
NG >> Repair harness or connector. 1 – Ground : Battery voltage.
SKIA5876E
1 – 23 : Continuity should exist.
SKIA5877E