2006 HYUNDAI TUCSON display
[x] Cancel search: displayPage 140 of 289
1FEATURES OF YOUR HYUNDAI
128
CLASSIC → JAZZ → ROCK → DEFEAT
J290B01JM-GAT1. POWER ON-OFF/VOLUME
Control KnobThe radio unit may be operated when the ignition
key is in the "ACC" or "ON" position. Press the
button to switch the power on. The display
shows the radio frequency in the radio mode,
the tape direction indicator in the tape mode, or
CD track in the CD AUTO CHANGER mode. To
switch the power off, press the button again.VOLUME ControlRotate the knob clockwise to increase the
volume and turn the knob counterclockwise to
reduce the volume.2. BAND SelectorPressing the button changes the AM, FM1 and
FM2 bands. The mode selected is shown on the
display.3. SEEK Select Button
(Automatic Channel Selection)Press the SEEK select button 1 sec. or more.
When the ( ) side is pressed, the unit will
automatically tune to the next higher frequency
and when the ( ) side is pressed, it will
automatically tune to the next lower frequency.o When completed, any preset station may be
recalled by selecting AM, FM1 or FM2 band
and the appropriate station button.
5. Best Station Memory Button
(BSM)When the BSM button is pressed for two sec-
onds or longer, the six channels from the high-
est field intensity are selected next and stored
in memory. The stations selected are stored in
the sequence frequency from the first preset
key.6. EQ ButtonPress the EQ button to select the CLASSIC,
JAZZ, ROCK and DEFEAT MODE for the
desired tone quality. Each press of the button
changes the display as follows;
4. PRESET STATION Select
ButtonsSix (6) stations for AM, FM and FM2 respec-
tively can be preset in the electronic memory
circuit.HOW TO PRESET STATIONSSix AM and twelve FM stations may be pro-
grammed into the memory of the radio. Then, by
simply pressing the AM / FM select button and/
or one of the six station select buttons, you may
recall any of these stations instantly. To pro-
gram the stations, follow these steps:
o Press AM/FM selector to set the band for
AM, FM1 and FM2.
o Select the desired station to be stored by
seek, scan or manual tuning.
o Determine the preset station select button
you wish to use to access that station.
o Press the station select button for more than
two seconds. A select button indicator will
show in the display indicating which select
button you have depressed. The frequency
display will flash after it has been stored into
the memory. You should then release the
button, and proceed to program the next
desired station. A total of 18 stations can be
programmed by selecting one AM and two
FM station per button.
7. TUNE (Manual) Select KnobRotate the knob clockwise to increase the
frequency and turn the knob counterclockwise
to reduce the frequency.
Page 141 of 289
1
FEATURES OF YOUR HYUNDAI
129129129129129
Mode Select KnobPressing the MODE button changes the BASS,
MIDDLE, TREBLE, FADER and BALANCE
mode.
The mode selected is shown on the display.
After selecting the each mode, rotate the mode
select knob clockwise or counterclockwise.BASS ControlTo increase the BASS, rotate the knob clock-
wise, while to decrease the BASS, rotate the
knob counterclockwise.MID ControlTo increase the MID, rotate the knob clockwise,
while to decrease the MID, rotate the knob
counterclockwise.TREBLE ControlTo increase the TREBLE, rotate the knob clock-
wise, while to decrease the TREBLE, rotate the
knob counterclockwise.
FAD (Fader Control)Rotate the control knob clockwise to empha-
size rear speaker sound (front speaker sound
will be attenuated). When the control knob is
turned counterclockwise, front speaker sound
will be emphasized (rear speaker sound will be
attenuated).BALANCE ControlRotate the knob clockwise to emphasize right
speaker sound (left speaker sound will be
attenuated). When the control knob is turned
counterclockwise, left speaker sound will be
emphasized (right speaker sound will be at-
tenuated).
!
CAUTION:
o Do not place beverages close to the
audio system. The audio system mecha-
nism may be damaged if you spill them.
o Do not impact on the audio system, or
the audio system mechanism could be
damaged.
Page 143 of 289

1
FEATURES OF YOUR HYUNDAI
131131131131131
J290D01JM-GAT1. TAPE PROGRAM ButtonThis allows you to play the reverse side of the
tape by merely pressing the program button.
The PLAY and an arrow will appear in the display
to show tape direction.2. EJECT Buttono When the EJECT button is pressed with a
cassette loaded, the cassette will eject.
o When the EJECT button is pressed during
FF/REW mode, the cassette will eject.3. DOLBY ButtonIf you get background noise during tape PLAY,
you can reduce this considerably by merely
pressing the DOLBY button. If you want to
cancel the DOLBY feature, press the button
again.4. REPEAT Buttono To repeat the track you are currently listen-
ing to, press the RPT button. To cancel,
press again.
o If you do not release RPT operation when the
track ends, it will automatically be replayed.
This process will be continued until you push
the button again.
5. AUTO MUSIC Select ButtonPress the button to find the starting point of each
song in a prerecorded music tape. The quiet
space between songs (must have at least a 4
sec. gap) can be identified by the AUTO MUSIC
Select button.
o Pressing the will play the begin-ning of
the next music segment.
o Pressing the will start replay at the
beginning of the music just listened to.
o To stop FF or REW action, press the button
again.6. FF/REW Buttono Fast forward tape winding starts when the
FF button is pressed during PLAY or REW
mode.
o PLAY starts when the FF button is pressed
again during FF mode.
o Tape rewinding starts when the REW button
is pressed during PLAY or FF mode.
o PLAY starts when the REW button pressed
again during REW mode.
CAUTION:
o Do not insert anything like coins into the
player slot as damage to the unit may
occur.
o Do not place beverages close to the
audio system. The playback mechanism
may be damaged if you spill them.
o Do not impact on the audio system, or
the playback mechanism could be dam-
aged.
!
Page 145 of 289
1
FEATURES OF YOUR HYUNDAI
133133133133133
J290F02JM-GAT1. LOAD ButtonThis compact disc playing will accommodate up
to six discs.
To insert one disc do the following:
1. Press and release the LOAD Button.
2. Green light on both sides of the slot will be
illuminated and the will blink ten times on
the display.
3. Load a disc while the is blinking. Insert a
disc partway into the slot, label side up. The
player will pull the disc in.NOTE:o The disc can be only inserted while the
light is blinking.
o This CD player is suitable only for 12 cm
discs, do not use irregular shaped CDs.
When the disc is inserted, the disc will begin to
play automatically.
To insert multiple discs do the followings:
1. Press and hold the LOAD button for two
seconds or more.
You will then hear two beeps and the green
light on the both sides of the slot will be
illuminated.2. Load a disc while the is blinking. Insert
a disc partway into the slot, label side up. The
player will pull the disc in.
Once the disc is loaded, the numbers of the
vacant disc will blink on the display continu-
ously. If the next "DISC NO." is appeared on
the display with the both side of the slot
illuminated, you can then load another disc.
3. Load the remaining disc by following the same
procedures 1 and 2.
When you finished loading 6 discs, the CD
player will begin to play the last CD loaded.
4. To load more than one disc but less than six,
complete Steps 1 and 2. When you have
finished loading discs, press LOAD button to
cancel the loading function or wait for 10
seconds. The CD player will begin to play the
last CD loaded.
As each CD starts to play, the DISC number will
appear on the display.
NOTE:The disc player takes up to six discs. Do not
try to load more than six.
2. Playing CDo Press the 6CDC to start CD playback,
during radio operation or cassette tape play-
ing.
o When discs are in the CD deck, if you press
the 6CDC button the CD player will begin
playing even if the radio or cassette player
is being used.
o The CD player can be used when the ignition
switch is in either the "ON" or "ACC" position.3. EJECT Buttono When the EJECT button is pressed with
a CD loaded, the CD will eject.
o To eject all of the discs, press this button for
2 seconds or more.4.DISC Select ButtonTo select the CD you want, push "DISC
" or "DISC " to change the disc number.
Page 146 of 289
1FEATURES OF YOUR HYUNDAI
134
5. RANDOM ButtonWith random, you can listen to the tracks in
random, rather than sequential order, on all of
the discs or on one disc.
To use random, do the following:
o Press and release the RDM button to play
the tracks on all of the discs or on one disc
that are loaded, in random order. RDM will
appear in the display. Press RDM to turn if
off.6. REPEAT Buttono To repeat the track you are currently listen-
ing to, press the RPT button. To cancel,
press again.
o If you do not release RPT operation after all
the tracks are played back, the unit will play
back again from the first track.7. TRACK UP/DOWNo The desired track on the disc currently being
played can be selected using the track
number.
o Press once to skip forward to the begin-
ning of the next track.
o Press once to skip back to the beginning
of the track.
8. FF/REW ButtonWhile the disc is playing, if you hold down the FF
button continuously, the selected track is ad-
vanced. Holding down the REW button continu-
ously moves the selected track back.9. SCAN Buttono Press the SCAN button to playback the first
10 seconds of each track.
o Press the SCAN button again within 10 sec.
when you have reached the desired track.10. EQ ButtonPress the EQ button to select the CLASSIC,
JAZZ, ROCK and DEFEAT MODE for the
desired tone quality. Each press of the button
changes the display as follows;
CLASSIC → JAZZ → ROCK → DEFEAT
NOTE:o To assure proper operation of the unit,
keep the vehicle interior temperature
within a normal range by using the
vehicle's air conditioning or heating sys-
tem.
o When replacing the fuse, replace it with
a fuse having the correct capacity.
o The preset station frequencies are all
erased when the car battery is discon-
nected. Therefore, all data will have to be
set again if this should occur.
o Do not add any oil to the rotating parts.
Keep magnets, screwdrivers and other
metallic objects away from the tape
mechanism and head.
o This equipment is designed to be used
only in a 12 volt DC battery system with
negative ground.
o This unit is made of precision parts. Do
not attempt to disassemble or adjust
any parts.
o When driving your vehicle, be sure to
keep the volume of the unit set low
enough to allow you to hear sounds
coming from the outside.
o Do not expose this equipment (includ-
ing the speakers and tape) to water or
excessive moisture.
Page 148 of 289
1FEATURES OF YOUR HYUNDAI
136
INDICATION
Er2
Er3
Er6
Er8
HHH
no CD
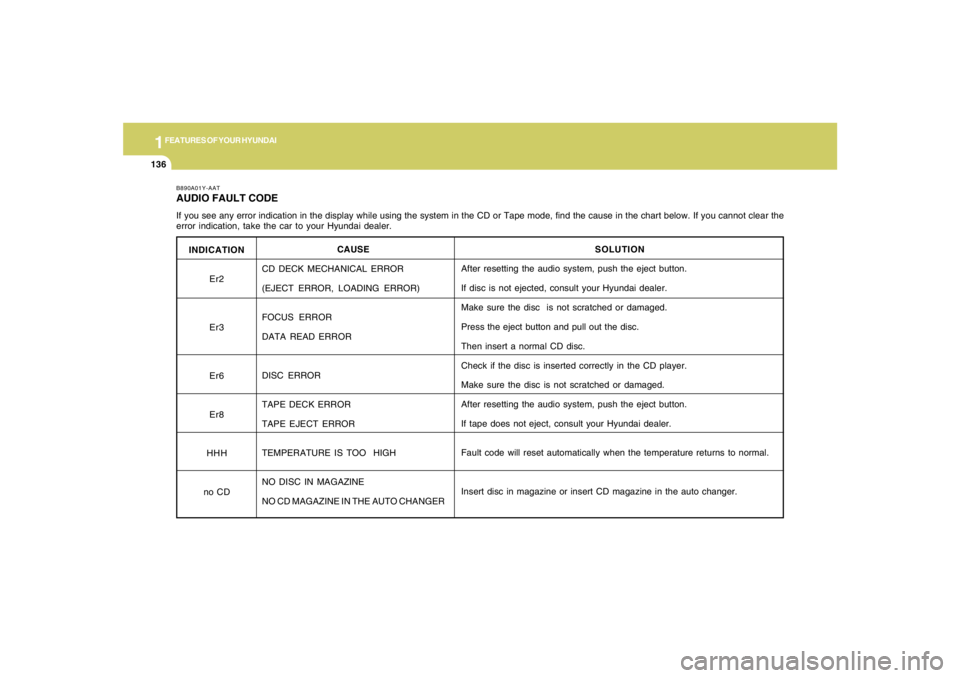
B890A01Y-AATAUDIO FAULT CODEIf you see any error indication in the display while using the system in the CD or Tape mode, find the cause in the chart below. If you cannot clear the
error indication, take the car to your Hyundai dealer.
SOLUTION
After resetting the audio system, push the eject button.
If disc is not ejected, consult your Hyundai dealer.
Make sure the disc is not scratched or damaged.
Press the eject button and pull out the disc.
Then insert a normal CD disc.
Check if the disc is inserted correctly in the CD player.
Make sure the disc is not scratched or damaged.
After resetting the audio system, push the eject button.
If tape does not eject, consult your Hyundai dealer.
Fault code will reset automatically when the temperature returns to normal.
Insert disc in magazine or insert CD magazine in the auto changer. CAUSE
CD DECK MECHANICAL ERROR
(EJECT ERROR, LOADING ERROR)
FOCUS ERROR
DATA READ ERROR
DISC ERROR
TAPE DECK ERROR
TAPE EJECT ERROR
TEMPERATURE IS TOO HIGH
NO DISC IN MAGAZINE
NO CD MAGAZINE IN THE AUTO CHANGER
Page 190 of 289
3
WHAT TO DO IN AN EMERGENCY
5
TIRE PRESSURE MONITORING SYS-
TEM (TPMS)
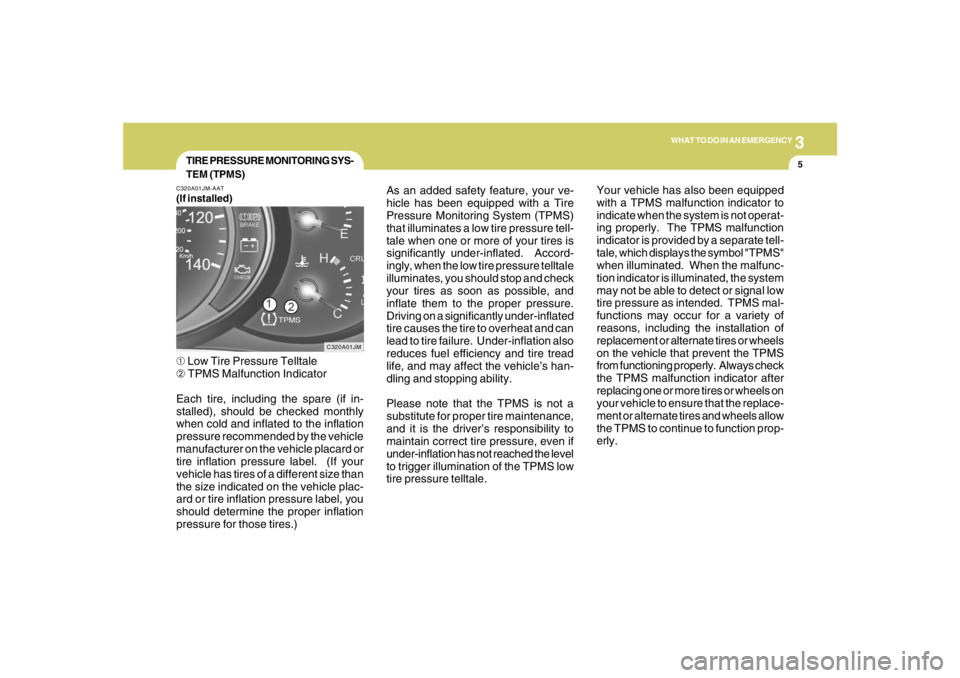
C320A01JM C320A01JM-AAT
(If installed)➀ Low Tire Pressure Telltale
➁ TPMS Malfunction Indicator
Each tire, including the spare (if in-
stalled), should be checked monthly
when cold and inflated to the inflation
pressure recommended by the vehicle
manufacturer on the vehicle placard or
tire inflation pressure label. (If your
vehicle has tires of a different size than
the size indicated on the vehicle plac-
ard or tire inflation pressure label, you
should determine the proper inflation
pressure for those tires.)As an added safety feature, your ve-
hicle has been equipped with a Tire
Pressure Monitoring System (TPMS)
that illuminates a low tire pressure tell-
tale when one or more of your tires is
significantly under-inflated. Accord-
ingly, when the low tire pressure telltale
illuminates, you should stop and check
your tires as soon as possible, and
inflate them to the proper pressure.
Driving on a significantly under-inflated
tire causes the tire to overheat and can
lead to tire failure. Under-inflation also
reduces fuel efficiency and tire tread
life, and may affect the vehicle’s han-
dling and stopping ability.
Please note that the TPMS is not a
substitute for proper tire maintenance,
and it is the driver’s responsibility to
maintain correct tire pressure, even if
under-inflation has not reached the level
to trigger illumination of the TPMS low
tire pressure telltale.Your vehicle has also been equipped
with a TPMS malfunction indicator to
indicate when the system is not operat-
ing properly. The TPMS malfunction
indicator is provided by a separate tell-
tale, which displays the symbol "TPMS"
when illuminated. When the malfunc-
tion indicator is illuminated, the system
may not be able to detect or signal low
tire pressure as intended. TPMS mal-
functions may occur for a variety of
reasons, including the installation of
replacement or alternate tires or wheels
on the vehicle that prevent the TPMS
from functioning properly. Always check
the TPMS malfunction indicator after
replacing one or more tires or wheels on
your vehicle to ensure that the replace-
ment or alternate tires and wheels allow
the TPMS to continue to function prop-
erly.