2006 Hyundai Tiburon lock
[x] Cancel search: lockPage 143 of 266

2
DRIVING YOUR HYUNDAI
4
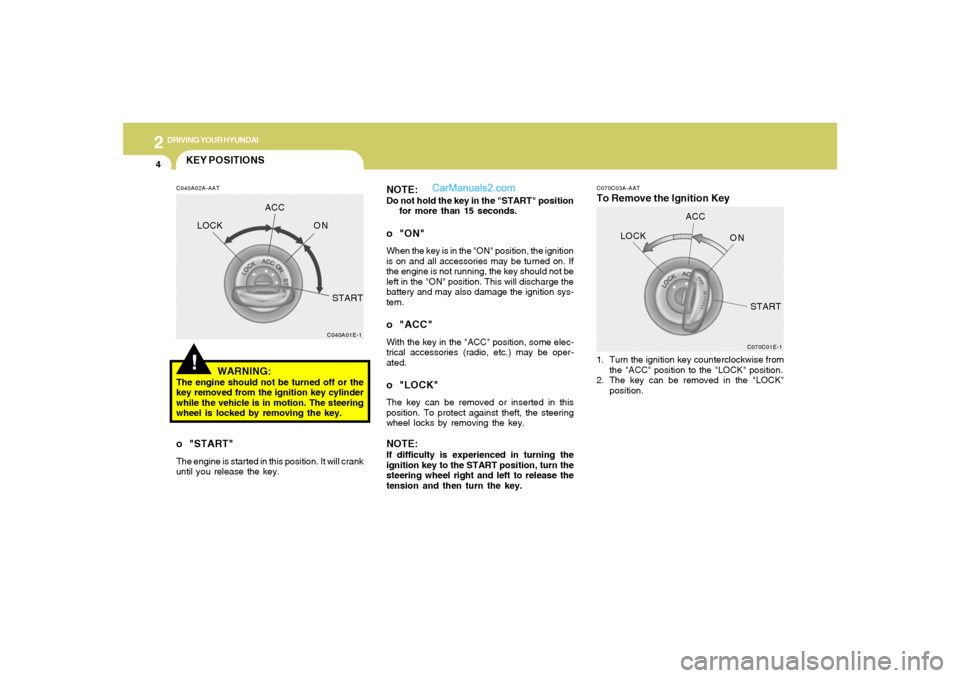
C070C03A-AATTo Remove the Ignition Key NOTE:
Do not hold the key in the "START" position
for more than 15 seconds.o "ON"When the key is in the "ON" position, the ignition
is on and all accessories may be turned on. If
the engine is not running, the key should not be
left in the "ON" position. This will discharge the
battery and may also damage the ignition sys-
tem.o "ACC"With the key in the "ACC" position, some elec-
trical accessories (radio, etc.) may be oper-
ated.o "LOCK"The key can be removed or inserted in this
position. To protect against theft, the steering
wheel locks by removing the key.NOTE:If difficulty is experienced in turning the
ignition key to the START position, turn the
steering wheel right and left to release the
tension and then turn the key.1. Turn the ignition key counterclockwise from
the "ACC" position to the "LOCK" position.
2. The key can be removed in the "LOCK"
position.
C070C01E-1
LOCKACC
ON
START
!KEY POSITIONSC040A02A-AAT
WARNING:
The engine should not be turned off or the
key removed from the ignition key cylinder
while the vehicle is in motion. The steering
wheel is locked by removing the key.o "START"The engine is started in this position. It will crank
until you release the key.
C040A01E-1
LOCKACC
ON
START
Page 144 of 266

2
DRIVING YOUR HYUNDAI
5
STARTING!
C050A01A-AAT
WARNING:
Never run the engine in a closed or poorly
ventilated area any longer than is needed to
move your car in or out of the area. The
carbon monoxide gas emitted is odorless
and can cause serious injury or death.
C050A01E-1
LOCKON
START
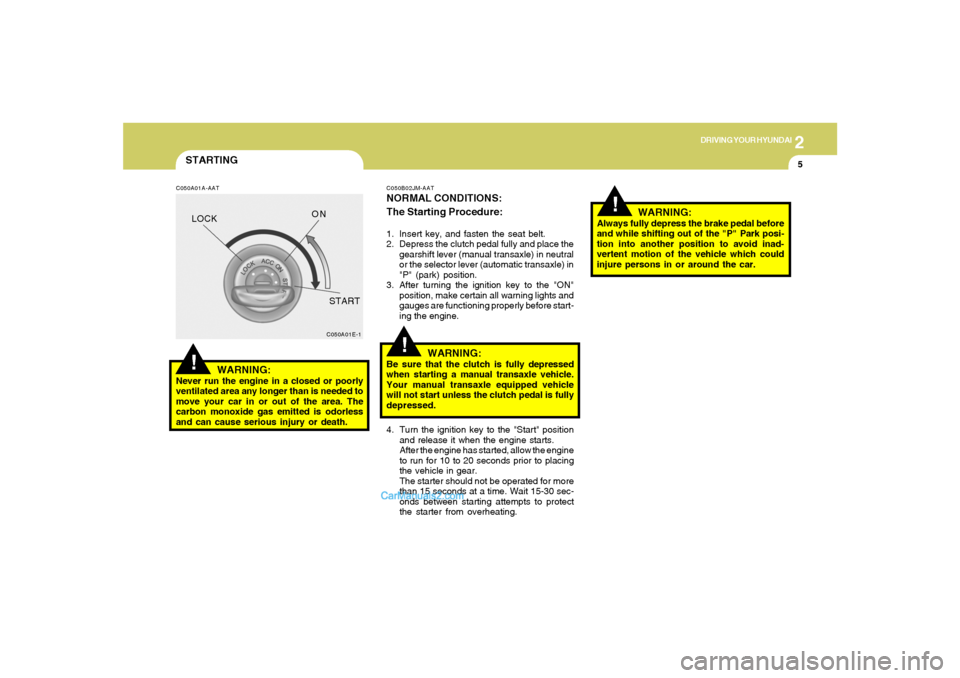
C050B02JM-AATNORMAL CONDITIONS:
The Starting Procedure:1. Insert key, and fasten the seat belt.
2. Depress the clutch pedal fully and place the
gearshift lever (manual transaxle) in neutral
or the selector lever (automatic transaxle) in
"P" (park) position.
3. After turning the ignition key to the "ON"
position, make certain all warning lights and
gauges are functioning properly before start-
ing the engine.
WARNING:
Be sure that the clutch is fully depressed
when starting a manual transaxle vehicle.
Your manual transaxle equipped vehicle
will not start unless the clutch pedal is fully
depressed.
!
4. Turn the ignition key to the "Start" position
and release it when the engine starts.
After the engine has started, allow the engine
to run for 10 to 20 seconds prior to placing
the vehicle in gear.
The starter should not be operated for more
than 15 seconds at a time. Wait 15-30 sec-
onds between starting attempts to protect
the starter from overheating.
!
WARNING:
Always fully depress the brake pedal before
and while shifting out of the "P" Park posi-
tion into another position to avoid inad-
vertent motion of the vehicle which could
injure persons in or around the car.
Page 151 of 266

2
DRIVING YOUR HYUNDAI
12
GOOD BRAKING PRACTICES!
C130A02A-AAT
WARNING:
o Whenever leaving vehicle or parking,
always set the parking brake as far as
possible and fully engage the vehicle's
transaxle into the park position. Ve-
hicles not fully engaged in park with the
parking brake set are at risk for moving
inadvertently and injuring yourself or
others.
o All vehicles should always have the park-
ing brake fully engaged when parking to
avoid inadvertent movement of the car
which can injure occupants or pedestri-
ans.
o Nothing should be carried on top of the
shelf panel behind the rear seat. If there
were an accident or a sudden stop, such
objects could move forward and cause
damage to the vehicle or injure the occu-
pants.
!
ANTI-LOCK BRAKE SYSTEM (ABS)C120A03A-AAT(If installed)The Anti-Lock Brake System (ABS) is designed
to prevent wheel lock-up during sudden braking
or on hazardous road surfaces. The ABS con-
trol module monitors the wheel speed and con-
trols the pressure applied to each brake. Thus,
in emergency situations or on slick roads, ABS
will increase vehicle control during braking.NOTE:o A click sound may be heard in the engine
compartment when the vehicle begins
to move after the engine is started. These
conditions are normal and indicate that
the anti-lock brake system (Electronic
Stability Program) is functioning prop-
erly.
o During ABS operation, a slight pulsation
may be felt in the brake pedal when the
brakes are applied. Also, a noise may be
heard in the engine compartment while
braking. These conditions are normal
and indicate that the anti-lock brake
system is functioning properly.
WARNING:
ABS will not prevent accidents due to im-
proper or dangerous driving maneuvers.
Even though vehicle control is improved
during emergency braking, always main-
tain a safe distance between you and ob-
jects ahead. Vehicle speeds should always
be reduced during extreme road condi-
tions.
The braking distance for cars equipped
with an anti-lock braking system may be
longer than for those without it in the
following road conditions.
During these conditions the vehicle should
be driven at reduced speeds.
o Rough, gravel or snow-covered roads.
o With tire chains installed.
o Roads where the road surface is pitted or
has different surface height.
The safety features of an ABS equipped
vehicle should not be tested by high speed
driving or cornering. This could endanger
the safety of yourself or others.
Page 152 of 266

2
DRIVING YOUR HYUNDAI
13
o If your car is equipped with an automatic
transaxle, don’t let your car creep forward.
To avoid creeping forward, keep your foot on
the brake pedal when the car is stopped.
o Use caution when parking on a hill. Firmly
engage the parking brake and place the gear
selector lever in "P" (automatic transaxle) or
in first or reverse gear (manual transaxle).
If your car is facing downhill, turn the front
wheels into the curb to help keep the car from
rolling. If your car is facing uphill, turn the front
wheels away from the curb to help keep the
car from rolling. If there is no curb or if it is
required by other conditions to keep the car
from rolling, block the wheels.
o Under some conditions your parking brake
can freeze in the engaged position. This is
most likely to happen when there is an
accumulation of snow or ice around or near
the rear brakes or if the brakes are wet. If
there is a risk that the parking brake may
freeze, apply it only temporarily while you put
the gear selector lever in "P" (automatic) or
in first or reverse gear (manual transaxle)
and block the rear wheels so the car cannot
roll. Then release the parking brake.
o Do not hold the vehicle on the upgrade with
the accelerator pedal. This can cause the
transmission to overheat. Always use the
brake pedal or parking brake. o After being parked, check to be sure the
parking brake is not engaged and that the
parking brake indicator light is out before
driving away.
o Driving through water may get the brakes
wet. They can also get wet when the car is
washed. Wet brakes can be dangerous!
Your car will not stop as quickly if the brakes
are wet. Wet brakes cause the car to pull to
one side. To dry the brakes, apply the
brakes lightly while driving slowly until the
braking action returns to normal, taking care
to keep the car under control at all times. If
the braking action does not return to normal,
stop as soon as it is safe to do so and call your
Hyundai dealer for assistance.
o Don’t coast down hills with the car out of gear.
This is extremely hazardous. Keep the car
in gear at all times, use the brakes to slow
down, then shift to a lower gear so that engine
braking will help you maintain a safe speed.
o Don’t "ride" the brake pedal. Resting your
foot on the brake pedal while driving can be
dangerous because it can result in the brakes
overheating and losing their effectiveness. It
also increases the wear of the brake com-
ponents.
o If a tire goes flat while you are driving, apply
the brakes gently and keep the car pointed
straight ahead while you slow down. When
you are moving slowly enough for it to be safe
to do so, pull off the road and stop in a safe
place.
ELECTRONIC STABILITY
PROGRAM (ESP)C310A02JM-AAT(If installed)
!
WARNING:
Never drive too fast for the road conditions
or too quickly when cornering. Electronic
stability control (ESP) will not prevent acci-
dents. Excessive speed in turns, abrupt
maneuvers and hydroplaning on wet sur-
faces can still result in serious accidents.
Only a safe and attentive driver can prevent
accidents by avoiding maneuvers that
cause the vehicle to lose traction. Even with
ESP installed, always follow all the normal
precautions for driving - including driving
at safe speeds for the conditions.
Page 156 of 266

2
DRIVING YOUR HYUNDAI
17
C160H02A-AATUse Approved Window Washer Anti-
Freeze in SystemTo keep the water in the window washer system
from freezing, add an approved window washer
anti-freeze solution in accordance with instruc-
tions on the container. Window washer anti-
freeze is available from Hyundai dealers and
most auto parts outlets. Do not use engine
coolant or other types of anti-freeze as these
may damage the paint finish.C160I01A-AATDon’t Let Your Parking Brake FreezeUnder some conditions your parking brake can
freeze in the engaged position. This is most
likely to happen when there is an accumulation
of snow or ice around or near the rear brakes
or if the brakes are wet. If there is a risk the
parking brake may freeze, apply it only tempo-
rarily while you put the gear selector lever in "P"
(automatic) or in first or reverse gear (manual
transaxle) and block the rear wheels so the car
cannot roll. Then release the parking brake.
C160C01A-AATUse High Quality Ethylene Glycol Cool-
antYour Hyundai is delivered with high quality
ethylene glycol coolant in the cooling system. It
is the only type of coolant that should be used
because it helps prevent corrosion in the cool-
ing system, lubricates the water pump and
prevents freezing. Be sure to replace or replen-
ish your coolant in accordance with the main-
tenance schedule in Section 5. Before winter,
have your coolant tested to assure that its
freezing point is sufficient for the temperatures
anticipated during the winter.C160D01F-AATCheck Battery and CablesWinter puts additional burdens on the battery
system. Visually inspect the battery and cables
as described in Section 6 (See page 6-23). The
level of charge in your battery can be checked
by your Hyundai dealer or a service station.
C160E01A-AATChange to "Winter Weight" Oil if Neces-
saryIn some climates it is recommended that a lower
viscosity "winter weight" oil be used during cold
weather. See Section 9 for recommendations.
If you aren’t sure what weight oil you should use,
consult your Hyundai dealer.C160F01F-AATCheck Spark Plugs and Ignition SystemInspect your spark plugs as described in Sec-
tion 6 (See page 6-10) and replace them if
necessary. Also check all ignition wiring and
components to be sure they are not cracked,
worn or damaged in any way.C160G01A-AATTo Keep Locks from FreezingTo keep the locks from freezing, squirt an
approved de-icer fluid or glycerine into the key
opening. If a lock is covered with ice, squirt it with
an approved de-icing fluid to remove the ice. If
the lock is frozen internally, you may be able to
thaw it out by using a heated key. Handle the
heated key with care to avoid injury.
Page 172 of 266

3
WHAT TO DO IN AN EMERGENCY
7
CHANGING A FLAT TIRED060A02A-AATThe procedure described on the follow-
ing pages can be used to rotate tires as
well as to change a flat tire. When
preparing to change a flat tire, check to
be sure the gear selector lever is in "P"
(automatic transaxle) or reverse gear
(manual transaxle) and that the parking
brake is set, then:
D060A01GKD060B02GK-AAT
1. Obtain Spare Tire and Tool
Remove the spare tire and remove the
jack and tool bag from the trunk.
HGK4008
The jack is located behind the right side
of luggage trim. Remove the jack cover
by unscrewing the bolts. Turn the jack
end counterclockwise to lower the jack
height by using a screw driver or wrench
bar and remove it from the bracket.
HGK4009
Page 173 of 266

38WHAT TO DO IN AN EMERGENCY
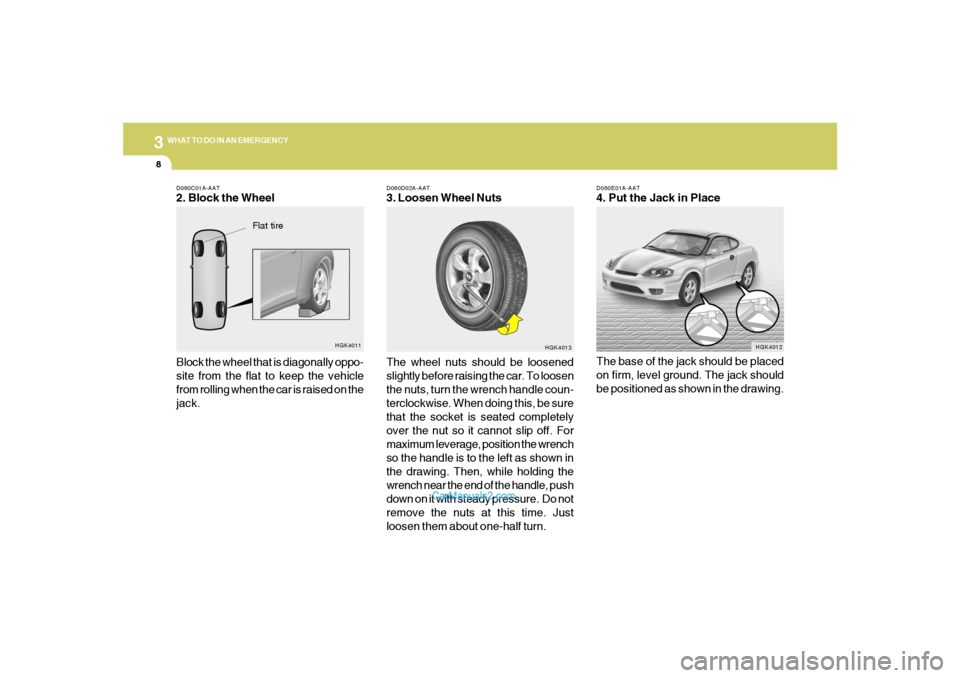
D060E01A-AAT4. Put the Jack in Place
The base of the jack should be placed
on firm, level ground. The jack should
be positioned as shown in the drawing.
HGK4012 D060D02A-AAT
3. Loosen Wheel Nuts
The wheel nuts should be loosened
slightly before raising the car. To loosen
the nuts, turn the wrench handle coun-
terclockwise. When doing this, be sure
that the socket is seated completely
over the nut so it cannot slip off. For
maximum leverage, position the wrench
so the handle is to the left as shown in
the drawing. Then, while holding the
wrench near the end of the handle, push
down on it with steady pressure. Do not
remove the nuts at this time. Just
loosen them about one-half turn.
HGK4013
D060C01A-AAT2. Block the Wheel
Block the wheel that is diagonally oppo-
site from the flat to keep the vehicle
from rolling when the car is raised on the
jack.
HGK4011
Flat tire
Page 174 of 266

3
WHAT TO DO IN AN EMERGENCY
9
!
WARNING:
Do not get under the car when it is
supported by the jack! This is very
dangerous as the jack could fall and
cause serious injury or death. No
one should stay in the car while the
jack is being used.
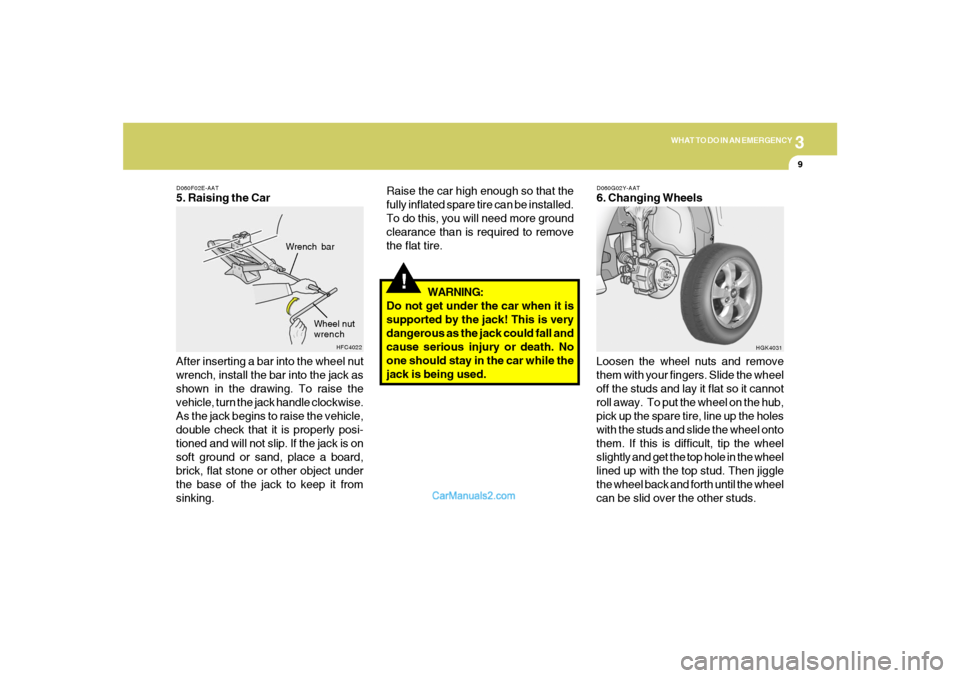
D060F02E-AAT5. Raising the Car
After inserting a bar into the wheel nut
wrench, install the bar into the jack as
shown in the drawing. To raise the
vehicle, turn the jack handle clockwise.
As the jack begins to raise the vehicle,
double check that it is properly posi-
tioned and will not slip. If the jack is on
soft ground or sand, place a board,
brick, flat stone or other object under
the base of the jack to keep it from
sinking.
HFC4022
Wrench bar
Wheel nut
wrench
D060G02Y-AAT6. Changing Wheels
Loosen the wheel nuts and remove
them with your fingers. Slide the wheel
off the studs and lay it flat so it cannot
roll away. To put the wheel on the hub,
pick up the spare tire, line up the holes
with the studs and slide the wheel onto
them. If this is difficult, tip the wheel
slightly and get the top hole in the wheel
lined up with the top stud. Then jiggle
the wheel back and forth until the wheel
can be slid over the other studs.
HGK4031
Raise the car high enough so that the
fully inflated spare tire can be installed.
To do this, you will need more ground
clearance than is required to remove
the flat tire.